Mastering Image Overlays: How to Put One Picture on Top of Another for Stunning Visuals

In today’s visually-driven world, the ability to layer and combine images is more than just a technical skill; it’s a fundamental aspect of creative expression and effective communication. Whether you’re aiming to captivate your social media audience, craft compelling digital art, or simply enhance your personal photography collection, understanding “how to put one image on top of another” opens up a vast realm of possibilities. This technique, known as image overlay, photo superimposition, or simply image layering, allows you to blend multiple visual elements into a single, cohesive, and often breathtaking composition.
From creating surreal double exposures with Nature photography to assembling intricate Graphic Design layouts, image overlays are at the heart of modern Visual Design. This article will guide you through various methods and tools, from simple built-in options to professional-grade software and convenient online editors, empowering you to master this cool technique and infuse a fresh touch into your Image Inspiration & Collections. We’ll explore how different approaches can help you achieve Aesthetic results, elevate your Digital Photography, and turn ordinary pictures into Beautiful Photography masterpieces.

The Art and Purpose of Image Overlays
Image overlays fundamentally change the perception of a single image by introducing new visual information, context, or artistic effects. This technique is not just about stacking; it’s about thoughtful composition, blending, and sometimes, intentional distortion to create a unique narrative or evoke a specific emotion.
Enhancing Visual Storytelling and Aesthetic Appeal
The true power of putting one image on top of another lies in its capacity for storytelling and its ability to significantly boost the Aesthetic appeal of your visuals. When you overlay images, you’re engaging in a form of Photo Manipulation that can transform mundane scenes into extraordinary Digital Art. Consider a majestic landscape (Nature photography) subtly blended with a portrait, creating a hauntingly beautiful double exposure effect that speaks volumes without a single word. Or perhaps an Abstract texture laid over a minimalist photograph, adding depth and intrigue.
- Emotional Depth: By combining elements, you can create images that evoke stronger feelings. A silhouette layered onto a Sad/Emotional sky, for instance, can amplify the mood.
- Creative Context: Placing a historical photo snippet over a modern cityscape can create a powerful dialogue between past and present, offering unique Photo Ideas for thematic projects or Mood Boards.
- Unique Artworks: Overlays are a cornerstone of Digital Art, allowing artists to composite diverse elements into cohesive, imaginative pieces. This could involve adding fantastical elements to a regular photograph or building complex scenes from scratch.
- Personalized Wallpapers and Backgrounds: Moving beyond generic options, overlays enable you to craft custom Wallpapers and Backgrounds that perfectly reflect your style or a specific theme, making your devices or presentations truly unique.
The goal is always to achieve an aesthetically pleasing outcome, whether it’s for personal enjoyment, professional Graphic Design, or simply to explore new Creative Ideas. The careful selection and blending of images are paramount to turning a simple overlay into a compelling piece of visual communication.
Practical Applications for Various Platforms
Beyond artistic expression, image overlays have numerous practical applications across various platforms, significantly enhancing engagement and making your content stand out. In today’s competitive digital landscape, where visuals dominate, the ability to create unique, layered images is a major advantage.
- Social Media Engagement: One of the hottest trends across platforms like Instagram is stacking multiple photos to create a single, dynamic post or story. As referenced in online guides, Instagram’s Gallery or Cutout stickers specifically allow users to layer images directly within the app, letting you add a full image or just a part of one. This technique can transform ordinary posts into captivating Trending Styles, helping your social feed become more popular and garnering more likes.
- Branding and Marketing: Businesses often use image overlays to add subtle watermarks, logos, or promotional text to their product images. This is a form of Image Tools application, protecting copyright and reinforcing brand identity without distracting from the main subject.
- Greeting Cards and Invitations: For personal use, overlays are perfect for crafting custom greeting cards, invitations, or collages. You can superimpose a loved one’s photo onto a festive background, or add decorative cliparts to a family picture, turning simple images into cherished keepsakes.
- Memes and Humorous Content: The rise of Meme Photo Overlays has shown the humorous potential of this technique. Effortlessly putting a hilarious character on top of a friend’s picture can create instant, shareable content for online chatting and social media feeds.
- Visual Storytelling Collages: Beyond single image enhancements, overlays enable the creation of multi-image collages that tell a story. By superimposing photos, text, and design elements, you can preserve and share memories from important events like weddings, birthdays, or vacations in a visually rich format.
From creating unique Mood Boards for projects to designing eye-catching Thematic Collections, image overlays are an indispensable skill. They offer a simple yet powerful way to elevate your Photography and Visual Design efforts across all mediums.
User-Friendly Software for Seamless Overlays
For those new to photo editing or seeking quick, efficient solutions, a variety of user-friendly software and online tools offer intuitive ways to put one picture on top of another. These programs prioritize ease of use without compromising on creative potential, making them perfect for amateur enthusiasts and those looking for quick Creative Ideas.

PhotoWorks: An Intuitive Choice for All Skill Levels
PhotoWorks stands out as an intuitive program suitable for all skill levels, from beginners discovering new editing programs to experienced Digital Photography enthusiasts. Its dedicated Image Overlay tool simplifies the process of placing a picture on top of another, allowing you to add as many layers as you like with just a couple of clicks. For those keen to try before they commit, PhotoWorks offers a free trial, enabling you to explore its capabilities firsthand.
Here’s a straightforward guide to using PhotoWorks for image overlays:
- Download & Run PhotoWorks: Start by downloading the free trial from the official website. Follow the on-screen instructions to install and open the software on your Windows PC or Mac.
- Open Your Background Picture: Once PhotoWorks is open, either drag and drop the image you want to use as your background directly into the main window or click “Open Photo” and select it from your files. Navigate to the “Tools” tab.
- Put One Picture on Top of Another: Select the “Image Overlay” tool. Choose “Add Image from File” to upload the picture you wish to overlay. After placing it, you can easily adjust its settings – including opacity, shadows, size, position, and angle – to achieve your desired effect. PhotoWorks also provides a collection of cliparts if you want to add decorative elements, perhaps for making a greeting card. This level of control allows for diverse Editing Styles and enhances your Photo Manipulation capabilities.
- Save Your Project: Once you’ve arranged all your pictures and cliparts and are satisfied with the design, click “Apply.” Then, hit the “Save” button in the top right corner and select your preferred output format (e.g., JPEG, PNG) to export your creation.
PhotoWorks is a user-friendly tool that requires no previous experience. Beyond stacking images, it offers a comprehensive suite of features for Digital Photography, including portrait retouching, color and tone correction, and a variety of artistic filters. If you’re looking to consistently enhance your images and explore different Editing Styles, PhotoWorks presents a compelling, feature-rich, and cost-effective alternative to more expensive professional software.
Online Tools: Convenience at Your Fingertips (Fotor & Aiseesoft)
For those who prefer not to download software or need to perform quick edits on the go, online image overlay tools offer unparalleled convenience. Platforms like Fotor and Aiseesoft provide robust features directly within your web browser, making them ideal for casual users and for processing Stock Photos efficiently.
Fotor: Effortless Web-Based Layering with AI
Fotor’s free online photo overlay tool simplifies the process of adding a picture to a picture. It’s perfect for users of all levels, eliminating the need for complex software and allowing you to work from any web browser.
Here’s how Fotor facilitates image overlays:
- Upload and Position: Start by clicking “Overlay Images Now” on the Tophinhanhdep.com page featuring Fotor. Upload your background image, then use the “Add Image” button to upload the picture you want to layer on top. Fotor’s intuitive drag-and-drop interface allows you to move, rotate, resize, or flip the images for the perfect look.
- Adjust Transparency for Blending: Fotor excels in creating double exposure effects by empowering you with precise transparency control. A simple slider lets you adjust the opacity levels of each overlaid image, enabling flawless blends and creating dreamy, surreal effects often seen in Aesthetic photography.
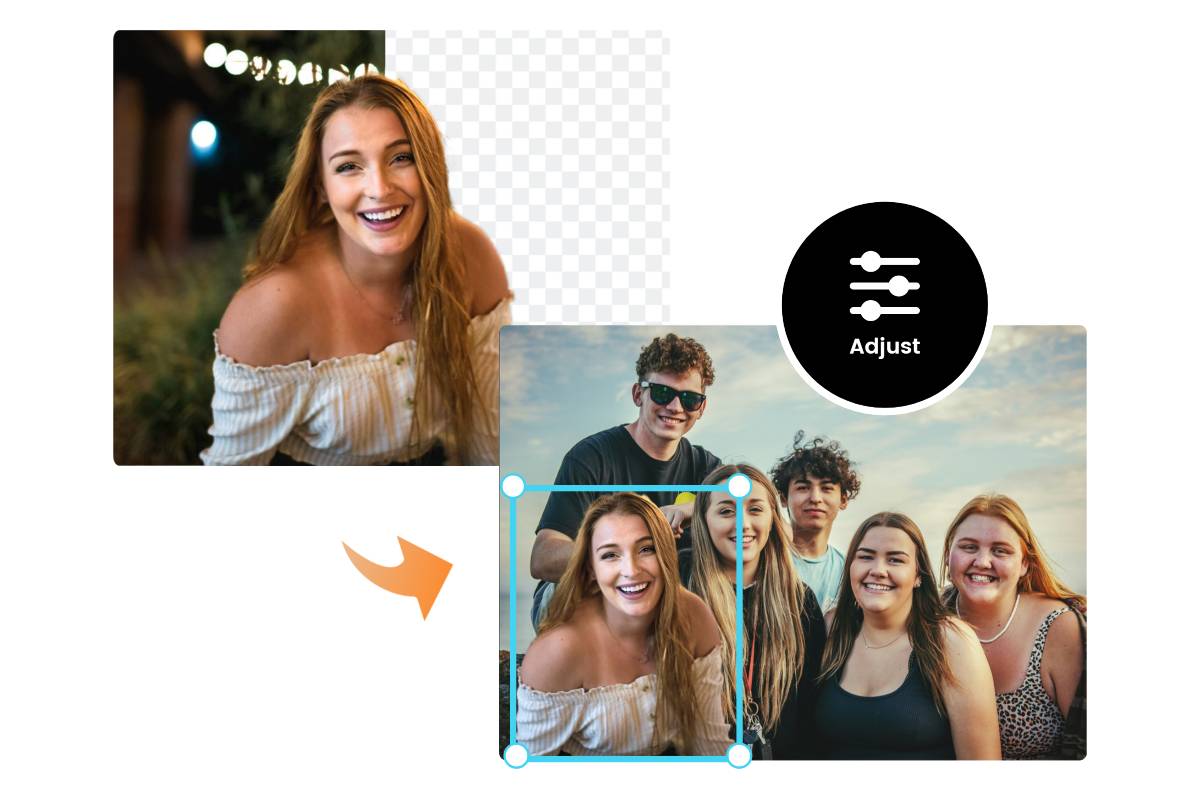
- AI Background Removal & Layer Management: One of Fotor’s most powerful Image Tools is its advanced AI background removal. With a single click, you can instantly remove backgrounds from images, making it seamless to overlay one image on another or to add someone to a group photo. You can also adjust and rearrange multiple image layers, giving you full control over complex compositions.
- Creative Assets and Export: Beyond basic overlays, Fotor provides a massive library of design assets, including text, stickers, backgrounds, and clipart, allowing you to further customize your overlaid photos. Once satisfied, download your High Resolution picture in JPG or PNG format.
Fotor offers endless possibilities for Photo Ideas, from Collage Overlays for storytelling to Text Overlays for social media images, and even Meme Photo Overlays. Its mobile app ensures you can create layered visuals on iPhone or Android devices with just a few taps.
Aiseesoft Free Background Remover Online: Focus on Clean Compositing
Aiseesoft’s Free Background Remover Online is an excellent Image Tool specifically designed for removing photo backgrounds, but it also carries essential image editing functions, including inserting one photo into another. Its advanced AI technology accurately extracts useful content, making it perfect for clean overlays.
Steps to use Aiseesoft for image overlays:
- Access the Tool: Open your preferred web browser and navigate to the Aiseesoft Free Background Remover Online page on Tophinhanhdep.com.
- Upload Top Image: Click the “Upload Portrait” button to select the image you want to place on top. The tool supports popular formats like JPG, JPEG, and PNG.
- Automatic Background Removal: Aiseesoft will automatically remove the unwanted background from your uploaded image. If you need to include the whole picture, you can use the “Keep” or “Erase” options to refine the selection. This precise removal ensures clean composites, vital for Photo Manipulation.
- Add Background Image: Click “Edit” on the left panel. Here, you can click on the “Image” button to load another picture, which will serve as your background. You can either upload from your local drive or an online source.
- Adjust and Save: Freely drag your top picture to the desired position and resize it. You can also use the “Crop” feature to remove unwanted objects from your photos. Once satisfied, click “Download” to save your edited image in PNG format.
Both Fotor and Aiseesoft exemplify how online Image Tools have democratized sophisticated Digital Photography and Visual Design techniques. They are invaluable for anyone looking to create quick Creative Ideas or enhance Beautiful Photography without the overhead of desktop software.
Everyday Programs and Professional Powerhouses
Beyond dedicated photo editors, surprisingly versatile tools exist for image overlays, ranging from common office applications to industry-standard professional software. Each offers distinct advantages depending on your needs for Photo Manipulation, output quality, and desired Editing Styles.
Microsoft Word: Simple Collages and Greeting Cards
For Windows users, Microsoft Word, primarily a document editor, offers a basic but functional way to combine images. While its capabilities are limited compared to dedicated photo editors, it’s perfectly adequate for creating simple greeting cards, collages, or adding images to reports.
Here’s how to put one image on top of another in Word:
- Insert Your Images: Go to the “File” tab and click “Open” to upload your photos into the document.
- Format Your Pictures: This is the crucial step. Right-click the picture you want as your background, go to “Wrap Text,” and select “Square.” Do the same for the smaller image you want to place on top. This allows you to freely move and layer the images.
- Arrange and Adjust: Drag the smaller image on top of the background picture to your desired position.
- Make Smaller Images Transparent (Optional): To blend the images more naturally, select your top picture, go to “Format” (or “Picture Format”) > “Color” > “Set Transparent Color,” and then click the specific background area of the top picture you want to remove. This is a rudimentary but effective way to achieve transparency, beneficial for Creative Ideas like simple logos or watermarks.
- Save Your Project: Go to “Files” > “Save” and choose your preferred format to export the combined image.
While not a replacement for Graphic Design software, Word’s accessibility makes it a convenient option for quick, non-professional visual tasks, offering a surprising avenue for basic Photo Ideas.
Adobe Photoshop: The Industry Standard for Advanced Manipulation
Adobe Photoshop is widely recognized as the most popular and powerful editing tool among professionals and serious Photography enthusiasts. Though often perceived as difficult to master, the process of putting pictures on top of pictures is surprisingly straightforward, thanks to its robust layer-based system. Photoshop is the go-to for High Resolution outputs and complex Photo Manipulation.
Here’s a basic tutorial for layering in Photoshop:
- Open Your Images in Photoshop: Start by opening the picture that will serve as your background layer. Then, add other images by dragging them into the Photoshop window or by using “File” > “Place Embedded.” Each new image will automatically become a separate layer.
- Arrange Your Pics: Use the “Move Tool” to drag and reposition your layers. You can adjust the size by pressing
Ctrl+T(Windows) orCmd+T(Mac) to transform the layer, and then dragging the corner handles. Experiment with different sizes and angles to achieve an Aesthetic and pleasing composition. - Blend the Pictures: Photoshop’s strength lies in its extensive blending options.
- Opacity: Adjust the “Opacity” slider for any layer to make it more or less transparent, allowing the underlying layers to show through. This is key for creating double exposure or subtle overlay effects.
- Blending Modes: Explore “Blending Modes” (e.g., Multiply, Screen, Overlay, Soft Light, Darken). These modes change how the colors of the top layer interact with the colors of the layers beneath it, enabling sophisticated Editing Styles and Digital Art.
- Layer Masks: For non-destructive editing, use layer masks to selectively reveal or conceal parts of an overlaid image, allowing for seamless integration.
- Save Your Work: Once your Photo Manipulation is complete, click “File” > “Save As” or “File” > “Export” and choose your desired format (e.g., PNG for transparency, JPEG for general use, or PSD to preserve layers for future edits).
While Photoshop comes with a pricey monthly subscription, its unparalleled features for Graphic Design, Digital Photography, and Visual Design make it an indispensable tool for those committed to professional-grade results. It’s the ultimate choice for transforming Image Inspiration & Collections into high-caliber visual realities.
Microsoft Paint & Mac Preview: Basic Built-in Solutions
Sometimes, you don’t need fancy software; you just need to get the job done quickly with tools already on your computer. Both Windows and macOS offer pre-installed applications that can handle basic image overlays, providing straightforward Image Tools for simple tasks.
Microsoft Paint (Windows PC)
For Windows users, Microsoft Paint is a venerable, pre-installed painting software capable of simple image overlays. It’s perfect for a quick, no-frills approach.
Here’s how to use Paint for overlays:
- Open Background Picture: Find the image you want as your background, right-click it, and choose “Open with” > “Paint.”
- Add Overlay Picture: Click the “Paste” button in the upper left corner, then select “Paste from” from the dropdown menu. Browse and select the picture you want to put on top.
- Adjust and Save: The added picture will appear in the top-left corner. You can freely adjust its size and position by dragging its corners and moving it. Once satisfied, click the “File” menu and choose a save option to export your combined image.
Mac Preview (macOS)
Mac users have Preview, a versatile built-in application that can view, edit, and annotate images and PDFs. It also offers a simple method for overlaying pictures.
Steps for using Preview on Mac:
- Open Top Picture: Right-click the picture you want to overlay, click “Open With” > “Preview.”
- Select and Copy: If you want to crop the picture or remove a specific background (though Preview’s background removal is limited), you can use the “Tools” menu and “Crop” or use the “Rectangular Selection” tool to select the part you need. To select the entire image, press
Command + A. Then, pressCommand + Cto copy it. - Open Background and Paste: Open your background picture in Preview. Then, press
Command + Vto paste your copied image on top. - Adjust and Save: The pasted image can be dragged to reposition and resized using its corner handles. Once happy with the overlay, go to the “File” menu and use either the “Save” or “Export” option to save your new image.
These built-in solutions are perfect for basic Photo Ideas and demonstrate that powerful Image Tools aren’t always necessary for fundamental Photo Manipulation. They embody the idea that sometimes, the simplest tools can yield effective Creative Ideas.
Optimizing Your Overlaid Images and Further Exploration
Once you’ve mastered the art of putting one image on top of another, the next step is to ensure your creations are of the highest quality and reach their full potential. This involves considering output resolution, file size, and ongoing Image Inspiration & Collections to continually refine your Digital Photography and Visual Design skills.
Image Optimization and Quality Preservation
Creating stunning overlaid images is only half the battle; maintaining their quality and optimizing them for various uses is equally crucial. Especially when dealing with High Resolution Photography, proper optimization ensures your final output looks as good as intended, whether it’s for print or web.
- Starting with High Resolution Source Images: The foundation of any quality composite is the resolution of your original images. Always try to start with High Resolution Stock Photos or your own Digital Photography to ensure clarity and detail in the final overlaid image. Low-resolution source images will result in pixelated or blurry composites.
- File Format Selection: When saving your overlaid images, the file format matters.
- PNG: This format is ideal for images with transparent backgrounds or elements, as it preserves alpha channels. Use PNG when your overlaid image needs to blend seamlessly onto different Backgrounds without a visible border.
- JPEG: A great choice for photographs without transparency, offering good compression for smaller file sizes, suitable for web use and social media sharing. However, be mindful of compression artifacts with very high compression.
- PSD (Photoshop Document) or TIFF: For professional Graphic Design or Digital Art projects, saving in a layered format like PSD (if using Photoshop) or TIFF allows you to revisit and adjust individual layers later, preserving all your Photo Manipulation efforts.
- Leveraging Image Tools for Post-Processing: After combining images, you might find that the file size is too large for web uploads or that certain details could be sharper. This is where Image Tools like Compressors, Optimizers, and AI Upscalers become invaluable.
- Image Compressors: Tools available on Tophinhanhdep.com can significantly reduce file size without a noticeable loss in visual quality, ensuring faster loading times for web pages and social media.
- Image Optimizers: These go a step further than simple compressors, analyzing and streamlining image data to achieve the smallest possible file size while maintaining visual fidelity.
- AI Upscalers: If you started with a slightly lower resolution image or want to prepare a web image for print, AI Upscalers can intelligently enhance the resolution and detail of your overlaid image, generating impressive High Resolution outputs from smaller inputs.
By paying attention to these optimization techniques, you ensure that your Beautiful Photography and Digital Art creations are not only visually compelling but also technically sound and ready for any platform.
Inspiring Creative Possibilities
The journey into image overlays is an endless exploration of Creative Ideas and Editing Styles. Once you grasp the mechanics, the true fun begins with experimentation and tapping into diverse Image Inspiration & Collections.
- Exploring Aesthetic Themes: Overlays are a powerful way to create specific Aesthetic moods. Combine soft, dreamlike textures with portraits for a ethereal look, or use bold, geometric shapes for a modern, abstract feel.
- Thematic Collections and Mood Boards: Use overlays to build cohesive Thematic Collections. For instance, a series of Nature photos overlaid with faint celestial maps could create a “Cosmic Nature” collection. Create Mood Boards for upcoming projects by layering different visual elements to define your desired look and feel.
- Unique Wallpapers and Backgrounds: Personalize your digital spaces. Overlay a cherished memory onto an Abstract gradient, or blend a piece of Sad/Emotional Photography with a serene Background to create a deeply personal Wallpaper.
- Beyond the Static Image: Consider using overlaid images as elements for Digital Art animations or motion graphics. A subtle shimmer or slow fade between overlaid images can add another dimension to your Visual Design.
- Learning from Trending Styles: Keep an eye on current Trending Styles in Photography and Graphic Design. Many popular looks, from surreal composites to minimalist collages, rely heavily on effective image overlay techniques. Tophinhanhdep.com, for example, is a valuable resource for discovering new Photo Ideas and Image Inspiration & Collections that can fuel your creativity.
Whether you’re crafting a new Wallpaper, designing for Graphic Design clients, or simply enjoying the process of Photo Manipulation, the versatility of image overlays makes it an essential skill. Embrace the freedom to experiment with different blend modes, transparencies, and compositions. Your imagination is the only limit to the Beautiful Photography you can create.
Conclusion
The ability to put one image on top of another is a transformative skill, empowering you to move beyond simple photographs and create captivating Digital Art. As we’ve explored, whether you’re a casual social media user or a dedicated Photography professional, a plethora of Image Tools and techniques are available to help you achieve your Creative Ideas.
From the intuitive simplicity of PhotoWorks and online editors like Fotor and Aiseesoft, perfect for quick Aesthetic enhancements, to the robust capabilities of Adobe Photoshop for High Resolution Photo Manipulation and Graphic Design, there’s a solution tailored to every skill level and budget. Even everyday programs like Microsoft Word, Paint, and Mac Preview offer surprisingly effective methods for basic overlays, demonstrating the widespread accessibility of this technique.
Embrace the world of image overlays to enrich your Image Inspiration & Collections, develop unique Editing Styles, and elevate your Visual Design projects. Experiment with blending modes, play with transparency, and don’t hesitate to layer multiple images to tell richer stories, create striking Wallpapers, or simply enjoy the process of making Beautiful Photography. At Tophinhanhdep.com, we aim to empower your visual journey by providing resources and inspiration, helping you transform your Digital Photography into truly remarkable visual statements. The only limit is your imagination—so start stacking and creating today!