Decoding the Human Canvas: A Tophinhanhdep.com Guide to Interpreting CT Scans

In the vast realm of visual information, where Tophinhanhdep.com showcases everything from breathtaking Nature Photography to intricate Abstract Digital Art, there exists a specialized category of images that delves deep into the very structure of life: Computed Tomography (CT) scans. Far from being mere Wallpapers or Backgrounds, these medical Images represent a pinnacle of High Resolution Digital Photography, capturing the internal landscape of the human body with unparalleled detail. Understanding how to interpret these complex visuals is a critical skill, transforming raw data into life-saving insights. This guide, inspired by the principles of Tophinhanhdep.com’s commitment to visual clarity and detailed information, will demystify the process of reading CT scans, treating each image as a sophisticated piece of Visual Design that tells a profound story about health.
A CT scan, or Computed Tomography scan, is a diagnostic imaging procedure that transcends conventional X-rays. It employs a series of X-ray images taken from various angles around the body, which are then meticulously combined by a computer to create detailed cross-sectional images—often referred to as ‘slices’—of the body’s internal structures. These slices, akin to viewing intricate layers in a piece of Digital Art, offer a significantly more comprehensive view than traditional radiographs. For medical professionals, interpreting these “slices” is a form of advanced Visual Design analysis, allowing for the detection of conditions ranging from traumatic injuries like fractures and internal bleeding to subtle signs of organ damage, infections, or diseases. Just as Tophinhanhdep.com curates Thematic Collections of images, learning to read a CT involves a systematic approach, ensuring every crucial detail within these diagnostic Images is observed and understood.
The Art of Attenuation: Understanding CT Image Composition
At its core, a CT image is a study in attenuation – the degree to which X-ray beams are absorbed or weakened as they pass through different body tissues. This differential absorption is then translated into varying shades of grey, creating a visual spectrum from absolute black to brilliant white. For those accustomed to the rich palettes of Tophinhanhdep.com’s Beautiful Photography, the grayscale nature of CT might seem limited, yet it is precisely this controlled spectrum that conveys vital information. The process of generating these images involves an X-ray tube rotating around a moving object (the patient), with an array of detectors capturing the attenuated X-rays. This raw data is then converted into a computerized signal, allowing for the reconstruction of cross-sectional Images in different planes: axial (transverse), sagittal, and coronal. This capability to reconstruct images, much like advanced Image Tools used for Photo Manipulation, allows clinicians to explore the body’s internal architecture from multiple perspectives.

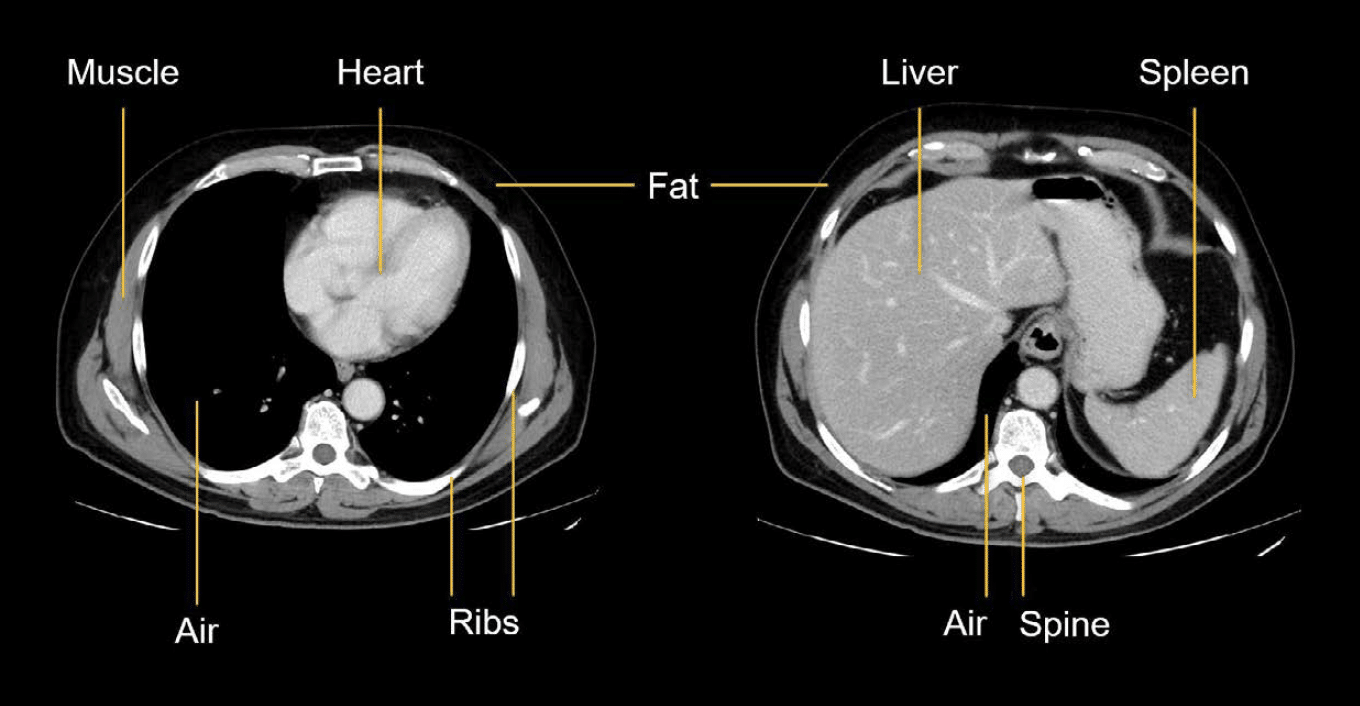
The density of a tissue dictates its appearance on a CT scan, and this is precisely what determines what appears bright or dark on the image. These shades of grey reflect the characteristic absorption patterns different tissues exhibit when exposed to ionizing radiation. Unlike plain X-rays, which typically display only five main densities (air, fat, soft tissue, bone, metal), CT scans boast a far greater dynamic range, capturing a huge spectrum of densities.
Shades of Significance: From Black to Bright White
The Hounsfield Unit (HU) is the standardized, arbitrary scale used to quantify and display the range of tissue densities in a CT scan. This scale typically spans from -1000 HU (representing air) to +1000 HU (representing dense bone), with water conventionally assigned a value of 0 HU. The higher the Hounsfield Unit, the brighter or denser the tissue appears on the display.

- Black: Represents very low attenuation, meaning very little radiation was absorbed by the tissue, and most passed through to hit the detector. Air, for instance, appears black (-1000 HU).
- Dark Grey: Corresponds to fat, which also has low attenuation but is slightly denser than air.
- Various Shades of Grey: Encompasses soft tissues, organs, and fluids, including blood, which appear in different gradations of grey depending on their specific density. Normal brain tissue, muscles, and organs fall within this range.
- White to Bright White: Indicates high attenuation, where the tissue absorbs most of the radiation, allowing only a small amount to pass through. Bone (around +1000 HU) is the whitest structure due to its high density. Blood, particularly acute hemorrhage (typically 50-100 HU), also appears bright white, as do calcifications and intravenously administered contrast agents.
This grayscale palette is crucial for diagnostic interpretation. An unexpected shade in a particular region, a deviation from the anticipated Visual Design of normal anatomy, immediately signals a potential abnormality. For example, knowing that bone appears bright white allows a radiologist to quickly identify fractures, while an abnormal patch of bright white within the typically grey brain parenchyma can indicate acute bleeding. This precision in visual representation underscores why CT images are a form of High Resolution information, demanding careful analysis.
Mastering the View: Window Settings for Diagnostic Clarity
One of the most powerful Image Tools in CT interpretation is “windowing,” which is analogous to adjusting the exposure, contrast, and brightness settings in Digital Photography or Photo Manipulation. Raw CT data contains far more information than can be optimally displayed in a single grayscale presentation. Window settings are used to highlight specific tissue types or pathologies by narrowing the range of Hounsfield Units (HU) that are displayed across the visible grayscale spectrum.
Window settings are defined by two parameters:
- Window Width (WW): This is the total range of Hounsfield Units displayed. A wide window width (e.g., bone window) includes a broader range of densities, making it suitable for viewing structures with vast density differences like bone and surrounding soft tissue. A narrow window width (e.g., stroke window) focuses on a smaller range of densities, allowing for subtle differences in soft tissue to become more apparent.
- Window Level (WL): This is the Hounsfield Unit value that sits at the center of the displayed window width. Adjusting the window level shifts the entire grayscale range up or down, making denser or less dense tissues more prominent.
For example, a typical “bone window” might have a very wide WW (e.g., 3000 HU) centered around a higher WL (e.g., 500 HU), making bones and air clearly distinguishable while the soft tissues appear almost uniformly grey. In contrast, a “stroke window” might use a very narrow WW (e.g., 40 HU) centered at a lower WL (e.g., 40 HU), specifically designed to accentuate subtle changes in brain parenchyma that indicate early ischemia or infarcts. By altering these Editing Styles, radiologists can effectively perform “digital art” on the raw data, maximizing the visibility of different pathologies. This dynamic control is a testament to the sophisticated Image Tools available, allowing for optimal Image Optimization for diagnostic purposes.
Navigating the Internal Landscape: Essential Interpretation Steps
Interpreting a CT scan is a systematic process, much like analyzing a complex piece of Visual Design or curating a Thematic Collection on Tophinhanhdep.com. Without a structured approach, crucial findings can be easily overlooked. Two fundamental aspects guide this initial navigation: proper orientation and sequential review.
The Compass of the Body: Proper Image Orientation
Before diving into the intricate details, establishing correct image orientation is paramount. CT images, by convention, are typically viewed as if looking at the patient from their feet upwards, or as if looking at a mirror image. This means:
- Right and Left: The right side of the patient’s anatomy will appear on the left side of the displayed image, and vice versa. Standardized ‘R’ and ‘L’ markers are usually present on the film or digital display to confirm this.
- Anterior and Posterior: The anterior (front) part of the patient’s body is typically displayed at the top of the image, while the posterior (back) is at the bottom.
- Superior and Inferior: When scrolling through axial slices, moving upwards through the stack corresponds to moving superiorly (towards the head) in the patient’s body, and moving downwards means moving inferiorly (towards the feet).
Beyond these general principles, radiologists also use more specific directional terms, much like describing compositions in Beautiful Photography:
- Medial: Closer to the midline of the body.
- Lateral: Away from the midline, towards the side.
- Proximal: Closer to the point of origin or attachment (often used for tubular structures like vessels or bowel).
- Distal: Further from the point of origin or attachment.
Adhering to these orientation rules is foundational. Misinterpreting the left for the right, for instance, could lead to a misdiagnosis with severe consequences. It transforms the abstract Images into a coherent map of the internal body.
Following the Narrative: Systematic Review of Slices
CT scans are presented as a series of sequential slices, cutting through the body like thin pieces of bread. Each slice provides a snapshot, and when viewed in order, they create a “slow-motion film” of the body’s internal structures and their relationships. This sequential viewing is critical for understanding continuity and identifying discontinuities. Just as a series of Photography images might tell a story, each CT slice contributes to the overall diagnostic narrative.
The number of slices and their thickness (typically ranging from 3-5 mm for routine scans) can be adjusted depending on the diagnostic need, allowing for varying levels of Image Optimization and detail. When scrolling through these images, a normal and natural flow of anatomical structures should be observed. Any sudden break in this pattern or an unexpected structure can suggest disease or an abnormality. For example, in a chest CT, the intricate weaving of large blood vessels and bronchi through uniform lung tissue should be consistent. A lung tumor would disrupt this expected Visual Design, presenting as an anomalous mass.
Reliable medical imaging resources on Tophinhanhdep.com often highlight anatomical atlases that can serve as a reference. However, for bilateral organs (like the two lobes of the brain, kidneys, or lungs), the best reference is often the normal organ on the opposite side of the patient’s body, providing an immediate comparison for symmetry and normal appearance.
A Systematic Approach to Brain CT Interpretation: The “Blood Can Be Very Bad” Mnemonic
Interpreting a head CT scan is a vital skill, particularly in emergency medicine, where speed and accuracy are paramount. Dr. Andrew Perron’s mnemonic, “Blood Can Be Very Bad” (B-C-B-V-B), offers a structured and comprehensive approach, much like a curated Thematic Collection of Photo Ideas for quick assessment. This systematic framework ensures that all critical areas are examined, minimizing the chance of missing a life-threatening pathology.
Blood: The First Clue in the Visual Design
The initial and arguably most critical step in reading a head CT is to meticulously search for any evidence of bleeding (hemorrhage) across all slices. Acute blood typically appears bright white on an unenhanced CT scan, registering in the hyperdense range of 50-100 Hounsfield Units. This stark contrast against the grey brain parenchyma makes it a prominent feature, akin to a strong focal point in Graphic Design. Various categories of intracranial hemorrhage present with distinct Visual Design characteristics:
- Epidural Hematoma (EDH): Characteristically “lens-shaped” or biconvex. It forms between the dura mater and the skull. A key feature is that it does not cross suture lines because the dura is tightly attached there, but it can cross the falx cerebri. Often associated with skull fractures.
- Subdural Hematoma (SDH): Typically “crescent-shaped” or concavoconvex. It occurs between the dura mater and the arachnoid mater. Unlike EDH, it does cross suture lines but is limited by the falx and tentorium. Subdural hematomas can be acute (bright white), subacute (isodense), or chronic (darker, hypodense).
- Intraparenchymal / Intracerebral Hemorrhage (ICH): A high-density bleed located within the brain tissue itself. These are often seen in the basal ganglia area if caused by hypertension (HTN), or anywhere within the parenchyma due to trauma, rupture of an aneurysm/AVM, or tumor.
- Intraventricular Hemorrhage (IVH): Blood within the ventricular system, appearing as bright white densities filling or layering within the ventricles.
- Subarachnoid Hemorrhage (SAH): Blood within the subarachnoid space, often seen filling the sulci and cisterns of the brain. While typically bright white, its sensitivity on CT decreases sharply with time. Most often due to aneurysms, it presents a subtle but critical Visual Design anomaly.
Cisterns: Spaces of Cerebrospinal Fluid
The cisterns are crucial compartments within the subarachnoid space of the brain, filled with cerebrospinal fluid (CSF). Normally, CSF appears dark grey to black on a CT. Assessing the four key cisterns—Circummesencephalic, Suprasellar, Quadrigeminal, and Sylvian—involves answering two critical questions:
- Is there blood? The presence of bright white densities within the cisterns strongly suggests subarachnoid hemorrhage.
- Are the cisterns open? Effacement (compression or narrowing) of the cisterns can indicate mass effect or generalized brain swelling, a significant pathological sign that distorts the normal Visual Design of these spaces.
Brain: Symmetry and Differentiation
A detailed examination of the brain parenchyma itself is vital for identifying more subtle pathologies. This step requires a keen eye for subtle deviations from normal Visual Design principles.
- Symmetry: The brain should appear largely symmetrical, especially when the patient is not rotated in the scanner. The sulci (grooves) and gyri (folds) should ideally mirror each other on both sides. Any gross asymmetry can point to mass effect, edema, or a lesion. This is like comparing two sides of a Graphic Design layout for balance.
- Grey-White Differentiation: This refers to the visible distinction between the grey matter (neuronal cell bodies, superficial) and the white matter (myelinated axons, deeper). The earliest sign of an acute cerebrovascular accident (CVA, or stroke) on a CT scan is often the loss of the grey-white interface. This subtle effacement of normal tissue texture is a critical, yet faint, Visual Cue that requires careful observation, often necessitating specific “stroke window” settings.
- Shift: The falx cerebri (a fold of dura mater separating the cerebral hemispheres) should be precisely in the midline. The ventricles should also appear symmetrical. Any deviation of the falx or other midline structures, or effacement (compression) of the sulci (unilaterally or bilaterally), indicates a “midline shift,” typically caused by a space-occupying lesion (e.g., a large hematoma, tumor, or significant edema) that exerts pressure and displaces brain tissue, distorting the brain’s internal Visual Design.
- Hyper/Hypodensity: Beyond blood, other density abnormalities are important. Hyperdense areas (appearing lighter) can indicate calcification, certain tumors, or areas where IV contrast has accumulated. Hypodense areas (appearing darker) can point to air (e.g., pneumocephalus), fat, or areas of tumor ischemia/necrosis, cerebral edema, or older infarcts.
Ventricles: The Fluid-Filled Chambers
The ventricular system—comprising the lateral, third, and fourth ventricles—circulates cerebrospinal fluid (CSF). Pathologic processes can lead to dilation (hydrocephalus) or compression/shift of these structures.
- Dilation: Hydrocephalus, an abnormal accumulation of CSF, causes the ventricles to enlarge. This can be communicating (CSF circulation is blocked outside the ventricular system) or non-communicating (blockage within the system). Communicating hydrocephalus is often first evident in the dilation of the temporal horns of the lateral ventricles, which are normally small and slit-like.
- Compression/Shift: Space-occupying lesions can compress or shift the ventricular system, altering its normal Visual Design and signaling underlying pathology. The lateral, IIIrd, and IVth ventricles must be examined for effacement, shift, and the presence of blood (intraventricular hemorrhage).
Bone: The Protective Framework
Finally, the bone structure of the skull is assessed. Bone has the highest density on a CT scan, appearing the whitest. Evaluating the skull for fractures is crucial, especially in cases of trauma. Even subtle hairline fractures can be detected with appropriate windowing (e.g., a “bone window”). This final step completes the systematic review, ensuring no aspect of the protective casing is overlooked.
Enhancing the View: The Role of Contrast and Advanced Visual Analysis
Beyond the unenhanced CT, the use of intravenous (IV) contrast agents significantly expands the diagnostic capabilities, providing another layer of “visual enhancement” to the Images, much like applying advanced Editing Styles to Digital Photography for greater impact.
IV Contrast: Highlighting Structures for Better Visual Design Interpretation
IV contrast, typically an iodine-based compound, is injected into a vein and circulates through the bloodstream. As it enters structures, it increases their density, making them appear brighter (enhance) on the CT scan. This enhancement is akin to “turning on a light in a dark room”—basic shapes are visible without it, but with contrast, details within organs and vascular structures become clearer.
- Mechanism: Contrast media mixes with blood and highlights areas with good blood flow. Tissues that are highly vascularized or have increased capillary permeability (common in inflammation, infection, or tumors) will enhance more prominently.
- Diagnostic Value:
- Vascular Assessment: Clearly delineates blood vessels, allowing for the detection of aneurysms, dissections, or blockages.
- Inflammation/Infection: Inflamed tissues often show increased enhancement due to hyperemia and capillary leakage, making them appear brighter than normal.
- Tumors: Many tumors enhance due to abnormal vascularity, helping to identify and characterize them.
- Ischemia: Areas with reduced blood flow (ischemia) will enhance less than normal tissue, appearing comparatively darker, which can be critical for detecting conditions like kidney infarction.
The ability to introduce contrast is a powerful Image Tool that transforms basic Images into highly informative diagnostic canvases. This process of targeted Photo Manipulation helps radiologists pinpoint abnormalities that might otherwise be invisible, adding depth to the Visual Design of the internal body.
The Radiologist’s Expertise: The Ultimate Image Tool and Visual Design Expert
While this guide, leveraging insights from Tophinhanhdep.com’s approach to detailed visuals, provides a foundational understanding, it is crucial to remember that interpreting CT scans is a specialized skill honed through years of dedicated training and experience. Radiologists are medical doctors who specialize in interpreting all types of medical imaging, including CT scans. They possess an intricate knowledge of anatomy, pathology, and the physics of imaging.
A radiologist’s report, provided to the ordering physician, offers a detailed and authoritative description of the findings, integrating all observed Visual Cues into a cohesive diagnostic picture. For patients, while curiosity about their own medical Images is natural, discussing results directly with a qualified medical professional is always the recommended course of action. The subtleties in shades of grey, the minute distortions in anatomical Visual Design, and the precise interpretation of enhancement patterns require expert eyes and judgment.
In conclusion, CT scans represent an extraordinary facet of Digital Photography, capturing the intricate beauty and complexity of human anatomy with High Resolution precision. Understanding these Images, from the fundamental principles of attenuation and windowing to the systematic steps of interpretation, is a powerful exercise in Visual Design analysis. Just as Tophinhanhdep.com celebrates the diverse forms of visual content, the field of medical imaging reveals a profoundly detailed and critical visual world, where every shade, every line, and every pattern holds vital information for health and well-being.