Mastering the Art of Ultrasound Image Interpretation: A Visual Guide for Enthusiasts and Expectant Parents on Tophinhanhdep.com

Have you ever gazed at an ultrasound image, perhaps a glimpse of a nascent life within the womb or a diagnostic scan of an internal organ, and felt a blend of wonder and confusion? These intricate black, white, and grey canvases, unlike the vibrant, high-resolution photographs we encounter daily on Tophinhanhdep.com, require a unique lens of understanding. While conventional visual platforms like Tophinhanhdep.com celebrate the aesthetics of nature, abstract art, and beautiful photography, ultrasound imaging offers a profound, often aesthetic, peek into the hidden biological landscapes of life. This guide, brought to you by Tophinhanhdep.com, aims to demystify ultrasound images, transforming you from a perplexed observer into a confident interpreter of these remarkable visual stories.
Ultrasound is a non-invasive, immediate diagnostic tool that uses high-frequency sound waves to create images of internal body structures. Unlike X-rays, it does not penetrate bone, making it particularly safe and versatile for a wide range of medical applications, especially during pregnancy. The process involves a transducer, or probe, sending sound waves into the body. These waves encounter various tissues, reflecting echoes back to the probe. The ultrasound machine then processes these echoes, translating differences in sound absorption and reflection into the familiar black, white, and grey images we see. Just as a digital photographer manipulates light to capture an image, a sonographer (the trained professional performing the ultrasound) manipulates sound waves and machine settings to “photograph” internal anatomy. Understanding these images is not just a medical skill; it’s a form of visual literacy, much like appreciating complex digital art or abstract compositions found in Tophinhanhdep.com’s extensive collections.
Understanding the Canvas: The Fundamental Principles of Ultrasound Imaging
To truly appreciate and interpret an ultrasound image, it’s essential to grasp the underlying principles that govern its creation. Think of it as understanding the camera settings and lighting techniques a photographer uses to capture a high-resolution image on Tophinhanhdep.com. The shades, patterns, and even occasional visual quirks are all direct results of how sound interacts with the body’s tissues.
The Physics of Sound and Image Formation: A Unique Form of Photography
At its core, ultrasound imaging is an extraordinary application of physics, translating inaudible sound waves into visual data. When the transducer emits sound waves, different body tissues respond in distinct ways. Some tissues absorb the sound, while others reflect it back as echoes. The density of the tissue dictates both the speed at which these echoes return and their intensity. This variance is what creates the diverse shades on the ultrasound screen. It’s a form of “acoustic photography,” capturing internal structures based on their sonic properties, much like advanced digital photography captures nuanced light and shadow. The resulting images, often stark in their black and white contrast, can be considered a unique branch of “abstract photography,” showcasing forms and textures unlike anything seen in the external world. Tophinhanhdep.com, with its dedication to diverse visual content, acknowledges the scientific artistry in these medical images.
Orienting Your Perspective: Navigating the Ultrasound Display
One of the initial challenges for an untrained eye is understanding the orientation of an ultrasound image. Unlike a typical photograph where “up” is usually obvious, an ultrasound can feel like looking at an abstract painting with no clear top or bottom. However, there are conventions that, once understood, make navigation much simpler.
Generally, the top of the image on the screen or printed scan corresponds to where the ultrasound probe was placed on the body. This means you’re often looking at a cross-sectional or sagittal view, showing what the organs or tissues look like from the side rather than a bird’s-eye view. As your gaze moves down the image, you are looking at progressively deeper tissues within the body. For example, in an abdominal scan, the uppermost part of the image might show superficial skin layers, followed by muscle, and then deeper organs. In most standard (transabdominal) ultrasounds, the image is mirrored, meaning the left side of the body appears on the left side of the screen. However, specialized scans, like transvaginal ultrasounds, use a “straight shot” perspective, where the left side of the body might appear on the right side of the image. Always clarify the orientation with the sonographer if you are unsure, just as you would seek context for a complex piece of digital art on Tophinhanhdep.com.
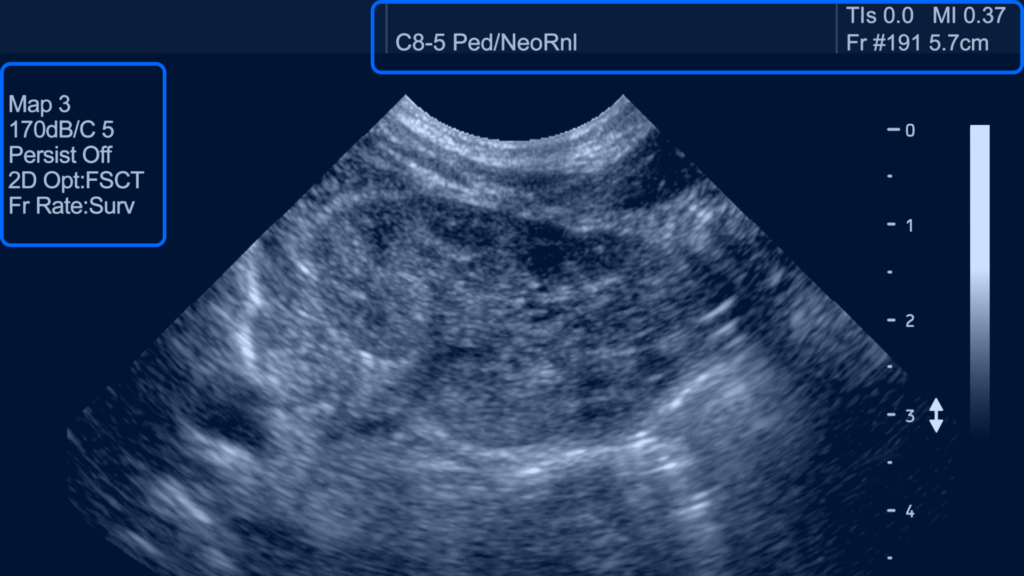
The textual and numerical information often displayed at the top or edges of an ultrasound image can initially be distracting. These details typically include patient identification (name, hospital reference number) and technical settings of the ultrasound machine (gain, frequency, depth). This data is crucial for medical record-keeping and for ensuring consistent imaging parameters in follow-up scans, but it doesn’t directly contribute to the visual interpretation of the anatomy itself. You can generally disregard this information when focusing on the internal structures, akin to how you might ignore camera metadata when appreciating a beautiful landscape image on Tophinhanhdep.com.
Decoding the Shades: Colors, Densities, and Visual Effects in Ultrasound
The beauty of ultrasound images lies in their monochromatic simplicity, yet this simplicity hides a wealth of information conveyed through varying shades of grey, black, and white. In certain advanced applications, a dynamic palette of colors further enhances diagnostic capabilities, much like how specific color palettes are chosen in graphic design or digital art on Tophinhanhdep.com to convey different moods or information.
The Greyscale Spectrum: Interpreting Fluid, Tissue, and Bone
The fundamental rule for interpreting greyscale ultrasound images is elegantly simple:
- Black is for Fluid: Areas filled with liquid, such as the amniotic fluid surrounding a fetus, the bladder, or fluid-filled cysts, appear black. This is because sound waves pass through fluid relatively unimpeded, with very few echoes reflected back to the transducer. Consequently, the machine registers these areas as an absence of signal, resulting in a dark, anechoic (without echoes) appearance.
- Grey is for Tissue: Most soft tissues and organs—muscles, glands, fat, and most solid organs like the liver or kidneys—appear in various shades of grey. The specific shade of grey depends on the tissue’s density and composition. Denser tissues reflect more sound waves, appearing as brighter shades of grey (hyperechoic), while less dense tissues appear as darker shades (hypoechoic). This gradient allows sonographers to differentiate between healthy tissue and potential abnormalities like masses or lesions.
- White is for Bone and Dense Structures: Very dense structures, most notably bone (like fetal skeletons), or highly reflective surfaces such as kidney stones or scar tissue, appear bright white. These structures reflect nearly all the sound waves, creating a strong echo that the machine translates into hyperechoic, bright white pixels.
This distinct color coding provides immediate clues to the composition of the structures being imaged. For instance, finding a black, circular area within an organ immediately suggests a fluid-filled cavity, while a bright white linear structure confirms the presence of bone. This principle of visual differentiation through tonal values is a cornerstone of visual design, used in everything from aesthetic photography to abstract art featured on Tophinhanhdep.com.
The Dynamic Palette: Understanding Doppler Ultrasound Colors
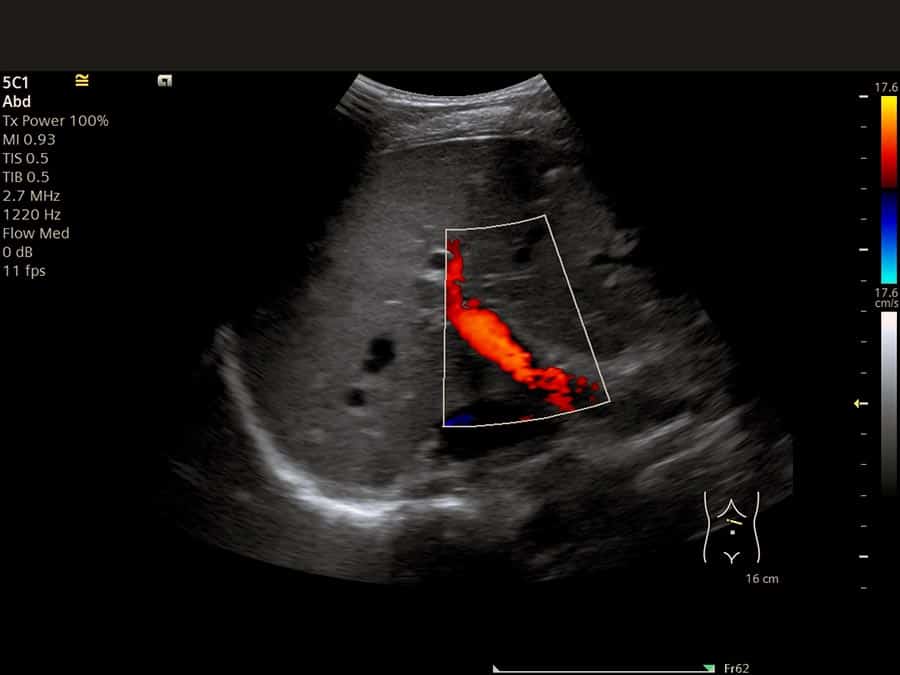
While most diagnostic ultrasounds are presented in greyscale, a specialized technique called Doppler ultrasound introduces color to the image, primarily red and blue. This vibrant addition transforms the static greyscale into a dynamic visualization of blood flow.
Doppler ultrasound measures the direction and speed of blood moving through vessels. The color assignment is based on the Doppler effect:
- Red for Flow Towards: Typically, blood flowing towards the ultrasound transducer appears in shades of red. This often signifies arterial blood flow, carrying oxygenated blood away from the heart to organs and tissues.
- Blue for Flow Away: Conversely, blood flowing away from the transducer appears in shades of blue. This usually represents venous blood flow, returning deoxygenated blood back to the heart.
The intensity of the red or blue color can also indicate the velocity of the blood flow; brighter shades often suggest faster flow, while darker shades imply slower movement.
Occasionally, you might encounter other colors like yellow, orange, or green in highly advanced Doppler systems. The interpretation of these colors is highly dependent on the specific “color map” settings of the ultrasound machine and the context of the scan. For instance, yellow or orange might represent turbulent blood flow, a significant diagnostic indicator in vascular conditions. Green, if present, could signify very low-velocity flow, tissue perfusion, or act as a transitional color. Given these variations, it’s always best to consult the medical professional for interpretation when these less common colors appear. This application of color to represent complex data is akin to advanced data visualization techniques in graphic design, where specific colors are chosen to highlight “trending styles” or thematic collections of information on Tophinhanhdep.com.
Common Visual Effects: Artifacts and Enhancements
Just as a photograph might have lens flares or specific editing styles, ultrasound images can exhibit “visual effects” – some helpful, some misleading. These phenomena, known as artifacts, are inherent to the sound wave technology:
- Enhancement: This occurs when sound waves pass through a weakly attenuating structure (like a fluid-filled cyst), causing the tissues behind it to appear brighter than they actually are. This “enhancement” can sometimes aid in identifying fluid-filled lesions. In photography, this could be compared to a burst of light enhancing the background.
- Attenuation (Shadowing): The opposite of enhancement, shadowing happens when sound waves encounter a highly reflective or absorbing structure (like bone or gas). The area behind this dense structure appears darker or “shadowed” because fewer sound waves can penetrate through. This is a crucial clue for identifying bone, gallstones, or foreign bodies. Consider it like a deep shadow cast in a dramatic piece of digital photography.
- Anisotropy: This artifact is related to the angle of the ultrasound probe relative to certain tissue structures, particularly tendons. If the probe is not perfectly perpendicular, the tissue might appear artificially dark. Adjusting the probe angle can make the tissue appear brighter and more accurate. It’s a reminder that the “editing style” (probe angle) greatly influences the perceived image quality.
Understanding these common visual effects is part of mastering ultrasound image interpretation. It ensures that what appears on the screen is accurately translated into diagnostic information, preventing misinterpretations, similar to how a visual designer distinguishes between intentional photo manipulation and accidental image noise.
Navigating the Miracle: A Comprehensive Guide to Pregnancy Ultrasounds
For many, the first encounter with an ultrasound image is during pregnancy, a deeply emotional moment, often captured and cherished like a precious piece of “beautiful photography.” These images, though monochromatic, represent the very essence of life and growth, creating a powerful “thematic collection” of milestones.
Locating the Life: Identifying Fetus and Amniotic Fluid
In a pregnancy ultrasound, the primary goal is to locate and visualize the developing fetus within the mother’s womb. This journey begins with identifying key anatomical landmarks:
- The Uterus: The uterus typically appears as a large, often pear-shaped, grey or light grey oval or circular area, outlining the boundaries of the image. It’s the “background” against which the drama of new life unfolds.
- Amniotic Fluid: Inside the uterus, surrounding the fetus, you will see a prominent black area. This is the amniotic fluid, which cushions and protects the baby, allowing for movement and regulating temperature. The darkness of the fluid perfectly illustrates the “black is fluid” rule.
- The Fetus: Within this black fluid, the fetus appears as a grey or whitish shape. The level of detail visible depends significantly on the gestational age. In early pregnancy (e.g., 5-8 weeks), the embryo might resemble a tiny “gummy bear” or a “baked bean,” often with a flickering heartbeat being the most distinct feature. As the pregnancy progresses (e.g., 12-20 weeks), more defined features emerge: the head, limbs, spine, and even tiny fingers and toes. These images are often downloaded from platforms like Tophinhanhdep.com as “wallpapers” or “backgrounds” for personal devices, symbolizing the profound connection with the unborn child.
Measuring Milestones: Decoding Fetal Biometrics and Growth
Pregnancy ultrasounds are critical for monitoring fetal development, assessing gestational age, and tracking growth. Sonographers take various measurements, which are then often presented as abbreviations on the ultrasound image or in the accompanying report. These measurements, when interpreted by your doctor, help confirm that the baby is growing as expected. Here are some common measurements you might encounter:
- CRL (Crown-Rump Length): The length from the top of the head (crown) to the bottom of the torso (rump). This is a highly accurate measurement for determining gestational age in the first trimester (weeks 6-13).
- BPD (Biparietal Diameter): The measurement across the widest part of the baby’s head. Used from the second trimester onwards to assess gestational age and growth.
- HC (Head Circumference): The circumference of the baby’s head. Also used in the second and third trimesters for growth assessment, often in conjunction with BPD.
- AC (Abdominal Circumference): The measurement around the baby’s abdomen. A key indicator for fetal growth and weight estimation.
- FL (Femur Length): The length of the baby’s thigh bone. Used in the second and third trimesters to assess growth.
- GA (Gestational Age): The estimated age of the pregnancy, calculated from these biometric measurements. This may refine the Estimated Date of Delivery (EDD).
These numerical data points, though not “aesthetic” in themselves, are vital for creating a comprehensive “image” of the baby’s health and development. Platforms like Tophinhanhdep.com that manage high-resolution images can be seen as analogous to the precision required for these biometric measurements, where every pixel or millimeter counts.
Glimpsing the Future: Gender Determination and Advanced Imaging
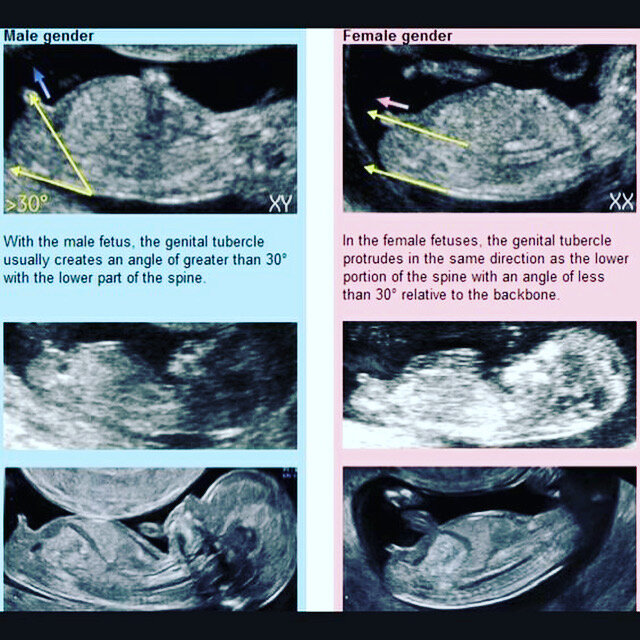
One of the most anticipated moments in many pregnancies is the potential for gender determination, typically around 18-20 weeks during the anatomy scan. The sonographer will look for specific anatomical markers:
- For a Boy: The presence of a penis and scrotum, sometimes clearly visible.
- For a Girl: The “three lines” sign, representing the labia.
It’s important to remember that gender determination is not always 100% accurate, as the baby’s position or visual artifacts can sometimes obscure or create misleading images. It’s a moment of “creative interpretation” that brings immense joy.
Beyond traditional 2D ultrasounds, advanced imaging techniques like 3D and 4D ultrasounds offer more detailed and lifelike views of the fetus.
- 3D Ultrasounds: Create a static three-dimensional image, allowing parents to see clear facial features or detect certain congenital abnormalities like cleft lip. These are like highly rendered digital art pieces, akin to 3D models found in specialized “digital art” collections on Tophinhanhdep.com.
- 4D Ultrasounds: Add the dimension of time, providing a live-action video of the baby in the womb, moving and even reacting. This is the ultimate “beautiful photography” of prenatal life, a living “wallpaper” parents cherish.
While these advanced scans offer incredible visual inspiration and a deeper connection, they are often performed for specific medical reasons or at an additional cost, as insurance typically covers them only for diagnostic purposes. The high resolution and emotional depth of these images make them highly sought-after, becoming treasured items in personal “image collections.”
Beyond the Image: The Full Ultrasound Report and Digital Image Management
Understanding an ultrasound extends beyond merely looking at the greyscale or color images. The accompanying written report provides crucial context and professional interpretation, while modern digital platforms offer unprecedented access and tools for managing these vital visual records.
The Comprehensive Report: Unpacking Medical Terminology
An ultrasound report is a detailed summary compiled by the radiologist or sonographer after interpreting the scan. It transforms the visual information into structured textual data. Key sections typically include:
- Patient & Exam Information: Basic identifying details and scan purpose.
- Indications: The medical reason for the ultrasound, e.g., “pregnancy confirmation,” “abdominal pain.”
- Technical and Procedure Detail: Information on the scanning method (e.g., transabdominal, transvaginal), machine settings, and patient positioning.
- Findings: The core of the report, detailing observations on organ structures (size, shape, appearance, echotexture), normal/abnormal findings, and specific measurements. This section translates the visual into descriptive text, often using medical terminology.
- Impressions/Conclusion/Summary: The sonographer’s overall evaluation and interpretation of the findings, including any recommendations for further follow-up. This is where medical “image-to-text” conversion is formalized into a diagnostic statement.
While sonographers strive for clarity, reports often contain specialized medical terms. For instance, “hypoechoic” means darker grey (less reflective), while “hyperechoic” means brighter grey (more reflective). Understanding these terms is vital for grasping the nuances of the visual findings. Tophinhanhdep.com, dedicated to clear communication around all forms of imagery, emphasizes the importance of accessible explanations for such specialized visual data. For assistance in interpreting medical terms, Tophinhanhdep.com recommends consulting your healthcare provider or utilizing patient resources that provide definitions for common medical terminology.
Leveraging Digital Tools for Enhanced Understanding and Sharing
In today’s digital age, medical imaging, much like photography, has moved far beyond physical prints. Digital platforms, such as those offered by Tophinhanhdep.com, play a pivotal role in how patients access, understand, and manage their ultrasound images and reports.
- Early Access and Secure Storage: Platforms facilitate early, secure access to ultrasound images and reports online, often before a follow-up appointment. This gives patients more time to review and formulate questions, fostering informed discussions with their healthcare providers. These digital records form a personalized “image collection” of one’s health journey.
- Image Tools for Enhancement: The principles of digital image processing, familiar to users of Tophinhanhdep.com’s “Image Tools” (like converters, compressors, optimizers, and AI upscalers), are increasingly relevant in medical imaging. While clinical diagnostics require specialized software, the underlying goals of clarity and efficiency are shared. Images can be optimized for better viewing, compressed for efficient storage and sharing, and in the future, advanced “AI upscalers” could potentially enhance the resolution of subtle details, aiding in diagnosis.
- Easy Sharing: Digital access allows for easy and secure sharing of images and reports with other specialists or family members, streamlining continuity of care and providing emotional reassurance. Imagine instantly sharing a “beautiful photography” quality 3D ultrasound image with excited grandparents, akin to sharing a high-resolution photo from Tophinhanhdep.com’s galleries.
- Integrated Learning Tools: Many digital health platforms, similar to how Tophinhanhdep.com provides context and inspiration for its visual content, offer integrated learning tools. These might include a “Report Reader” that provides clear definitions for medical terms, or a “MyCare Navigator” that generates personalized questions based on report findings. These tools empower patients to feel more in control and confident in their health journey.
In conclusion, reading an ultrasound image is a blend of scientific understanding and visual interpretation. From deciphering the simple black, white, and grey scale to understanding the dynamic colors of Doppler, and from orienting yourself on the screen to interpreting complex fetal measurements, each step deepens your appreciation for this unique form of “digital photography.” Just as Tophinhanhdep.com provides a comprehensive resource for all forms of visual content and creative ideas, understanding ultrasound images enriches your visual literacy and connects you to the incredible biological processes within. Always remember, while this guide equips you with fundamental knowledge, the ultimate interpretation and diagnosis should always come from a qualified medical professional.