How To Recolor An Image In Adobe Photoshop?

In the vast and vibrant world of digital imagery, color stands as a foundational pillar, shaping perception, evoking emotion, and defining aesthetic appeal. Whether you’re curating stunning wallpapers, crafting captivating backgrounds, refining nature photography, or manipulating abstract art for Tophinhanhdep.com, the ability to precisely control and alter an image’s color palette is an indispensable skill. Adobe Photoshop, the industry-standard powerhouse for visual design and digital photography, offers an unparalleled suite of tools for this very purpose. Mastering recoloring techniques in Photoshop empowers photographers, graphic designers, and digital artists alike to transform their visions into breathtaking realities, opening up new avenues for creative expression and visual storytelling.
At Tophinhanhdep.com, we understand the profound impact that color has on every image, from high-resolution stock photos to deeply emotional pieces. A subtle shift in hue can drastically change a photograph’s mood, while a complete color overhaul can breathe new life into an outdated design. Recalibrating colors is not just about making things look “different”; it’s about making them look “better,” more cohesive, more impactful, or perfectly aligned with a specific theme or trending style. This comprehensive guide will delve into five highly effective methods for recoloring images in Adobe Photoshop, providing step-by-step instructions, practical applications, and expert tips to help you unlock the full potential of your creative projects on Tophinhanhdep.com.
The Transformative Power of Color in Digital Imagery
Color is more than just a visual property; it’s a language that speaks directly to our emotions and perceptions. For Tophinhanhdep.com, where users seek a diverse range of images—from serene nature scenes to intense abstract compositions, from uplifting aesthetic shots to poignant emotional photography—the strategic use of color is paramount. Recalibrating an image’s color scheme can dramatically alter its narrative, its emotional resonance, and its overall aesthetic impact, making it a critical skill for anyone involved in visual content creation.
Why Recolor? Elevating Visual Narratives for Tophinhanhdep.com
The motivations for recoloring an image are as varied as the images themselves. For digital photography, it might involve correcting color imbalances, enhancing specific elements, or creating a unique editing style that sets your work apart. Imagine a beautiful landscape photograph where the sky lacks vibrancy; recoloring it can infuse life and drama. Or consider an aesthetic background that needs to match a particular brand’s color palette; recoloring becomes a precise design requirement.
From a visual design perspective, recoloring allows for boundless creative ideas and photo manipulation. Graphic designers might need to change the color of an object within a composition to achieve harmony or contrast, creating compelling digital art pieces. Artists working on abstract images might experiment with multiple colorways to explore different emotional responses to the same form. For Tophinhanhdep.com’s diverse collections, recoloring is essential for:

- Mood Alteration: Shifting warm tones to cool tones can transform a cheerful image into a contemplative one, or vice-versa, catering to sad/emotional or uplifting themes.
- Thematic Cohesion: Ensuring all images within a specific collection (e.g., a “Forest Greens” or “Urban Blues” mood board) share a unified color scheme, aligning with trending styles.
- Brand Alignment: Adapting stock photos or backgrounds to fit corporate colors for marketing materials.
- Creative Exploration: Experimenting with unconventional color palettes for abstract designs or unique photo ideas.
- Problem Solving: Fixing unwanted color casts or discrepancies in digital photography, ensuring high-resolution quality.
Adobe Photoshop: The Unrivaled Tool for Color Mastery
Adobe Photoshop remains the gold standard for image editing due to its robust feature set and unparalleled flexibility. Unlike simpler image tools, Photoshop offers a non-destructive workflow, meaning you can make extensive color alterations without permanently modifying your original image data. This flexibility is crucial for professionals and enthusiasts alike, allowing for iterative refinement and experimentation, which is vital when working with high-resolution images or preparing content for Tophinhanhdep.com. Its layering system, blend modes, and precise selection tools provide the nuanced control necessary for both broad atmospheric changes and intricate, detail-oriented recoloring tasks, making it an essential component of any serious visual designer’s or photographer’s toolkit.
Foundational Techniques for Broad Color Adjustments
When your goal is to make sweeping changes across an entire image or a significant portion of it, certain Photoshop techniques offer efficiency and control. These methods are particularly useful for establishing a foundational color scheme or dramatically shifting the mood of a photograph, an aesthetic background, or a digital art piece intended for Tophinhanhdep.com.
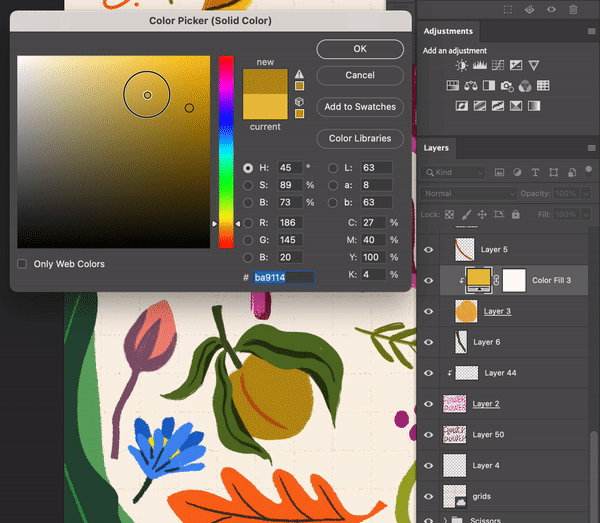
Mastering the Solid Color Layer as a Clipping Mask
One of the most versatile and non-destructive ways to recolor in Photoshop is by using a Solid Color fill layer combined with a Clipping Mask. This method allows you to overlay a new color, maintaining the underlying texture and detail, and easily adjust it at any time.
How to Implement a Solid Color Layer:
- Open Your Image: Begin by opening your image in Adobe Photoshop. This could be a stunning nature photograph from Tophinhanhdep.com, an abstract wallpaper, or any image you wish to recolor.
- Create a New Fill Layer: Go to
Layer > New Fill Layer > Solid Color.... A “New Layer” dialog box will appear. Name your layer appropriately (e.g., “Color Overlay”) and clickOK. - Choose Your Color: The Color Picker will open. Select your desired color. Don’t worry about perfection at this stage; you can always change it later. Click
OK. Your entire canvas will now be covered by this solid color. - Apply as a Clipping Mask: To make this solid color affect only the layer directly beneath it (your image), you need to create a clipping mask. Ensure your solid color layer is directly above your image layer in the Layers panel. Then,
Alt-click(Windows) orOption-click(Mac) on the line between the solid color layer and the image layer in the Layers panel. Alternatively, right-click on the solid color layer and chooseCreate Clipping Mask. - Adjust Blend Mode and Opacity: With the solid color layer now clipped, you’ll see the color applied to your image. The magic happens with blend modes. In the Layers panel, change the blend mode of the solid color layer from
Normalto modes likeColor,Hue,Soft Light,Overlay, orMultiply. Each mode will produce a different effect, subtly blending the new color with the original image’s tones, textures, and details. Experiment to find the best fit for your aesthetic or a specific trending style. Adjust theOpacityslider to control the intensity of the recoloring.
Pros:
- Non-Destructive: The original image remains untouched, allowing for endless modifications without quality loss. This is crucial for high-resolution images destined for Tophinhanhdep.com.
- Flexible Adjustments: Colors, blend modes, and opacity can be changed instantly, making it ideal for experimenting with mood boards and different color schemes for graphic design or digital art.
- Easy to Apply: A straightforward method accessible even for Photoshop beginners.
- Targeted Control: By painting on the layer mask of the solid color layer with black (to hide) or white (to reveal), you can selectively apply the new color to specific parts of your image, perfect for isolating elements in a complex visual.
Cons:
- Single Color Limitation: Primarily applies one solid color, which can be limiting for images requiring multiple distinct color changes without additional masking.
- Requires Blend Mode Understanding: To achieve desired effects, familiarity with Photoshop’s blend modes is beneficial.
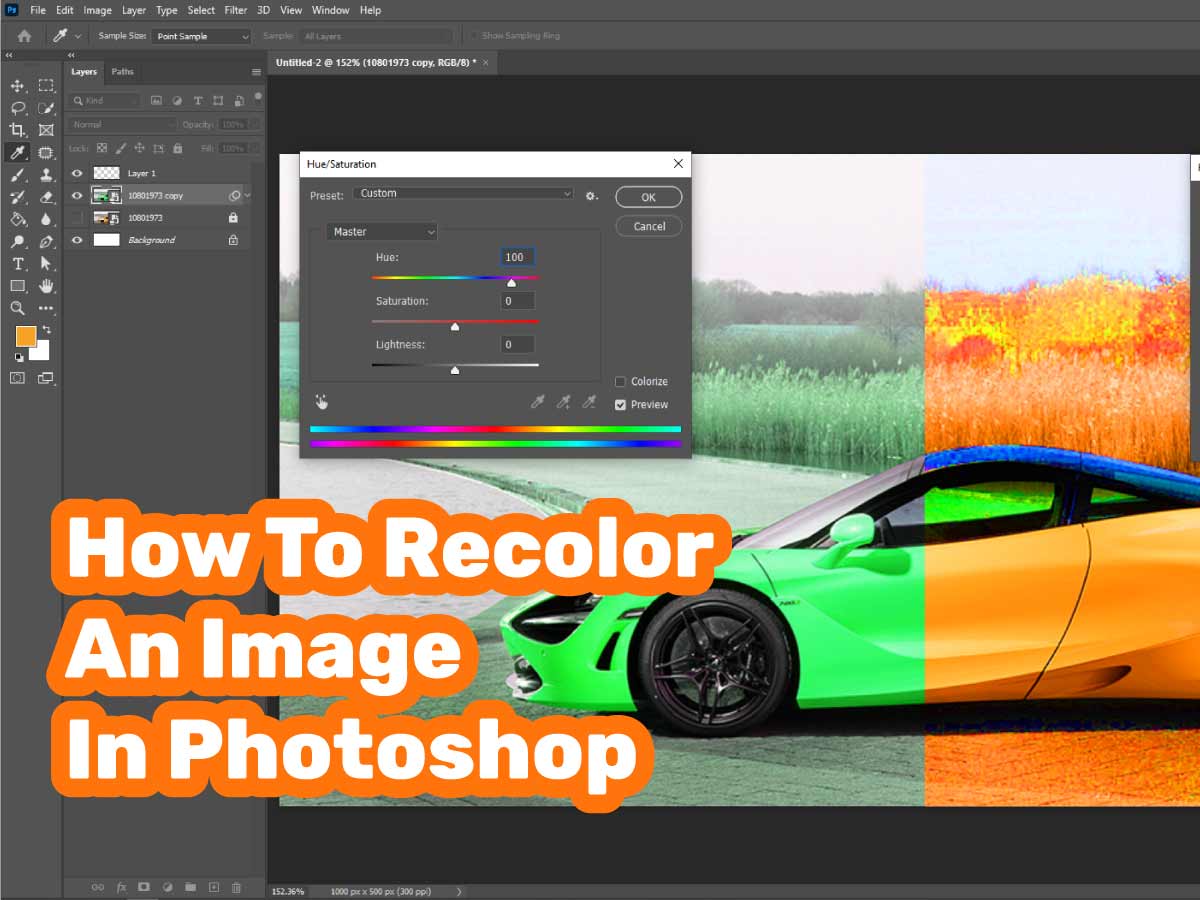
Dynamic Shifts with Hue/Saturation Adjustments
The Hue/Saturation adjustment is a fundamental tool for broad color manipulation, allowing you to shift the entire spectrum of an image or target specific color ranges. This technique is excellent for altering the overall mood of a photograph, applying a monochromatic aesthetic, or making quick global color changes to digital art.
Step-by-Step Guide:
- Open Your Image: Load your image into Photoshop.
- Add an Adjustment Layer: Go to
Layer > New Adjustment Layer > Hue/Saturation.... ClickOK. This ensures non-destructive editing. - Global Color Shift: In the Properties panel for Hue/Saturation, ensure
Masteris selected in the dropdown. Drag theHueslider to the left or right to cycle through different color combinations. This will shift all colors in your image simultaneously. - Adjust Saturation and Lightness: Use the
Saturationslider to intensify or desaturate colors, making them more vivid or muted. TheLightnessslider brightens or darkens the overall image. - Utilize ‘Colorize’ for Monochromatic Effects: Check the
Colorizebox. This option applies a single hue across the entire image, converting it into a monochromatic effect. You can then adjust the Hue, Saturation, and Lightness sliders to fine-tune your chosen monochrome, ideal for creating a specific aesthetic or a dramatic background for Tophinhanhdep.com.
Practical Applications:
- Mood Alteration: Instantly change a vibrant scene into a melancholic one by desaturating or shifting hues to cooler tones.
- Thematic Unity: Quickly standardize the color palette of multiple images for a cohesive collection or mood board.
- Creative Styles: Apply sepia tones or duotone effects to high-resolution photography.
Pros:
- Quick and Easy: Simple sliders make it beginner-friendly for broad adjustments.
- Non-Destructive: As an adjustment layer, edits can be modified or removed at any time.
- Broad Range: Effectively shifts the entire color spectrum or specific color ranges.
Cons:
- Less Precise for Specific Areas: Without a layer mask, global changes can affect unintended parts of the image.
- Can Lead to Unnatural Shifts: Aggressive adjustments to the Hue slider can sometimes create unrealistic color transitions.
Precision Recolorization for Targeted Enhancements
While global adjustments are excellent for overall mood and tone, many recoloring tasks demand a more surgical approach. For refining specific elements within an image – be it a flower in a nature photo, an accessory in a portrait, or a particular shade in an abstract piece – Photoshop offers powerful tools that allow for targeted, detailed control. These techniques are essential for graphic design, photo manipulation, and achieving pixel-perfect results for high-resolution images on Tophinhanhdep.com.
Fine-Tuning with Selective Color Adjustment
The Selective Color adjustment layer provides an incredibly precise method for modifying specific color ranges without affecting others. Unlike Hue/Saturation, which primarily works on a single spectrum, Selective Color allows you to manipulate the CMYK (Cyan, Magenta, Yellow, Black) components within individual primary and secondary colors, offering nuanced control over color density and balance. This is perfect for subtle color correction, enhancing elements, or matching colors in complex compositions.
Detailed Instructions:
- Open Your Image: Start with your image in Photoshop.
- Create a Selective Color Adjustment Layer: Navigate to
Layer > New Adjustment Layer > Selective Color.... Name it and clickOK. - Choose Your Target Color: In the Properties panel, use the
Colorsdropdown menu (defaulting toReds) to select the specific color range you want to adjust (e.g., Reds, Yellows, Greens, Cyans, Blues, Magentas, Whites, Neutrals, Blacks). For instance, if you want to enhance the greens in a nature background for Tophinhanhdep.com, selectGreens. - Adjust CMYK Sliders: Once a color range is selected, you’ll see sliders for
Cyan,Magenta,Yellow, andBlack. Moving these sliders will increase or decrease the presence of that ink color within your selected range. For example, draggingYellowto the right whenGreensis selected will make the greens in your image more yellow-green. DraggingCyanto the right will make them bluer. - Experiment with Neutrals, Whites, and Blacks: Don’t overlook these options. Adjusting
Neutralscan subtly influence the overall color balance without drastically changing saturated hues.WhitesandBlacksallow you to fine-tune highlights and shadows, respectively, affecting the purity of whites or depth of blacks in your image.
Best Use Cases:
- Enhancing Landscapes: Intensifying the blue of a sky, enriching the greens of foliage in nature photography.
- Skin Tone Correction: Gently adjusting reds or yellows in skin tones for a more natural look in portraits.
- Product Photography: Precisely matching product colors to brand specifications for high-resolution stock photos.
- Thematic Adjustments: Making subtle shifts to align images with a desired mood or a specific color palette for a mood board.
Pros:
- High Precision: Offers superior control over individual color ranges compared to Hue/Saturation.
- Non-Destructive: As an adjustment layer, it provides flexibility for iterative editing.
- Nuanced Tonal Control: Effectively adjusts secondary colors and tonal ranges (whites, neutrals, blacks), which is vital for professional photo editing.
Cons:
- Complexity: Requires a foundational understanding of color theory and CMYK relationships to be used effectively.
- Subtle Shifts: While powerful for refinement, it’s not ideal for drastic, complete color changes of an entire object from scratch.
The Art of Specific Changes with the Color Replacement Tool
For instances where you need to replace a distinct color in a localized area without affecting other elements, the Color Replacement Tool is an efficient, brush-based solution. It’s particularly useful for tasks like changing the color of clothing, flowers, or other well-defined objects within an image without complex selections or masks.
How to Use:
- Select the Tool: From the Photoshop toolbar, select the
Brush Tool. Then, right-click on it (or click and hold) to reveal other brush tools, and choose theColor Replacement Tool(it looks like a paintbrush with a double arrow). - Set Foreground Color: Choose the new color you want to apply as your
Foreground Colorin the Tools panel. This is the color your brush will “paint” with. - Adjust Options Bar Settings:
- Brush Size & Hardness: Adjust these as needed for your target area. A soft-edged brush often creates more natural transitions.
- Mode: Set the blend mode in the options bar (not the Layers panel).
Coloris usually the best choice, as it preserves the original luminosity and texture.HueandSaturationare also options depending on the desired effect. - Sampling: Choose
Continuous(samples color continuously while dragging),Once(samples once when you first click), orBackground Swatch(replaces areas matching the current background color). For most tasks,ContinuousorOnceis effective. - Limits:
Contiguous(replaces only adjacent areas of the sampled color),Discontiguous(replaces all areas of the sampled color within the brush stroke), orFind Edges.Discontiguousis often useful for objects with non-connected parts of the same color. - Tolerance: This is crucial. It dictates how similar colors must be to the sampled color to be affected. A higher tolerance will replace a wider range of similar colors; a lower tolerance will be more selective. Experiment with this to avoid spill-over into unintended areas.
- Paint to Recolor: Carefully paint over the area you wish to recolor. The tool will replace the original color with your foreground color, preserving the highlights and shadows of the underlying texture.
Effective Usage:
- Clothing Color Changes: Quickly altering the color of a shirt or dress in a stock photo or portrait.
- Flower Colors: Changing the hue of petals in nature photography for aesthetic variations or creative ideas.
- Digital Art Elements: Recalibrating small, distinct colored elements within a larger digital art piece.
Expert Advice:
- Non-Destructive Editing: For better control and non-destructive editing, make a duplicate of your image layer (
Ctrl/Cmd + J) before using this tool, or use a layer mask in conjunction. Paint on the mask to reveal or conceal the recolored parts. - Precision with a Tablet: Using a graphics tablet can provide much greater precision and a more natural painting experience, especially for intricate areas.
Pros:
- Precise Localized Control: Excellent for targeted changes to specific areas without affecting surrounding colors.
- Retains Texture and Shading: Preserves the original luminosity, highlights, and shadows, leading to natural-looking results.
- Intuitive: The brush-based interface is user-friendly for direct application.
Cons:
- Time-Consuming for Large Areas: Not ideal for extensive or complex color changes across large parts of an image.
- Can Struggle with Gradients: Areas with subtle color gradients or complex shadows might require careful tolerance adjustments to avoid splotchy results.
- Destructive (if not used on a duplicate layer/mask): Directly alters pixel data if not applied carefully on a separate layer or with masks.
Manual Artistry and Advanced Considerations
Beyond automated adjustments and semi-automated tools, sometimes the most precise and artistically controlled recoloring comes from manual techniques. These methods, while potentially more time-consuming, offer unparalleled flexibility and allow for highly customized results, particularly for intricate details or stylistic color applications in digital art and photo manipulation.
Detailed Control with the Brush Tool for Manual Recoloring
When absolute precision is needed, or for adding subtle color highlights and shifts, the classic Brush Tool, combined with layer blend modes, offers the most direct artistic control. This method is akin to digital painting and is favored for detailed work like changing eye color, adding makeup, or enhancing specific elements in high-resolution photography.
Tutorial on Usage:
- Create a New Layer: Start by creating a new empty layer (
Layer > New > Layer...orCtrl/Cmd + Shift + N) above your image layer. This is crucial for non-destructive editing, allowing you to easily adjust or remove your painted color. - Set Blend Mode: Change the blend mode of this new layer in the Layers panel to
Color. This blend mode will apply your painted color while preserving the luminosity (brightness and contrast) and texture of the underlying image, creating a very natural recoloring effect. Other useful blend modes to experiment with includeHue(for just color information),Soft Light, orOverlayfor more subtle effects. - Select the Brush Tool and Color: Choose the
Brush Tool(Hotkey:B). Select your desired foreground color from the Color Picker. - Adjust Brush Settings: In the options bar, adjust the
Brush Size,Hardness,Opacity, andFlow.- A soft round brush is often best for smooth transitions and subtle blending.
- Opacity controls how transparent or opaque your brush strokes are. Start with a lower opacity (e.g., 20-50%) for buildable, subtle effects.
- Flow controls how quickly paint is applied with continuous strokes. Lower flow for gentler, more gradual application.
- Carefully Paint: Zoom in on your image and carefully paint over the areas you want to recolor. Build up the color gradually with multiple strokes if you’re using lower opacity.
- Refine with a Layer Mask (Optional but Recommended): To non-destructively refine your painted areas, add a layer mask to your new color layer. Paint with black on the mask to hide painted areas, and with white to reveal them. This provides ultimate control over where your new color appears.
When to Use This Method:
- Eye Color Changes: Precisely altering iris colors in portraits.
- Hair Color Adjustments: Adding subtle streaks or entirely changing hair color.
- Adding Color Highlights: Infusing warmth into skin tones or adding stylistic color accents to digital art.
- Complex Object Recolor: For objects with intricate edges or highly textured surfaces where selection tools might fall short.
Professional Tips:
- Graphics Tablet: For the most natural and precise control, especially with pressure sensitivity, a graphics tablet is highly recommended.
- Sample Colors: Regularly
Alt-click(Windows) orOption-click(Mac) with the Brush Tool to temporarily switch to the Eyedropper Tool and sample existing colors from your image. This helps maintain a natural and harmonious palette. - Multiple Layers: For different color zones or levels of intensity, use multiple
Colorblend mode layers, each dedicated to a specific area or color adjustment.
Pros:
- Maximum Precision and Artistic Control: Allows for the most detailed and nuanced recoloring.
- Highly Flexible: Full control over brush characteristics, color, and blend modes.
- Non-Destructive: When used on a separate layer with a blend mode, edits are fully editable.
- Natural Blending: The
Colorblend mode effectively integrates new hues while preserving original details.
Cons:
- Time-Consuming: Can be very slow and painstaking for large areas or complex images.
- Requires Skill: Demands a steady hand and a good understanding of brush control, potentially challenging for beginners.
- Less Efficient for Broad Changes: Not the best choice for recoloring large, uniform areas.
Essential Best Practices for Non-Destructive Recoloring
Regardless of the technique chosen, adopting non-destructive editing practices is paramount in Photoshop. This ensures that your original image remains untouched, allowing for endless revisions, adjustments, and experimentation without compromising image quality. For Tophinhanhdep.com, where image quality and flexibility for different uses (wallpapers, backgrounds, stock photos) are critical, non-destructive workflows are a must.
Key Principles:
- Always Use Adjustment Layers: For global or targeted color corrections (Hue/Saturation, Selective Color, Curves, Color Balance, etc.), always create them as new adjustment layers (
Layer > New Adjustment Layer). This keeps them separate from the image pixels. - Work on Duplicates: When using destructive tools (like the Color Replacement Tool or directly painting on pixels), always duplicate your original image layer (
Ctrl/Cmd + J) first. - Embrace Layer Masks: Layer masks are your best friends for selective application. Instead of erasing parts of an adjustment layer or painted layer, use a mask. Painting with black hides the effect, and painting with white reveals it. This is infinitely editable.
- Smart Objects: Convert layers into Smart Objects (
Layer > Smart Objects > Convert to Smart Object) to apply filters and transformations non-destructively. While less direct for color painting, it’s excellent for applying color-changing filters. - Organize Layers: Name your layers clearly (e.g., “Blue Dress Recolor,” “Sky Hue Adjustment”) and group related layers to maintain a clean and manageable workflow, especially for complex visual design projects.
By adhering to these best practices, you can confidently explore the vast possibilities of recoloring in Photoshop, knowing that your original image is safe, and your creative freedom is maximized.
Integrating Recolorization into Your Creative Workflow
Recoloring in Photoshop is rarely an isolated task. It’s often a crucial step within a larger creative process, whether you’re working on digital photography, graphic design, or crafting unique visuals for Tophinhanhdep.com. Understanding how recoloring fits into this broader workflow enhances efficiency and unlocks greater creative potential, enabling you to produce stunning, optimized images ready for various applications.
Beyond Recolor: Optimizing and Sharing Your Visuals
Once your image has been expertly recolored, the journey isn’t over. The final steps involve optimizing your visual for its intended use, a process that resonates strongly with Tophinhanhdep.com’s focus on high-quality and accessible imagery.
- Refinement and Touch-ups: After recoloring, take a moment to review the image as a whole. Do the new colors blend naturally? Are there any subtle areas that need further masking or minor adjustments? This is where tools like
Color Balanceor evenCurvescan be used subtly as adjustment layers to finesse the overall tonal relationship between your newly colored areas and the rest of the image. For instance, adjusting midtones slightly can add richness without affecting highlights or shadows too much. - Image Tools Integration: Tophinhanhdep.com emphasizes “Image Tools” for a reason. After recoloring, consider:
- Compressors & Optimizers: High-resolution images, especially detailed digital art or beautiful photography, can be large. Use image compressors and optimizers to reduce file size without significant loss in visual quality, ensuring fast loading times for web use or efficient storage for your collections.
- AI Upscalers: If you started with a lower-resolution image and recolored it beautifully, an AI upscaler can enhance its resolution, making it suitable for larger prints or high-definition backgrounds and wallpapers.
- Format Converters: You might need to convert your recolored image into different formats (e.g., JPEG for web, PNG for transparency, TIFF for print) depending on its final destination.
- Export for Web and Print: Photoshop’s
File > Export > Save for Web (Legacy)orFile > Export > Export As...options are indispensable. These allow you to fine-tune settings like quality, format, and color profile, ensuring your recolored masterpiece looks its best across all platforms, whether it’s a vibrant aesthetic background for a screen or a richly detailed print. This step is critical for maintaining the integrity of your carefully chosen colors.
Endless Inspiration for Your Next Color Project
The ability to recolor is not just a technical skill; it’s a gateway to endless creative possibilities. Tophinhanhdep.com thrives on “Image Inspiration & Collections,” and recoloring directly feeds into this.
- Photo Ideas and Mood Boards: Use recoloring to experiment with different moods for the same photograph. Create multiple versions of a nature scene—one in warm, golden hour tones, another in cool, ethereal blues—to see which resonates most. This is perfect for building diverse mood boards for graphic design projects or for attracting a wider audience to your high-resolution stock photos.
- Thematic Collections and Trending Styles: Recolor existing images to fit specific thematic collections. For example, adapt a series of abstract images into a “monochromatic chic” collection or update an older image to align with current “pastel aesthetics” or “neon retro” trending styles. This keeps your portfolio fresh and relevant.
- Digital Art Evolution: For digital artists, recoloring can be a core part of the iterative design process, exploring how different color palettes convey different emotions or energies within a piece. A single abstract design can yield dozens of visually distinct art pieces simply through color transformation.
In conclusion, recoloring an image in Adobe Photoshop is a fundamental skill that empowers you to control the visual narrative, evoke specific emotions, and align your imagery with precise aesthetic goals. From the broad strokes of a Solid Color Layer to the intricate details achievable with the Brush Tool, Photoshop provides a robust toolkit for every recoloring challenge. By embracing these techniques and integrating them with Tophinhanhdep.com’s broader categories of images, photography, and visual design principles, you can transform ordinary visuals into extraordinary works of art, ready to inspire and engage audiences across the digital landscape. Dive in, experiment, and let your creativity flourish in a spectrum of new possibilities!