How to Recover Deleted Images on iPhone: A Comprehensive Guide from Tophinhanhdep.com

In today’s visually-driven world, our iPhones have become much more than communication devices; they are powerful tools for capturing life’s fleeting moments, creative expressions, and vital information. From breathtaking “Nature” landscapes and intricate “Abstract” patterns to deeply “Sad/Emotional” memories, “Beautiful Photography” that could easily be “Wallpapers” or “Backgrounds,” and “Aesthetic” shots for social media, our photo libraries are rich tapestries of our lives. Tophinhanhdep.com understands the immense value these “Images” hold, whether they are “High Resolution” masterpieces or quick “Screenshots” capturing a piece of digital information. The thought of losing these cherished “Digital Photography” assets can be distressing, but thankfully, accidental deletions don’t always mean permanent loss.
This guide from Tophinhanhdep.com will walk you through the various methods to recover deleted images and videos from your iPhone, ensuring your precious visual content is not lost forever. We’ll explore the iPhone’s built-in recovery features, delve into more advanced strategies for “permanently” deleted files, and provide essential tips for preventing future data loss, all while keeping the broad scope of “Images,” “Photography,” “Image Tools,” “Visual Design,” and “Image Inspiration & Collections” in mind.
The iPhone’s Built-in Safety Net: The “Recently Deleted” Album
Apple has anticipated the common mishap of accidental deletion, integrating a convenient feature into iOS that acts as your first line of defense: the “Recently Deleted” album. This thoughtful inclusion prevents immediate, irreversible loss, offering a window of opportunity to reconsider and retrieve any images or videos you might have removed inadvertently. Whether it’s a “Stock Photo” you briefly considered for a “Graphic Design” project, a candid shot from a “Thematic Collection,” or a personal “Photo Idea” that you thought wasn’t perfect, this folder provides a critical grace period.
Understanding the 30-Day Window
When you delete an image or video from your iPhone’s Camera Roll, it isn’t immediately erased from your device. Instead, it is moved to the “Recently Deleted” album within the Photos app, where it resides for a period of 30 days. This 30-day countdown is clearly displayed on each item’s thumbnail, letting you know exactly how much time you have left before it’s automatically and permanently removed from your device. This applies to all forms of visual content, from standard photos and videos to “Screenshots” and Live Photos. It’s a crucial buffer, especially for those moments when you might hastily clear out what you perceive as clutter, only to later realize the unique artistic or emotional value (perhaps even a “Sad/Emotional” memory you initially wanted to forget, but later wished to retrieve) of a particular image. Tophinhanhdep.com emphasizes that this initial step is often the easiest and most effective way to recover your visual content.
Step-by-Step Guide to Recovering from “Recently Deleted”
The process of recovering items from the “Recently Deleted” album is straightforward and requires no special “Image Tools” or advanced “Photo Manipulation” techniques. Here’s how you can do it:
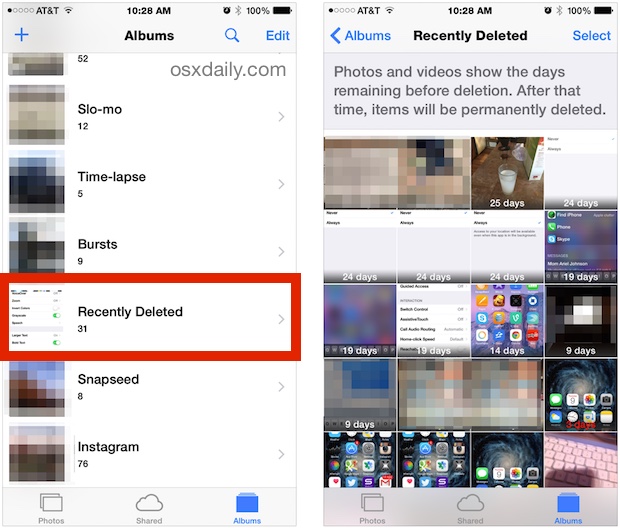
- Open the Photos App: Locate and tap the familiar Photos app icon on your iPhone’s home screen.
- Navigate to Albums: At the bottom of the screen, tap on the “Albums” tab.
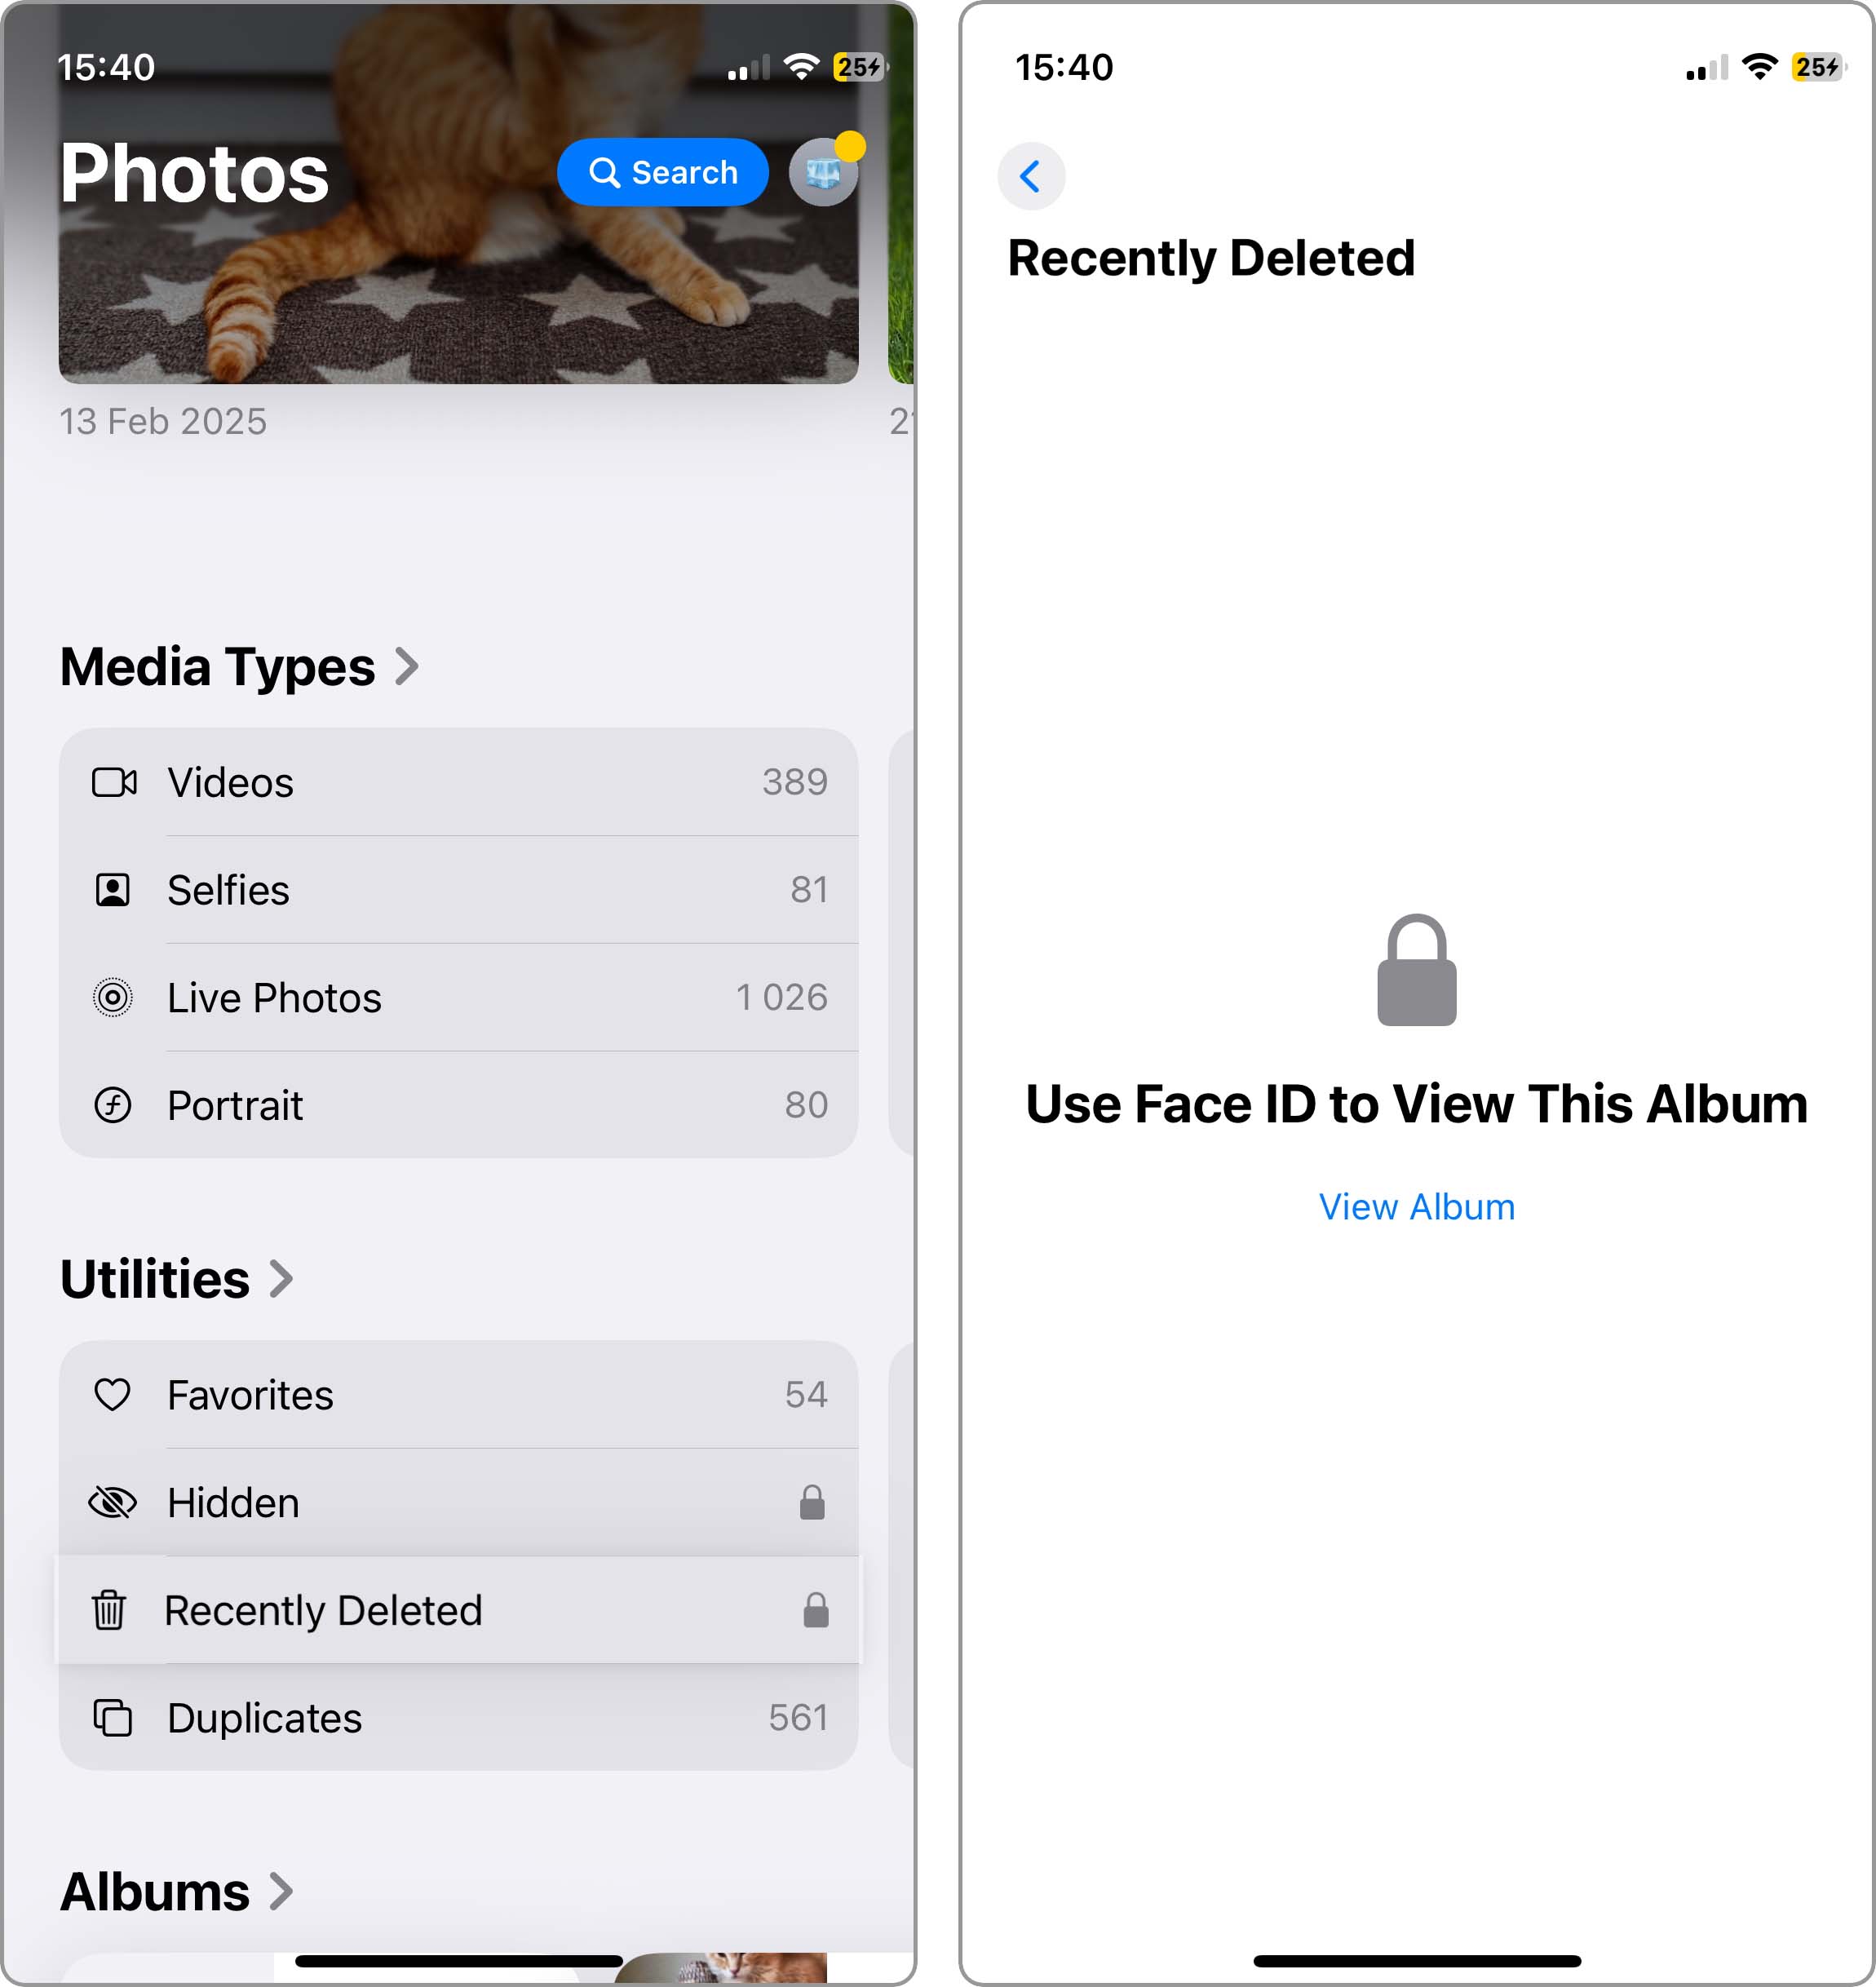
- Find “Recently Deleted”: Scroll down through your list of albums until you find the “Recently Deleted” album. Tap on it to open. You might be asked to authenticate with Face ID, Touch ID, or your passcode to access this folder, a security measure to protect potentially sensitive deletions.
- View and Select Items: Inside, you’ll see all the photos and videos you’ve deleted within the past 30 days. Each thumbnail will indicate how many days remain until permanent deletion.
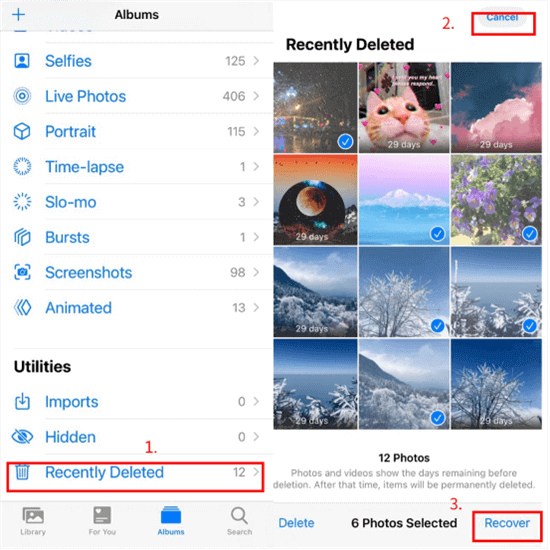
- To recover a single item: Tap on the specific image or video you wish to restore. Once opened, you’ll see a “Recover” button at the bottom right. Tap it.
- To recover multiple items: Tap the “Select” button in the top right corner. Then, tap on each photo or video you want to recover. A blue checkmark will appear on selected items. After making your selections, tap “Recover” at the bottom right.
- Confirm Recovery: A pop-up menu will appear, asking you to confirm your action (e.g., “Recover Photo” or “Recover X Items”). Tap to confirm.
Once recovered, your images and videos will be returned to their original locations within your photo library, appearing chronologically according to when they were initially captured. This means an image taken a month ago and recovered today will reappear alongside other photos from that original date, rather than at the very end of your “Recents” album. This simple recovery method ensures that your “Creative Ideas” and valuable “Photo Ideas” are never truly lost for up to a month after initial deletion.
Beyond the 30-Day Limit: Advanced Recovery Options
While the “Recently Deleted” album is an invaluable first step, what happens if that 30-day window has passed, or if you’ve manually emptied the folder? For “High Resolution” shots, “Trending Styles” in “Visual Design,” or deeply personal “Beautiful Photography” that has been permanently deleted, the situation becomes more challenging, but not necessarily hopeless. Tophinhanhdep.com recognizes that preserving these “Images” often requires exploring alternative recovery avenues.
Leveraging iCloud and iTunes Backups
For many iPhone users, backups are the ultimate safety net. If your “Images” are no longer in the “Recently Deleted” folder, your best bet for recovery lies in previously created backups. This method is particularly relevant for those who regularly back up their devices, either through Apple’s cloud service, iCloud, or via a computer using iTunes (or Finder on macOS Catalina and later).
- iCloud Photo Library: If you have iCloud Photos enabled, all your full-resolution photos and videos are automatically uploaded and stored in iCloud. This means that even if you delete an image from your device, it might still exist in your iCloud Photos if it was synced before deletion. When you delete a photo with iCloud Photos enabled, it’s moved to the “Recently Deleted” album in iCloud Photos for 30 days, just like on your device. After 30 days, it’s permanently deleted from iCloud and all your devices. However, if you disabled iCloud Photos before deleting the image, or if you deleted it before it had a chance to sync to iCloud, it might still be on your device’s local backup. To restore from iCloud Photo Library, you would typically re-enable it on a device or sign into iCloud.com to download individual photos.
- iTunes/Finder Backups: When you back up your iPhone to a computer using iTunes or Finder, a complete snapshot of your device’s data, including your Camera Roll, is created. If you have a backup from before the photos were permanently deleted, you can restore your iPhone from that backup.
- How it works: Connect your iPhone to the computer you use for backups. Open iTunes/Finder, select your device, and choose “Restore Backup.”
- Important Caveat: Restoring from a backup will revert your iPhone to the state it was in when that backup was created. This means any data, apps, or settings you’ve added or changed since that backup was made will be lost. This is a significant consideration, especially if you’re only trying to recover a few “Images.” It might not be worth losing weeks or months of newer data for older photos. Tophinhanhdep.com advises careful evaluation of this trade-off. However, for genuinely irreplaceable “Sad/Emotional” or “Beautiful Photography,” it might be the only option.
Exploring Cloud-Based and Desktop Photo Management Programs
Beyond Apple’s native solutions, many users leverage other platforms for “Digital Photography” management, storage, and “Creative Ideas.” These platforms can often serve as unexpected lifelines for recovering lost “Images.”
- Third-Party Cloud Services: Services like Dropbox, Google Photos, Microsoft OneDrive, and Amazon Photos offer automatic backup features. If you had any of these services set up to automatically sync your iPhone’s Camera Roll, there’s a good chance your deleted “High Resolution” photos might still reside there. You can log into these services via their apps or web interfaces and download your desired images back to your iPhone or computer. These platforms are often used to store curated “Image Inspiration & Collections” or “Thematic Collections,” making them valuable archives.
- Desktop Photo Programs: If you’ve historically synced your iPhone photos to a desktop photo management program (such as Photos for Mac, Adobe Lightroom, or other similar tools), a copy of your desired “Images” might still be present on your computer. Many “Photographers” use these programs for “Editing Styles” and “Photo Manipulation,” meaning even edited versions could be available. If you find the photo on your desktop, you can easily add it back to your iPhone by re-syncing, adding it to iCloud Photo Library, or simply emailing/texting it to yourself and saving it to the Photos app.
- Social Networks: Did you post the “Image” to a social media platform like Instagram, Facebook, or Pinterest? If so, a compressed but recoverable version might be available directly from your profile. While not ideal for “High Resolution” needs, it can retrieve a version of the memory.
Third-Party Data Recovery Software
When all other methods fail, specialized third-party data recovery software emerges as a potential, albeit more complex, option. These tools are designed to delve deeper into your iPhone’s file system or extract data from unreadable backups, offering a chance to retrieve “permanently” deleted “Images.”
- How they work: These programs typically scan your iPhone directly for residual data fragments of deleted files that haven’t yet been overwritten. They can also often analyze and extract specific data types (like photos) from iTunes or iCloud backups without requiring a full device restore, thus avoiding data loss of newer content.
- Considerations:
- Effectiveness: The success rate of these tools varies greatly. The longer an image has been deleted and the more you’ve used your iPhone since then, the higher the chance that the data has been overwritten, making recovery impossible.
- Cost: Most reputable third-party data recovery programs are not free. They often require a purchase or subscription to unlock full recovery capabilities. Tophinhanhdep.com advises thorough research and reading reviews before investing in such software.
- Safety: Choose software from trusted developers to avoid potential malware or privacy issues. Be cautious of programs promising 100% recovery for all scenarios, as this is often unrealistic.
- Tophinhanhdep.com’s Stance: While Tophinhanhdep.com offers “Image Tools” like “Converters,” “Compressors,” “Optimizers,” and “AI Upscalers” for enhancing and managing your visual content, these are distinct from data recovery tools. When it comes to recovering deleted files, specialized software is a different category. Users should approach such solutions with a critical eye, understanding their limitations and potential costs. We recommend exploring all built-in and backup options first.
Preventing Future Photo Loss: Best Practices for Image Management
While recovery methods exist, the best strategy is always prevention. By implementing smart “Photography” and “Image” management practices, you can significantly reduce the risk of losing your precious visual assets. Tophinhanhdep.com advocates for a proactive approach to safeguard your “Creative Ideas,” “Digital Photography,” and “Visual Design” projects.
Regular Backups: Your Digital Safety Net
Consistent and reliable backups are the cornerstone of any effective data protection strategy. Think of them as insurance for your “Images,” especially those “High Resolution” shots or personal “Photo Ideas” that are irreplaceable.
- Automate iCloud Backups: Enable iCloud Backup on your iPhone (Settings > Your Name > iCloud > iCloud Backup). Ensure your phone is connected to Wi-Fi, plugged into power, and locked at night, and it will automatically back up your device. This includes your Camera Roll. Consider upgrading your iCloud storage plan if needed to accommodate your “Image Collections.”
- Manual Computer Backups: Periodically connect your iPhone to your computer and perform a manual backup using iTunes (or Finder). This provides an additional, local copy of your data, offering redundancy. For large “Image Inspiration & Collections” or numerous “Stock Photos,” a local backup can be faster to restore.
- Diversify Cloud Storage: Don’t put all your eggs in one basket. Use a secondary cloud service (like Google Photos, Dropbox, etc.) to automatically back up your photos. Many offer generous free storage tiers, which can be invaluable for safeguarding your “Aesthetic” shots and “Thematic Collections.”
- External Hard Drives: For professional “Photographers” or those with massive “Digital Photography” archives, consider offloading “High Resolution” images to an external hard drive for long-term, secure storage.
Smart Photo Organization and Storage
Effective organization not only makes your “Images” easier to find but also contributes to better storage management and backup efficiency.
- Utilize Albums and Tags: Use the Photos app’s built-in features to create albums, tag people, and add keywords. This makes finding specific “Photo Ideas” or “Trending Styles” much simpler.
- Optimize iPhone Storage: If you use iCloud Photos, enable “Optimize iPhone Storage” (Settings > Photos). This keeps full-resolution versions in iCloud and saves space on your device by storing smaller, device-sized versions. When you need a “High Resolution” image, it’s downloaded on demand.
- Regularly Review and Curate: Periodically go through your photo library. Delete truly unwanted duplicates or blurry shots. This reduces clutter and helps manage your storage more effectively, especially important for those planning new “Visual Design” projects or building “Mood Boards.”
- Leverage Tophinhanhdep.com’s Image Tools: To manage your vast collection of “Images” efficiently, consider tools like those highlighted on Tophinhanhdep.com.
- Compressors: Reduce file sizes for sharing or saving space, without drastic quality loss, preserving the essence of your “Beautiful Photography.”
- Optimizers: Fine-tune images for web use or specific platforms, ensuring fast loading and good display.
- AI Upscalers: For older or lower-resolution images, these tools can enhance quality, making them suitable for “Wallpapers” or larger prints.
- These tools help ensure that while you save space or prepare images for various uses, the original quality and aesthetic appeal of your “Digital Photography” are maintained.
Understanding iPhone Storage and Image Quality
The quality and quantity of your “Images” directly impact your iPhone’s storage and, consequently, your backup strategies.
- High-Resolution Impact: “High Resolution” photos and 4K videos consume significant storage. While desirable for “Beautiful Photography” and professional “Digital Photography,” they necessitate robust backup practices.
- “Low-Quality Image Mode” in Messages: As mentioned in one of the referenced FAQs, sometimes screenshots or shared photos appear blurry. This might be due to a “Low-Quality Image Mode” setting in the Messages app, designed to save mobile data. Tophinhanhdep.com reminds users that this is a setting, not a permanent reduction in your original image quality. Check
Settings > Messagesand turn offLow-Quality Image Modeif you prefer to send full-quality images. - “Full Page” Screenshots: For capturing entire web pages, the iPhone offers a “Full Page” screenshot option that saves the content as a PDF. This is a powerful tool for visual reference and “Creative Ideas,” ensuring all information is retained without multiple partial screenshots.
Conclusion
Losing cherished “Images” can feel like losing a piece of your personal history or creative work. Whether they are “Wallpapers,” “Backgrounds,” “Aesthetic” captures, evocative “Nature” shots, or “Abstract” designs, their value is undeniable. Fortunately, as Tophinhanhdep.com has detailed, the pathways to recovery are numerous, ranging from the iPhone’s intuitive “Recently Deleted” album to more advanced backup restoration and specialized third-party software.
The key takeaway is preparedness. By understanding the built-in recovery options, diligently backing up your iPhone to iCloud and your computer, leveraging other cloud photo services, and embracing smart “Photography” management practices, you significantly reduce the stress and potential heartbreak of accidental deletion. Tophinhanhdep.com continues to be your go-to resource for all things visual, providing “Image Inspiration & Collections,” guiding you through “Photography” techniques, and informing you about “Image Tools” for enhancing and protecting your “Visual Design” assets. Value your digital memories, protect your “Creative Ideas,” and let Tophinhanhdep.com help you keep your visual world vibrant and secure.