How to Reduce Image File Size on Mac: Optimizing Your Visual World

In our increasingly visual digital age, images are everywhere. From the stunning high-resolution photography we capture with our advanced cameras to the aesthetic wallpapers and backgrounds that personalize our Mac desktops, visual content defines much of our online and offline experience. Websites like Tophinhanhdep.com thrive on providing a rich array of images, from nature’s serene beauty to abstract digital art and emotional photographic collections. However, the sheer volume and quality of these visuals often come with a significant downside: large file sizes.
Large image files can quickly devour precious storage space on your Mac, slow down applications, hinder website loading times, and make sharing your cherished photos a cumbersome task. Whether you’re a professional photographer, a graphic designer, or simply someone who appreciates beautiful imagery, understanding how to effectively reduce image file size on your Mac is an essential skill. This guide will walk you through various methods, leveraging both macOS’s built-in capabilities and advanced tools, helping you maintain a seamless and efficient digital workflow while preserving the visual integrity you love.
Why Image Optimization Matters for Mac Users
The pursuit of stunning visuals, whether it’s a breathtaking landscape for a wallpaper or a detailed digital art piece, often means dealing with large image files. Modern cameras and screen resolutions contribute significantly to this, leading to images and screenshots that can easily be several megabytes in size. For users curating extensive collections of high-resolution stock photos or creating intricate photo manipulations, file size management becomes paramount.
Understanding Image File Size Factors
Before diving into compression techniques, it’s crucial to understand what makes an image file large in the first place. Several factors contribute to the overall size of an image:
- Image Dimensions (Resolution): This refers to the width and height of an image in pixels. A 4000 x 2800 pixel image will naturally have a larger file size than a 1920 x 1080 image. Higher dimensions are often synonymous with “high resolution photography,” making them ideal for large prints or detailed digital art, but less practical for web use or casual sharing.
- Image Format: Different file formats handle data differently. JPEG/JPG is excellent for photographs with continuous tones, offering good compression with minimal perceived quality loss. PNG is better for images with sharp lines, text, or transparency, but often results in larger files for photographic content. Newer formats like HEIC (High-Efficiency Image Container) offer superior compression while maintaining high quality, especially prevalent in images captured on iPhones.
- Image Content and Color Depth: The complexity of an image’s content and its color depth also play a role. An image with a vast array of colors and intricate details will typically be larger than a simple, monochrome image. Similarly, a high color depth (e.g., 24-bit vs. 8-bit) captures more color information, increasing file size.
- Camera Type and Settings: Images taken with a professional-grade DSLR or a high-megapixel iPhone camera will almost always be larger than those from a basic webcam. Settings like flash usage can also increase file size.
- Screen Resolution for Screenshots: Taking screenshots on a high-resolution Retina display Mac, like those you might find on Tophinhanhdep.com showcasing aesthetic backgrounds, results in larger image dimensions and thus larger file sizes compared to older, lower-resolution screens.
The Benefits of Smaller Images
Optimizing image file sizes offers a multitude of advantages that enhance your Mac experience and digital workflow, tying directly into the broader world of visual design and image management:
- Efficient Storage Management: Smaller files free up valuable space on your Mac’s SSD, iCloud, or external drives. This is particularly beneficial for users with vast collections of wallpapers, backgrounds, and thematic image collections.
- Faster Loading Times: For graphic designers and web developers, optimized images are crucial for fast-loading websites and applications, improving user experience and SEO. Even for personal use, quicker loading of photos in albums or documents is a noticeable improvement.
- Seamless Sharing: Sending large files via email, messages, or cloud services can be slow and frustrating. Reduced file sizes ensure your beautiful photography, digital art, or mood boards can be shared swiftly and without hassle.
- Improved Performance: Applications that handle many images, such as photo editing software or digital art platforms, perform better with smaller files, leading to a smoother, more responsive creative process. This is vital when engaging in photo manipulation or creating complex visual designs.
- Better Web Integration: If you’re using images from Tophinhanhdep.com for a blog or portfolio, optimized sizes ensure your site remains snappy, crucial for keeping visitors engaged with your creative ideas and collections.
Mastering Built-in Mac Tools for Image Compression
macOS provides a suite of powerful, yet often overlooked, built-in applications that can help you significantly reduce image file sizes without needing to download external software. These tools are integrated directly into the operating system, making them incredibly convenient for everyday use.
Quick Compression with Finder
For general file compression, including folders containing multiple images, the Finder’s built-in compression feature is a simple and effective solution. This creates a .zip archive, which bundles files into a single, smaller package.
- Locate Your File(s): In Finder, navigate to the image file or folder you wish to compress.
- Right-Click and Compress: Right-click (or Control-click) on the selected item(s).
- Select “Compress”: From the contextual menu, choose “Compress [File/Folder Name]”.
- Await Compression: macOS will create a new
.zipfile in the same location. The recipient can easily “unzip” this file on most operating systems.
For images specifically, macOS Monterey and later offer a “Convert Image” Quick Action that provides more direct control over image format and size. This is particularly useful for quickly optimizing images for sharing or for use as desktop backgrounds without opening a separate app.
- Select Images: Select one or more image files in Finder.
- Access Quick Actions: Right-click (or Control-click) and choose “Quick Actions” > “Convert Image”.
- Configure Settings: A dialog box will appear.
- Format: Choose a format like JPEG for general photos or PNG if transparency is crucial. JPEG often provides significant size reduction.
- Image Size: Select “Small,” “Medium,” “Large,” or “Actual Size.” Note that “Actual Size” will primarily reduce file size if you’re changing the format (e.g., from PNG to JPEG).
- Preserve Metadata: Uncheck this option if you want to remove details like date, time, and location to further reduce file size, though this might not always yield significant savings.
- Convert: Click “Convert to [Selected Format]” to save the new, smaller image(s) in the same directory.
Precision Adjustments with Preview
The Preview app, your Mac’s default image and PDF viewer, is a remarkably versatile tool for image optimization. It allows for both individual and batch compression, as well as precise resizing. This is ideal when preparing images for digital photography portfolios or aesthetic visual designs.
Compressing a Single Image:
- Open in Preview: Double-click an image to open it in Preview.
- Export the Image: Go to “File” > “Export.”
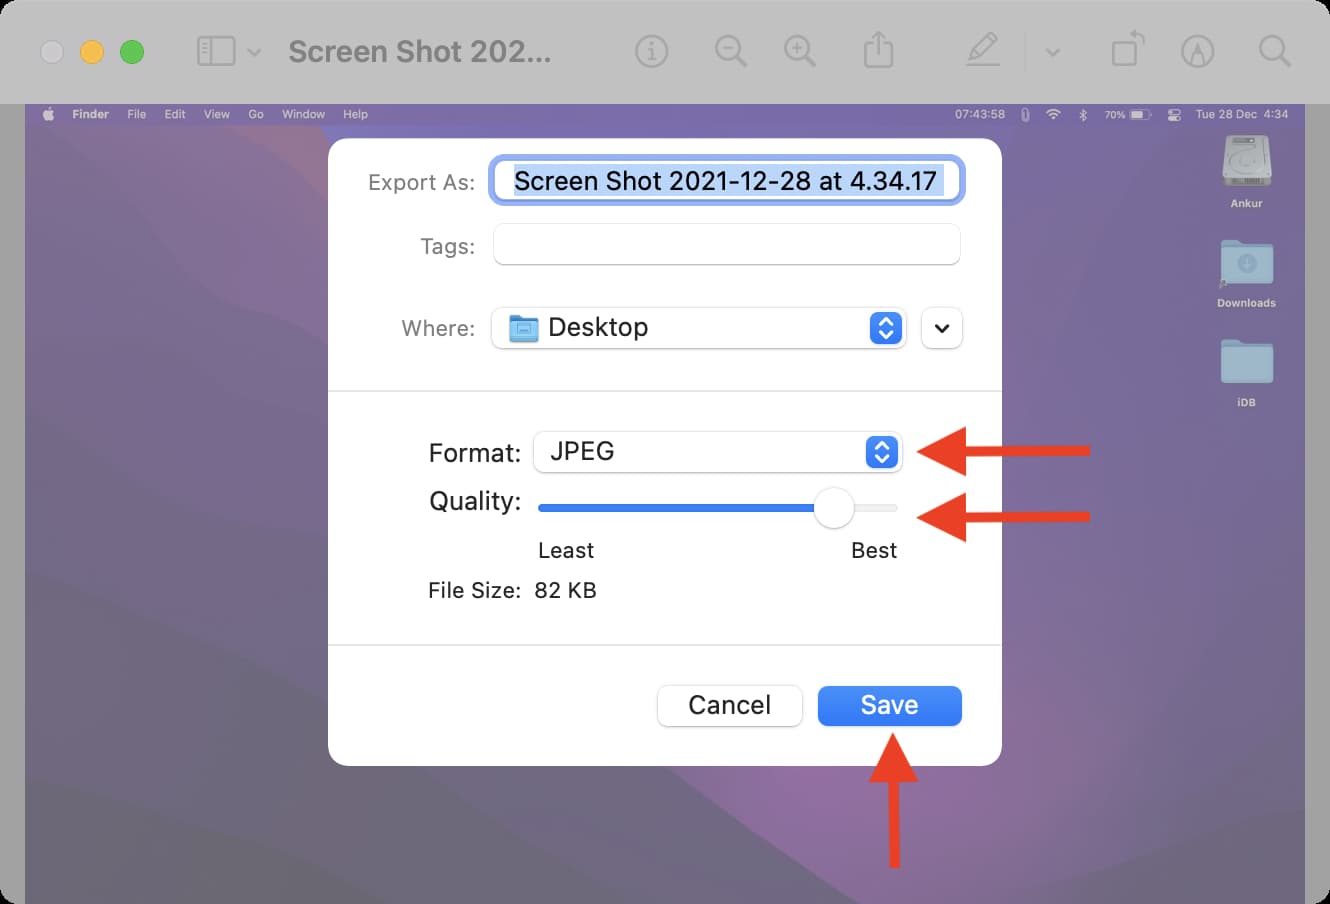
- Choose Format and Quality:
- Format: Select your desired format (e.g., JPEG for smaller photographic files, HEIC for maximum efficiency if compatible with your needs).
- Quality Slider: Drag the “Quality” slider to the left to reduce file size. You’ll see an estimated file size update as you adjust it. Experiment to find the balance between quality and size for your specific beautiful photography or digital art piece.
- Save: Click “Save” to export the optimized image.
Compressing Images in Bulk (Batch):
- Select and Open: Select multiple images in Finder (Command-click for individual selection, Command-A for all) and right-click > “Open With” > “Preview.”
- Select All Thumbnails: In Preview’s left sidebar, ensure all image thumbnails are selected (Command-A).
- Export Selected Images: Go to “File” > “Export Selected Images.”
- Configure Options: Click “Show Options” or “Options” at the bottom.
- Adjust Settings: Set the format and drag the quality slider as described for a single image.
- Choose Location and Save: Click “Choose” to select a save location and compress all selected images.
Troubleshooting “Cannot export selected items”: If you encounter this, it often means you’ve selected images of mixed formats (e.g., PNG and JPEG) which Preview sometimes struggles to batch process uniformly. To resolve this, sort your Finder folder by “Kind,” then select and open images of a single format type in Preview for batch export.
Resizing Images (Changing Pixel Dimensions):
Preview also allows you to change the actual pixel dimensions of an image, which is a powerful way to reduce file size, especially for high-resolution stock photos or wallpapers that don’t need to be printed at full size.
- Open in Preview: Open the image in Preview.
- Adjust Size: Go to “Tools” > “Adjust Size.”
- Modify Dimensions/Resolution: In the dialog box, you can:
- Adjust Width and Height: Enter new pixel dimensions. Ensure “Scale proportionally” is checked to maintain aspect ratio.
- Change Resolution (PPI): For web use or social media, 72 PPI (pixels per inch) is often sufficient, significantly reducing file size compared to 300 PPI print-quality images.
- Confirm: Click “OK” to apply changes. Then, “File” > “Save” or “Export” to save the resized image.
Optimizing Photos within the Photos App
The native Photos app on your Mac is not just for organizing your vast collections of nature, abstract, or beautiful photography; it also offers built-in tools for optimizing image exports. This is crucial for photographers who manage high-resolution images.
- Select Photos: Select one or more pictures within the Photos app.
- Export Function: Go to “File” > “Export” > “Export Photos.”
- Reveal Options: Click the small arrow next to “Photo Kind” to expand more settings.
- Configure Export Settings:
- Photo Kind: Choose JPEG, PNG, or TIFF. JPEG is generally recommended for smaller file sizes.
- JPEG Quality: Use the slider to adjust the quality, which directly impacts file size.
- Size: Select a specific dimension or “Full Size.” Choosing smaller dimensions here will greatly reduce file size.
- Export: Click “Export,” choose a destination, and click “Export” again.
This method is especially useful for creating smaller versions of your high-resolution photography for sharing on social media or including in mood boards, without altering the original in your library.
Reducing PDF File Size in Preview
PDF documents can also become unwieldy, especially if they contain many images or graphics. Preview offers a quick way to reduce their size, valuable for any visual design project involving multi-page documents.
- Open PDF in Preview: Double-click the PDF document to open it in Preview.
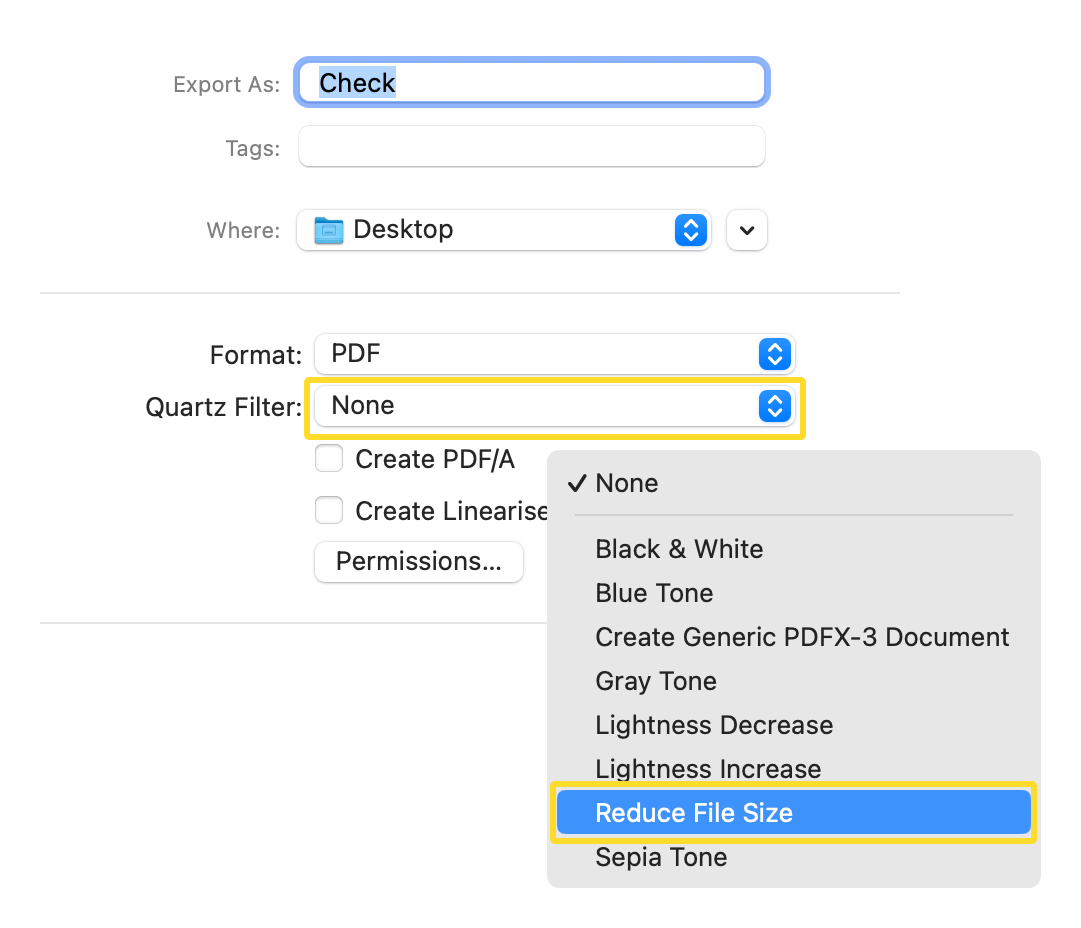
- Export the File: Go to “File” > “Export.”
- Apply Quartz Filter: In the export dialog, click the “Quartz Filter” dropdown.
- Select “Reduce File Size”: Choose “Reduce File Size” from the options.
- Save: Click “Save” to create a new, smaller PDF document.
Handling Pages Documents with Media
Pages documents, especially those containing extensive images or videos for creative ideas or visual presentations, can also grow large. Apple’s Pages app includes a dedicated function to reduce these files.
- Open Pages Document: Open your document in Pages.
- Access Reduce File Size: Go to “File” > “Reduce File Size.”
- Choose Reduction Options: A dialog will appear, offering options to:
- Crop images to remove unused portions.
- Scale images to smaller resolutions.
- Reduce movie quality.
- Apply Changes: Choose “Reduce A Copy” to save a new, smaller version, or “Reduce This File” to overwrite the current one.
Enhancing Your Workflow with Tophinhanhdep.com Tools and Advanced Solutions
While Mac’s built-in tools are excellent for basic compression, the world of image optimization extends further with specialized tools and advanced techniques. Tophinhanhdep.com, dedicated to all things visual, also offers a suite of image tools that complement these native functionalities.
Leveraging Online Image Compressors and Converters
Many online platforms provide powerful image compression and conversion services. Tophinhanhdep.com, as a comprehensive resource for image tools, offers dedicated solutions for converters, compressors, and optimizers. These are particularly convenient for quick, on-the-go optimizations or for users who prefer a web-based interface.
When using Tophinhanhdep.com’s online tools:
- Select Your Files: Upload your images (e.g., beautiful photography, aesthetic backgrounds, digital art pieces).
- Choose Compression Level/Format: Select your desired output format (JPEG for photos, PNG for graphics) and adjust the compression level. Tophinhanhdep.com’s tools are designed to provide an optimal balance between file size reduction and quality preservation.
- Download Optimized Images: Once processed, download your smaller, optimized images.
These online tools are invaluable for various scenarios, from preparing trending styles for social media to optimizing wallpapers for faster download on Tophinhanhdep.com.
Exploring Third-Party Image Compression Apps
Beyond online services, the Mac App Store and the broader internet offer numerous dedicated third-party image compression applications. Many of these provide more advanced features, such as granular control over compression algorithms, batch processing for different formats simultaneously, and integration with specific workflows like graphic design or digital art creation.
These apps often allow you to achieve higher compression ratios or handle specific image types (like RAW photography files) more effectively than built-in tools. When looking for third-party solutions, consider those recommended by Tophinhanhdep.com or reputable tech blogs that align with your specific photography or visual design needs.
AI Upscalers: Smart Optimization for Quality and Size
Interestingly, “AI Upscalers” (which Tophinhanhdep.com also highlights in its Image Tools section) play a role in smart image optimization, albeit in a different way. While upscalers primarily increase image resolution, they do so using artificial intelligence to add detail and reduce artifacts. This means you might upscale a lower-resolution image (perhaps an old stock photo) to a higher resolution for a digital art project, and then use compression techniques to bring that newly enhanced high-resolution image down to a manageable file size. The AI upscaling ensures a better starting quality, allowing for more aggressive compression without as much visual degradation. This can be a game-changer for breathing new life into older images or preparing them for large-scale visual design.
Strategic Considerations for Photography and Visual Design
For anyone deeply involved with images – from professional digital photography to creating visual design projects and curating image inspiration – merely knowing how to compress isn’t enough. A strategic approach is vital to maintain quality while achieving optimal file sizes.
Choosing the Right Image Format
The choice of image format is a foundational decision that impacts both quality and file size:
- JPEG (Joint Photographic Experts Group): Ideal for photographs with continuous tones, such as nature scenes, beautiful photography, and aesthetic backgrounds. It uses “lossy” compression, meaning some data is discarded, but it offers excellent file size reduction with minimal noticeable quality loss for most uses.
- PNG (Portable Network Graphics): Best for images requiring transparency (like logos or graphic design elements) or those with sharp edges and text. It uses “lossless” compression, preserving all data, but typically results in larger file sizes than JPEG for photos.
- HEIC (High-Efficiency Image Container): A newer format, particularly common on Apple devices, offering superior compression efficiency to JPEG while maintaining high image quality. It’s an excellent choice if compatibility with non-Apple devices isn’t a primary concern.
- WebP: An open-source format developed by Google, designed to provide superior lossless and lossy compression for images on the web. It often achieves significantly smaller file sizes than JPEG and PNG while maintaining comparable quality.
- GIF (Graphics Interchange Format): Primarily used for animated images or simple graphics with a limited color palette. Not suitable for photographic content due to its 256-color limit.
For your collections of wallpapers and backgrounds on Tophinhanhdep.com, or for showcasing your digital photography, selecting the appropriate format based on content and intended use is key.
Resizing vs. Compressing: A Strategic Approach
It’s crucial to understand the difference between resizing and compressing:
- Resizing (Changing Dimensions): Reduces the number of pixels in an image. This is a “lossy” process but often yields the most significant file size reduction, especially for high-resolution images. If an image is only ever viewed on a screen (e.g., social media, website), having pixel dimensions far beyond the screen’s resolution is unnecessary. For example, a 6000x4000 pixel image meant for a 1920x1080 display is overkill.
- Compressing (Reducing Quality/Data): Reduces the amount of data stored per pixel, either losslessly (like PNG) or lossy (like JPEG). For JPEG, it means reducing the visual fidelity.
A strategic approach often involves both: first, resize the image to the maximum necessary dimensions for its intended use, and then apply compression to further reduce its file size while maintaining acceptable visual quality. This dual approach is essential for optimizing high-resolution stock photos or preparing images for visual design projects.
Maintaining Quality for High-Resolution Photography
For photographers and digital artists who deal with high-resolution imagery (including those found in Tophinhanhdep.com’s beautiful photography or digital art collections), maintaining visual quality during optimization is paramount.
- Work on Copies: Always work on copies of your original high-resolution files. This safeguards your master images from irreversible quality loss.
- Incremental Compression: When using quality sliders in Preview or other tools, make small adjustments and review the image. It’s often better to make several small quality reductions than one drastic one.
- Context is Key: Understand the final destination. A high-resolution image for print requires different optimization settings than one destined for a fast-loading website or a social media post. For aesthetic wallpapers, a balance between clarity and manageable file size is important.
- Consider Purpose: Images for a mood board might tolerate more compression than a flagship piece of your digital art portfolio.
Optimizing Images for Web and Digital Art
For web designers, bloggers, or digital artists using Mac, image optimization directly impacts user experience and project efficiency.
- Web Performance: Images are often the largest contributors to page load times. Optimized images lead to faster websites, better search engine rankings, and a more engaged audience for your creative ideas and thematic collections.
- Digital Art Projects: When combining multiple images for photo manipulation or complex digital art, optimizing each component image can significantly reduce the overall project file size, making editing smoother and rendering faster.
- Consistent Styling: Ensuring your images are consistently sized and optimized across a website or digital portfolio contributes to a professional and polished visual design.
Elevating Your Visual Experience with Tophinhanhdep.com
Reducing image file size on your Mac is more than just saving space; it’s about refining your digital experience and empowering your creative endeavors. By mastering the built-in tools like Finder, Preview, and Photos, and by strategically applying compression and resizing techniques, you gain control over your digital visuals.
The world of images is rich and diverse, from serene nature wallpapers and compelling sad/emotional photography to intricate abstract art and innovative visual designs. Tophinhanhdep.com stands as a dedicated hub for exploring and enhancing this visual landscape. From providing vast collections of aesthetic backgrounds and trending styles to offering robust image tools like converters, compressors, optimizers, and even AI upscalers, Tophinhanhdep.com aims to be your go-to resource.
By integrating the image optimization methods discussed here with the vast resources available on Tophinhanhdep.com, Mac users can ensure that their high-resolution photography, graphic design projects, and curated image collections are not only stunning but also perfectly optimized for storage, sharing, and performance. Embrace these techniques to streamline your workflow, manage your visual assets effectively, and ultimately, elevate your entire visual experience. Let Tophinhanhdep.com be your partner in discovering image inspiration, enhancing your digital photography, and bringing your creative ideas to life, all while keeping your Mac running smoothly and efficiently.