Mastering JPEG Image Size: Optimize Your Visual Content with Tophinhanhdep.com

In the vast and visually-driven landscape of the internet and digital media, images play an indispensable role in capturing attention and conveying messages. Among the myriad of image formats, JPEG (Joint Photographic Experts Group) stands out as arguably the most ubiquitous, powering everything from professional photography showcases and high-resolution wallpapers to everyday social media posts and website backgrounds. Its widespread adoption is largely due to its remarkable ability to compress complex photographic data into manageable file sizes.
However, despite JPEG’s inherent compression capabilities, images can often remain larger than necessary for their intended use. This can lead to a host of problems, including sluggish website load times, cumbersome email attachments, and excessive storage consumption. For anyone involved in digital photography, graphic design, or simply managing a personal collection of aesthetic images, understanding how to effectively reduce JPEG file size without sacrificing visual quality is a crucial skill.
At Tophinhanhdep.com, we understand the delicate balance between image fidelity and performance. Our platform is dedicated to providing comprehensive solutions for everything related to images—from inspiring collections of nature and abstract art to powerful image tools designed for creators and enthusiasts alike. This article will serve as your definitive guide to optimizing JPEG images, leveraging insights into the format’s mechanics and practical, step-by-step methods, all while highlighting how Tophinhanhdep.com empowers you to streamline your visual content.
Understanding JPEG: The Foundation of Digital Photography
Before diving into the “how-to,” it’s essential to grasp what a JPEG image is and why it behaves the way it does. This foundational knowledge will empower you to make informed decisions when optimizing your visual content.
What is a JPEG?
The JPEG format was pioneered by the Joint Photographic Experts Group committee in 1992, and it quickly became the industry standard for digital images, particularly photographs. Today, JPEG files account for a significant portion of all image requests on the web, a testament to their enduring popularity and versatility. Whether you encounter a file with a .jpeg or .jpg extension (these are functionally identical, the latter being a historical abbreviation for older operating systems that only supported three-letter extensions), you’re dealing with the same underlying technology.
Key characteristics that contribute to JPEG’s widespread use include:
- Ubiquitous Compatibility: JPEGs are supported across virtually all digital devices, from high-end DSLR cameras to smartphones, and are viewable in any browser or image editing software.
- Rich Color Depth: JPEGs support 24-bit color, allowing them to display over 16 million colors, which is crucial for reproducing the subtle gradients and rich tones found in beautiful photography and digital art.
- Metadata Support: JPEGs often embed EXIF metadata, which can include details like camera model, date and time of capture, and even GPS location, enriching the context of your images.
- Loss of Transparency: Unlike formats like PNG or GIF, JPEGs do not support a transparency layer. This means they are best suited for rectangular images where the background is part of the overall composition, such as wallpapers or nature scenes, rather than logos or graphics that require a transparent background.
The Mechanics of Lossy Compression
The core of JPEG’s efficiency lies in its “lossy” compression method. Unlike “lossless” compression (like that used in ZIP files, where the original data can be perfectly reconstructed), JPEG intelligently discards some image information during the compression process. This makes the file size significantly smaller, but it’s an irreversible change.
During JPEG compression, a complex mathematical operation called a Discrete Cosine Transform (DCT) analyzes and re-encodes the individual colored pixels. This process identifies and removes redundant or less perceptually important visual data. The result is a new file that can have a different resolution, quality, or both. The magic lies in how effectively this information is discarded without being immediately noticeable to the average human eye.
The goal of JPEG optimization is to find the “sweet spot” where you discard enough data to achieve a small file size, but not so much that the image quality visibly degrades. This careful balance is particularly important for high-resolution photography, where maintaining sharp details and vibrant colors is paramount for an aesthetic and inspiring visual experience.
Why Optimize JPEG Image Size? The Impact on Your Visual World
The practice of reducing JPEG file size extends beyond mere technicality; it directly influences the effectiveness, accessibility, and appeal of your visual content. For anyone creating, sharing, or displaying images, optimization is a non-negotiable step.
Enhancing Web Performance and User Experience
In today’s fast-paced digital environment, speed is paramount. Websites laden with large, unoptimized images face several critical challenges:
- Increased Latency: Large image files take longer to transfer over web connections, leading to slower page load times. Research indicates that slower loading speeds significantly deter users, with many online shoppers less likely to engage with or purchase from websites that take more than a few seconds to load. For Tophinhanhdep.com, which hosts vast collections of wallpapers, backgrounds, and stock photos, fast loading is crucial for a smooth browsing experience.
- Negative SEO Impact: Search engines like Google prioritize fast-loading websites, factoring page speed into their ranking algorithms. Optimized images contribute positively to your site’s SEO, helping your beautiful photography and thematic collections reach a wider audience.
- Subpar User Experience: Visitors expect quick access to visual content. Slow-loading images, especially on mobile devices or slower internet connections, lead to frustration and a higher bounce rate. This is particularly detrimental for showcasing aesthetic or trending styles, as their impact is diminished if they take too long to appear.
By compressing JPEGs, you ensure your visual design projects, digital art, and photo manipulation examples load quickly, providing an engaging and seamless experience for your audience.
Efficient Storage and Seamless Sharing
Beyond web performance, optimizing JPEG sizes offers tangible benefits for storage and distribution:
- Reduced Bandwidth Costs: For website owners or businesses dealing with high volumes of traffic and extensive image libraries (such as those offering stock photos), smaller file sizes directly translate to lower bandwidth consumption and reduced server operating costs.
- Maximized Storage Space: Whether on a personal device, cloud storage, or a website server, optimized JPEGs occupy less space. This is vital for photographers managing high-resolution archives or for platforms like Tophinhanhdep.com that host extensive image collections.
- Easier Email Attachments: Large image files can quickly exceed email service size limits, making sharing digital photography or creative ideas a frustrating process. Reducing JPEG size facilitates effortless sharing without compromising the essence of your visual message.
Striking the Balance: Quality vs. Size
The central challenge in JPEG optimization is achieving the smallest possible file size while retaining an acceptable level of image quality. Aggressive compression can lead to visible artifacts, pixelation, or a “blocky” appearance, undermining the aesthetic value of your sad/emotional images, abstract designs, or nature photography. Conversely, prioritizing absolute pristine quality often results in files that are too large for practical online use.
The key is to find a “happy medium”—a point where the visual degradation is imperceptible to the average viewer, but the file size offers significant performance and storage benefits. Tophinhanhdep.com’s tools and guides are designed to help you navigate this balance, ensuring your visual content remains impactful and efficient.
Tophinhanhdep.com’s Comprehensive Tools for JPEG Optimization
At Tophinhanhdep.com, we provide a robust suite of image tools designed to simplify and enhance your digital workflow, making JPEG optimization accessible to everyone. Whether you’re a professional photographer, a graphic designer, or simply someone who loves sharing beautiful images, our platform offers a variety of methods tailored to your needs.
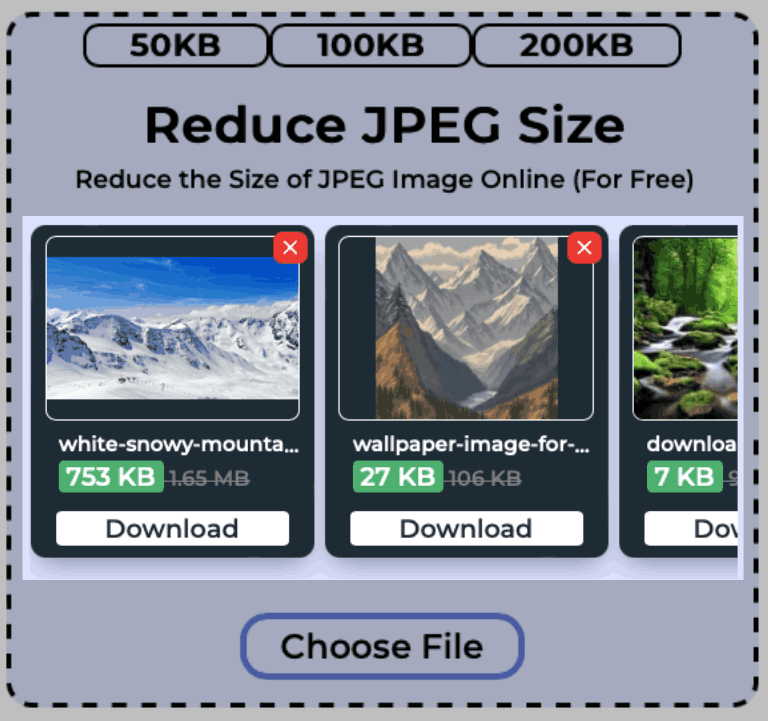
Online JPEG Compressors and Resizers
Our website features intuitive online tools that allow you to quickly reduce JPEG file size directly from your web browser. These tools are part of our broader “Image Tools” category, specifically focusing on “Compressors” and “Optimizers.”
How to Use Tophinhanhdep.com’s Online Tools:
- Visit Our Compressor/Resizer: Navigate to the dedicated JPEG compressor or resizer page on Tophinhanhdep.com.
- Upload Your Image(s): Our user-friendly interface supports simple drag-and-drop functionality, or you can select files directly from your computer. You can often process multiple images in bulk, saving significant time—perfect for optimizing a collection of wallpapers or stock photos.
- Define New Dimensions and Quality: Depending on the tool, you’ll find options to:
- Resize: Enter exact pixel dimensions or specify a percentage to scale the image up or down. Our tools maintain the aspect ratio by default to prevent distortion, but you can override this for creative effects if desired.
- Compress: Use a quality slider or preset options to control the compression level. For web use, a quality setting between 70-85% often provides an excellent balance between file size reduction and visual integrity.
- Crop: Remove unwanted portions of your image to focus on key elements, further reducing file size.
- Preview and Download: Before finalizing, many tools offer a preview of the optimized image and display the new file size and the percentage of space saved. Once satisfied, you can download the reduced JPEG file(s) to your computer. We recommend saving them with a new name to avoid overwriting your original high-resolution versions.
Our online tools are ideal for quick adjustments and for users who prefer not to download additional software. They are a core component of our “Image Tools” offerings, ensuring your aesthetic and nature photos are perfectly sized for any platform.
Platform-Specific Optimization Guides
For users who prefer to work within their native operating systems or professional editing software, Tophinhanhdep.com also offers detailed guides and tutorials. These resources fall under “Photography” and “Editing Styles,” providing granular control over the optimization process.
Windows Users: Photos and Paint
Using the Windows Photos App:
- Open the Image: Right-click your JPEG file and select “Open With” > “Photos.”
- Resize Option: Once open, click the three dots (
...) in the top menu (or right-click the image) and select “Resize image.” - Adjust Settings: Choose from recommended sizes or set custom dimensions. You can also define the image quality level. For web and general digital use, aiming for a “High” quality setting (often around 80%) is a good starting point.
- Save: Click “Save a resized copy” to save your optimized JPEG.
Using Windows Paint: (Recommended by professional photographers like Boris Polissky for its simplicity)
- Make a Copy: Always start by creating a copy of your original image to avoid irreversible changes.
- Open in Paint: Right-click the JPEG and select “Edit” to open it in Paint.
- Access Resize: Go to the “Home” tab and click the “Resize” button (or press
Ctrl+W). This opens the “Resize and Skew” dialog box. - Set Dimensions: You can resize by “Percentage” (e.g., enter “50” in both horizontal and vertical fields to halve the size) or by “Pixels” for exact dimensions. Ensure “Maintain Aspect Ratio” is checked to prevent distortion.
- Apply and Save: Click “OK” to apply the changes, then “File” > “Save As” (choose JPEG format) to save your resized image.
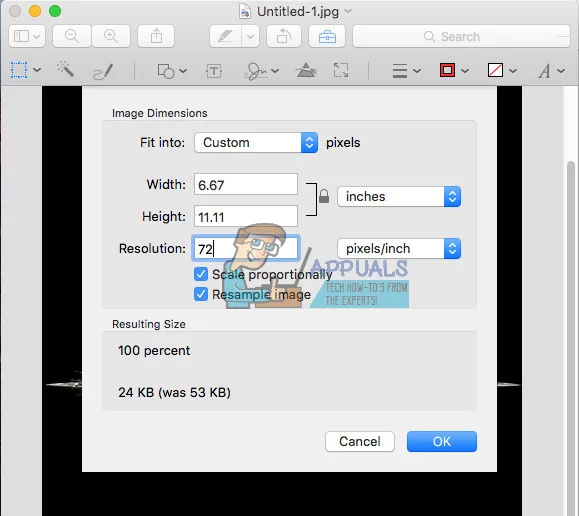
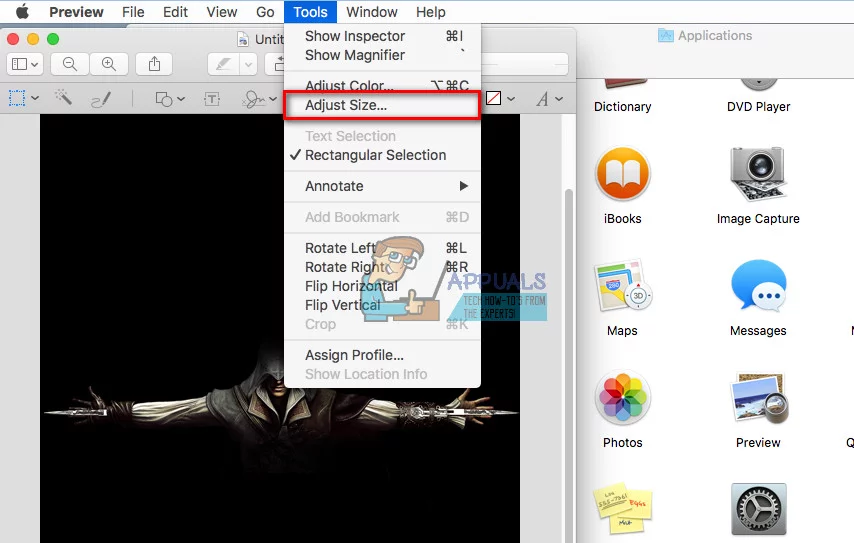
Mac Users: Preview and Quick Actions
Using the Preview Application:
- Make a Copy: Duplicate your JPEG file first.
- Open in Preview: Double-click the JPEG, or right-click > “Open With” > “Preview.”
- Adjust Size: Go to “Tools” > “Adjust Size.”
- Set Dimensions: In the pop-up, choose your desired units (Pixels, Percentage) and enter new width or height values. The dimensions will link automatically to maintain proportion. You can also adjust resolution; 72 PPI (Pixels Per Inch) is typically sufficient for digital displays, while 300 PPI is preferred for print.
- Check File Size and Save: The dialog box often displays the resulting file size. Click “OK,” then “File” > “Save” (or “Save As” to create a new file).
Using Quick Actions (macOS Monterey and later):
- Select Image: Right-click on the JPEG file.
- Convert Image: Choose “Quick Actions” > “Convert Image.”
- Format and Size: Select “JPEG” as the format and choose an image size (Small, Medium, Large) from the dropdown.
- Convert: Click “Convert to JPEG” to save the compressed image.
Professional Software: Adobe Photoshop
For those engaged in “Digital Photography,” “Editing Styles,” and “Photo Manipulation,” Adobe Photoshop offers unparalleled control.
- Open Image: Launch Photoshop and go to “File” > “Open” to select your JPEG.
- Access Image Size: Go to “Image” > “Image Size.”
- Adjust Settings: In the dialog box, you can set “Pixel Dimensions” and “Document Size.” Ensure the link icon is “on” to maintain proportionality. Adjust width, height, and resolution (72 PPI for screen, 300 PPI for print).
- Resampling Method: For optimal results when reducing size, choose resampling methods like “Bicubic Sharper” or “Bicubic.”
- Save for Web: For web-optimized JPEGs, use “File” > “Export” > “Save for Web (Legacy)” (or “Export As…”). This dialog offers fine-tuned control over quality, format, and file size, often with a live preview.
Mobile Devices: Android and iOS
While native options are limited, Tophinhanhdep.com can recommend reliable third-party apps found in your device’s app store, perfect for optimizing your “Aesthetic” and “Nature” shots on the go.
For iOS (iPhone/iPad):
- High Efficiency Format: In “Settings” > “Camera” > “Formats,” select “High Efficiency.” This setting captures photos in HEIF/HEVC format, which is more space-efficient than JPEG, ensuring smaller file sizes without noticeable quality loss from the outset.
- Third-Party Apps: Use apps recommended by Tophinhanhdep.com (e.g., Photo Compress) to manually resize or compress existing JPEGs. These apps typically allow you to select a photo, choose new dimensions or a compression level, and save the optimized version to your camera roll.
For Android Devices:
- Third-Party Apps: Download a reputable image resizer app (e.g., Photo & Picture Resizer) from the Google Play Store.
- Grant Access: Launch the app and grant it permission to access your photos.
- Select and Resize: Open the desired photo within the app. Most apps offer a “Resize” tool where you can choose preset sizes or enter custom dimensions. Like desktop tools, they usually maintain the aspect ratio.
- Save: The optimized image is often saved automatically, or you’ll click a “Save” button.
Advanced Image Optimization and Integration
Beyond individual image adjustments, Tophinhanhdep.com’s broader “Image Tools” and “Visual Design” sections offer advanced solutions:
- AI Upscalers: While the general rule is to avoid enlarging JPEGs due to quality loss, our AI Upscalers can intelligently enhance lower-resolution images, mitigating some of the pixelation.
- WebP Conversion: For cutting-edge web performance, our “Converters” can transform JPEGs into WebP format, offering superior compression without visual compromise.
- Automated Optimization Plugins: For website owners managing large “Image Collections” or “Stock Photos” on platforms like WordPress or Shopify, Tophinhanhdep.com can guide you to plugins that automate image optimization upon upload, streamlining your workflow significantly.
Best Practices for Effective JPEG Compression
Mastering JPEG compression involves more than just knowing how to use the tools; it’s about adopting smart practices that ensure consistent quality and efficiency across all your visual projects.
Prioritize Smart Resizing and Quality Settings
- Resize Down, Don’t Blow Up: The golden rule of JPEG optimization is to resize images to a smaller size. Enlarging a JPEG significantly will invariably lead to a noticeable decrease in quality, resulting in blurry or pixelated visuals. If you need a larger image, always start with the highest resolution original you have.
- Find Your Quality Sweet Spot: For web use, a JPEG quality setting between 70% and 85% often provides an ideal balance. It dramatically reduces file size compared to 100% quality, yet the visual difference is usually imperceptible to the human eye. Test different settings to find what works best for your specific images and desired outcome, especially for delicate “Aesthetic” or “Beautiful Photography” pieces.
- Match Resolution to Purpose: Consider where the image will be displayed. A full-screen background image requires higher resolution than a small thumbnail for an email. Use 72 PPI for digital screens and 300 PPI for print, as suggested in our guides.
Leverage Bulk Processing and Automation
- Optimize in Batches: For large “Image Collections” or when preparing numerous “Wallpapers” or “Backgrounds,” use Tophinhanhdep.com’s online bulk processing tools or desktop software that supports batch operations. This saves immense time compared to optimizing images one by one.
- Automate for Websites: If you manage a website with frequent image uploads, explore Tophinhanhdep.com’s recommended plugins for Content Management Systems. These tools can automatically compress and optimize JPEGs as they are uploaded, ensuring consistent performance for your “Digital Photography” and “Thematic Collections” without manual intervention.
Backup and Version Control
- Always Keep Originals: Before performing any lossy compression or resizing, always create a copy of your original, high-resolution JPEG. This provides a safety net, allowing you to revert to the uncompressed version if you’re unhappy with the results or if future needs require a larger, higher-quality image. This is a critical practice for “Digital Photography” and “Creative Ideas” where raw assets are invaluable.
- Use Descriptive Filenames: When saving optimized versions, use clear and descriptive filenames (e.g.,
my-beautiful-photo-web-optimized.jpg). This helps in easily identifying different versions of the same image and prevents accidental overwriting.
Conclusion
The ability to effectively reduce JPEG file size is a cornerstone of efficient digital content management, directly impacting everything from website load times and SEO rankings to storage costs and sharing capabilities. For photographers, designers, and enthusiasts alike, mastering this skill ensures that your visual content remains impactful, accessible, and high-performing.
Tophinhanhdep.com is your ultimate partner in this endeavor, offering an extensive range of “Image Tools” including online “Compressors,” “Optimizers,” and comprehensive “Converters,” alongside rich “Image Inspiration & Collections” like “Wallpapers,” “Backgrounds,” and “Beautiful Photography.” Our platform provides the resources and guidance you need to navigate the complexities of digital image optimization, empowering you to present your “Visual Design” and “Digital Photography” in their best light.
Explore Tophinhanhdep.com today to transform your visual content, ensuring that every JPEG you create or share is perfectly optimized for its purpose, enhancing its aesthetic appeal and technical performance.