Mastering Image and Video Reflection in DaVinci Resolve: A Comprehensive Guide to Creative Visual Manipulation

In the dynamic world of digital content creation, the ability to manipulate visuals is paramount. From fine-tuning the composition of a photograph to crafting intricate video sequences, tools that offer precision and flexibility are invaluable. DaVinci Resolve stands as a titan in this arena, a professional-grade video editor renowned for its expansive feature set encompassing editing, color correction, visual effects, and audio post-production. While its capabilities are vast and often favored by industry experts for producing high-resolution, pixel-perfect output, its intricate interface can sometimes appear daunting to newcomers.
This guide aims to demystify one of the fundamental yet creatively powerful visual manipulations: reflecting, flipping, and rotating images and videos within DaVinci Resolve. We’ll embark on a step-by-step journey, elucidating how to achieve these effects with DaVinci Resolve’s robust tools, exploring their aesthetic implications for various visual design projects, and offering insights into when and why these techniques can transform ordinary media into captivating digital art. Furthermore, we’ll connect these editing practices to the broader themes of stunning photography, creative ideas, and visual storytelling, providing inspiration for mood boards, thematic collections, and trending styles that resonate with the essence of Tophinhanhdep.com’s focus on beautiful photography and visual design. Whether you’re a seasoned professional seeking advanced manipulation techniques or a budding creator looking for an intuitive way to enhance your visual projects, understanding these core principles is essential.
Beyond DaVinci Resolve’s advanced features, we’ll also touch upon more accessible alternatives for those seeking a simpler path to quick edits, ensuring that every creator, regardless of their skill level, can achieve their visual goals. Prepare to unlock new dimensions of visual design, transforming your images and videos with artistic reflection and orientation adjustments.
The Art of Flipping and Mirroring in DaVinci Resolve
Flipping, or mirroring, an image or video horizontally or vertically is more than just a corrective measure; it’s a powerful artistic tool. In visual design, altering the orientation of your media can profoundly impact composition, balance, and aesthetic appeal. A horizontal flip can create symmetry where none existed, offering a fresh perspective on a familiar scene, while a vertical flip can introduce an abstract, ethereal quality, especially effective for backgrounds or artistic photography. Understanding how to master these techniques in DaVinci Resolve allows creators to not only fix orientation issues but also to experiment with “aesthetic” compositions and “creative ideas” that push the boundaries of “digital art.”
Horizontal and Vertical Flipping for Aesthetic Impact
The simple act of flipping an image or video can yield dramatic results. Imagine a landscape photo where the primary subject feels off-center or unbalanced. A horizontal flip might perfectly rebalance the image, drawing the viewer’s eye to a more compelling focal point. For portraits, it can correct an unflattering angle or create a more symmetrical, appealing look. In video, flipping can be used to maintain screen direction across different cuts, ensuring continuity, or to create deliberate disorientation for artistic effect.
Consider the application in “visual design” and “photo manipulation”:
- Compositional Balance: Flipping can help achieve a more harmonious layout, especially useful for creating “wallpapers” or “backgrounds” where visual symmetry is desired.
- Narrative Reorientation: For video storytelling, flipping footage can alter implied movement, useful for creative transitions or correcting misaligned shots.
- Abstract Art: A vertical flip of a natural scene can transform it into a surreal, abstract piece, ideal for “abstract” image collections.
- Correcting Selfie Videos: Often, front-facing cameras produce mirrored footage. Flipping ensures the final output matches real-world orientation.
These subtle yet impactful adjustments are crucial for achieving “pixel-perfect” precision and enhancing the overall visual narrative of your content.
Step-by-Step Guide to Flipping Your Visuals
DaVinci Resolve, while powerful, makes the core task of flipping surprisingly straightforward. This process applies seamlessly to both video clips and still images, making it a versatile technique for all your media needs.
-
Open DaVinci Resolve and Create a New Project: Begin by launching DaVinci Resolve on your computer. On the initial screen, you’ll see a list of recent projects. To start fresh, click “New Project.” Assign a descriptive name to your project and click “Create.” This establishes the foundation for your creative work.
-
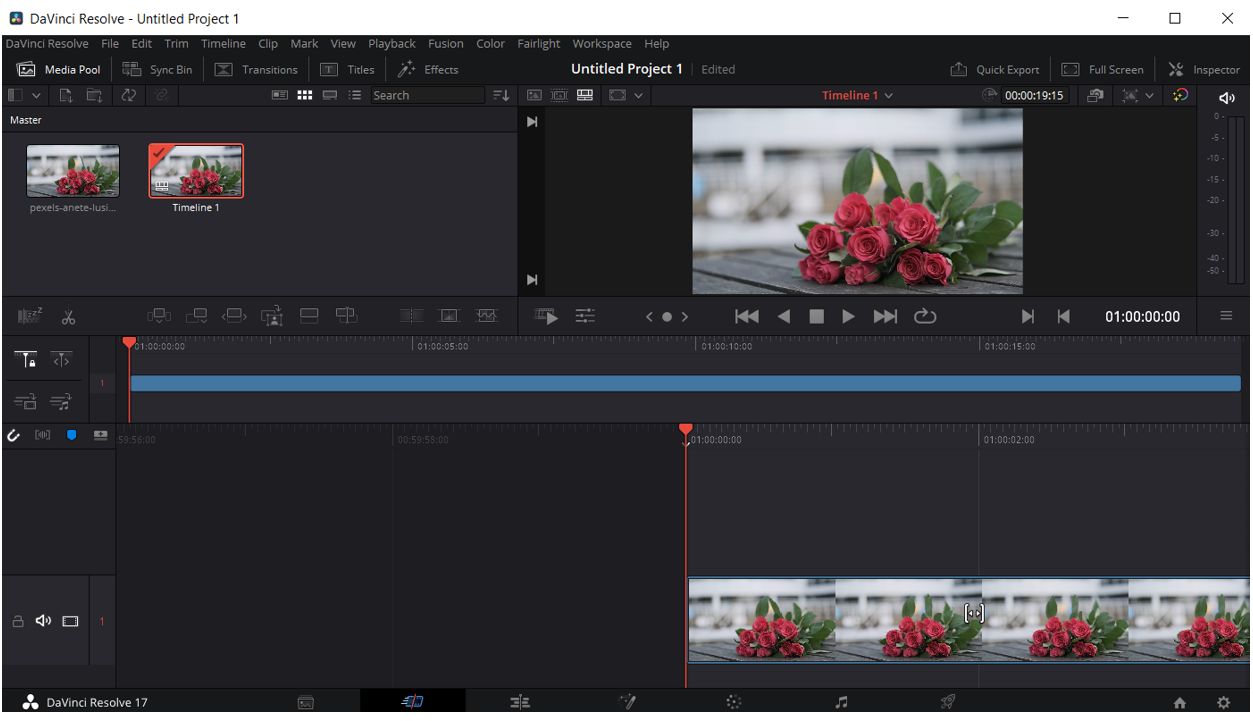
Import Your Media: Next, you need to bring your visual assets into DaVinci Resolve. Navigate to
File > Import > Mediaor use the keyboard shortcutCtrl+I(Windows) /Cmd+I(Mac). Browse your computer to select the video clip or still image you wish to flip. Once imported, your media will appear in the Media Pool. Drag and drop the selected file from the Media Pool onto your timeline. This makes it active for editing. -
Access the Inspector Panel: With your media on the timeline, ensure it is selected. The Inspector Panel is your primary hub for most visual transformations. You’ll typically find the “Inspector” button in the top right corner of the DaVinci Resolve interface. Click it to reveal the panel on the right side of your screen. This panel provides a comprehensive set of controls for altering the properties of your selected clip or image.
-
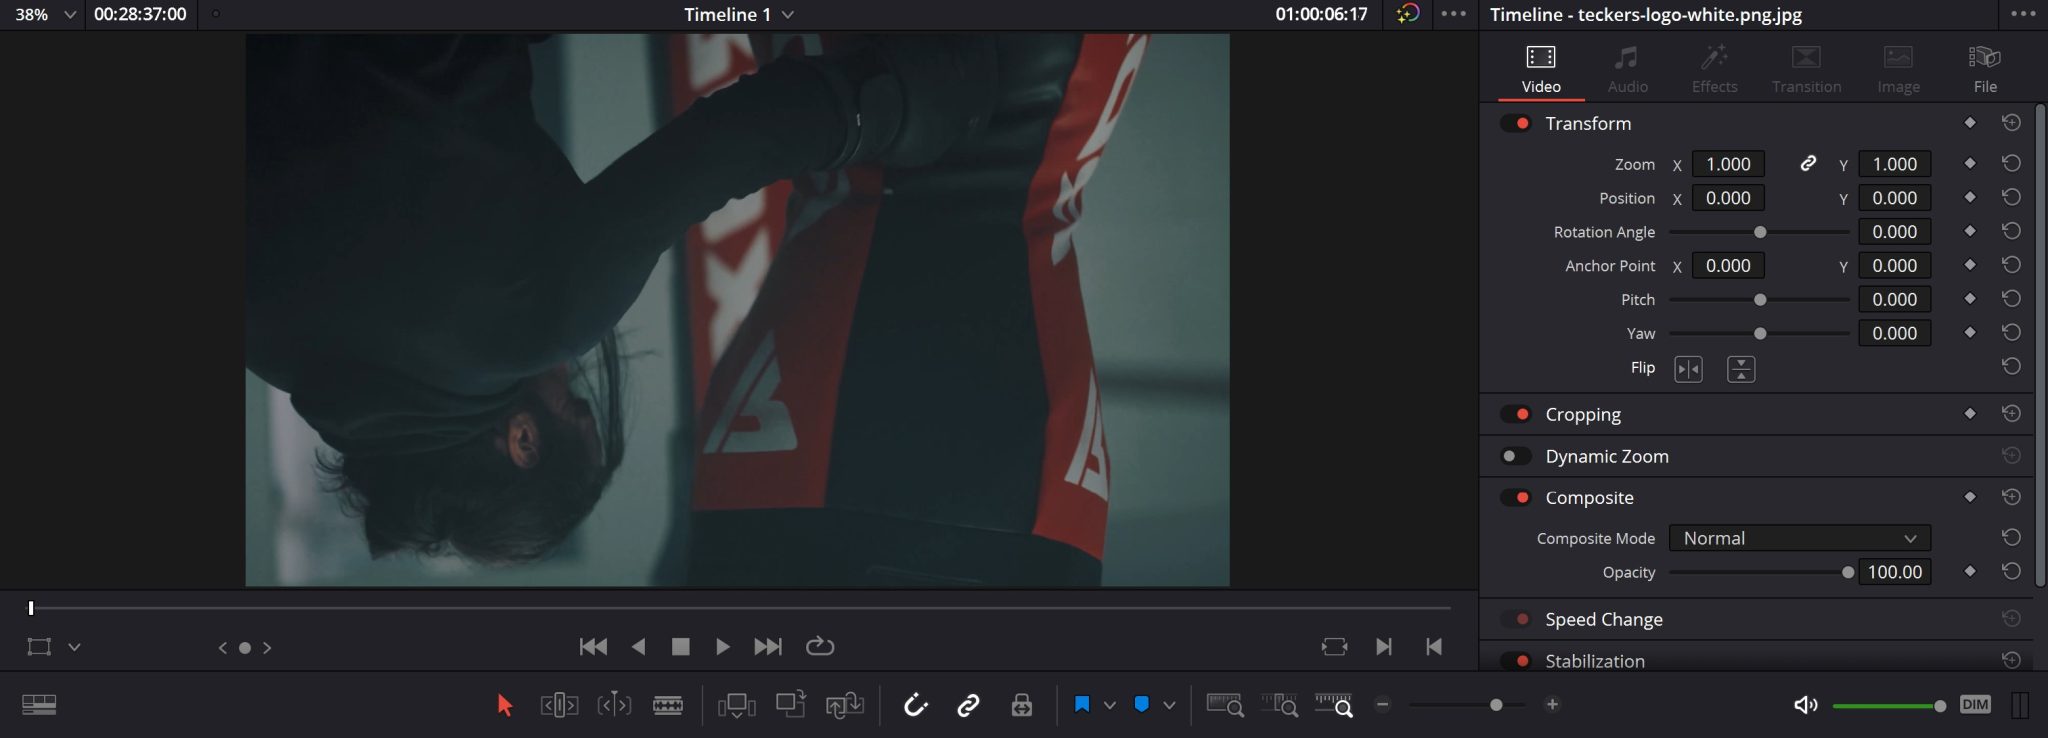
Locate and Apply the Flip Option: Within the Inspector Panel, under the “Video” tab (often the default), look for the “Transform” section. Here, you will find the “Flip” options. There are usually two distinct buttons or checkboxes: one for “Horizontal Flip” and another for “Vertical Flip.” Simply click on the button corresponding to the direction you wish to flip your media. You’ll observe the change instantly in the viewer window. This immediate feedback loop is invaluable for real-time visual adjustments, allowing you to iterate quickly until you achieve the desired effect for your “beautiful photography” or “aesthetic” video sequence.
-
Further Editing and Refinement: Flipping your media is often just the first step in a broader editing process. DaVinci Resolve offers an extensive array of tools to further enhance your visuals. After flipping, you might want to:
- Adjust Color Grading: Fine-tune colors to evoke specific moods or match a thematic collection, linking to “Photography: Editing Styles” and “Visual Design: Graphic Design.”
- Apply Effects: Add stylistic filters or visual effects to complement the new orientation.
- Crop or Resize: Adjust the framing to emphasize specific elements of your flipped image or video, crucial for creating optimized “wallpapers” or “backgrounds.”
- Combine with Other Clips: Integrate your flipped media into a larger project, creating complex narratives or dynamic “mood boards.”
-
Export Your Final Project: Once you are satisfied with your flipped and edited visual, it’s time to export. Go to
File > Quick Export. Choose your preferred video settings (resolution, format, codec) and destination. For still images, you can export a single frame by right-clicking on the timeline viewer and selecting “Grab Still,” then exporting it from the Gallery. This step ensures your “high resolution” images or videos are ready for sharing, upload to Tophinhanhdep.com, or use in other “visual design” projects, providing optimized output that aligns with “Image Tools: Converters, Compressors, Optimizers.”
By following these steps, you gain mastery over a fundamental transformation that can significantly enhance the creative potential of your “digital photography” and “video production” efforts within DaVinci Resolve.
Rotating and Reversing: Dynamic Visual Transformations
Beyond simple mirroring, DaVinci Resolve empowers creators with the ability to rotate and reverse media, opening up even more avenues for “visual design” and “creative ideas.” Rotation offers precise control over the angular orientation of your footage, indispensable for correcting minor tilts or achieving dramatic spinning effects. Reversing, on the other hand, manipulates time itself, creating unique narrative elements and “abstract” visual sequences that can captivate an audience. These dynamic transformations are key to producing engaging content, whether for “stock photos,” “digital photography,” or intricate video productions.
Precision Rotation for Perfect Angles
Rotating a video or image is a common need, whether to correct a slightly crooked shot or to achieve a completely new perspective. DaVinci Resolve offers two primary methods for this: the Inspector Panel and the Transform Tool, each providing a different level of interaction and precision.
Using the Inspector Panel for Rotational Control
The Inspector Panel provides numerical and slider-based controls for exact rotation. This method is ideal for precise adjustments, such as correcting a specific degree of tilt or setting a perfect 90/180/270-degree rotation.
-
Create or Open a Project and Import Media: As with flipping, start by opening DaVinci Resolve, creating a new project, and importing your video or image. Drag the media to your timeline.
-
Access the Inspector Panel: Select your media on the timeline and click the “Inspector” button in the top right corner.
-
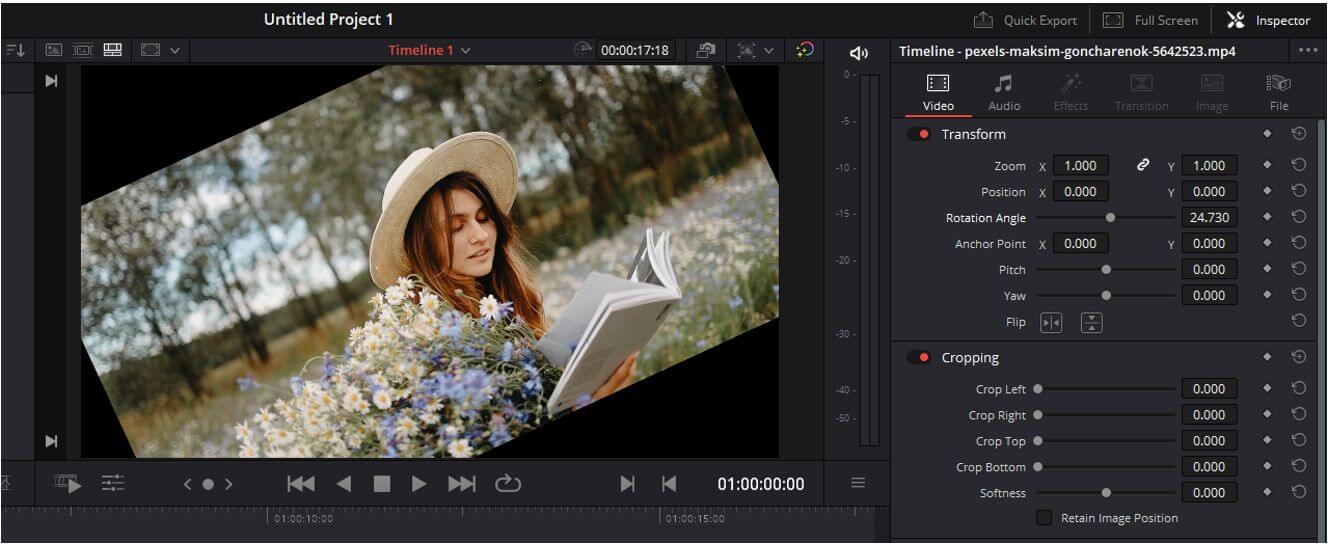
Adjust the Rotation Angle: Within the Inspector Panel, under the “Video” tab and the “Transform” section, locate the “Rotation Angle” parameter. You can either:
- Use the Slider: Drag the slider left or right to visually adjust the angle.
- Enter a Value: Click on the numerical input field and type in a specific degree (e.g., 90 for a quarter turn clockwise, 180 for an upside-down orientation, -90 for a quarter turn counter-clockwise).
- Anchor Point Adjustment: An advanced feature here is the “Anchor Point” for the X and Y axes. This determines the point around which the rotation occurs. By default, it’s the center, but changing it can create unique, off-center rotation effects, adding another layer to your “creative ideas” for “photo manipulation.”
Utilizing the Transform Tool for Interactive Rotation
For a more visual and interactive approach, the Transform Tool allows you to manipulate your media directly within the preview window.
-
Import Video to Timeline: Again, import your video or image and place it on the timeline.
-
Activate the Transform Tool: Above the timeline in the viewer window, you’ll see a rectangular button that often toggles different overlay controls. Click this button and select “Transform” from the dropdown menu. This will overlay controls directly onto your video in the preview window.
-
Rotate Visually: Once the Transform controls are active, you’ll see handles around your media. A rotation handle (often a curved arrow) will allow you to click and drag to rotate the video or image freely. This method is excellent for visual artists who prefer a direct manipulation feel, aligning with “visual design” and “digital art” principles. After making your adjustments, click “Apply” (or click the Transform button again to deselect).
Tips for Rotational Excellence:
- Snap to Grid: For accurate alignment, enable “Snap to Grid” (usually found in view options) when rotating.
- Keyframing Rotation: For dynamic effects, you can keyframe the Rotation Angle over time to create spinning, turning, or tilting animations, transforming static “photography” into engaging “motion graphics.” This can elevate “sad/emotional” or “beautiful photography” into cinematic sequences.
Manipulating Time: Reversing Your Video Sequences
Reversing video footage is a potent creative technique, capable of transforming mundane actions into intriguing visual paradoxes. This effect is often used for comedic timing, dramatic emphasis, or to create a surreal, dreamlike quality. In DaVinci Resolve, reversing a video is achieved through its Retime Controls.
-
Create a New Project and Import Media: Start by opening DaVinci Resolve, creating a new project, and importing your desired video clip. Drag it onto your timeline.
-
Navigate to the Edit Page: By default, you might be on the “Cut” page. To access the Retime Controls, you need to be on the “Edit” page. Click on the “Edit” page tab at the bottom of the DaVinci Resolve interface.
-
Activate Retime Controls: On the Edit page, select your video clip on the timeline. Right-click on the clip, and from the contextual menu that appears, select “Retime Controls.” Alternatively, use the keyboard shortcut
Ctrl+R(Windows) /Cmd+R(Mac). This will display a speed change overlay directly on your video clip on the timeline. -
Reverse the Segment: On the speed change overlay, you’ll see a percentage (usually 100%) indicating the clip’s current playback speed. Click on the small downward-pointing arrowhead next to this percentage. A menu will pop up. From this menu, select “Reverse Segment.” Instantly, your video clip will be set to play backward.
-
Further Editing and Export: Once reversed, you can continue editing your video. You might want to:
- Adjust Speed: Further fine-tune the playback speed of the reversed segment.
- Add Effects: Apply visual effects or transitions to enhance the reversed footage, contributing to unique “visual design” elements.
- Color Grade: Harmonize the reversed clip with the rest of your project.
- Export: When your editing is complete, go to
File > Quick Exportto render your masterpiece.
Reversing footage is a fantastic way to introduce “creative ideas” and “thematic collections” into your projects, from making someone un-jump into a pool to creating an “abstract” rewind effect for transitions. It adds an unexpected twist that can elevate your “digital photography” and video editing skills.
Beyond Basic Adjustments: Advanced Visual Effects in DaVinci Resolve
DaVinci Resolve’s capabilities extend far beyond simple flips and rotations. It offers a powerful suite of advanced visual effects that can animate your content, add stylistic flair, and even mimic physical camera phenomena. For those engaged in “visual design,” “digital art,” and crafting compelling “image inspiration,” delving into these tools can unlock unprecedented creative potential, allowing you to transform static “photography” into dynamic, engaging narratives or evoke specific moods and “aesthetic” qualities.
Animating Visuals for Engaging Content
Animation brings life and movement to your images and videos, making them more engaging and expressive. DaVinci Resolve’s animation tools, particularly through keyframing and effect application, enable you to orchestrate subtle shifts or grand transformations over time.
-
Create a New Project and Select Media: Begin by setting up your project in DaVinci Resolve and importing the video or image you intend to animate. Drag it onto your timeline.
-
Add Effects for Animation: DaVinci Resolve’s “Effects” library is a treasure trove of creative possibilities.
- On the Cut Page: Look for the “Effects” option usually located at the top of the interface. Clicking it will reveal a panel filled with various effects.
- Browse and Apply: Explore categories like “OpenFX” or “Transitions.” Once you find an effect you like, drag and drop it directly onto your video clip on the timeline. This applies the basic effect.
-
Edit and Keyframe the Effect: To truly animate, you need to adjust the effect’s parameters over time using keyframes.
- Go to the Edit Page: If you’re not already there, switch to the “Edit” page.
- Open Inspector and Effects Tab: Select your clip on the timeline and open the “Inspector Panel.” Click on the “Effects” tab within the Inspector.
- Adjust Parameters and Set Keyframes: Here, you’ll find various parameters specific to the applied effect. Each parameter often has a small diamond-shaped icon next to it. Clicking this diamond creates a “keyframe” at the playhead’s current position, locking in that parameter’s value.
- Create Movement: Move the playhead to a different point in your timeline, change the parameter’s value, and click the diamond again to set a new keyframe. DaVinci Resolve will automatically interpolate (animate) the changes between these keyframes, creating smooth transitions. For instance, you could animate the “Rotation Angle” to make an image spin, or adjust the “Scale” to create a zoom effect, all contributing to a compelling “visual design.”
By mastering keyframing, you can craft dynamic “digital art,” animate “wallpapers,” or create mesmerizing slideshows from your “beautiful photography” that tell a richer story, transforming still images into evocative visual experiences. This ties directly into creating “mood boards” and “thematic collections” that possess movement and life.
Evoking Mood: Lens Reflections and Film Damage
DaVinci Resolve 15 and later versions introduce advanced ResolveFX that can add realistic or stylized visual imperfections, enhancing the mood and authenticity of your footage. Two particularly compelling effects are “Lens Reflections” and “Film Damage,” which align perfectly with creating “trending styles” and specialized “thematic collections.”
Crafting Realistic Lens Reflections
Lens reflections (distinct from lens flares) occur when light sources within or just outside the frame bounce off internal lens elements, creating subtle or prominent reflections of the scene itself. DaVinci Resolve’s “Lens Reflection” effect allows you to simulate these optical phenomena, adding a layer of realism or artistic imperfection to your “digital photography” and “cinematic” footage.
-
Access on the Color Page: The “Lens Reflection” effect is typically applied on the “Color” page, not the “Edit” page. Navigate to the “Color” page.
-
Create a New Node and Apply Effect: With your clip selected, create a new node (Alt+S on Windows, Option+S on Mac) for better workflow. Open the “Effects” panel (usually on the right) and scroll down to “ResolveFX Light” to find “Lens Reflection.” Drag and drop it onto your new node.
-
Customize for Believability: The default reflection might not match your shot perfectly. You’ll need to customize it:
- Bright Light Source is Key: The effect relies heavily on the luminance values of your shot. For the reflection to appear, you need a bright light source within your frame.
- Presets: Experiment with the available presets. The “Plain” preset often provides a good starting point for a less stylized, more natural reflection.
- Isolation Controls: These determine which highlights generate the reflection. Adjust them to fine-tune the source of the reflection.
- Global Controls: Control overall properties like brightness, colorization, and “smoothness” (to reduce sharp edges).
- Opacity (Indirect): There’s no direct “opacity” slider. To make the reflection more transparent, you typically need to decrease its brightness or increase the gamma in the surrounding areas of the node, which indirectly affects its visibility.
- Add Grain: To make the generated reflection appear more organic and integrate seamlessly with your footage, consider adding a subtle film grain effect to the same node. This can enhance the “aesthetic” and realism, aligning with “Photography: Editing Styles.”
This effect is ideal for adding subtle realism to “beautiful photography” or crafting a vintage camera feel for “thematic collections.”
Simulating Archival Film Damage
The “Film Damage” effect allows you to transform modern, pristine footage into something that looks like it was shot on old celluloid, complete with scratches, dirt, and color shifts. This is invaluable for creating “thematic collections” like historical reenactments, “abstract” nostalgic looks, or stylized digital art.
-
Apply the Film Damage Effect: On the “Edit” or “Color” page, open the “Effects” panel and find “Film Damage” under “ResolveFX Stylize.” Drag it onto your clip.
-
Delve into the Control Panels: The effect comes with several control panels, each offering deep customization:
- Blur and Shift:
- Film Blur: Increase this to soften the image, mimicking the less sharp lenses and film stocks of yesteryear.
- Temperature/Tint Shift: Adjust these to introduce sepia tones, color casts, or other vintage color shifts, crucial for “editing styles” that evoke specific eras.
- Add Dirt:
- Density & Size: Control how much and how large the “dirt” appears. Often, decreasing density and size creates a more believable, subtle effect.
- Dirt Blur: Increasing the blur helps the dirt blend more organically with the footage, rather than looking like an artificial overlay.
- Add Scratch:
- Density & Length: Similar to dirt, adjust these for the appearance of scratches.
- Scratch Blur: Again, adding blur can make scratches appear more natural, as if embedded in the film emulsion.
- Add Vignetting:
- Vignette Focal Factor: Increase this to darken the edges of the frame, a common characteristic of older lenses and film, drawing attention to the center of your “beautiful photography” or “nature” shots.
- Blur and Shift:
-
Combine with Other Effects: For an even more authentic look, combine “Film Damage” with:
- Black and White Conversion: Essential for an archival feel.
- Camera Shake: Simulate handheld historical footage.
- Aspect Ratio Adjustment: Apply a 4:3 letterbox to mimic older film formats.
By meticulously adjusting these parameters, you can craft a highly convincing “film damage” effect, perfect for “image inspiration” that draws from historical or vintage aesthetics, transforming your “high resolution” captures into relics from another time. This level of detail in “photo manipulation” and “visual design” is what makes DaVinci Resolve a standout tool for creators.
DaVinci Resolve for Every Creator: Ease of Use vs. Professional Power
DaVinci Resolve’s reputation precedes it as a powerhouse for professional video and image editing. Its comprehensive suite of tools, from advanced color grading to intricate visual effects, truly makes it an all-in-one solution for high-end “digital photography” and cinematic production. However, this depth of functionality comes with a significant learning curve, often posing a challenge for beginners. Understanding where DaVinci Resolve fits into a creator’s workflow, and when to consider alternative “image tools,” is crucial for efficiency and creative satisfaction.
Navigating DaVinci Resolve’s Learning Curve
DaVinci Resolve is, without a doubt, designed for professionals. Its interface, while incredibly powerful, is densely packed with features spread across multiple dedicated pages (Cut, Edit, Fusion, Color, Fairlight, Deliver). For someone new to video or image editing, this complexity can be overwhelming. The sheer number of options and the sophisticated workflow demand a considerable investment of time and effort to learn effectively.
- Complexity of Interface: Beginners often find themselves lost amidst the multitude of tools and panels.
- Feature Depth: Each page offers granular control, requiring users to understand underlying principles of color science, visual effects compositing, and audio engineering.
- Time Investment: Achieving “pixel-perfect” results or complex “photo manipulation” in DaVinci Resolve typically requires dedicated learning and practice.
Therefore, while DaVinci Resolve is ideal for those aspiring to professional-grade “high resolution” output and deep “visual design” capabilities, it might not be the “perfect” solution for everyone, especially those seeking quick edits or who are just starting their creative journey. Its power is best utilized by creators committed to mastering a robust tool for ambitious “digital art” and “video production” projects.
Beginner-Friendly Alternatives for Quick Visual Edits
Recognizing that not everyone needs or has the time to master a professional NLE like DaVinci Resolve, several user-friendly alternatives offer streamlined solutions for common video and image manipulation tasks, including flipping and rotation. These “image tools” prioritize ease of use, making them perfect for beginners or for those who need to make quick edits for social media, “mood boards,” or “thematic collections” without the steep learning curve.
iMyFone Filme: The Simple and Intuitive Approach
iMyFone Filme is an excellent example of a video editor designed with beginners in mind. It offers a self-explanatory interface and a focus on essential tools, making it easy for anyone to create engaging videos and perform basic “image manipulation” without prior experience.
Key Features of iMyFone Filme:
- Core Editing Tools: Provides all fundamental and many advanced editing functions such as splitting, trimming, speed adjustment, color correction, frame freezing, blur effects, rotation, and flipping.
- Animated Templates: A rich library of ready-to-use templates for various purposes, allowing users to quickly create “mesmerizing and eye-catching videos and slideshows.” This is perfect for creating “image inspiration” rapidly.
- Extensive Libraries: Offers libraries for effects, transitions, stickers, filters, and text styles, all accessible via drag-and-drop.
- Flexible Export Options: Allows users to customize export settings (aspect ratio, resolution, frame rate, bitrate) and direct upload to social media platforms, streamlining sharing.
How to Flip a Video/Image Using iMyFone Filme:
- Create a New Project: Open Filme and select “Editing Mode.” Choose your desired aspect ratio for the new project.
- Import Media: Import your video or image files into Filme’s media menu and drag the selected clip to the timeline.
- Flip and Rotate: Select the media on the timeline.
- For horizontal flip (mirror), click the “Mirror” button located above the timeline.
- For vertical flip, click the “Edit” button (often a pencil icon) to open a panel on the right. From there, you can rotate your video by 180 degrees to achieve a vertical flip effect.
- Export: Click the “Export” button, select your preferred settings, and save your video or image.
iMyFone Filme is ideal for creating “short clips,” “video resumes,” or “slideshows” where efficiency and a user-friendly experience are paramount, especially for quick uploads to Tophinhanhdep.com.
CapCut Desktop: Accessibility with Precision
CapCut Desktop is another highly recommended alternative, celebrated for its ease of use and precise controls. It offers a balance between simplicity and powerful editing capabilities, making it a strong contender for creators looking for an intuitive way to manipulate videos and images. Its focus on user-friendly design makes “rotating videos” or images a breeze.
Key Features of CapCut Desktop:
- Easy Rotation Controls: Rotate videos to any desired angle with just a few clicks.
- Precise Angle Adjustment: Offers intuitive and accurate controls for fine-tuning rotation, ensuring “perfect alignment.”
- Real-time Review: Edits are visible instantly, streamlining the editing process.
- Integrated Editing Tools: Seamlessly combine rotation with exposure adjustments, filters, text overlays, and more, all within the same interface.
How to Rotate Video/Image in CapCut Desktop:
- Upload Video/Image: Start a new project in CapCut. Click “Import” to bring your media from your computer to the CapCut interface, then drag it to the timeline.
- Rotate Your Media: Select the media on the timeline. In the upper right corner, click the “Basic” button. You’ll find the rotating toolbar here. Adjust the angle (e.g., 90°, 180°, 270°) using the slider or by entering a specific value.
- Export and Share: Once satisfied, click “Export.” Adjust settings like format, frame rate, and bitrate. CapCut also offers direct sharing options to platforms like YouTube or TikTok, making it easy to share your “creative ideas” with your audience and on platforms like Tophinhanhdep.com.
CapCut is an excellent choice for creators who need “fast and quality video editing” for social media or general content creation, offering powerful tools for refining “digital photography” and creating engaging “visual design.”
In conclusion, while DaVinci Resolve offers an unparalleled toolkit for advanced “visual design” and “digital photography” manipulation, particularly for intricate effects like “lens reflections” and “film damage,” its learning curve is substantial. For those prioritizing simplicity and speed in tasks like flipping and rotating, accessible alternatives like iMyFone Filme and CapCut Desktop provide efficient, user-friendly solutions that still yield impressive results for “image inspiration” and sharing on platforms like Tophinhanhdep.com. The choice of tool ultimately depends on the creator’s skill level, project complexity, and desired workflow, but the ability to creatively manipulate images and videos remains a cornerstone of impactful visual content.