Seamlessly Elevate Your Visuals: Mastering White Background Removal for Stunning Images on Tophinhanhdep.com

Have you ever gazed at a photograph and envisioned it against a different, more captivating backdrop? Or perhaps you’re a digital artist striving for the perfect composite, a photographer preparing high-resolution stock images, or a visual designer crafting a unique mood board. The journey to transform ordinary images into extraordinary visual masterpieces often begins with a single, crucial step: removing the background. On Tophinhanhdep.com, where we celebrate the power of Images – from Wallpapers and Backgrounds to Aesthetic, Nature, Abstract, Sad/Emotional, and Beautiful Photography – and empower your Photography with High Resolution and diverse Editing Styles, mastering this technique is indispensable.
This comprehensive guide, tailored for both seasoned professionals and budding enthusiasts, will unravel the art and science behind eliminating white backgrounds, primarily using the robust capabilities of Adobe Photoshop. We’ll delve into various tools and techniques, explore when and why to apply them, and demonstrate how this foundational skill unlocks endless possibilities for Visual Design, Graphic Design, Digital Art, and Photo Manipulation, transforming your creative ideas into stunning realities for Image Inspiration & Collections on Tophinhanhdep.com.

The ability to isolate a subject from its original white backdrop allows for unparalleled creative freedom. Imagine a striking product image seamlessly placed within a vibrant Abstract scene, or a cherished Portrait Photo gracefully integrated into a breathtaking Nature landscape. A clean, transparent background ensures your images are versatile, ready for any Thematic Collections or Trending Styles you wish to explore. So, let’s discard the white, embrace boundless creativity, and propel your photo editing prowess to new heights!
The Transformative Power of Background Removal in Digital Art and Photography
In the dynamic world of digital content creation, the flexibility of an image is paramount. A photograph, no matter how perfectly composed, can be limited by its background. This is particularly true for images featuring a plain white backdrop, a common choice for initial product shots or studio portraits. However, this seemingly simple background often restricts creative application, making background removal a cornerstone skill for anyone serious about Photography, Visual Design, or building diverse Image Collections.
Why a Transparent Background is Crucial for Creative Endeavors
A transparent background acts as a blank canvas, offering immense versatility for your Creative Ideas and Photo Manipulation projects. Without the constraint of an original backdrop, an image can be:
- Integrated into Custom Wallpapers: Imagine personalizing your desktop or device with a favorite subject placed against a Nature, Abstract, or Aesthetic background of your choice, all powered by the high-resolution images found on Tophinhanhdep.com.
- Seamlessly Composited for Digital Art: For Digital Art and Graphic Design, isolating elements allows for the creation of intricate scenes, mood boards, and visually rich compositions that were previously impossible. This is vital for showcasing Stock Photos or creating unique Photo Ideas.
- Adapted for Trending Styles: As Trending Styles in Visual Design evolve, a transparent image can be quickly adapted to new color schemes, textures, or thematic contexts without requiring a complete re-shoot.
- Enhanced for Aesthetic Appeal: Replacing a dull or distracting white background with something more Beautiful, whether it’s a soft gradient, a blurred urban scene, or an Emotional abstract pattern, can dramatically alter an image’s aesthetic impact.
- Optimized for Web and Print: Removing backgrounds is often the first step in preparing images for Optimization for web use, ensuring faster loading times, or preparing them for high-quality print.
This foundational editing step allows you to transcend the limitations of original capture, opening up a universe of Creative Ideas where your subjects truly shine within any desired visual narrative.
Preparing Your Images for Tophinhanhdep.com’s Tools and Collections
At Tophinhanhdep.com, we understand that creating stunning visuals is a multi-step process. Background removal isn’t just an end in itself; it’s often a critical precursor to leveraging our other Image Tools. Once your subject is cleanly isolated with a transparent background, you can then:
- Compressors and Optimizers: Apply these tools to reduce file size without sacrificing the clarity of your now perfectly cutout subject, making your High Resolution images load faster on websites or share more easily.
- AI Upscalers: Further enhance the quality of your isolated subject, especially if it’s destined for large-scale Wallpapers or detailed Digital Photography projects.
- Converters: Easily convert your transparent PNGs into other formats suitable for different platforms or printing needs, maintaining the background transparency.
- Image-to-Text: For certain applications, a clean subject can enhance the accuracy of image-to-text tools if the background previously contained distracting elements.
By ensuring a pristine cutout, you maximize the efficiency and effectiveness of all subsequent Image Tools, ensuring that your contributions to Thematic Collections or personal Mood Boards are always of the highest standard.
Unlocking Photoshop’s Potential: Diverse Techniques for White Background Removal
Adobe Photoshop remains the industry standard for professional image editing, offering an unparalleled suite of tools for background removal. While the ultimate goal is always a clean separation of subject from background, the “best” tool often depends on the image’s complexity, edge detail, and the nature of the white background itself. Generally, the process involves selecting the object, or the background, and then isolating it.
Here are the fundamental approaches:
- Selection and Inversion: Select the object using precise tools (e.g., Pen Tool, Lasso Tool), then inverse the selection to target the background, which can then be deleted.
- Automatic Selection: Tools like the Object Selection Tool or Quick Selection Tool attempt to automatically identify and select the subject with a single click or drag.
- Direct Erasing: Tools like the Background Eraser or Magic Eraser directly remove pixels based on color similarity, offering a more immediate approach for simpler backgrounds.
Let’s explore these techniques in detail.
Precision with the Pen Tool: Your Pixel-Perfect Companion
For pixel-perfect selections and sharp-edged objects, the Pen Tool is widely considered the gold standard. This technique, known as Clipping Path, is meticulous but yields the most professional and crisp results, essential for High Resolution Stock Photos and intricate Graphic Design.
To remove a white background using the Pen Tool:
- Open Your Image: Launch Photoshop and open the image you wish to edit.
- Select the Pen Tool: From the Photoshop toolbar, select the Pen Tool (P). Ensure it’s set to “Path” mode in the options bar.
- Create a New Path Layer: In the Paths panel (Window > Paths), click the “Create new path” icon.
- Zoom for Precision: Zoom into your image (300% or more is recommended) to accurately see the object’s outlines. This precision is key for a flawless selection.
- Outline the Object: Carefully click to create anchor points along the edge of your subject. For curves, click and drag to manipulate the bezier handles, forming smooth, accurate curves. Continue this process until you have fully outlined the object, returning to your starting point to close the path.
- Convert Path to Selection: With the path layer active in the Paths panel, Ctrl-click (Cmd-click on Mac) on the path thumbnail. This will convert your path into an active selection (marching ants).
- Refine the Selection (Feathering): To soften the edges slightly for a more natural look, press Shift+F6 (or Go to Select > Modify > Feather). A feather radius of 0.3px to 0.5px is often sufficient for high-resolution images, preventing a harsh, cut-out appearance.
- Apply a Layer Mask: In the Layers panel, click the “Add layer mask” icon (a rectangle with a circle inside). This non-destructive method hides the background while preserving your original image data.
- Add a New Background: Create a new layer below your masked object layer. Go to the adjustment layer to add a solid color, a gradient, or place a new image background (e.g., a Nature scene or Abstract pattern from Tophinhanhdep.com) behind your isolated subject. You can experiment with any color or image you like, observing how your subject transforms.
After completing these steps, meticulously review your work, especially around intricate areas. The Pen Tool’s precision makes it ideal for products, architectural elements, or any object with defined edges where accuracy is paramount for Beautiful Photography and Photo Manipulation.
The Background Eraser: Ideal for Complex Edges and Delicate Details
When dealing with images that have intricate, soft edges like hair, fur, smoke, or translucent elements (e.g., glass), the Pen Tool might fall short. This is where the Background Eraser Tool shines, employing an Image Masking Technique for non-destructive removal. This tool excels at distinguishing foreground from background based on color, making it invaluable for realistic Portrait Photo Background Removal.
Here’s how to use it effectively:
- Protect Your Original Image: In the Layers panel, right-click on your background layer and select “Duplicate Layer.” Then, click the eye icon next to the original layer to hide it. This creates a safety net, allowing you to quickly revert if mistakes occur.
- Create a High-Contrast Background: To better visualize your cutout, create a new layer below your duplicate image layer. Fill this new layer with a bright, contrasting color (e.g., neon green or magenta) using the Paint Bucket Tool. This temporary background will highlight any missed pixels or jagged edges as you erase.
- Select the Background Eraser Tool: Locate the Background Eraser Tool in the toolbar (it might be nested under the standard Eraser Tool). Its cursor appears as a circle with crosshairs, which samples the color directly beneath it.
- Adjust Tool Settings: In the options bar at the top, configure these key settings:
- Limits: Set to “Find Edges” to prevent the eraser from bleeding into the foreground.
- Sampling: Start with “Once” for consistent color removal, or “Background Swatch” if you’ve defined a specific background color to remove.
- Tolerance: This is crucial. A lower tolerance (e.g., 20-30%) is for areas with subtle color differences between foreground and background (like delicate hair strands). A higher tolerance (e.g., 50-70%) is for distinct white backgrounds. Experiment with this setting.
- Protect Foreground Color: If parts of your subject are the same color as the background, select a foreground color swatch (using the eyedropper tool) and check “Protect Foreground Color” to prevent those areas from being erased.
- Brush Size: Adjust the brush size as needed (using
[and]) for broad strokes or fine detail work.
- Erase the Background: Click and drag the crosshairs over the white background. The tool will sample the color directly under the crosshairs and erase similar colors within the brush’s tolerance. Carefully move around the edges of your subject. For delicate areas like hair, reduce tolerance and brush size, and work slowly. The contrasting temporary background will clearly show your progress.
- Clean Up (Optional): If any minor white pixels remain or if you accidentally erased part of the subject, switch to a regular Eraser Tool for small clean-ups, or use the History panel to step back.
- Replace Background: Once satisfied with the cutout, hide or delete your temporary colored layer. You can now add a new solid color, a transparent background, or a compelling image background from Tophinhanhdep.com, such as a serene Nature backdrop or a bold Abstract design, to enhance your Beautiful Photography.
The Background Eraser requires practice and a keen eye, but its ability to handle complex, soft edges makes it indispensable for professional results in Portrait Photo and certain Product Image Background Removal.
Quick and Intelligent Selection Tools: Speeding Up Your Workflow
Photoshop also offers an array of automated and semi-automated selection tools that can significantly speed up the background removal process, especially for simpler subjects or when a pixel-perfect cutout isn’t strictly necessary. These tools are fantastic for rapid prototyping in Visual Design or for quickly preparing images for Mood Boards.
White Background Removal Using Object Selection Tool
The Object Selection Tool (introduced in Photoshop CC) leverages Adobe’s AI to intelligently detect and select objects within an image.
- Open Your Image: Start by opening your image in Photoshop.
- Select the Object Selection Tool: Choose it from the toolbar.
- Choose a Mode: In the options bar, select either “Rectangle” or “Lasso” mode. “Rectangle” is best for subjects easily enclosed by a rectangular box, while “Lasso” allows for more freeform drawing around complex shapes or multiple subjects.
- Draw a Selection: Draw a loose rectangle or lasso around the object you want to select. Photoshop’s AI will then analyze the area and automatically snap a selection to the perceived edges of your object.
- Refine Selection: If the initial selection isn’t perfect, use the Shift key to add to the selection or the Alt/Option key to subtract from it, dragging over the areas that need adjustment.
- Apply Layer Mask: Click the “Add layer mask” icon in the Layers panel. This instantly removes the background, leaving your selected object on a transparent layer. You can then add any background you desire.
This tool is incredibly fast and surprisingly accurate for many types of objects, making it a great starting point for many Photo Manipulation tasks.
White Background Removal Using Magic Wand Tool
The Magic Wand Tool is one of Photoshop’s oldest selection tools, ideal for selecting areas of consistent color. It’s particularly effective when your white background is very uniform and clean.
- Unlock the Layer: Double-click the background layer in the Layers panel to unlock it, allowing it to become an editable layer (Layer 0).
- Select the Magic Wand Tool: Find it in the toolbar (often grouped with the Quick Selection Tool).
- Adjust Settings: In the options bar, set “Tolerance” (controls the range of colors selected; start with 30-50 for white) and ensure “Contiguous” is checked (to select only adjacent pixels of similar color).
- Click the White Background: Click anywhere on the white background. The Magic Wand will select all adjacent pixels of similar color within your tolerance setting. Hold Shift and click on any unselected white areas (like shadows or gaps) to add them to the selection.
- Inverse Selection (Optional but Recommended): Once the entire background is selected, press Shift+Ctrl+I (Shift+Cmd+I on Mac) to inverse the selection, so only your subject is selected. This allows for a clean deletion of the background without affecting your subject.
- Delete the Background: Press the Delete key. The white background will be replaced with the transparency checkerboard pattern.
- Deselect: Press Ctrl+D (Cmd+D on Mac) to deselect the marching ants.
- Clean Up: Use a regular Eraser Tool with a small brush size to carefully remove any small remaining white specks or halos around the edges.
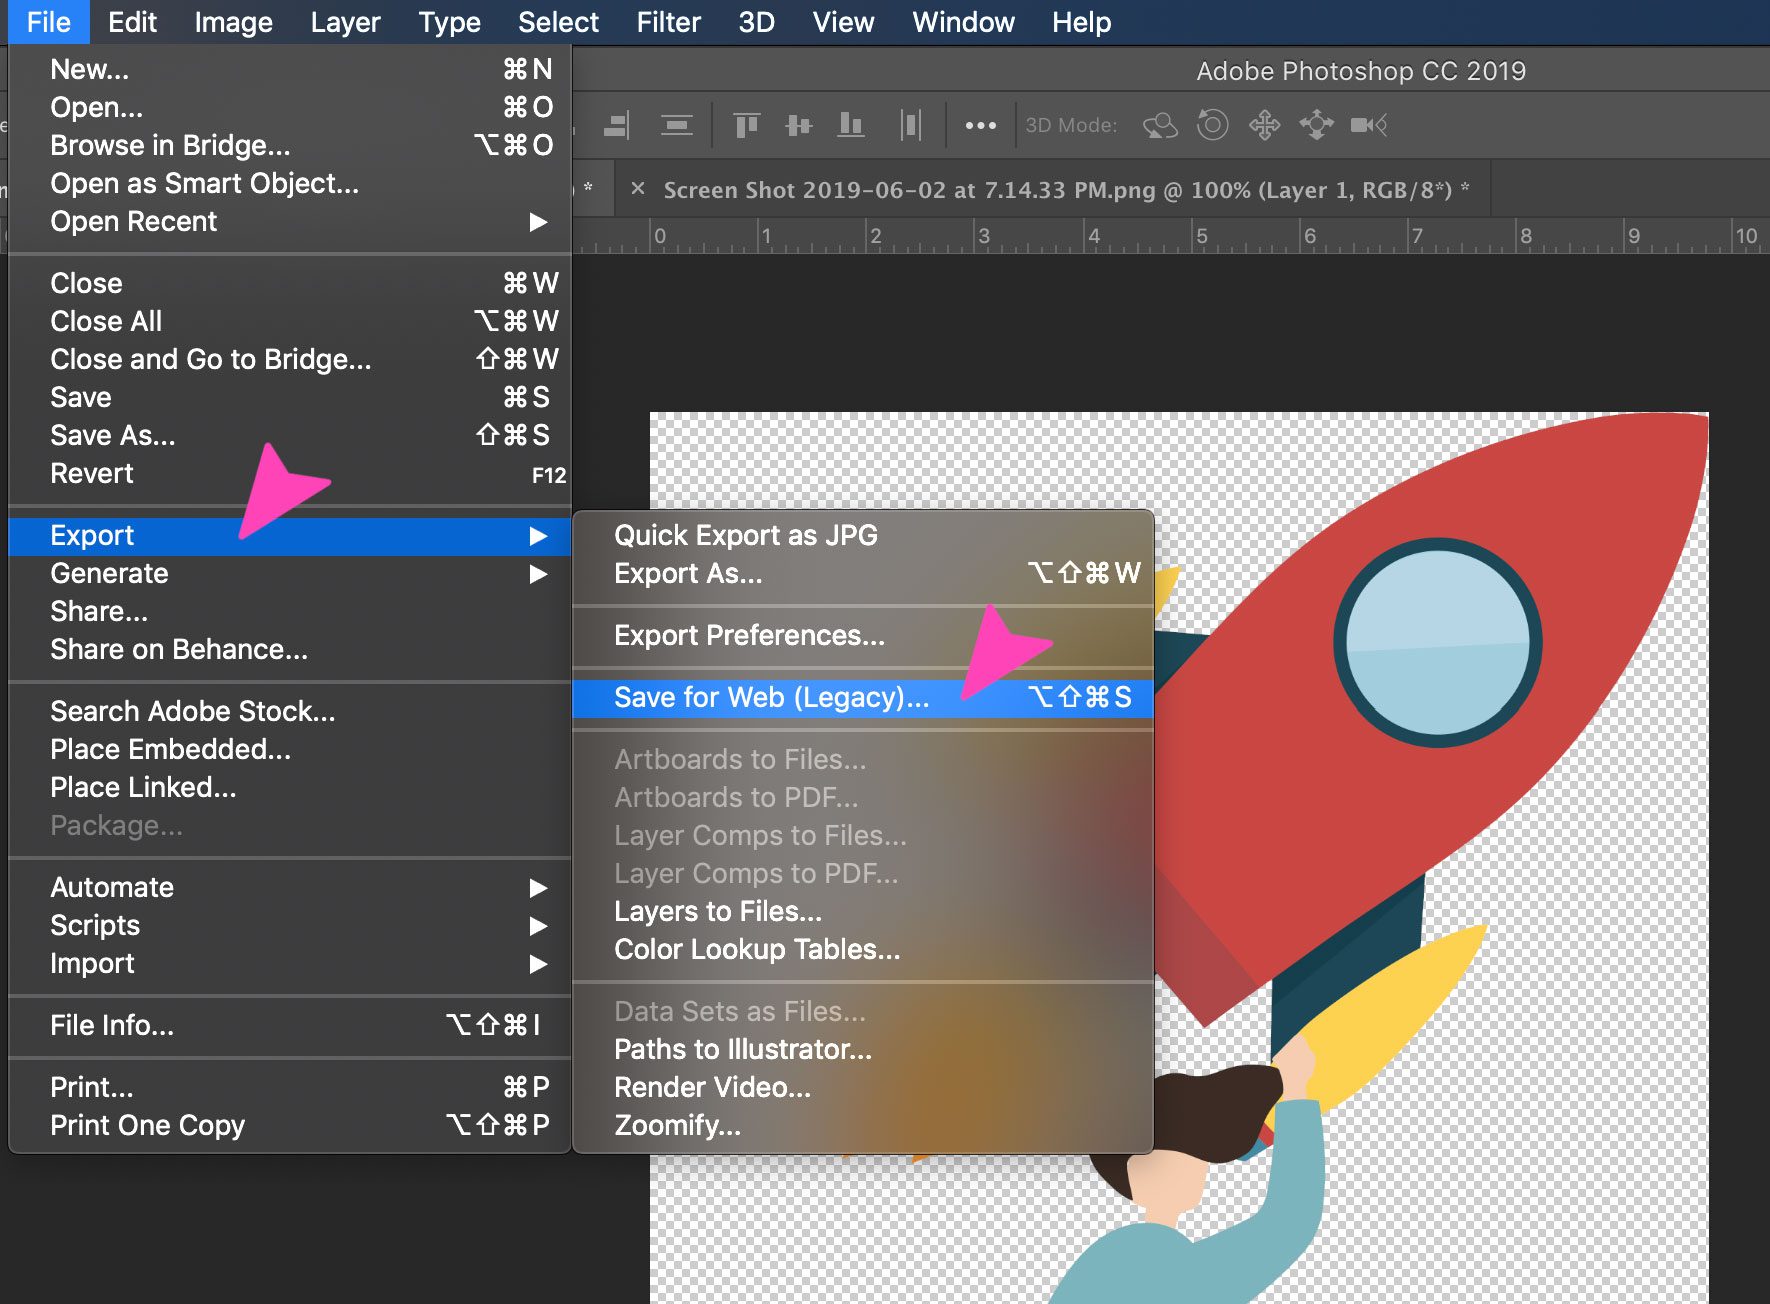
- Save as PNG: Remember to save your image as a PNG file to preserve the transparency, especially for Product Images or Graphic Design elements for Tophinhanhdep.com.
The Magic Wand is fast for simple, solid backgrounds but struggles with gradients, shadows, or backgrounds with color variations.
Quick Selection Tool to Remove Background From Image
The Quick Selection Tool is an intuitive “paint-and-select” tool that allows you to quickly brush over an area to select it. It’s more versatile than the Magic Wand for slightly more complex backgrounds.
- Open Image & Create New Transparent File: Open your image in Photoshop. For comparison, create a new document (File > New) and ensure “Background Contents” is set to “Transparent.” Arrange your windows (Window > Arrange > 2-Up Vertical) to see both files side-by-side.
- Duplicate Layer: Unlock and duplicate your image layer for non-destructive editing.
- Select the Quick Selection Tool: Choose it from the toolbar.
- Drag to Select Subject: Click and drag the cursor over the main subject. The tool intelligently expands the selection to find and follow the edges. Hold Alt/Option to subtract from the selection if it goes too far.
- Refine Selection (Q-Mask Mode): Press ‘Q’ on your keyboard to enter Quick Mask mode. The selected area will remain normal, while the unselected area (background) will be covered in a translucent red overlay. This mode is excellent for fine-tuning.
- Select the Brush Tool (B). Use white as your foreground color to add to the selection (erase red), and black to subtract from the selection (add red). Adjust brush size and hardness for precision.
- Zoom in to clean up edges, especially around hair or intricate details.
- Press ‘Q’ again to exit Quick Mask mode and see the refined selection.
- (Optional) Apply a small feather (Select > Modify > Feather) to soften the edges.
- Move Subject to New File: Select the Move Tool (V). Click on your selected subject in the original image and drag it over to the new transparent document. Photoshop will create a new layer for it. You can resize and position it as needed.
- Finalize: Once the subject is on the transparent canvas, you can save it as a PNG or add any new background.
The Quick Selection Tool is a fantastic balance of speed and control, making it a popular choice for many Photo Editing tasks on Tophinhanhdep.com.
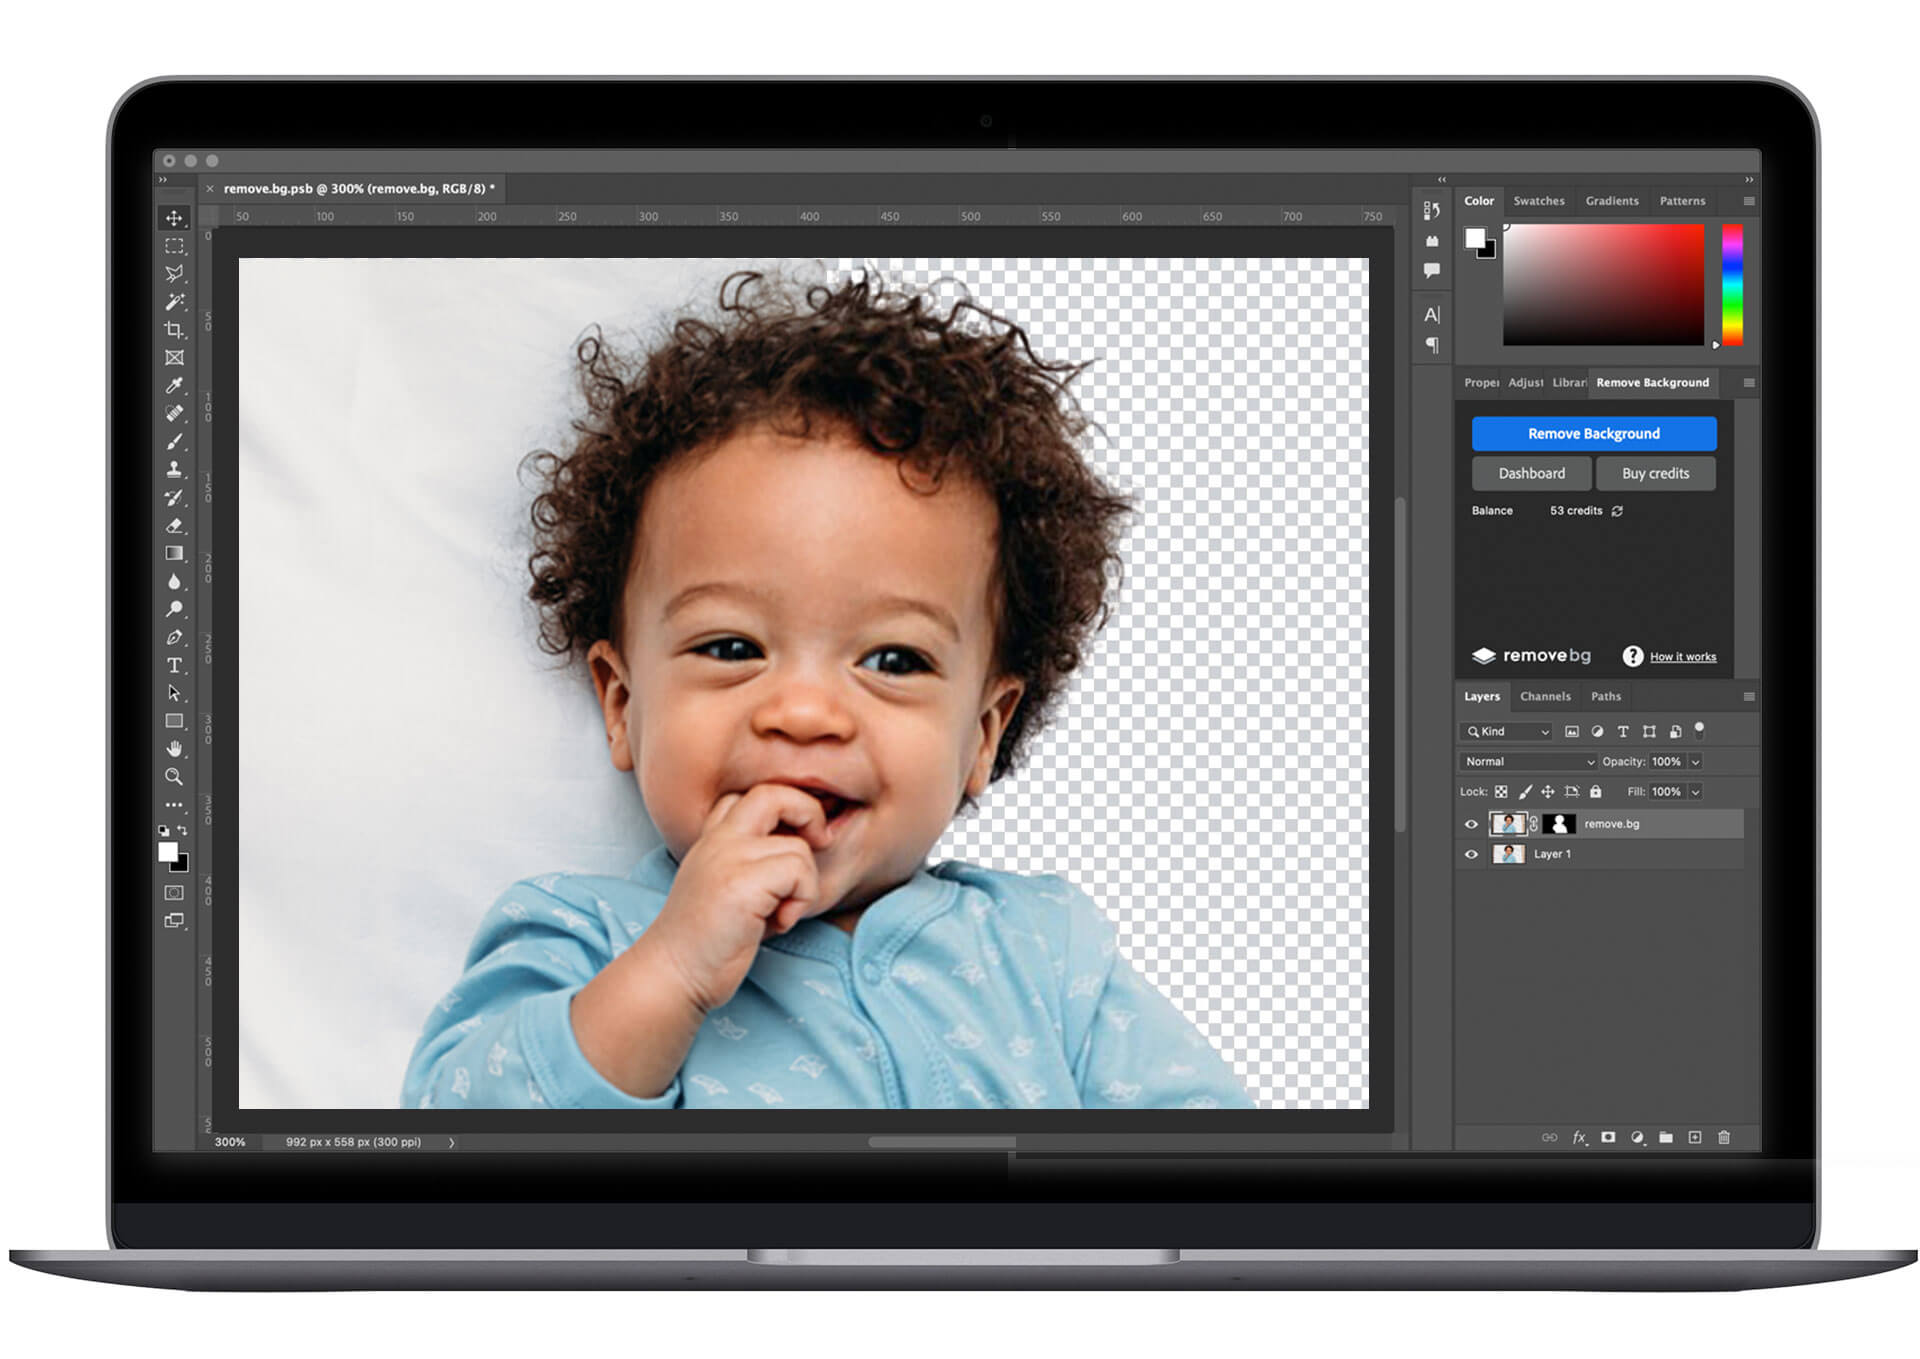
Beyond Photoshop: AI and Online Solutions for Effortless Background Removal
While Photoshop offers unparalleled control, not everyone has access to the software or the time to master its intricate tools. For those seeking quicker, more automated solutions, the landscape of Image Tools has evolved significantly, particularly with the advent of AI. On Tophinhanhdep.com, we recognize the value of streamlining workflows, and our recommended AI-powered background removers provide an excellent alternative.
These automated platforms, sometimes integrated as part of Tophinhanhdep.com’s toolkit, utilize advanced algorithms to detect and separate foreground subjects from backgrounds with remarkable speed. Users can simply upload an image, and the AI works its magic, typically delivering a transparent cutout in seconds.
Benefits of AI and Online Background Removers:
- Speed and Efficiency: They are incredibly fast, removing backgrounds in mere seconds, ideal for bulk processing or urgent Image Tools needs.
- Ease of Use: Most tools feature a user-friendly drag-and-drop interface, requiring no prior editing experience. This makes them accessible for anyone creating Mood Boards or simple Thematic Collections.
- Accessibility: Being web-based, they are accessible from any device with an internet connection, bypassing the need for expensive software licenses.
- Often Free for Basic Use: Many platforms offer free trials or a limited number of free removals, allowing users to test the quality before committing.
Limitations to Consider:
- Complex Edges: While AI has improved drastically, very intricate details like wispy hair, translucent objects, or highly blurred edges can still be challenging for automated tools, sometimes resulting in less precise cutouts compared to manual Photoshop techniques.
- Control: Users have less manual control over the selection and refinement process, meaning minor errors might require external touch-ups or using the tool’s limited in-built editor.
For simple Product Images with clear separation, or for quick Graphic Design mock-ups and Photo Ideas, Tophinhanhdep.com’s recommended AI tools are a powerful, time-saving asset. They perfectly complement our other Image Tools by providing a rapid initial step before you might use our compressors, optimizers, or AI upscalers for final polish.
Strategic Background Removal: When and Where It Matters Most
Understanding how to remove a white background is only half the battle; knowing when and why to apply this technique is equally important for achieving compelling Visual Design and curating exceptional Image Inspiration & Collections.
Elevating Product and Portrait Photography for Tophinhanhdep.com’s Collections
The strategic removal of white backgrounds plays a pivotal role in enhancing both product and portrait photography, making them suitable for diverse applications and Trending Styles on Tophinhanhdep.com.
- Product Images: While many e-commerce platforms (like Amazon and eBay) strictly require product photos on a pure white background to maintain consistency and professionalism, there are numerous scenarios where removing this white backdrop is crucial. For creative marketing campaigns, dynamic advertisements, or engaging Thematic Collections, isolating a product allows it to be placed into lifestyle shots, vibrant collages, or against specific Aesthetic Backgrounds that resonate with a brand’s identity. Imagine a white gadget, which might disappear against a white background, suddenly popping against a deep blue Abstract backdrop, or a piece of jewelry highlighted against a subtle Nature texture. This transformation is essential for impactful Digital Photography and Photo Manipulation that drives engagement.
- Portrait Photos: Often shot in studios with white or solid backdrops, portraits benefit immensely from background removal. This enables photographers and designers to:
- Create Unique Aesthetic Composites: Replace a plain studio background with a stunning Nature vista, an evocative Abstract design, or an Emotional atmospheric scene, lending depth and narrative to the portrait. This is a cornerstone of Beautiful Photography.
- Achieve Consistent Branding: For models or personal branding, transparent portraits can be easily integrated into various marketing materials, ensuring a consistent look across different platforms and Mood Boards.
- Focus on the Subject: By eliminating a potentially distracting background, the viewer’s attention is drawn entirely to the subject, enhancing the portrait’s overall impact and artistic merit. Special attention, as discussed, is paid to delicate elements like hair, often requiring advanced masking techniques for realistic results.
When to Embrace the White Background (and When to Transform It)
The decision to remove a white background isn’t always straightforward. It depends heavily on the image’s intended purpose and the desired Visual Design outcome.
When We Need to Remove White Backdrop:
- Compositing and Layering: If you plan to combine multiple image elements for Digital Art, Graphic Design, or complex Photo Manipulation, a transparent background is non-negotiable.
- Creating Custom Wallpapers and Backgrounds: To allow images to be placed seamlessly onto different Wallpapers or Backgrounds (e.g., Aesthetic, Nature, Abstract) from Tophinhanhdep.com.
- Flexible Branding and Marketing: For maximum adaptability in advertisements, social media content, or seasonal campaigns where the background needs to change frequently to match Trending Styles or Thematic Collections.
- Images with Transparent Elements: If your subject itself contains transparent or translucent parts (like glass, water, or delicate fabrics), removing the white background will allow these elements to interact realistically with a new background.
- Subject-Background Clashes: When the subject is predominantly white or a very light color, a white background can make it “disappear.” Replacing it with a contrasting color ensures visibility and impact.
When Not to Remove White BG:
- Standard E-commerce Product Listings: Many major online marketplaces (e.g., Amazon, eBay) have strict guidelines mandating pure white backgrounds for primary product images. This ensures uniformity and focuses customer attention solely on the product. Removing it here would be counterproductive.
- Official Documentation or Formal Presentations: In contexts requiring a clean, minimalist, or official aesthetic, a white background can convey professionalism and clarity.
- Aesthetic Choice: If a photograph genuinely looks its best on a white background, and no further Photo Manipulation or background replacement is required for your Creative Ideas, then there’s no need to alter it. Sometimes, simplicity is the ultimate sophistication, and a well-lit white background can enhance the perceived quality of High Resolution products or Beautiful Photography.
Understanding these nuances ensures that your efforts in background removal are always purposeful, enhancing the final image and aligning with your Visual Design objectives.
Conclusion
The ability to remove a white background from an image is more than just a technical skill; it’s a gateway to boundless creative expression in Digital Photography and Visual Design. As we’ve explored, whether you choose the pixel-perfect precision of Photoshop’s Pen Tool, the intelligent edge detection of the Background Eraser, the swiftness of the Object Selection and Quick Selection tools, or the efficiency of Tophinhanhdep.com’s recommended AI solutions, each method offers unique advantages depending on your image’s complexity and your desired outcome.
Mastering these techniques empowers you to transform ordinary subjects into extraordinary visuals, ready to be integrated into custom Wallpapers, dynamic Mood Boards, captivating Thematic Collections, or any Aesthetic or Nature backdrop you envision. It’s a fundamental step in Photo Manipulation, allowing your High Resolution images to adapt to Trending Styles and capture attention.
We encourage you to practice, experiment, and discover which tools best suit your workflow and Creative Ideas. The world of Image Tools is constantly evolving, and on Tophinhanhdep.com, we are committed to providing you with the resources, Stock Photos, and inspiration to excel. Explore our vast Image Inspiration & Collections and advanced Image Tools to take your visual storytelling to the next level. Your journey to stunning, impactful imagery truly begins when you master the art of background removal.