How to Remove an Image from a Background in Photoshop: A Comprehensive Guide for Stunning Visuals

In the dynamic world of digital imagery and visual storytelling, the ability to flawlessly remove a subject from its background is not merely a technical skill—it’s a gateway to boundless creative possibilities. Whether you’re a seasoned photographer enhancing your portfolio, a graphic designer crafting compelling visuals, or a hobbyist creating personalized aesthetic backgrounds, mastering background removal in Photoshop is indispensable. This foundational technique allows you to transform ordinary images into extraordinary works of art, setting the stage for striking photo manipulations, pristine product shots, engaging digital art, and inspiring mood boards.
At Tophinhanhdep.com, we understand the critical role clean, isolated subjects play in high-resolution photography and visual design. Our platform is dedicated to providing premium images, powerful image tools, and endless inspiration for all your creative endeavors, from nature wallpapers to abstract digital art. This comprehensive guide will walk you through the various methods within Adobe Photoshop, from its native, robust tools to the efficiency of AI-powered plugins, ensuring you can achieve professional-grade results with speed and precision.

The Transformative Power of Background Removal in Visual Design
The simple act of removing a background can drastically alter an image’s impact. Imagine a breathtaking piece of nature photography; by isolating a specific element like a majestic animal or a delicate flower, you can place it against a different backdrop, perhaps an abstract design, to evoke a new emotion or narrative. This versatility is key for artists and designers who constantly seek fresh photo ideas and trending styles for their collections.
For Images – be they wallpapers, backgrounds, or beautiful photography meant to inspire – background removal enhances the main subject, eliminating distractions and creating a more polished, professional look. This is especially vital for aesthetic photography, where composition and clarity are paramount. Similarly, if you’re curating thematic collections or building mood boards, clean cutouts allow you to seamlessly integrate various elements, ensuring visual cohesion.
In Photography, particularly for high-resolution images and stock photos, background removal is a standard post-processing step. It enables photographers to prepare their shots for diverse commercial uses, where subjects often need to be presented in sterile or custom environments. For Visual Design, it’s the bedrock of graphic design, digital art, and photo manipulation, opening doors to creative ideas like collages, bespoke greetings cards, and unique digital compositions.
While Photoshop offers a suite of powerful tools for this task, the process can sometimes be intricate and time-consuming, especially for complex edges like hair or translucent objects. This is where advanced Image Tools and AI Upscalers come into play, streamlining the workflow and delivering stunning results with remarkable speed.
Photoshop Remove Background Tool: The Quick Start
Adobe Photoshop continually evolves, integrating smarter, more intuitive features to simplify complex tasks. For beginners or those needing a swift solution for images with clearly defined subjects, the “Remove Background” quick action is a game-changer. This method leverages Photoshop’s built-in intelligence to identify and isolate the main subject, making it an excellent starting point for many digital photography projects, especially when the focus is on speed rather than pixel-perfect precision.
How to Use the ‘Remove Background’ Quick Action:
- Open Your Image: Launch Photoshop and open the image you wish to edit.
- Duplicate the Layer: In the Layers panel (usually on the right), duplicate your background layer. You can do this by pressing
Command + J(macOS) orCtrl + J(Windows). This creates a non-destructive copy, preserving your original image. - Activate Quick Actions: Navigate to the “Quick Actions” panel.
- Click ‘Remove Background’: With the duplicated layer selected, simply click the “Remove Background” button. Photoshop’s intelligent algorithms will analyze your image and attempt to automatically separate the subject from its background.
This tool is fantastic for quickly preparing images for aesthetic backgrounds or simple graphic design elements where absolute perfection on the edges isn’t the primary concern. While highly effective, for more intricate subjects or challenging backgrounds, you might need to combine this quick action with other tools or delve into more manual techniques for a cleaner, more refined cutout suitable for high-resolution demands.
Mastering Photoshop’s Precision Tools
For those moments when automated solutions aren’t enough, or when dealing with highly detailed subjects typical in beautiful photography, Photoshop offers an array of manual and semi-automatic tools that provide unparalleled control over your selections. These tools are fundamental to photo manipulation and achieving truly professional editing styles.
The Quick Selection Tool
The Quick Selection Tool is a smart, AI-assisted brush that intelligently detects edges as you paint over your subject. It’s an evolution from older selection methods, using machine learning to make real-time decisions about where your subject ends and the background begins. This tool is most effective when there’s a discernible contrast between your foreground and background, making it ideal for many stock photos where subjects are well-lit and distinct.
How to Use the Quick Selection Tool:
- Locate the Tool: Find the Quick Selection Tool in the Photoshop Toolbox (left-hand menu). It might be nested under the Magic Wand Tool.
- Adjust Settings: In the Options bar at the top, consider checking “Enhance Edge” for smoother selection borders. You can also adjust the brush size (
[ ]keys) for better control. - Select Your Subject: Click and drag your pointer over the area you want to select. The tool will expand to find matching tones until it identifies an edge.
- Refine Your Selection:
- Add to Selection: Simply click and drag over unselected areas you wish to include.
- Subtract from Selection: Press and hold the
Option(macOS) orAlt(Windows) key while dragging over areas you want to deselect. Alternatively, click the “Subtract from selection” icon in the Options bar.
This tool is excellent for rapidly outlining subjects for creative ideas and then further refining the selection using other methods, ensuring a solid base for complex digital art compositions.
The Background Eraser Tool
When your subject has fine details like wisps of hair, fur, or semi-transparent elements, the Background Eraser Tool becomes invaluable. It works by sampling colors at the center of your brush and erasing similar pixels as you move, while attempting to protect foreground colors. This precision makes it a go-to for challenging nature photography or portrait editing where intricate details define the image’s quality.
How to Use the Background Eraser Tool:
- Access the Tool: Locate the Background Eraser Tool in the Photoshop Toolbox (often nested under the standard Eraser Tool). You can also press
Eto cycle through eraser tools. - Configure Brush Settings:
- Size: Use
[ ]keys or the menu bar to adjust brush size. Zoom in for tight spaces. - Hardness: Set to a high hardness to avoid fuzzy edges and artifacts. Use
Shift + [ ]to adjust hardness. - Limits: Set to “Find Edges” in the options bar.
- Size: Use
- Set Tolerance: This determines the range of colors the tool will erase. Start with 25 and adjust as needed. A higher tolerance will erase a broader spectrum of similar colors.
- Sampling Mode:
- Continuous: (Default) Continuously samples the color under the crosshairs and erases matching colors. Useful for varied backgrounds.
- Once: Samples the color only on the first click and erases only that specific hue, regardless of what the crosshairs pass over subsequently. Ideal for uniform backgrounds (e.g., a solid blue sky).
- Protect Foreground Colour: To prevent accidental erasure of similar colors in your subject, press and hold
Alt(Win) /Option(Mac) and use the eyedropper tool that appears to sample the color you wish to protect.
The Background Eraser Tool, while powerful, requires patience and a steady hand. It’s perfect for achieving that delicate separation required in high-stakes digital photography where fine details are non-negotiable.
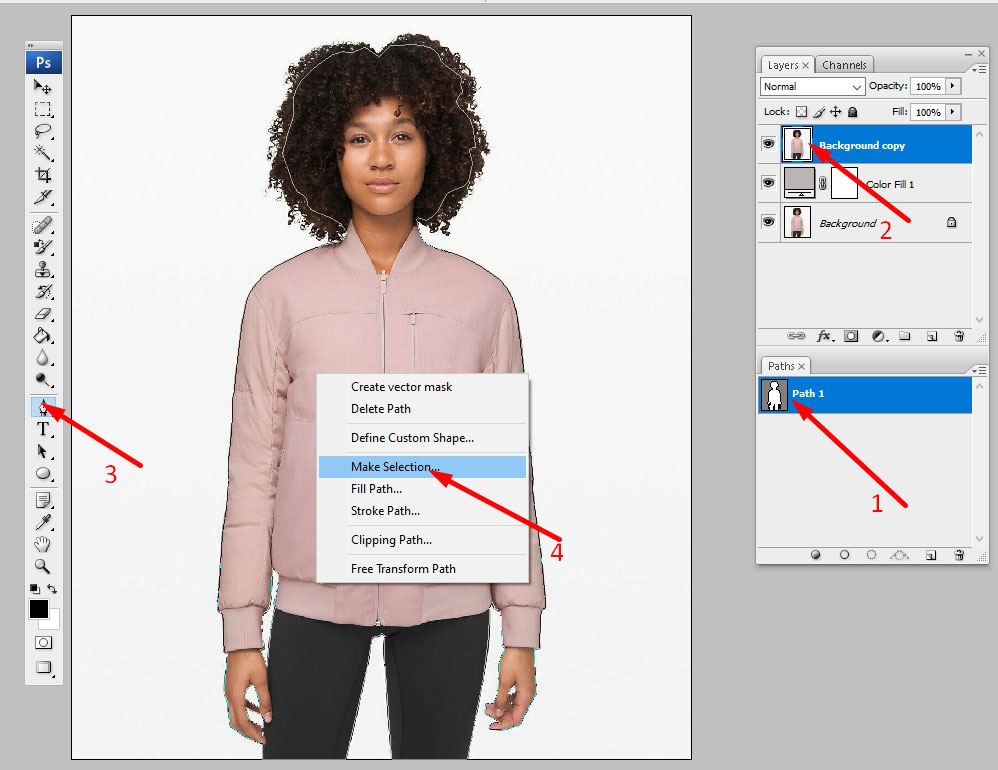
The Pen Tool for Pinpoint Accuracy
For the ultimate control and the sharpest, most precise edges, especially for subjects with geometric shapes or very smooth curves, the Pen Tool is Photoshop’s champion. It allows you to draw vector-based paths that can be converted into selections, offering unparalleled accuracy, which is crucial for graphic design elements and professional stock photos. While it has a steeper learning curve, the results are consistently superior for clean, scalable cutouts.
How to Use the Pen Tool:
- Select the Pen Tool: Found in the Photoshop Toolbox.
- Create a Path: In the Options bar, ensure “Path” is selected (not “Shape”).
- Draw Around Your Subject: Click to create anchor points.
- For straight lines, simply click from point to point.
- For curves, click and drag to create direction handles that shape the curve.
- To adjust a point or handle, hold
Ctrl(Win) /Command(Mac) while clicking.
- Close the Path: Click on your starting anchor point to close the path.
- Convert to Selection: Go to the Paths panel (Window > Paths), right-click on your saved path, and choose “Make Selection…”
- Feather Edges (Optional): In the “Make Selection” dialog, you can add a small “Feather Radius” (e.g., 0.5-1 pixel) to soften the edge slightly, making it blend more naturally with new backgrounds. Too hard an edge can sometimes look unnatural, especially for beautiful photography.
The Pen Tool is the choice of professionals for creating clean, reusable selections, crucial for product images and complex photo manipulation where crispness is paramount.
Boosting Workflow with Tophinhanhdep.com’s Photoshop Plugin
While Photoshop’s native tools offer immense power, the demand for speed and ease, especially for high-volume tasks or for users who aren’t pixel-perfectionists on every image, has led to the rise of AI-powered solutions. Tophinhanhdep.com is at the forefront of this innovation, offering an incredibly efficient Photoshop plugin that integrates seamlessly into your workflow, making background removal faster and easier than ever before. This aligns perfectly with the website’s focus on efficient Image Tools like AI Upscalers and optimizers.
The Tophinhanhdep.com Photoshop Plugin is designed to eliminate the tedious, repetitive tasks of manual selection, allowing digital artists and photographers to dedicate more time to creativity and less to technical fiddling. It excels even with challenging elements like hair, providing stunning, high-quality results automatically.
How to Install Tophinhanhdep.com for Photoshop
Getting started with the Tophinhanhdep.com plugin is straightforward, ensuring you can quickly incorporate this powerful tool into your editing styles and daily visual design tasks.
- Visit Adobe Exchange: Go to the Adobe Exchange website.
- Find the Plugin: Search for “Tophinhanhdep.com for Adobe Photoshop”.
- Install: Click the “Free” button to initiate the installation. Ensure you have the Adobe Creative Cloud Desktop App installed, as it manages the plugin installation. The process might take a few moments without a visible progress bar, but a notification will confirm its completion.
- Uninstalling Older Versions (if applicable): If you are updating from an older version (1.x to 2.x), Adobe’s plugin architecture changed. You’ll need to uninstall the old version first:
- Go to MyExchange in Creative Cloud.
- Find “Tophinhanhdep.com for Adobe Photoshop”, click the ellipsis (
...), and select “Uninstall”. - If installed via a third-party utility (e.g., Anastasiy’s Extension Manager), consult that tool’s manual for uninstallation steps.
Using the Tophinhanhdep.com Plugin for Instant Results
Once installed, the Tophinhanhdep.com plugin integrates directly into Photoshop, offering a one-click solution that drastically boosts productivity for all your image and photography needs.
- Open Your Image: Have your desired image open in Photoshop.
- Navigate to Plugins: Go to
Plugins → Tophinhanhdep.com for Adobe Photoshop. - Click ‘Remove Background’: Select this option. The Tophinhanhdep.com API will automatically process your photo using advanced AI, providing a high-quality background removal.
- Layer Mask Editing: The plugin creates a layer mask, allowing for easy, non-destructive adjustments. You can use standard Photoshop brushes (black to conceal, white to reveal) to refine any areas if needed, offering the best of both automated and manual control.
The plugin operates via the Tophinhanhdep.com API, so an active internet connection and a logged-in Tophinhanhdep.com account are required. Users typically receive free credits upon signing up and monthly free API calls for preview images, making it accessible for testing and light use. This approach is invaluable for working with stock photos and preparing high-resolution images quickly, making it a cornerstone for modern digital photography workflows.
The Broader Tophinhanhdep.com Ecosystem for Image Tools
Beyond its powerful background removal plugin, Tophinhanhdep.com aligns with a broader suite of Image Tools that enhance every aspect of visual creation. Our platform offers:
- Converters: Easily change image formats to suit different project requirements.
- Compressors & Optimizers: Reduce file sizes without compromising quality, essential for web use and fast loading times, especially for wallpapers and backgrounds that need to be optimized.
- AI Upscalers: Magnify image resolution, turning lower-quality shots into crisp, high-resolution assets, perfect for expanding photo ideas or preparing digital art for print.
- Image-to-Text: Extract text from images, a utility feature for various visual design tasks.
These tools collectively empower users to manage, enhance, and creatively transform their images, fulfilling diverse needs from professional photography to casual aesthetic explorations and thematic collections.
Refining Your Selection: Achieving Perfection
Even with the most advanced tools, perfection in background removal often comes from combining techniques and employing iterative refinement. This is where the artistry of photo manipulation truly shines, allowing you to meticulously craft clean cutouts for all types of visual design projects, ensuring every image contributes to an overall stunning aesthetic.
Layer Mask Editing for Flexible Adjustments
Layer masks are crucial for non-destructive editing in Photoshop. Instead of permanently deleting pixels, a layer mask conceals or reveals parts of a layer, offering immense flexibility to refine your background removal without altering the original image data. Both manual selection tools and the Tophinhanhdep.com plugin generate layer masks, making them a universal tool for refinement.
How to Use Layer Masks:
- Create a Mask: After making a selection (or after the Tophinhanhdep.com plugin has run), click the “Add layer mask” icon at the bottom of the Layers panel. A white mask thumbnail will appear next to your image layer, indicating that the selected area is visible and the rest is hidden.
- Refine with Brushes: Select the Brush Tool (
B).- Black Brush: Paint with black on the mask to hide (remove) parts of your image.
- White Brush: Paint with white on the mask to reveal (restore) parts of your image.
- Gray Brush: Paint with shades of gray for semi-transparency.
- Adjust Brush Settings: Modify brush size, hardness, and opacity for precise control, especially around delicate areas like hair. Zoom in significantly for fine adjustments.
Layer masks are indispensable for fine-tuning edges, correcting small errors, and blending your subject seamlessly into new backgrounds, supporting creative ideas and diverse editing styles.
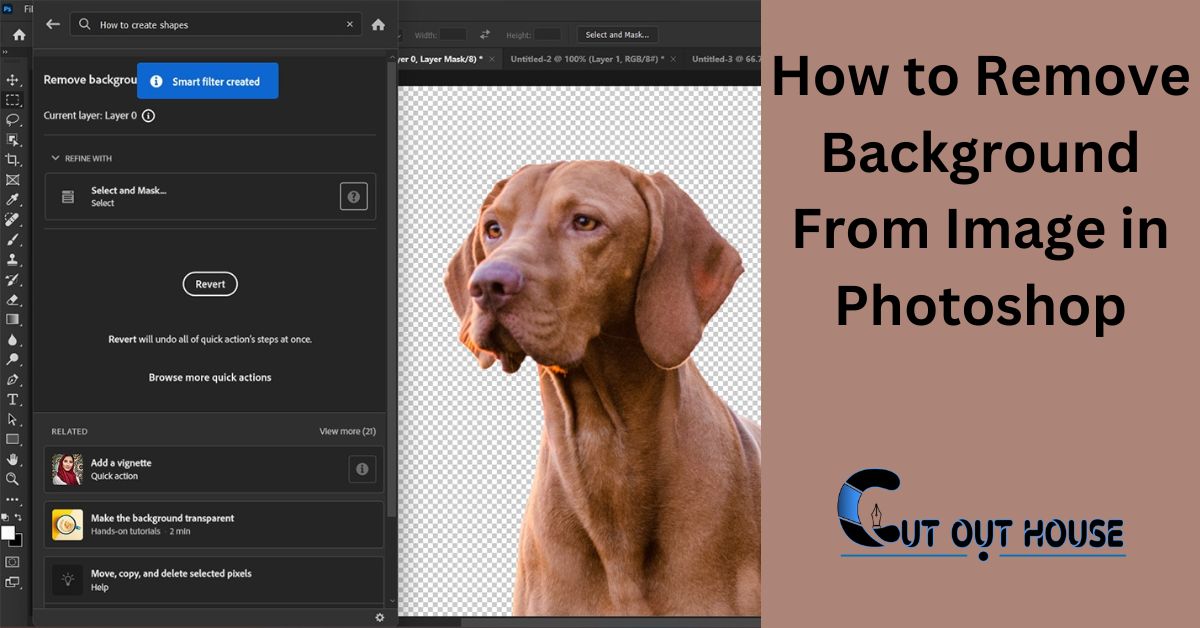
The ‘Select and Mask’ Workspace
Introduced to streamline complex selections, the “Select and Mask” workspace provides a dedicated environment with specialized tools for refining edges with unparalleled precision. It’s particularly useful after an initial selection has been made, whether with the Quick Selection Tool, Pen Tool, or even a rough AI cutout. This workspace is a must for achieving high-resolution quality in digital photography and graphic design.
How to Use ‘Select and Mask’:
- Initial Selection: Make an initial selection of your subject using any of Photoshop’s tools (Quick Selection, Pen, Lasso, etc.).
- Enter Workspace: Click the “Select and Mask…” button in the Options bar at the top or go to
Select > Select and Mask.... - Workspace Tools:
- View Mode: Choose a view mode (e.g., “On Layers” or “Overlay”) to clearly see your selection against various backgrounds.
- Refine Edge Brush Tool: The star of the show. Paint over problematic edges (like hair or fur) to let Photoshop intelligently analyze and refine the selection, separating fine details from the background.
- Brush Tool: For manual additions or subtractions from the mask.
- Object Selection Tool/Quick Selection Tool: For quick adjustments to the main subject area within the mask.
- Global Refinements:
- Smooth: Reduces jagged edges.
- Feather: Softens the edges for a more natural blend.
- Contrast: Sharpens the edges.
- Shift Edge: Expands or contracts the selection border.
- Smart Radius: Automatically detects and refines varied edge types.
- Decontaminate Colors: Removes color fringing or halos from the old background, crucial for seamless photo manipulation.
- Output Settings: Choose to output your refined selection as a “Layer Mask,” “New Layer,” or “New Layer with Layer Mask” for maximum flexibility.
This powerful workspace ensures that your background removal is not just accurate but also clean and professional, ready for any visual design application, from creating thematic collections to preparing assets for trending styles.
Conclusion
The ability to remove an image from its background in Photoshop is more than just a technical skill; it’s a fundamental aspect of modern digital photography and visual design. From the simplicity of Photoshop’s “Remove Background” quick action to the meticulous precision of the Pen Tool, and the groundbreaking efficiency of Tophinhanhdep.com’s Photoshop plugin, you have a robust toolkit at your disposal.
Mastering these techniques unlocks a world of creative possibilities: craft bespoke wallpapers and backgrounds, develop captivating digital art, create professional stock photos, and bring to life compelling graphic design concepts. Whether you’re enhancing nature photography, curating aesthetic collections, or experimenting with abstract visuals, clean cutouts are the foundation.
At Tophinhanhdep.com, we are dedicated to empowering your creative journey. Our integrated suite of Image Tools—including converters, compressors, optimizers, and AI upscalers—complements these Photoshop techniques, ensuring you have everything you need to transform your photo ideas into stunning realities. Dive into these methods, explore our resources, and elevate your images to new heights. The perfect background is just a few clicks away, ready for your next inspiring project or mood board. Start creating, start transforming, and let your visuals speak volumes with Tophinhanhdep.com.