Unlocking Creative Freedom: How to Remove Image Backgrounds in Adobe Illustrator for Enhanced Visuals on Tophinhanhdep.com

Adobe Illustrator, a cornerstone of the Adobe Creative Cloud suite, has been the industry standard for vector graphics since its inception. While many associate it primarily with creating logos, typography, and illustrations, its capabilities extend to refined image manipulation, particularly for achieving transparent backgrounds. For designers, photographers, and content creators aiming to elevate their visuals – from striking Aesthetic compositions to captivating Nature and Abstract art, or even poignant Sad/Emotional and Beautiful Photography – mastering background removal in Illustrator is an invaluable skill.

On Tophinhanhdep.com, we understand the pursuit of perfect imagery. Our platform champions the creation and enhancement of stunning visuals, offering a vast array of Images (including Wallpapers and Backgrounds), Photography resources (High Resolution shots, Stock Photos, insights into Digital Photography and diverse Editing Styles), and powerful Image Tools. This comprehensive guide will delve into Illustrator’s best techniques for background removal, ensuring your foreground subjects stand out, ready for any Visual Design project, Photo Manipulation, or Creative Ideas you envision. We’ll also explore how Tophinhanhdep.com can further streamline and enhance your image editing journey.
The Imperative of Background Removal in Modern Visual Design
In today’s visually-driven world, the ability to seamlessly integrate or isolate image elements is paramount. A transparent background empowers designers to place any subject – be it a product, a person, or an object from Nature Photography – onto diverse Wallpapers, Backgrounds, or into complex Graphic Design layouts without distracting remnants. This flexibility is crucial for developing compelling Mood Boards, curating Thematic Collections, and staying ahead of Trending Styles.
Why Transparency Transforms Your Images
Removing an image’s background isn’t merely about deletion; it’s about liberation. A transparent background allows the subject of your Beautiful Photography to become a versatile asset. Imagine taking a High Resolution shot of a delicate flower from a Nature series and being able to place it onto a vibrant Abstract background, or against a subtle gradient for a product advertisement. This process fuels Creative Ideas and sophisticated Photo Manipulation, transforming ordinary images into extraordinary Digital Art. For Stock Photos, it multiplies their utility, making them adaptable for countless design scenarios on platforms like Tophinhanhdep.com where versatility is key.
Illustrator’s Role in a Digital Photography Workflow
While Adobe Photoshop is renowned for raster image editing, Illustrator carves out a unique niche in the Digital Photography and Editing Styles landscape, especially when the goal is to create scalable, vector-based graphics from photos or to achieve incredibly precise cutouts. Unlike pixels that can become blurry when scaled, Illustrator’s vectors maintain their sharp edges and quality irrespective of size. This makes it an ideal choice for elements intended for logos, large-format prints, or digital assets that need to adapt across various screen resolutions. Its precision tools, while demanding a steeper learning curve, offer unparalleled control for Graphic Design professionals.
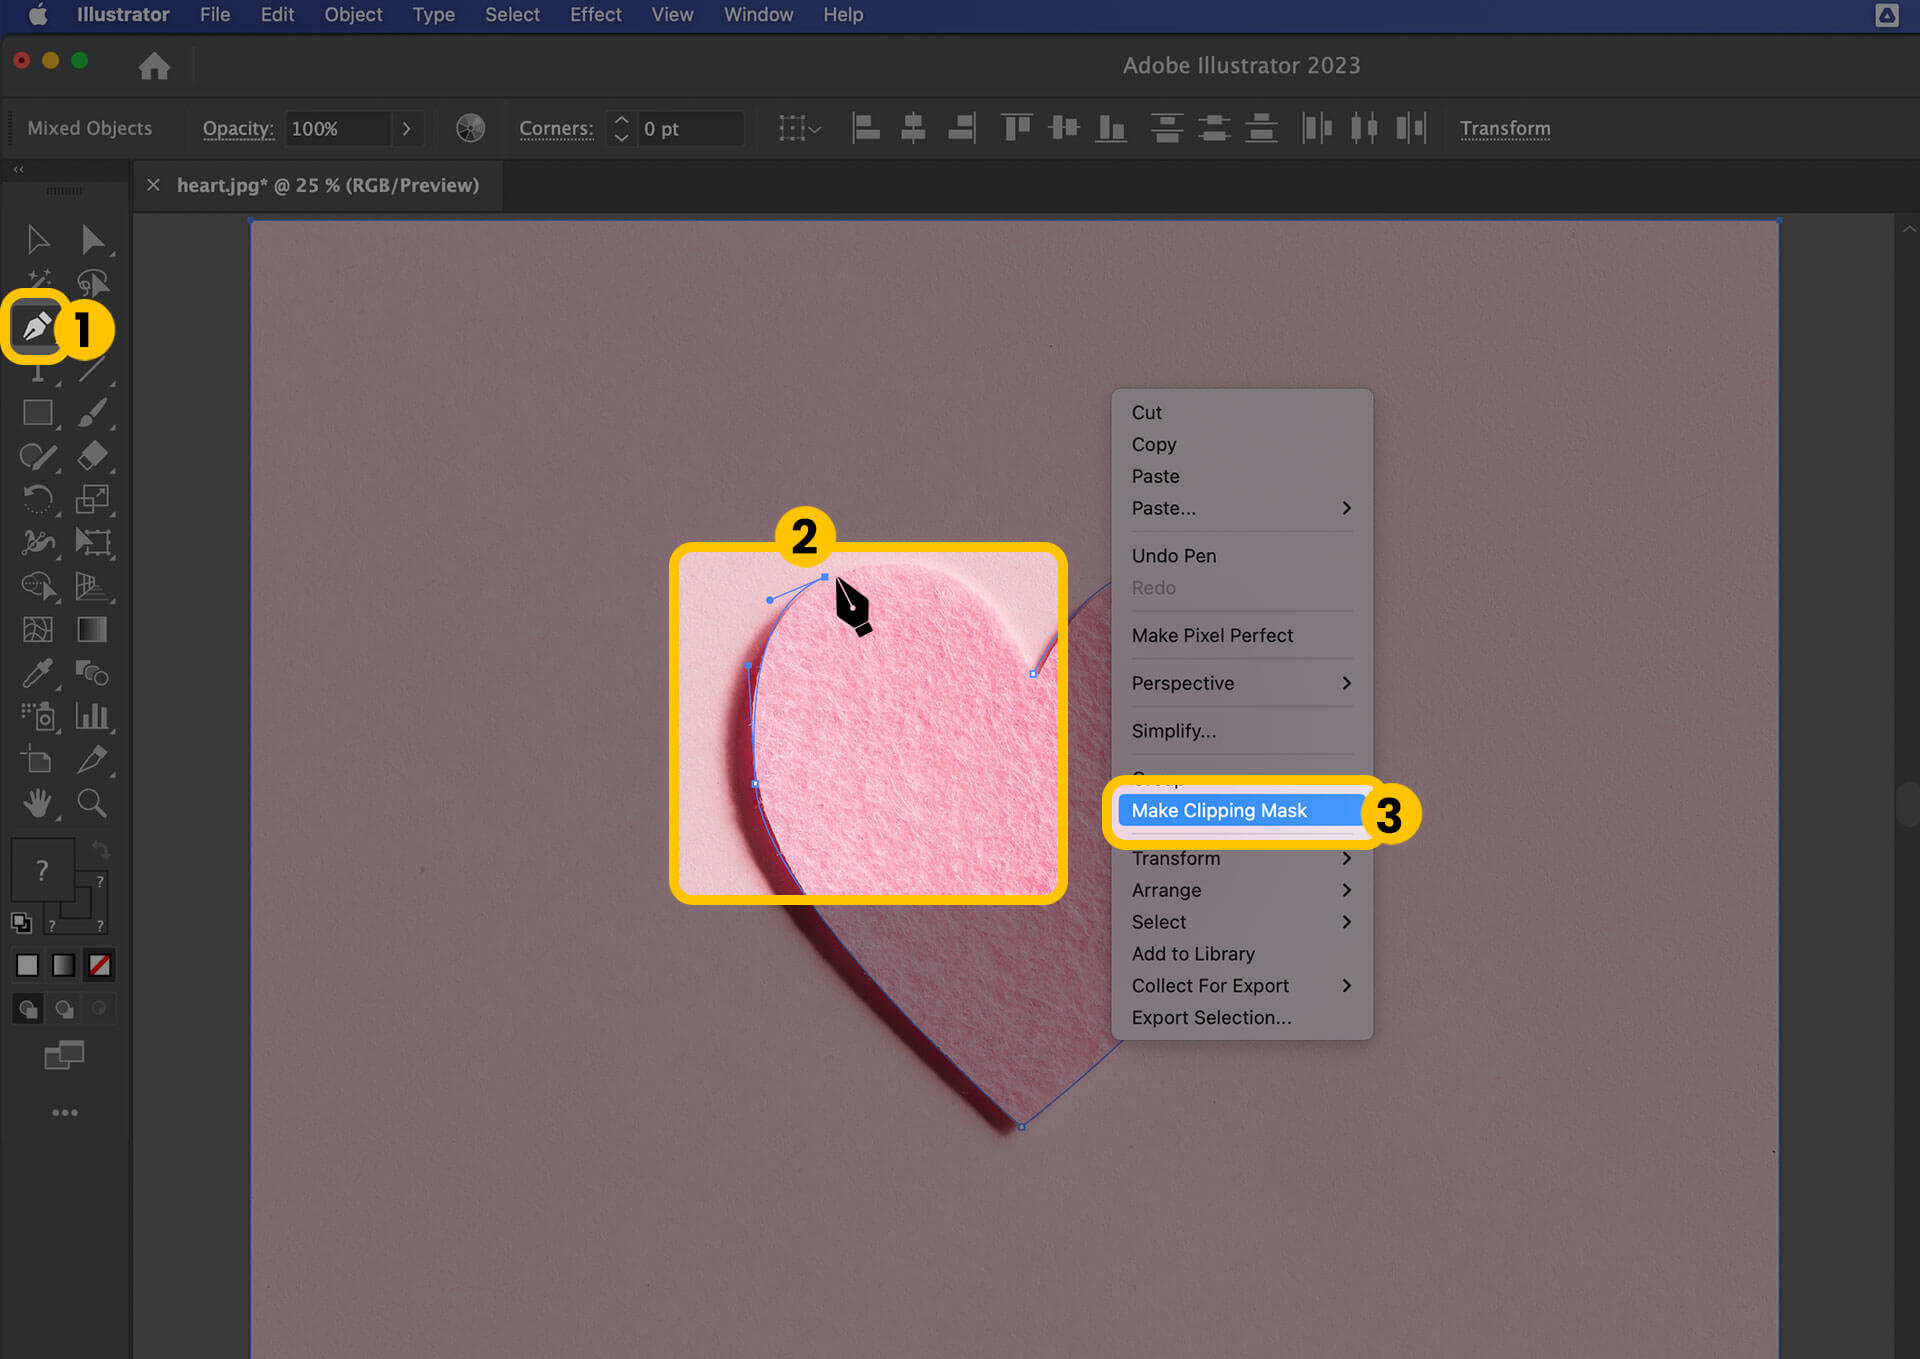
Method 1: Achieving Precision with Clipping Masks
The clipping mask technique in Adobe Illustrator is your go-to method for images with intricate details or complex edges, particularly when you need to extract a foreground object from a busy photographic background. This method leverages the Pen Tool, offering meticulous control to trace around your desired subject, ensuring a clean, professional cutout. This approach is fundamental for high-quality Photo Manipulation and creating pristine Graphic Design elements.
Step-by-Step with the Pen Tool
To begin, you’ll need to open your image in Adobe Illustrator. Navigate to File > Open or File > Place to bring your chosen image onto the artboard. For optimal results, especially with High Resolution Photography, zoom significantly into the area you intend to trace. You can do this by selecting the Zoom Tool (Z) from the toolbar and clicking on the desired area, or by using keyboard shortcuts (Alt/Option + scroll wheel). This magnification is crucial for achieving pixel-perfect precision around complex edges.
Next, select the Pen Tool (P) from the toolbar. Before you start tracing, it’s often helpful to set the fill color to ‘None’ (the white square with a red diagonal line) and choose a contrasting stroke color (e.g., bright red or blue) with a thin weight. This allows you to clearly see your tracing path without obscuring the image beneath. Begin clicking along the edge of your foreground object. Each click creates an “anchor point.” To create straight lines, simply click at different points. For curved lines, click and then drag the mouse to pull out “Bezier curve handles.” These handles allow you to adjust the curvature of the line segments. If you make a mistake, you can always press Ctrl/Command + Z to undo. The goal is to carefully follow the contours of your subject, placing anchor points strategically to minimize the number of adjustments needed later.
Crafting the Perfect Mask for Complex Subjects
The beauty of the Pen Tool lies in its flexibility. Once you’ve laid down your initial path, it rarely needs to be absolutely perfect from the first pass. You can always refine it. Use the Direct Selection Tool (A), represented by a white arrow, to click on individual anchor points. This will reveal their Bezier handles, allowing you to click and drag them to adjust the curve of the path segment. You can also click and drag anchor points themselves to reposition them. For Graphic Design work that demands absolute flawlessness, this level of detail is indispensable. This meticulous tracing process ensures that your extracted subject, whether from Stock Photos or your own Digital Photography, retains all its intended detail and crispness, perfectly isolating it for new Creative Ideas or Photo Manipulation projects.
Once your outline is complete, close the path by clicking back on your very first anchor point. This will connect the final segment to the starting point, forming a closed shape around your foreground object.
Applying and Saving Your Clipping Mask
With your path created, it’s time to apply the clipping mask. First, select both your image and the newly created path. You can do this by switching to the Selection Tool (V), then holding Shift and clicking on both the image and the path. Alternatively, you can drag a selection box around both elements. With both selected, right-click (or Ctrl-click on Mac) and choose “Create Clipping Mask.” Instantly, everything outside your meticulously drawn path will disappear, leaving only your foreground object visible against a transparent background.
Your image now has a transparent background within Illustrator. It’s crucial to save your work at this stage. Go to File > Save As. You can save it as an Adobe Illustrator file (.ai) to preserve all layers and editing capabilities, or as an Encapsulated PostScript (.eps) or Scalable Vector Graphics (.svg) file, which are versatile vector formats widely used in Graphic Design. These formats are excellent for maintaining High Resolution and scalability for future use, such as integrating into Thematic Collections or Mood Boards.
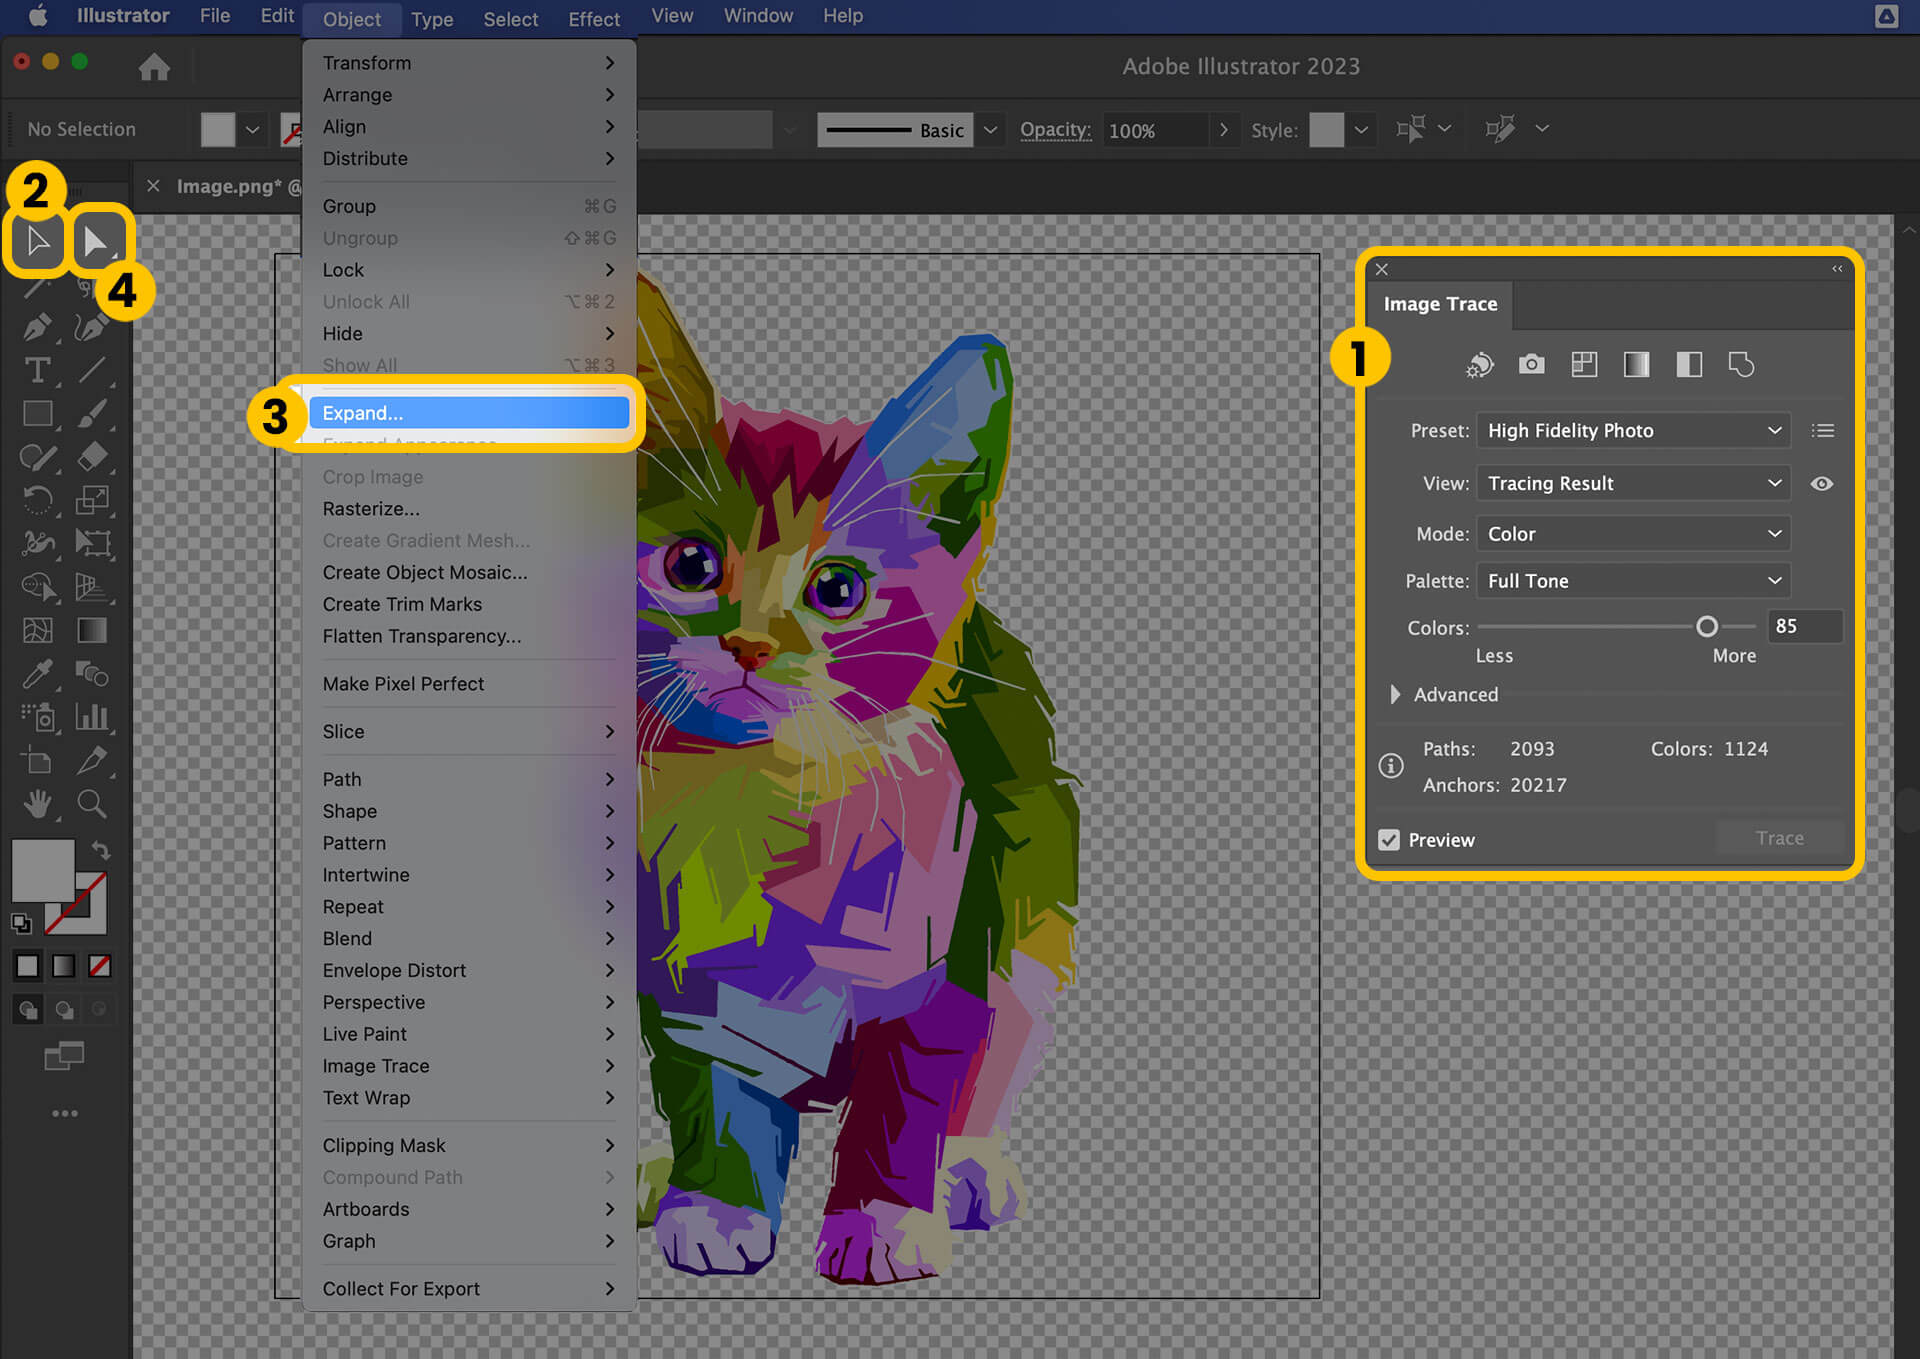
Method 2: Streamlining Background Removal with Image Trace
For images that don’t demand the meticulous precision of the Pen Tool, Illustrator’s Image Trace feature offers a remarkably efficient alternative. This method is particularly powerful because it converts raster images (pixel-based) into vector graphics, which are infinitely scalable without losing quality. This transformation is highly beneficial for Digital Art, Graphic Design, and when you need to reproduce visual elements at various sizes for Wallpapers or Backgrounds.
When to Leverage Image Trace
The Image Trace function truly shines when dealing with subjects that have clear, well-defined edges and a limited number of solid colors. Think logos, line art, cartoons, silhouettes, or simplified Abstract graphics. It’s not typically recommended for complex Beautiful Photography with subtle color gradients and intricate details, as the vectorization process can oversimplify the image, losing photographic nuances. However, for a Stock Photo that functions more as an icon or a graphic element, Image Trace can be a perfect fit, providing scalable assets for Creative Ideas or Trending Styles in visual communication. It transforms pixelated images into crisp, editable vectors, making it a valuable tool on Tophinhanhdep.com for creators seeking versatility.
The Image Trace Workflow
To begin, open your image in Illustrator (File > Place). Select the image using the Selection Tool (V). Now, open the Image Trace panel by going to Window > Image Trace. In this panel, you’ll see various presets. For images with a few colors, presets like “Sketched Art,” “Line Art,” or “3 Colors” can work well. For images that are slightly more complex but still graphic (not photographic), try “High Fidelity Photo” or “Low Fidelity Photo” to see which yields the best initial result.
The key settings to adjust are “Mode” (set to Color if your image has colors) and “Colors” (use the slider or input a number to define the maximum number of colors Illustrator will detect). Reducing the number of colors can often simplify the image and make background removal easier. After selecting your desired preset or adjusting settings, click the “Trace” button. Illustrator will then process your image, converting it into a vectorized preview.
Once traced, the image is still grouped as a single object. To separate the background elements, click “Expand” in the control panel at the top of the screen (or Object > Expand). This converts the traced result into editable vector paths. You will now see many anchor points defining the shapes of your image.
Deleting and Exporting Vectorized Backgrounds
After expanding the image, the background and foreground objects are separate vector shapes, but they are still grouped. To select and delete individual background components, you first need to ungroup them. With the vectorized image selected, go to Object > Ungroup. You may need to do this multiple times if there are nested groups.
Now, switch to the Direct Selection Tool (A) and click on any part of the background you wish to remove. Press the Delete key. If your background was a single, solid color, it might disappear entirely with one click. For more complex backgrounds or those with multiple disconnected elements, you might need to click and delete several areas. For a clear view of transparency, go to View > Show Transparency Grid (Shift+Ctrl+D or Shift+Command+D). This replaces the white artboard with a checkerboard pattern, confirming your background is indeed transparent.
Once you are satisfied with your transparent background, you can export the image. Go to File > Export > Export As. Choose PNG (.png) as the file format, as it fully supports transparency, making it perfect for web use, Wallpapers, or integrating into other Visual Design projects. Ensure the “Transparent” option is selected in the PNG Options dialog box before clicking Export.
Method 3: The Magic Wand for Quick, Consistent Selections
For designers and photographers working with pre-existing vector files or raster images with very simple, uniform backgrounds, the Magic Wand Tool in Adobe Illustrator offers an incredibly fast and intuitive way to remove unwanted areas. This method is highly effective for accelerating workflows when dealing with consistent visual attributes, supporting rapid Photo Ideas and Thematic Collections.
Targeting Vector-Based Images
The Magic Wand tool in Illustrator truly excels when your image is already a vector graphic (e.g., an AI, EPS, SVG, or certain PDF files) and features a background composed of a solid color or a very narrow, consistent color range. Unlike its Photoshop counterpart, which works on pixels, Illustrator’s Magic Wand selects vector shapes based on their shared attributes like fill color, stroke color, stroke weight, or opacity. This makes it ideal for cleaning up vectorized logos, simple illustrations, or Abstract graphic elements where the background is clearly distinguishable by these characteristics. It’s a fantastic shortcut for preparing elements for Digital Art or for quick Graphic Design edits.
Intuitive Selection and Deletion
To use the Magic Wand, first ensure your image is open in Illustrator. Select the Magic Wand Tool (Y) from the toolbar. Now, simply click on the background area you wish to remove. The Magic Wand will automatically select all contiguous or non-contiguous shapes within the image that share similar attributes (based on its settings).
To add more elements to your selection, hold down the Shift key and click on additional areas. If the Magic Wand accidentally selects parts of your foreground object, hold down the Alt (Windows) or Option (macOS) key and click on those areas to deselect them. This interactive process allows for quick and accurate adjustments, minimizing manual tracing for Photo Manipulation tasks where consistency is key.
The power of the Magic Wand can be further customized. Double-click the Magic Wand tool icon to open its settings panel. Here, you can adjust the “Tolerance” for color selection (how similar colors need to be to be selected) and specify whether the tool should consider “Fill Color,” “Stroke Color,” “Stroke Weight,” or “Opacity” when making selections. Fine-tuning these settings can significantly improve the accuracy of your selections, especially when dealing with slightly varied backgrounds or Aesthetic gradients. Once all unwanted background elements are selected, simply press the Delete key to make them disappear, revealing transparency.
The Efficiency of EPS for White Backgrounds
A particularly useful tip for Graphic Design professionals working with logos or simple graphics that have a plain white background is Illustrator’s ability to handle EPS files. When you save an Illustrator file as an EPS (.eps), you have the option to make the background automatically transparent. This is a swift, one-step process for specific scenarios.
To do this, go to File > Save As, and choose “Illustrator EPS” from the ‘Save as type’ or ‘Format’ dropdown menu. In the EPS Options dialog box that appears, under the ‘Preview’ section, select “Tiff (8-bit Color)” and most importantly, check the “Transparent” box. Click OK. This creates a scalable vector file where the white background is inherently transparent, ready for integration into any Visual Design project without further background removal steps. This method is particularly efficient for Stock Photos or graphic elements that will be used in print or digital media where crisp, scalable output is essential.
Optimizing Your Transparent Images and Exploring Tophinhanhdep.com’s Ecosystem
Once you’ve meticulously removed backgrounds in Adobe Illustrator, the next crucial step is exporting your images correctly to preserve transparency and ensure they are suitable for their intended use. This is where the diverse capabilities of Tophinhanhdep.com truly complement your Illustrator workflow, offering further optimization and a vast array of Image Tools.
Exporting for Diverse Applications
The choice of file format for your transparent image is critical and depends heavily on its final destination.
-
PNG (.png) for Web and Digital Transparency: This is the go-to format for images with transparent backgrounds destined for websites, digital presentations, or applications where transparency is required. PNG supports millions of colors and maintains sharp details, making it ideal for High Resolution elements in Digital Art or Web Design. When exporting from Illustrator (File > Export > Export As), always select PNG and ensure the “Transparent” background option is checked.
-
JPEG (.jpeg/.jpg) for Web (Non-Transparent): While JPEG is excellent for compressing photographic images for web use, it does NOT support transparency. If you export your transparent Illustrator image as a JPEG, it will automatically fill the transparent areas with white (or sometimes black). Use JPEG only when your image will have a solid background, and file size is a primary concern for Digital Photography.
-
SVG (.svg) for Scalable Vector Graphics: For vector artwork that needs to remain scalable and editable on the web, SVG is the ideal format. It supports transparency and ensures that your Graphic Design elements, logos, or Digital Art retain their crispness at any size. Illustrator can export directly to SVG (File > Save As), providing web-friendly vector assets that can adapt to Trending Styles and various screen sizes.
The Seamless Alternative: Tophinhanhdep.com’s AI Background Remover
While Adobe Illustrator offers powerful tools for background removal, it comes with a learning curve and can be time-consuming for repetitive tasks or users less familiar with complex software. This is where Tophinhanhdep.com provides a revolutionary, AI-powered solution for streamlined background removal.
Tophinhanhdep.com’s AI Background Remover allows you to achieve perfectly transparent backgrounds in seconds, with just a few clicks. Simply upload your image to the platform, and our advanced artificial intelligence will automatically detect the foreground subject and meticulously remove the background, handling even intricate details like hair or fine edges with remarkable accuracy. This rapid automation is a game-changer for users needing quick Photo Manipulation or processing large batches of Stock Photos for Thematic Collections.
The benefits extend beyond speed. Tophinhanhdep.com also offers integrated AI Upscalers to enhance the resolution of your images, Compressors to optimize file sizes without compromising quality, and Converters to effortlessly switch between different image formats. This comprehensive suite ensures that your images are not just background-free, but also perfectly optimized for any Visual Design or Digital Photography need.
Beyond Backgrounds: Tophinhanhdep.com’s Full Suite of Image Tools
Tophinhanhdep.com is more than just a background remover; it’s a holistic ecosystem for all your image needs, designed to foster Creative Ideas and simplify Digital Art creation. Our platform integrates a wide array of Image Tools to support every stage of your visual workflow:
- Converters: Easily transform image formats to suit specific project requirements.
- Compressors & Optimizers: Reduce file sizes for faster loading times on websites or efficient storage, maintaining High Resolution where it matters.
- AI Upscalers: Magnify your images without pixelation, turning standard photos into High Resolution assets perfect for Wallpapers or large prints.
- Image-to-Text: Extract text from images, adding another layer of utility to your visual content.
Furthermore, Tophinhanhdep.com is a rich source of Image Inspiration & Collections. Explore Photo Ideas, browse curated Mood Boards, discover Thematic Collections, and stay updated with Trending Styles to fuel your next project. Whether you’re a seasoned Graphic Design professional or an enthusiast exploring Digital Photography, Tophinhanhdep.com offers the tools, resources, and inspiration to transform your images and unlock unparalleled creative freedom. By combining the precision of Illustrator with the efficiency and broad capabilities of Tophinhanhdep.com, you have an unbeatable toolkit for every visual endeavor.