Mastering Background Removal in Photoshop: A Comprehensive Guide by Tophinhanhdep.com

In the dynamic world of digital imagery, the ability to flawlessly remove backgrounds from photos is not merely a technical skill but a foundational pillar for creative expression and professional presentation. Whether you’re a seasoned graphic designer, an aspiring digital artist, an e-commerce entrepreneur, or simply a photography enthusiast looking to elevate your aesthetic images, the technique of isolating a subject from its surroundings in Adobe Photoshop is invaluable. At Tophinhanhdep.com, we understand the power of a pristine image, offering a wealth of resources from high-resolution photography inspiration to advanced image tools designed to transform your visual content.
This comprehensive guide delves into the various methods Photoshop provides for background removal, from its built-in functionalities to the seamless efficiency of a dedicated plugin. We’ll explore both manual precision and AI-powered speed, ensuring you have the knowledge to tackle any image, no matter its complexity. Mastering these techniques not only refines your photo manipulation skills but also unlocks a universe of creative possibilities, allowing you to craft stunning visual narratives, design compelling marketing collateral, or simply perfect that beautiful photography for your personal collection. Join us as we explore the art and science of background removal, making your images truly stand out.
The Indispensable Role of Background Removal in Visual Design
The digital landscape is saturated with images, making it more crucial than ever for your visuals to capture attention and convey a clear message. Background removal is a transformative process that directly contributes to this clarity and impact, serving as a cornerstone in various aspects of visual design and photography.
Why Clarity Matters: Elevating Your Images
At its core, removing a background is about enhancing the main subject. By eliminating distracting or irrelevant elements, the viewer’s focus is immediately drawn to what truly matters. This principle applies universally, whether you’re working with stock photos, personal portraits, or highly detailed nature photography.
For e-commerce, a clean, white, or transparent background for product photos is standard practice, creating a professional look that highlights the item’s features without interference. In portrait photography, isolating a subject allows for greater control over the final composition, making it ideal for creating aesthetic images or personalized gifts. Imagine a loved one’s portrait seamlessly placed against an abstract background, or a candid shot transformed into a unique wallpaper. This versatility extends to all forms of imagery hosted on Tophinhanhdep.com, from beautiful photography used in marketing to sad/emotional images where the subject’s expression needs to be paramount.
Furthermore, background removal is essential for consistency in visual branding. Companies often require a uniform look across all their product images or team photos. The ability to quickly and accurately remove backgrounds ensures that all visuals adhere to these guidelines, maintaining a polished and cohesive brand identity. This also makes images more adaptable for various platforms and marketing materials, optimizing them for web and print.

Beyond Basic Edits: Fueling Creative Expression
Beyond the practical applications, background removal is a gateway to boundless creative ideas and photo manipulation. It liberates subjects from their original contexts, allowing them to be reimagined in new, exciting ways. This freedom is a driving force behind many trending styles in digital art and graphic design.
For instance, once a subject is isolated, it can be integrated into collages, superimposed onto fantastical backgrounds, or combined with other elements to create entirely new scenes. This is particularly relevant for digital artists who engage in photo manipulation to craft surreal or imaginative artworks. Think of combining elements from different nature backgrounds to form a unique abstract landscape, or placing a subject from a real-world photo into a whimsical, digitally painted environment. Tophinhanhdep.com’s collections of thematic collections and mood boards are filled with examples of how extracted subjects contribute to stunning compositions.
Moreover, the ability to change backgrounds facilitates the creation of unique image inspiration. Graphic designers can quickly prototype different layouts, test various color palettes, and experiment with diverse visual styles. This non-destructive approach—especially when employing layer masks—encourages iterative design and allows for endless creative exploration without compromising the original image. Whether you’re compiling a portfolio, designing a creative poster, or simply exploring new aesthetic photography ideas, the foundation laid by effective background removal is indispensable. It transforms a static image into a versatile asset, ready for any creative endeavor.
Essential Photoshop Tools for Manual Background Removal
Adobe Photoshop offers a diverse toolkit for background removal, catering to various image complexities and user skill levels. While some methods prioritize speed, others excel in precision, allowing for meticulous control over the final cut. Understanding these tools is key to achieving professional results and expanding your digital photography editing prowess.
The “Remove Background” Quick Action
For those seeking the quickest and most straightforward method, Photoshop’s “Remove Background” quick action is a game-changer. This AI-powered feature is embedded directly into the software, making it incredibly accessible for beginners or when dealing with relatively simple images where clean edges aren’t the absolute highest priority.
To use this:
- Open your image in Photoshop.
- Navigate to the Layers panel (usually on the right-hand side).
- Duplicate the current layer by pressing
Command+J(macOS) orCtrl+J(Windows). This creates a non-destructive backup of your original image. - Go to the Properties panel (often next to Layers) and locate the Quick Actions section.
- Click the “Remove Background” button.
Photoshop will automatically analyze your image, identify the subject, and mask out the background. While remarkably fast, it might struggle with intricate details like wisps of hair or areas where the subject and background colors are very similar. It’s an excellent starting point, especially for quickly prepping high-resolution stock photos or for initial drafts in visual design projects.
Precision with the Quick Selection Tool
The Quick Selection Tool, often paired with Photoshop’s intelligent algorithms, provides a more interactive and generally accurate selection method than the one-click “Remove Background.” It intelligently detects edges as you paint over the desired area, making it efficient for subjects with clear boundaries.
To utilize the Quick Selection Tool:
- Open your image in Photoshop.
- Select the Quick Selection Tool from the left-hand toolbar (it might be nested under the Magic Wand Tool; press
Wto cycle through these options). - In the Options bar at the top, check “Enhance Edge” for smoother, higher-quality selections.
- Click and drag the pointer over the area you want to select (your subject). Photoshop will automatically expand the selection to what it perceives as the edge.
- To add to the selection, simply continue clicking and dragging.
- To subtract from the selection (if the tool was over-enthusiastic), hold down the
Optionkey (macOS) orAltkey (Windows) and drag over the areas you want to deselect. Alternatively, you can switch to the “Subtract from selection” mode in the Options bar.
This tool is highly effective when there’s a good contrast between your foreground and background, making it suitable for many digital photography editing styles and graphic design tasks where crisp selections are required.
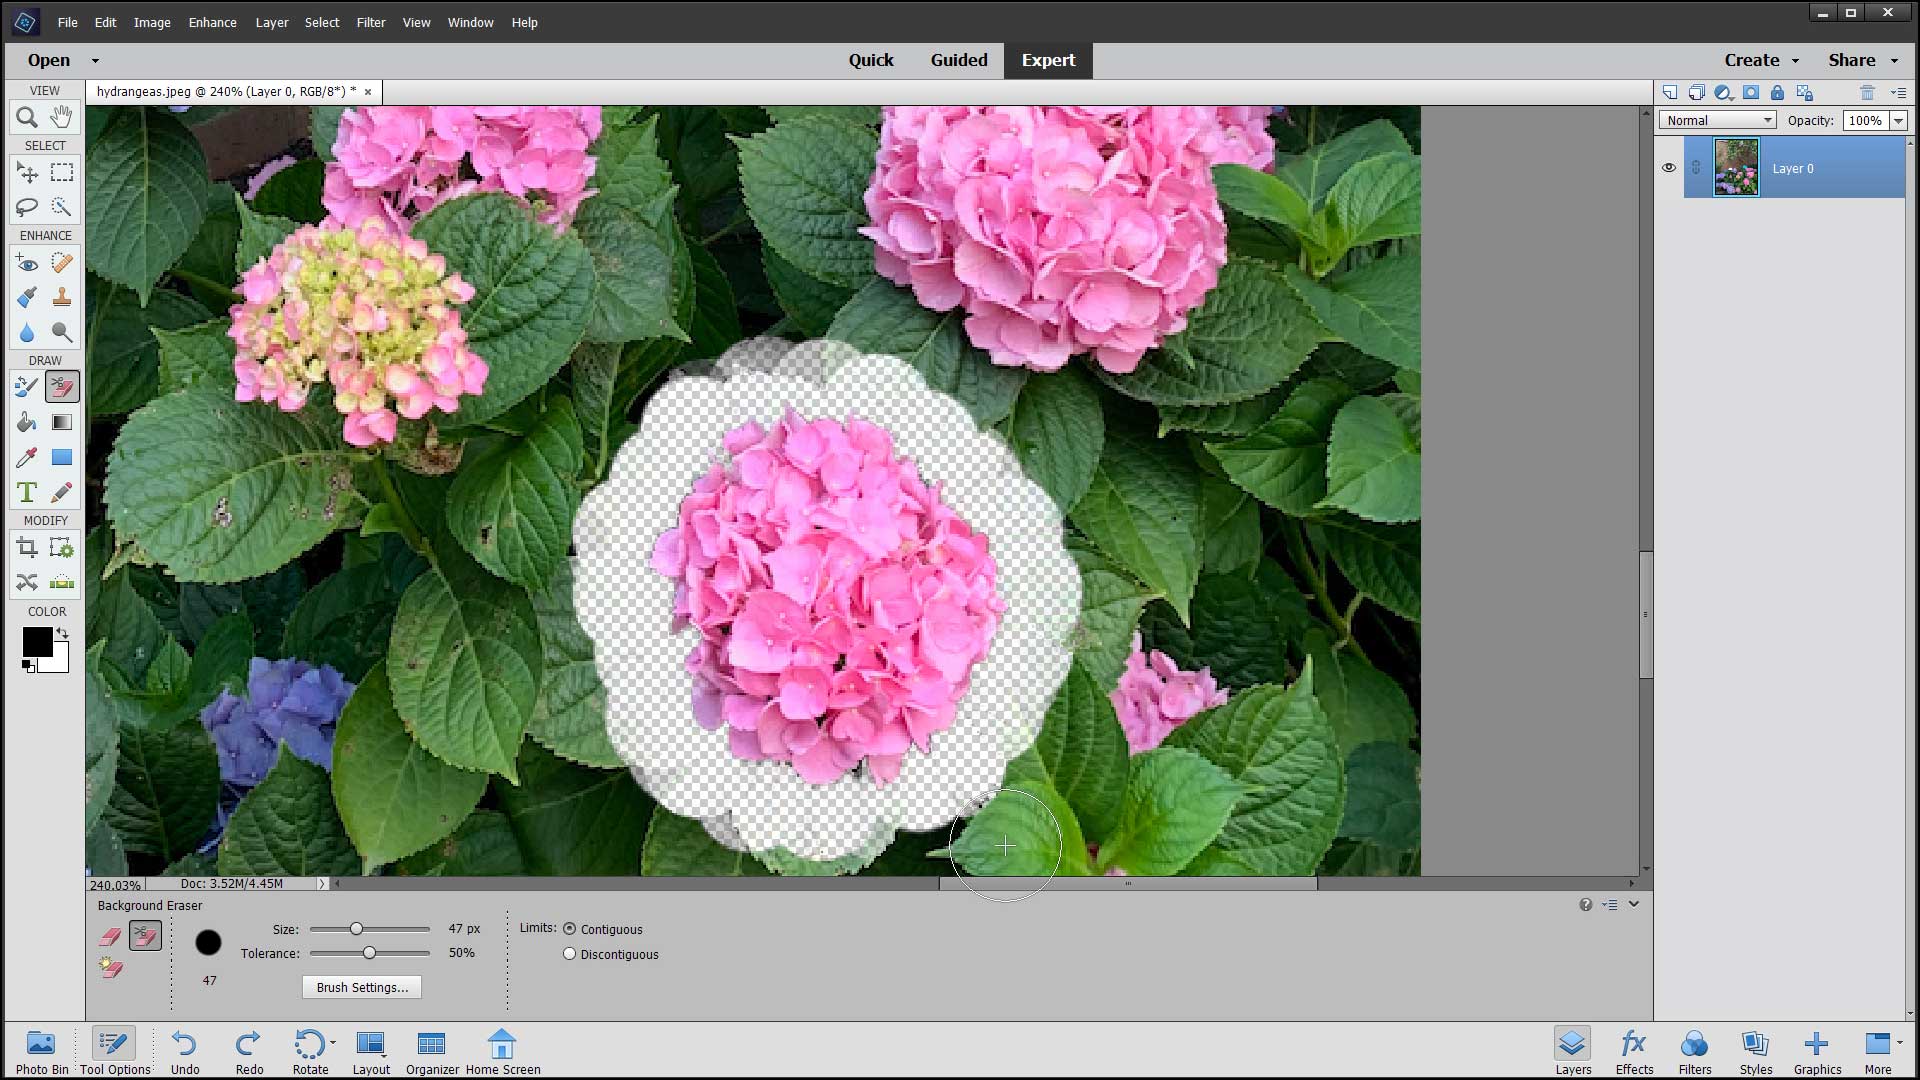
Detailing Edges with the Background Eraser Tool
For images with fine, intricate details where subjects blend subtly with the background—such as unruly hair, fur, or delicate foliage—the Background Eraser Tool offers a nuanced approach to background removal. It works by sampling the color directly under your brush’s crosshairs and erasing similar colors within a specified “tolerance” as you paint.
Here’s how to use it:
- Open your image in Photoshop.
- Select the Background Eraser Tool from the Photoshop Toolbox (it’s often hidden under the standard Eraser Tool; press
Eto access it). - Adjust the brush size using the
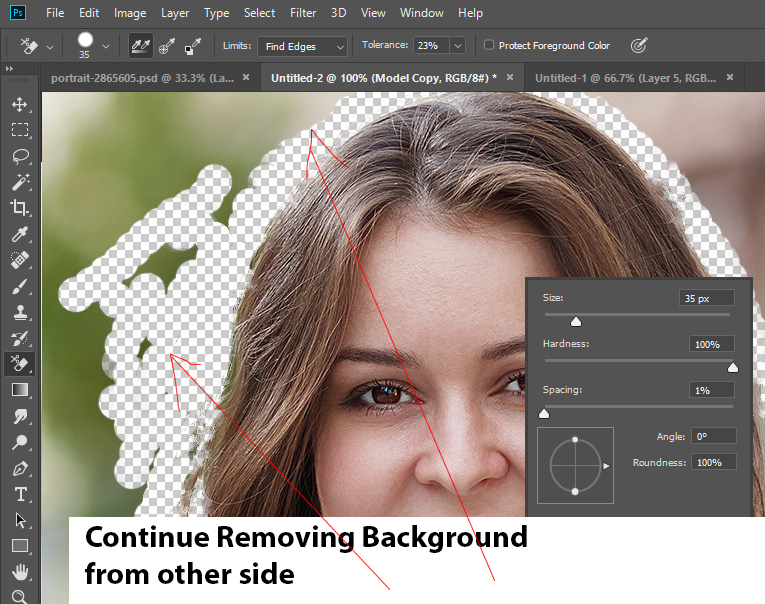
[and]bracket keys or from the options bar. For precision, a smaller brush is better, especially when zoomed in. - Set the Hardness of the brush to a high value (e.g., 90-100%) to prevent fuzzy edges and artifacts.
- In the Options bar, set Limits to “Find Edges.” This helps the tool distinguish between foreground and background more effectively.
- Place the crosshairs (the center of your brush) over the color you want to remove (the background) and click or drag. The tool will erase matching hues within your chosen tolerance.
- Tolerance determines the range of colors the tool will erase. Start with a value around 25-30% and adjust as needed. Higher tolerance erases a wider range of similar colors, while lower tolerance is more precise.
- If your background has multiple hues (e.g., a patchy sky), use “Continuous Sampling”. If the background is a single, uniform color, switch to “Once” in the sampling options.
- To protect specific foreground colors, click “Protect Foreground Colour” in the Options bar. Then,
Alt(Win) /Option(Mac) + click with the eyedropper tool to sample the color you wish to preserve.
While destructive (meaning it permanently alters pixels), the Background Eraser is excellent for tackling challenging conditions, especially when integrating a subject into a new background for complex photo manipulation.
Crafting Exact Paths with the Pen Tool
For unparalleled precision, especially when working on clean, crisp edges or subjects with defined geometric or smooth curves, the Pen Tool is the preferred choice of many professional visual designers. It requires patience and practice but yields the most accurate and editable selections.
How to use the Pen Tool:
- Open your image in Photoshop.
- Select the Pen Tool from the toolbar (shortcut
P). - In the Options bar, ensure “Path” is selected, not “Shape.”
- Click to create anchor points around your subject. For straight lines, simply click. For curves, click and drag to create Bezier handles, adjusting the curve’s arc. You can toggle between straight lines and curves by holding
Ctrl(Win) /Command(Mac) while adjusting points. - Close the path by clicking on your initial anchor point.
- Once the path is complete, go to the Paths panel (Window > Paths).
- Right-click on your saved path and select “Make Selection…”
- In the Make Selection dialog box, you can add a “Feather Radius” (e.g., 0.5-1.0 pixels) to slightly soften the edges, making them look more natural against a new background, especially for high-resolution images.
The Pen Tool creates vector-based paths, which are infinitely scalable and non-destructive until converted to a selection, making it perfect for graphic design elements and meticulous digital art.
Leveraging the Magic Wand and Lasso Tools
Photoshop’s selection tools also include the Magic Wand and Lasso Tools, each with specific strengths for background removal, especially useful for diverse aesthetic and thematic images found on Tophinhanhdep.com.
-
Magic Wand Tool (W): This tool is ideal for selecting areas of uniform color. If your image has a solid, distinct background (e.g., a white studio background or a clear blue sky), the Magic Wand can select it with a single click. Adjust the “Tolerance” in the options bar to control the range of similar colors included in the selection. Lower tolerance selects fewer colors, higher tolerance selects more. This is great for quick edits on high-contrast backgrounds.
-
Polygonal Lasso Tool (L): Part of the Lasso Tools submenu, the Polygonal Lasso is best for selecting areas with straight, angular edges. You click to set points, and Photoshop draws straight lines between them. It’s perfect for architectural elements or subjects that are predominantly geometric. Holding
Shiftallows you to constrain lines to 45 or 90-degree angles, which is useful for precise straight cuts. -
Magnetic Lasso Tool (L): Also found under the Lasso Tools, the Magnetic Lasso is designed for outlines that have a strong contrast with the background. As you move your mouse along an edge, it “snaps” to the contrasting pixels, creating a selection path automatically. This can be faster than the Pen Tool for somewhat complex, yet well-defined, shapes, though it may require refinement for perfect results.
These tools offer varying degrees of automation and manual control, allowing you to choose the best fit for the specific characteristics of your image and the desired level of precision.
Advanced Techniques for Flawless Extractions
While the basic tools provide a solid foundation, achieving truly flawless background removals, especially for intricate subjects or high-resolution photography, often requires more advanced techniques. Photoshop offers powerful features like “Select and Mask” and channel-based methods to refine edges and handle the most challenging scenarios.
Refining Selections with “Select and Mask”
After making an initial selection with any of the primary tools (Quick Selection, Magic Wand, Pen Tool, Lasso), the “Select and Mask” workspace is your go-to for perfecting edges. This dedicated environment offers a comprehensive suite of controls to fine-tune your mask, making it indispensable for digital photography and advanced photo manipulation.
To access “Select and Mask”:
- Make an initial selection of your subject using any preferred tool.
- Click the “Select and Mask…” button in the Options bar (it appears when a selection tool is active) or go to
Select > Select and Mask....
Within the “Select and Mask” workspace, you’ll find:
- View Modes: Allows you to preview your selection against different backgrounds (e.g., On Layers, On Black, On White, Overlay) to better identify imperfections.
- Edge Detection:
- Radius: Adjusts how far Photoshop looks for edge details around the selection. Increasing it is often beneficial for soft edges like hair.
- Smart Radius: An intelligent option that automatically varies the radius based on the image’s edges, excellent for complex areas.
- Global Refinements:
- Smooth: Reduces jaggy edges, creating a softer, more natural outline.
- Feather: Blurs the edge of the selection, making transitions less harsh. Use sparingly for natural blends.
- Contrast: Sharpens the edges of the selection, useful for defined subjects.
- Shift Edge: Expands or contracts the selection boundary.
- Refine Edge Brush Tool: This specialized brush is located in the left-hand toolbar within “Select and Mask.” Paint along challenging edges (like hair or fur) to let Photoshop intelligently refine them, distinguishing between foreground and background pixels.
- Brush Tool (B): Use this to manually add to (with
+mode) or subtract from (with-mode) your mask. - Output Settings: Choose how your refined selection is applied (e.g., Layer Mask, New Layer with Layer Mask, New Layer). Using a Layer Mask is highly recommended as it’s non-destructive, allowing for future adjustments.
“Select and Mask” is crucial for achieving high-quality results, especially when combining elements for graphic design, or for preparing images for AI upscalers where clean edges are paramount.
Channel-Based Isolation for Complex Elements
For the most notoriously difficult background removals—think intricate hair, transparent objects like glass, or delicate elements like tree branches and flowers—the Channel Tool offers an exceptionally powerful, albeit more advanced, method. This technique leverages the color information in an image’s channels to create highly precise masks.
The process involves:
- Open your image in Photoshop.
- Go to the Channels panel (Window > Channels).
- Analyze the Red, Green, and Blue channels. Look for the channel that displays the greatest contrast between your subject and the background. Often, the Blue or Green channel works best for skin tones, while the Red channel might highlight specific colors.
- Duplicate the most contrasting channel by dragging it to the “Create New Channel” icon at the bottom of the panel.
- With the duplicated channel selected, press
Ctrl+L(Win) /Command+L(Mac) to open the Levels adjustment. - Adjust the black and white sliders to drastically increase the contrast. Drag the black slider to the right to make the background as black as possible, and drag the white slider to the left to make your subject as white as possible. The goal is to make the subject appear completely white and the background completely black, or vice versa, in this channel.
- Refine the channel manually: Use a Brush Tool (B) set to
Overlayblending mode withblackpaint to “paint out” any remaining background gray areas (making them black). Usewhitepaint to “paint in” any subject areas that are still gray (making them white). - Once your channel is a clear black-and-white mask, Ctrl+click (Win) / Command+click (Mac) on the channel thumbnail in the Channels panel. This loads the white areas of the channel as a selection.
- Go back to the RGB channel (or CMYK) and then to the Layers panel.
- With the selection active, click the “Add Layer Mask” icon at the bottom of the Layers panel. This will create a layer mask based on your channel selection, effectively removing the background.
This channel-based method is a cornerstone for advanced photo manipulation and digital art, yielding exceptionally clean cutouts even from the most challenging high-resolution images.
Color Range for Solid Backgrounds
When working with images where the background consists primarily of a solid or very similar color range, Photoshop’s Color Range command offers a highly efficient selection method. This tool allows you to select pixels based on their color similarity, making it a quick alternative to manual selection tools for specific scenarios.
To use the Color Range Tool:
- Open your image in Photoshop.
- Go to Select > Color Range…
- In the Color Range dialog box, click the eyedropper tool on the background color you want to select. As you click, you’ll see a preview of the selection in the dialog box, showing white for selected areas and black for unselected areas.
- Use the “Fuzziness” slider to adjust the range of colors included in the selection. Higher fuzziness includes a broader spectrum of similar hues.
- You can use the
+eyedropper to add more colors to your selection (e.g., if there are slight variations in the background color) or the-eyedropper to remove unwanted colors from the selection. - Once you’re satisfied with the selection preview, click OK.
- A selection will appear on your image. You can then use this selection with a Layer Mask or simply press Delete to remove the background.
For images with a clear focal point and a relatively simple background, the “Focus Area” feature (also under the Select menu) can be an even quicker option. It attempts to automatically identify the in-focus subject, making a preliminary selection that can then be refined in “Select and Mask.” Both Color Range and Focus Area are excellent time-savers when dealing with specific image types, contributing to an optimized workflow for stock photos and general photography editing.
The Tophinhanhdep.com Plugin: A Shortcut to Perfection
While Photoshop’s native tools are powerful, they often demand significant time and expertise. For those prioritizing speed and seamless integration without compromising quality, the Tophinhanhdep.com plugin for Photoshop emerges as a revolutionary solution, harnessing advanced AI to simplify complex tasks.
Revolutionizing Workflow with AI-Powered Removal
The Tophinhanhdep.com Photoshop plugin is designed to drastically cut down the time spent on background removal, a task that can often be repetitive and creativity-draining. It integrates directly into your Photoshop workflow, offering a one-click solution that leverages state-of-the-art artificial intelligence.
Benefits of the Tophinhanhdep.com plugin:
- Productivity Boost: Say goodbye to manually picking pixels or meticulously drawing paths. The plugin automates the most time-consuming aspects of background removal, freeing you to focus on the creative elements of your visual design projects. This is especially valuable for professionals handling large volumes of high-resolution photography or graphic design tasks.
- Stunning Results: Speed doesn’t come at the expense of quality. Our AI is trained to handle even the most challenging conditions, such as fine hair, transparent elements, or intricate edges. The results are consistently top-tier, providing a clean, precise cut-out every time. This ensures your aesthetic images and beautiful photography maintain their integrity.
- Easy to Adjust Layer Mask Editing: The plugin doesn’t just delete pixels; it creates a non-destructive layer mask. This means you retain full control to further refine or restore areas of the image using Photoshop’s standard brush tools, just as you would with any manually created mask, but with an instant, high-quality starting point.
How to use the Tophinhanhdep.com Photoshop plugin:
- Install the plugin: Download it from the official Adobe marketplace or through our website, Tophinhanhdep.com. Ensure you have the Adobe Creative Cloud Desktop App installed for a smooth installation process.
- Open an image in Adobe Photoshop.
- Navigate to Plugins → Tophinhanhdep.com for Adobe Photoshop → Remove Background.
- Click “Remove Background.” The Tophinhanhdep.com API will then automatically process your photo using advanced algorithms.
The plugin operates by utilizing the Tophinhanhdep.com API, which requires an active internet connection and login to your Tophinhanhdep.com account. Users receive free credits upon signing up and a generous number of free API calls each month for preview images (up to 0.25 megapixels, e.g., 625x400), allowing you to test its capabilities without immediate cost. Full-resolution processing requires additional credits, which can be purchased flexibly.
The Tophinhanhdep.com plugin supports Adobe Photoshop CC (2021) 22.0 or newer, for both Mac and Windows, ensuring broad compatibility for a wide range of users. Updating the plugin is also streamlined, with clear instructions available on our help pages.
Seamless Integration for Digital Photography & Graphic Design
The true power of the Tophinhanhdep.com plugin lies in its ability to seamlessly integrate into existing professional workflows. For digital photography, where quick turnaround times and pristine results are critical, this tool becomes an indispensable asset. Photographers can process batches of images, isolate subjects, and then proceed with advanced editing styles, knowing the foundation of their image is perfectly prepared.
Graphic designers benefit immensely from this efficiency, especially when creating complex visual designs or photo manipulation projects. The plugin allows for rapid prototyping and iteration, providing clean cut-outs that can be instantly dropped into new layouts, collages, or mock-ups. This speed empowers designers to explore more creative ideas and respond faster to client demands, ensuring their digital art and creative collateral are always cutting-edge.
For website content, the plugin helps optimize images for web use by providing clean, transparent backgrounds, which can then be fed into image compressors and optimizers, further enhancing loading speeds and user experience—a core offering of Tophinhanhdep.com’s Image Tools. This integration of AI upscalers, converters, and our background removal plugin creates a comprehensive ecosystem for all your image editing needs. Whether you’re enhancing stock photos, developing thematic collections, or experimenting with new photo ideas, the Tophinhanhdep.com plugin ensures your journey from raw image to final masterpiece is as smooth and efficient as possible.
Beyond Background Removal: The Tophinhanhdep.com Ecosystem for Image Enhancement
Tophinhanhdep.com is more than just a resource for mastering Photoshop background removal; it’s a holistic platform dedicated to empowering visual creators across various disciplines. Our mission is to provide comprehensive tools, inspiration, and knowledge to help you achieve your creative vision, whether you’re working on personal projects or professional assignments.
Our commitment extends to a wide array of Image Tools, designed to optimize and enhance every aspect of your visual workflow. Beyond background removal, you’ll find powerful Image Converters to manage file formats, Compressors and Optimizers to ensure your images are web-ready without sacrificing quality, and advanced AI Upscalers that can intelligently enlarge your photos while preserving detail, making low-resolution images suitable for high-resolution displays or print. We even delve into specialized tools like Image-to-Text, catering to a broad spectrum of digital needs.
For Photography enthusiasts and professionals, Tophinhanhdep.com serves as an invaluable hub. We offer insights into acquiring High Resolution images, guiding you through best practices for capturing crisp, detailed shots. Our curated collections of Stock Photos provide diverse visual assets for any project, while our tutorials cover crucial aspects of Digital Photography, from foundational techniques to advanced concepts. Exploring different Editing Styles is also a key focus, helping you develop a unique visual language and adapt to current trends.
In the realm of Visual Design, we understand that creativity knows no bounds. Our platform supports your journey in Graphic Design by providing resources for creating compelling layouts and branding materials. We celebrate Digital Art and Photo Manipulation, offering tutorials and inspiration to push the boundaries of what’s possible. Our extensive library of Creative Ideas helps spark imagination, ensuring you always have a fresh perspective for your projects.
Finally, for Image Inspiration & Collections, Tophinhanhdep.com is a treasure trove. Dive into countless Photo Ideas for various genres, from stunning landscapes to captivating portraits. Explore Mood Boards to help define your aesthetic and Thematic Collections for specific projects. Stay ahead with articles on Trending Styles in visual culture. Our expansive galleries feature diverse categories of Images, including breathtaking Wallpapers, versatile Backgrounds, culturally relevant Aesthetic imagery, serene Nature scenes, thought-provoking Abstract art, poignant Sad/Emotional captures, and universally admired Beautiful Photography.
Tophinhanhdep.com is built to be your ultimate partner in the visual journey, providing not just the tools, but also the inspiration and expertise to transform your images into masterpieces.
Conclusion
Mastering background removal in Photoshop is an essential skill for anyone operating in the visual realm, from aspiring artists to seasoned professionals. As we’ve explored, Adobe Photoshop provides a rich suite of tools, each offering unique strengths for different image complexities and desired levels of precision. From the swift, AI-powered “Remove Background” quick action and the precision of the Quick Selection Tool to the intricate detailing capabilities of the Background Eraser and the vector-sharp accuracy of the Pen Tool, Photoshop equips you with diverse methods to isolate your subjects. Advanced techniques like “Select and Mask” and channel-based extractions further empower you to tackle even the most challenging edges, such as fine hair or transparent objects.
However, for those seeking unparalleled speed and efficiency without sacrificing quality, the Tophinhanhdep.com Photoshop plugin stands out as a revolutionary solution. By leveraging cutting-edge AI, it automates the often tedious process of background removal, delivering stunning, precise results with a single click and providing a non-destructive layer mask for ultimate flexibility. This integration allows artists, photographers, and designers to dramatically boost their productivity, freeing up valuable time to focus on creative composition, photo manipulation, and overall visual storytelling.
At Tophinhanhdep.com, we are dedicated to providing a comprehensive ecosystem of tools, tutorials, and inspiration to elevate your digital imagery. From high-resolution photography resources and aesthetic image collections to advanced AI upscalers and image optimizers, our platform supports your entire creative journey. Whether you’re crafting unique wallpapers, designing marketing collateral, or simply enhancing your personal photo collection, the ability to cleanly remove backgrounds is a foundational skill that unlocks endless creative possibilities.
We encourage you to experiment with these techniques, explore the power of the Tophinhanhdep.com plugin, and dive into the wealth of resources available on our website. Embrace these tools to transform your images, making your subjects pop and your creative visions a vibrant reality. Visit Tophinhanhdep.com today to further refine your skills and discover new avenues of image inspiration.