How to Remove Background from Image in Photoshop: A Comprehensive Guide for Stunning Visuals

In the dynamic world of digital imagery, the ability to flawlessly remove a background from an image in Photoshop is not just a technical skill—it’s a foundational art form that unlocks boundless creative possibilities. Whether you’re a budding photographer, a seasoned graphic designer, a visual artist, or simply someone looking to enhance their personal photo collection, mastering background removal is paramount. At Tophinhanhdep.com, we understand the power of a pristine image, and this guide will equip you with the knowledge and techniques to achieve professional-grade results using Adobe Photoshop, while also exploring efficient AI-powered alternatives.
Background removal serves myriad purposes across the diverse categories of visual content we celebrate, from crafting custom wallpapers and aesthetic backgrounds to isolating subjects for high-resolution stock photos or intricate digital art. It’s an essential step in photo manipulation, enabling artists to blend elements seamlessly, create stunning thematic collections, and adapt images to trending visual styles. This comprehensive guide will delve into both Photoshop’s native tools and innovative plugins, ensuring you can tackle any background removal challenge with confidence and precision.
The Indispensable Role of Background Removal in Visual Design
The digital landscape is increasingly visual, and the quality of your images directly impacts their effectiveness. Removing backgrounds isn’t merely about deletion; it’s about transformation, focus, and versatility. It elevates an ordinary photograph into a compelling visual asset, making it indispensable for various aspects of visual design and photography.
Enhancing Photography and Image Collections
For photographers, especially those dealing with high-resolution digital photography or preparing images for stock photo platforms, a clean subject isolation is a game-changer. Imagine a breathtaking shot of nature with a distracting element in the foreground, or a vibrant abstract piece that needs its core subject to pop without any visual clutter. Background removal allows you to:
- Refine Composition: By eliminating busy or irrelevant backgrounds, the primary subject instantly gains prominence, guiding the viewer’s eye exactly where you intend. This is crucial for aesthetic and impactful photography, from striking portraiture to detailed wildlife shots.
- Create Versatile Assets: A subject isolated on a transparent background becomes a flexible asset. It can be placed into new wallpapers, layered into complex backgrounds, or incorporated into various thematic collections, drastically increasing its utility.
- Achieve Professional Polishes: For professional photography, particularly product photography or corporate portraits, a clean, uniform background conveys professionalism and attention to detail. This skill is critical for ensuring your images meet the highest standards of digital photography and editing styles.
Fueling Graphic Design and Creative Concepts
In graphic design and digital art, background removal is a daily necessity. It’s the key to creating impactful visual narratives and imaginative photo manipulation. Without this capability, many creative ideas would remain confined by their original context.
- Seamless Photo Manipulation: Whether you’re compositing multiple images, creating surreal digital art, or designing a mood board for a new project, the ability to extract subjects cleanly is non-negotiable. It allows for the creation of new realities and imaginative scenarios.
- Designing Compelling Marketing Materials: From banners and flyers to social media graphics, products or individuals often need to be showcased against custom backgrounds that align with branding or campaign themes. This is where background removal shines, enabling designers to create visually cohesive and engaging content.
- Developing Creative Ideas: Background removal is often the first step in unlocking creative ideas. It allows designers to experiment with different backgrounds, apply unique editing styles, and generate fresh visual concepts that might otherwise be impossible. This freedom contributes to diverse image inspiration and trending styles.
Leveraging Advanced Image Tools and AI
The ecosystem of image tools extends far beyond simple editors. Background removal often integrates with other processes such as image optimization, AI upscaling, and even image-to-text conversion for content creation. Modern tools, especially those incorporating artificial intelligence, are revolutionizing how we approach this task.
- Efficiency in Workflow: AI-powered background removers drastically cut down the time spent on repetitive, manual pixel-picking. This efficiency boost frees up creative professionals to focus on more challenging and artistic aspects of their work.
- Enhanced Quality with Less Effort: Advanced algorithms can handle notoriously difficult edges, like wispy hair, intricate lace, or complex foliage, with surprising accuracy, delivering stunning results that once required meticulous manual effort.
- Integration with Broader Workflows: A cleanly removed background can then be seamlessly passed through other image tools – perhaps an AI upscaler for high-resolution output, or an image compressor for web optimization. This synergy across tools maximizes the potential of your visual assets.
Mastering Native Photoshop Tools for Background Removal
Adobe Photoshop offers a robust suite of tools for background removal, ranging from automated one-click solutions to highly precise manual techniques. Understanding each tool’s strengths allows you to choose the most effective method for any given image.
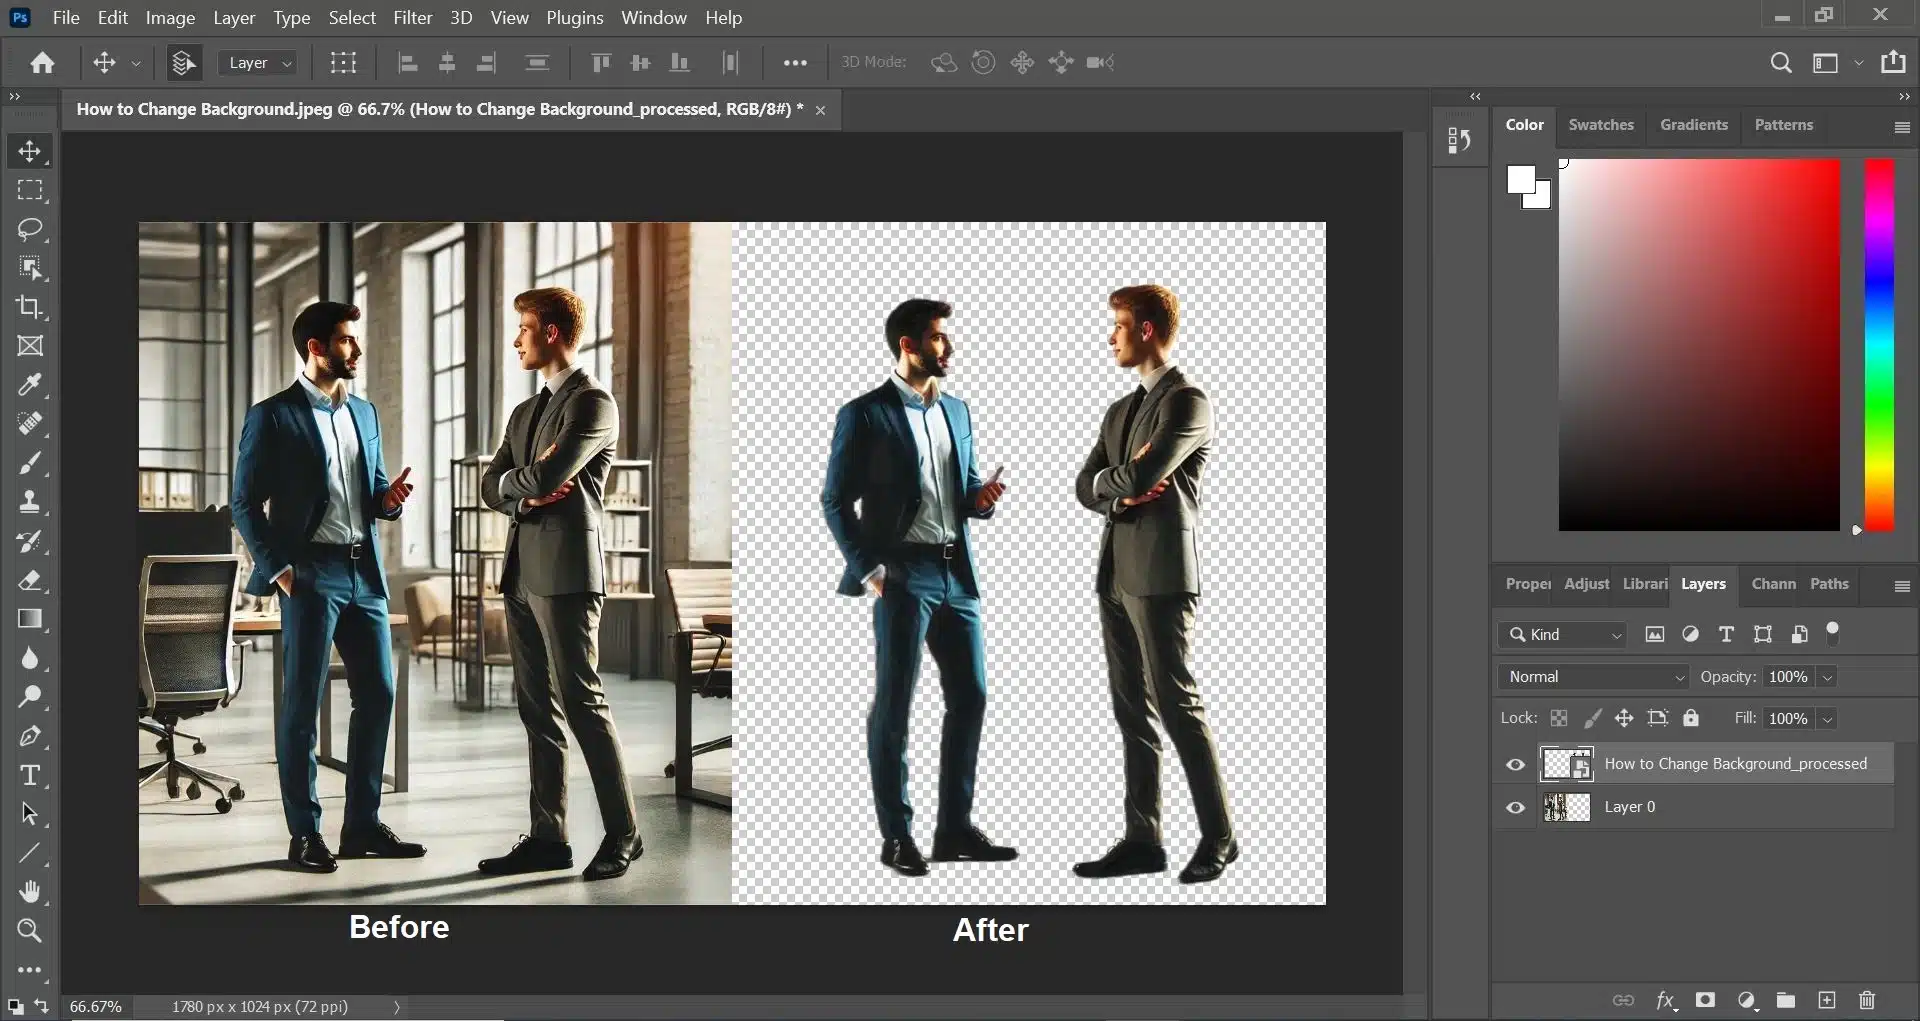
Quick and Effortless: The “Remove Background” Feature
For those who prioritize speed and don’t require absolute pixel-perfect edges, Photoshop’s built-in “Remove Background” command is a fantastic starting point. This feature leverages Adobe’s AI capabilities to identify and isolate the main subject automatically.
- Open Your Image: Begin by opening your desired image in Adobe Photoshop.
- Duplicate the Layer: In the Layers panel (usually on the right), press
Ctrl+J(Windows) orCommand+J(Mac) to duplicate your current image layer. This non-destructive approach preserves your original image. - Initiate Removal: Navigate to the
Propertiespanel (orQuick Actionsif available in your version) and click the “Remove Background” button. Photoshop’s AI will automatically process the image, attempting to isolate your subject and remove the background, often converting it into a layer mask for easy adjustments.
This method is ideal for images with clear subject-to-background contrast and works exceptionally well for product photos or simple portrait backgrounds.
Precision with the Pen Tool (Clipping Path Technique)
When ultimate precision is paramount, especially for commercial applications like product imagery where crisp, defined edges are essential, the Pen Tool is unbeatable. This method, often referred to as “Clipping Path,” creates vector-based selections that are flawlessly smooth.
- Select the Pen Tool: From the Photoshop toolbar, choose the Pen Tool (P). Ensure you are working in “Path” mode (selected in the options bar at the top).
- Create a Path: Carefully click to place anchor points around the outline of your subject. For curves, click and drag to create Bezier handles, shaping the curve accurately. Zoom in significantly (e.g., 300%) to ensure pixel-perfect accuracy.
- Close the Path: Connect the last anchor point to the first to close your path.
- Make a Selection: Go to the
Pathspanel, right-click on your newly created path, and select “Make Selection.” You can add a slightFeather Radius(0.3-0.5 pixels) to soften the edge slightly, preventing an unnaturally sharp cutout. - Apply Layer Mask or Delete: With the selection active, you can either create a
Layer Mask(recommended for non-destructive editing) or inverse the selection (Ctrl+Shift+IorCommand+Shift+I) and pressDeleteto remove the background. - Add New Background: Create a new layer beneath your subject layer and fill it with a solid color, gradient, or another image to replace the removed background.
The Pen Tool requires practice and patience but delivers the highest quality, most editable selections, crucial for high-resolution output and professional visual design.
Handling Complex Edges with the Background Eraser Tool (Image Masking)
For images with intricate details like hair, fur, or semi-transparent elements, the Background Eraser Tool is a powerful ally. This tool works by sampling colors and erasing similar pixels as you drag, attempting to preserve the foreground colors.
- Duplicate Layer & Create Contrast: As a best practice, duplicate your subject layer. To better visualize your progress, create a new layer below it and fill it with a bright, contrasting color (e.g., vibrant red or green).
- Select Background Eraser Tool: Find it nested under the standard Eraser Tool (E) in the toolbar.
- Adjust Settings:
- Brush Size: Use
[and]keys to adjust. A smaller brush is for fine details, a larger one for broad areas. - Hardness: Set to a high value (e.g., 90-100%) to avoid fuzzy artifacts.
- Limits: Set to
Find Edgesfor better edge detection. - Sampling:
Continuous: Best for backgrounds with varying colors, as it continuously samples new colors under the crosshairs.Once: Ideal for uniform backgrounds; it samples a color once and only erases that color, even if you drag over other hues.
- Tolerance: This is crucial. A lower tolerance (e.g., 5-20%) erases only colors very similar to the sampled color, great for delicate edges like thin hair against a slightly different background. A higher tolerance (e.g., 50-100%) erases a wider range of similar colors, good for broad, uniform background areas. Experiment to find the sweet spot.
- Protect Foreground Color: Use the Eyedropper Tool (Alt/Option + click) to sample a dominant color in your subject that you want to protect from being erased.
- Brush Size: Use
- Erase the Background: Click and drag the tool over the background areas. Keep the crosshairs (center of the brush) primarily over the background color to prevent erasing parts of your subject. Gradually reduce tolerance for fine details and increase it for large, uniform areas.
- Refine with Layer Mask: Once the initial background is removed, you can add a
Layer Mask(click the mask icon in the Layers panel) to your subject layer. Use a black brush on the mask to hide any remaining background artifacts and a white brush to restore accidentally erased subject areas. This non-destructive approach offers maximum control.
This technique is excellent for challenging images that require precise masking, common in digital photography editing and visual design.
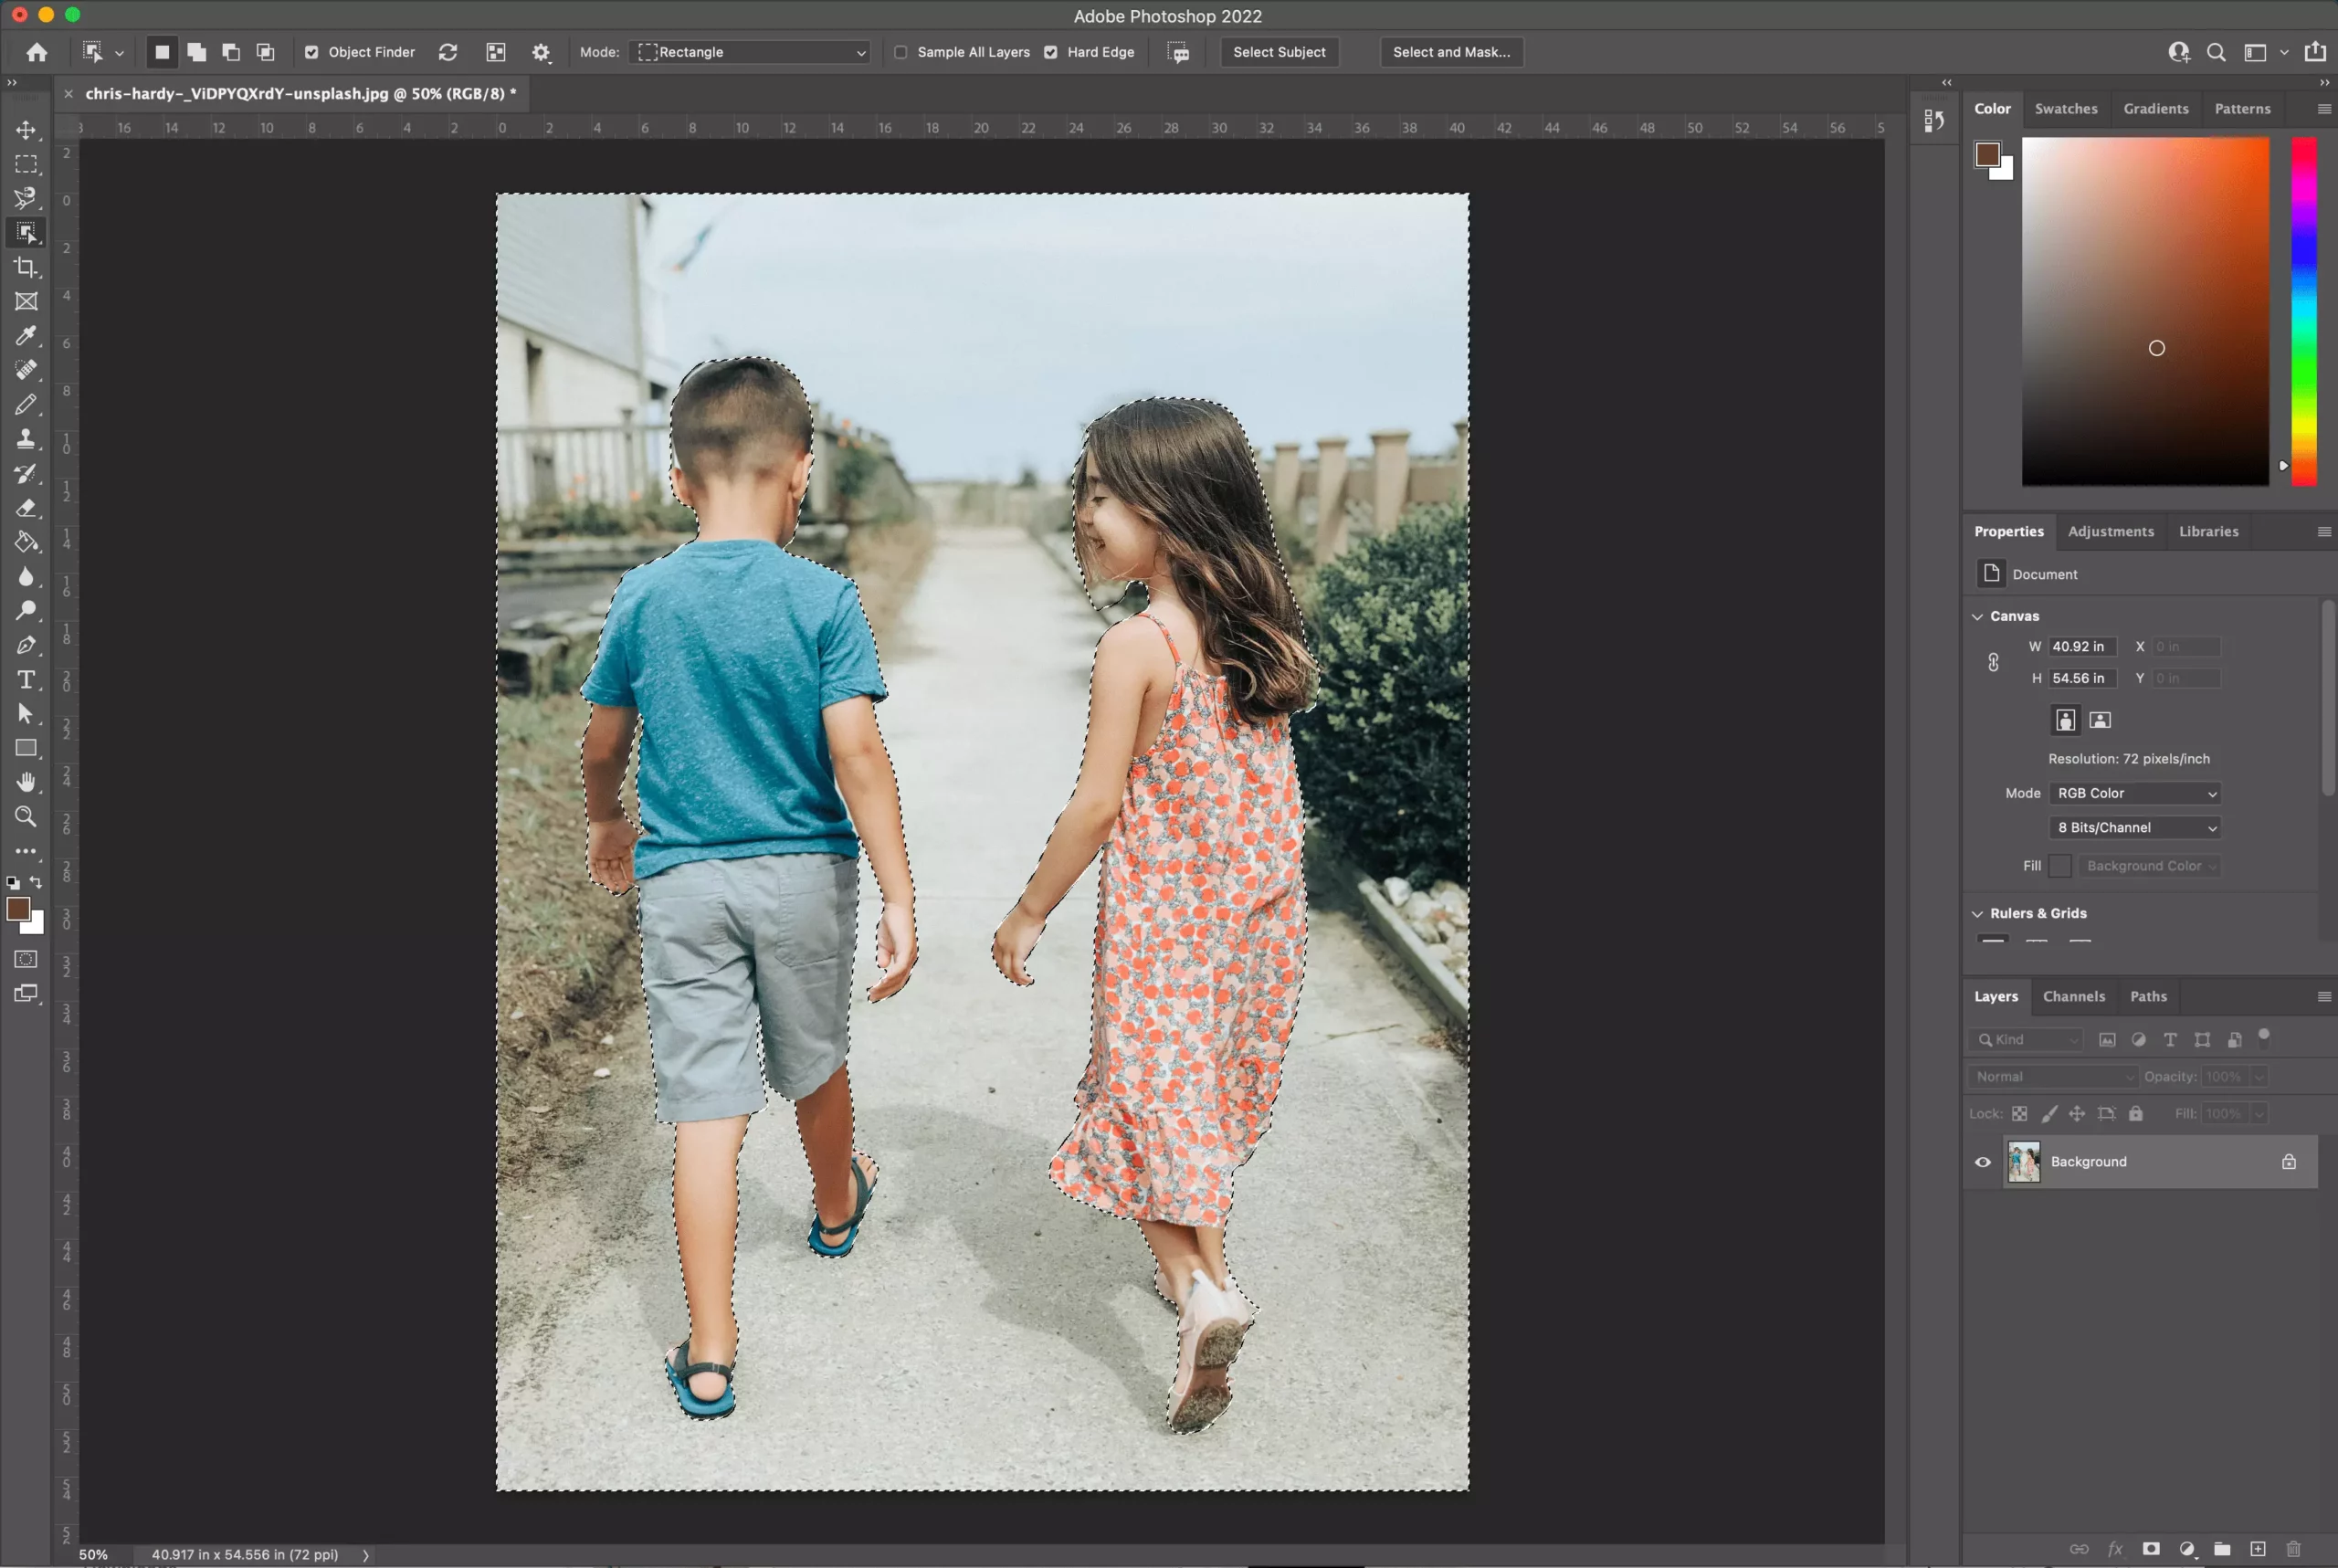
Swift Selections with the Quick Selection and Magic Wand Tools
For backgrounds with solid or clearly defined color areas, the Quick Selection and Magic Wand Tools offer rapid selection capabilities.
- Magic Wand Tool (W): Best for uniform, solid-color backgrounds. Simply click on the background area, and it selects all adjacent pixels of similar color based on your
Tolerancesetting. HoldShiftto add to the selection orAlt/Optionto subtract. - Quick Selection Tool (W): A more intelligent brush-like tool. Drag it over the area you want to select, and Photoshop intelligently expands the selection to find edges, often suitable for subjects with good contrast. Use
Shiftto add andAlt/Optionto subtract from the selection.
After making your initial selection with either tool, refine it using the Select and Mask workspace (described below) for better edges or simply apply a Layer Mask.
Flexible Outlining with the Lasso Tool
The Lasso Tool offers manual, freehand selection. While less precise than the Pen Tool, it’s useful for quick, rough selections or for areas that don’t conform to geometric shapes.
- Lasso Tool (L): Freehand drawing of selections. Best for irregular shapes or quickly isolating areas.
- Polygonal Lasso Tool (L): Creates selections using straight-line segments. Ideal for objects with many straight edges or angular shapes.
- Magnetic Lasso Tool (L): Automatically snaps to edges of high contrast as you drag your mouse along the boundary. Useful when the subject has a distinct, contrasting outline.
Once a selection is made, convert it to a Layer Mask or use Delete (after inverting the selection) for removal.
Advanced Refinement with Channels, Color Range, and Layer Masks
For truly complex situations, like semi-transparent objects or hair against a busy background, Photoshop provides more advanced tools for refining selections.
- Channels Panel: The
Channelspanel is invaluable for images where color separation is key. Often, one of the RGB channels (Red, Green, or Blue) will display the highest contrast between your subject and its background. Duplicate this channel, enhance the contrast usingImage > Adjustments > Levels(Ctrl+LorCommand+L), making the subject pure black and the background pure white. Load this channel as a selection, then return to your layers panel to apply it as aLayer Mask. This method is particularly effective for hair. - Color Range (
Select > Color Range): This tool is excellent for selecting areas based on color similarity. If your background is a consistent color,Color Rangeallows you to select it with great precision using an eyedropper. You can then refine the selection with theFuzzinessslider. - Layer Masks: The ultimate non-destructive editing technique. Instead of permanently deleting pixels, a layer mask allows you to hide or reveal parts of a layer. Black hides, white reveals, and shades of gray create transparency. This offers unparalleled flexibility for refining edges and blending elements, a cornerstone of creative photo manipulation and digital art.
- Select and Mask Workspace: After making an initial selection with any tool, click the “Select and Mask” button in the options bar (or
Select > Select and Mask). This dedicated workspace provides powerful tools like theRefine Edge Brush Toolto automatically clean up tricky edges (like hair), adjust smoothness, feathering, and contrast, and preview your selection against various backgrounds.
Streamlining Your Workflow with Photoshop Plugins and AI
While Photoshop’s native tools are powerful, third-party plugins and dedicated online AI tools have emerged to offer even faster, often one-click, solutions for background removal, especially beneficial for users seeking high productivity and stunning results with minimal effort.
The Power of the remove.bg Photoshop Plugin
The remove.bg Photoshop plugin is a prime example of how AI can integrate seamlessly into a professional workflow. It simplifies the complex task of background removal to a single click, providing an incredible productivity boost.
- Installation: Obtain the plugin from Adobe Exchange. Ensure you have the Creative Cloud Desktop App installed. Installation is usually straightforward, though it might take a few moments. For updates, uninstall the old version first, then install the new one.
- Login and Use: Once installed, you’ll find the plugin under
Plugins > remove.bg for Adobe Photoshop. To use it, simply open an image in Photoshop, ensure you’re logged into your remove.bg account (which utilizes their API), and click “Remove Background.” - Benefits:
- Unrivaled Speed: Backgrounds are removed in seconds, dramatically accelerating your workflow.
- High-Quality Results: The AI excels at complex conditions, such as fine hair or intricate details, often surpassing manual efforts.
- Layer Mask Integration: The plugin applies a layer mask, allowing you to easily adjust and refine the mask using Photoshop’s native tools (black brush to remove more, white brush to restore), providing the best of both automated speed and manual control.
- Credit System: While the plugin is free to download, processing images requires credits, which can be purchased or obtained through free trials (e.g., 1 free credit upon signup and 50 free API calls for preview images monthly).
This plugin is an excellent example of leveraging specialized AI tools to enhance professional photo editing and visual design workflows.
Exploring Online AI Background Removers (e.g., Tophinhanhdep.com)
For those who might find Photoshop’s learning curve too steep, or for quick, high-volume background removal tasks, online AI background removers like Tophinhanhdep.com offer a refreshingly simple solution. These tools provide one-click background removal directly in your web browser.
- Upload Image: Go to Tophinhanhdep.com and upload the image you wish to edit.
- Automatic Removal: The AI technology automatically detects and swiftly erases the background from your photo within seconds.
- Further Customization: Tophinhanhdep.com often provides additional features, such as pre-configured background choices, an AI background generator to craft instant new backdrops, or basic editing tools to refine your subject. Whether you need to remove a white background or isolate a complex logo, the process is streamlined and user-friendly.
These online tools are perfect for quick edits, social media content, and tasks where ease of use is prioritized, aligning with the “Image Tools” and “AI Upscalers” (as a clean cutout is a prerequisite for good upscaling) aspects of Tophinhanhdep.com’s services.
Choosing the Right Tool for Every Scenario
With numerous options available, deciding which tool to use for background removal can be daunting. The “best” tool often depends on the image’s complexity, the desired level of precision, and your available time.
Best Practices for Hair and Soft Edges
Handling fine details like wispy hair, furry textures, or translucent materials (e.g., glass) is arguably the most challenging aspect of background removal.
- Primary Recommendation: Background Eraser Tool and Channels: For intricate hair and fur, the
Background Eraser Tool(with careful tolerance adjustments) combined withImage Maskingis highly effective. For even more challenging scenarios, particularly with varying colors behind hair, utilizing theChannelspanel to create a high-contrast mask is often the superior method. - AI Advantage: The
remove.bg Photoshop pluginor dedicated online AI tools like Tophinhanhdep.com are exceptionally good at handling these delicate edges automatically, often saving hours of manual labor with impressive accuracy. - Refine Edge/Select and Mask: Regardless of your initial selection method, always leverage the
Select and Maskworkspace in Photoshop, particularly itsRefine Edge Brush Tool, to meticulously clean up soft edges and feathered details.
Background Removal for Portraits and Product Images
The application of background removal varies significantly for different image types.
- Portrait Photography: For portraits, especially self-portrait photography ideas, the goal is often to either create a clean, minimalist look or place the subject into a more aesthetically pleasing background.
- Tools: The
Quick Selection Toolfollowed bySelect and Maskis a fast option for well-defined subjects. For maximum control, thePen Toolcreates pristine outlines, while theBackground Eraser Tooladdresses hair. Layer masks are essential for non-destructive editing, allowing for adjustments to skin retouching or overall image quality.
- Tools: The
- Product Images: For e-commerce, product images often require a pure white or transparent background to meet platform standards (like Amazon or eBay) and ensure the product stands out.
- Tools: The
Pen Tool(Clipping Path) is the gold standard for product images, ensuring sharp, pixel-perfect edges. For simple products with solid backgrounds, theMagic Wand Toolor Photoshop’s one-clickRemove Backgroundfeature can be very efficient. Ensure you save the final image in aPNGformat to preserve transparency.
- Tools: The
When to Embrace or Retain a White Background
While the focus is often on removal, there are times when a white background is not only acceptable but preferred.
- E-commerce Standards: Many online marketplaces specifically require product images to have a pure white background. In these cases, it’s not about removing the white but ensuring it is perfectly clean, bright, and uniform.
- Clean Aesthetic: Sometimes, a simple white background is the best way to highlight a subject without any distractions, contributing to a clean, minimalist, and professional aesthetic. If an image genuinely looks beautiful and serves its purpose on white, there’s no need to change it.
- Creative Choice: In visual design, a white background can be a deliberate creative choice, providing a sense of space, purity, or stark contrast.
Conversely, you should remove a white background if you intend to:
- Replace it with a new, more engaging background (e.g., for aesthetic, nature, or abstract compositions).
- Create an image composite by blending the subject with other elements.
- Add a solid color background that enhances the product or portrait more effectively.
- Need a transparent background for versatile use in graphic design, like creating logos or visual assets for mood boards.
Conclusion
Mastering background removal in Photoshop is an essential skill that dramatically enhances your capabilities in digital photography, visual design, and creative image manipulation. From Photoshop’s precise Pen Tool and versatile Background Eraser to its intelligent Quick Selection and automated “Remove Background” feature, you have a wealth of tools at your disposal. For those seeking unparalleled speed and ease, integrating a Photoshop plugin like remove.bg or utilizing online AI platforms such as Tophinhanhdep.com can be a game-changer.
The ability to cleanly isolate subjects empowers you to create stunning wallpapers, refine high-resolution photographs, develop captivating digital art, and compile impressive image collections that align with trending styles. Remember, practice is key to proficiency. Experiment with different tools and techniques, learn when to use a non-destructive Layer Mask for flexibility, and leverage the power of Select and Mask for refining intricate edges.
At Tophinhanhdep.com, we believe in empowering your creative journey. By mastering these background removal techniques, you’re not just deleting pixels; you’re opening up a world of visual possibilities, transforming your snapshots into masterpieces, and bringing your most ambitious creative ideas to life. Keep exploring, keep creating, and elevate your visual content to new heights.