Mastering Image Background Removal in Word: A Comprehensive Guide to Enhancing Your Visuals

In an increasingly visual world, the ability to manipulate images effectively is no longer a niche skill reserved for graphic designers. From crafting compelling presentations and professional reports to creating engaging digital content, the power to control your visuals directly within familiar applications like Microsoft Word is invaluable. One of the most common and impactful image editing tasks is removing an image’s background. This seemingly simple action can transform a cluttered photograph into a polished asset, allowing the subject to stand out and integrate seamlessly into any document layout.
At Tophinhanhdep.com, we understand the profound impact of high-quality visuals on communication and engagement. Our mission revolves around providing resources for stunning images—be it breathtaking Wallpapers, versatile Backgrounds, or inspiring Aesthetic Photography—and equipping users with the tools and knowledge for Visual Design and Photo Manipulation. While dedicated image editing software offers advanced capabilities, Microsoft Word provides a surprisingly robust built-in feature that enables users to remove backgrounds without needing any special graphics programs. This guide will walk you through the process, from basic steps to advanced tips, ensuring your documents achieve the visual polish they deserve, and connecting these practical skills to the broader world of Imagery, Photography, and Visual Design.
The Essentials of Background Removal in Microsoft Word
The “Remove Background” feature in Microsoft Word is a powerful tool designed to simplify photo manipulation for everyday users. It allows you to isolate the main subject of an image, making it appear as if it was captured against a transparent backdrop. This capability opens up a world of creative possibilities for your documents, presentations, and digital art projects.
Why Remove a Background? Unlocking Creative Potential
The reasons for wanting to remove an image background are manifold, deeply intertwined with principles of Visual Design and effective communication:
- Enhancing Visual Focus: A busy or distracting background can pull attention away from the main subject of your image. Removing it ensures that your message is clear and that the viewer’s eye goes exactly where you want it to. This is crucial for product images, professional portraits, or any visual where the subject’s clarity is paramount.
- Achieving Seamless Integration: When combining multiple images or placing a subject against a specific colored or textured background within a document, a transparent background is essential. It allows the subject to blend naturally with its new surroundings, rather than appearing as a stark, rectangular block. This is key for creating cohesive Aesthetic designs or Thematic Collections.
- Boosting Design Flexibility: A transparent subject can be easily resized, repositioned, and layered with other elements without the constraints of its original background. This freedom is a cornerstone of Graphic Design and Photo Manipulation, enabling you to experiment with various layouts and Creative Ideas. Imagine placing a cleanly cut-out product shot on a vibrant Abstract background or an elegant Nature scene, transforming its appeal.
- Improving Document Aesthetics: A document filled with images that have clean, removed backgrounds often looks more professional and polished. It contributes to a consistent visual style, which is a hallmark of good Visual Design. This extends to High Resolution images and Stock Photos you might use, ensuring their full potential is realized.
Microsoft has continuously refined this feature, making it accessible across various versions of Word. Whether you’re using the latest Microsoft 365 or an older standalone version, the core functionality remains intuitive and effective for most common scenarios.
Step-by-Step: Removing Backgrounds in Modern Word (2019, 2021, Microsoft 365)
The process of removing an image background in recent versions of Microsoft Word is streamlined and user-friendly. These steps apply to Word for Office 365, Word 2019, and Word 2021, ensuring a consistent experience for most contemporary users.
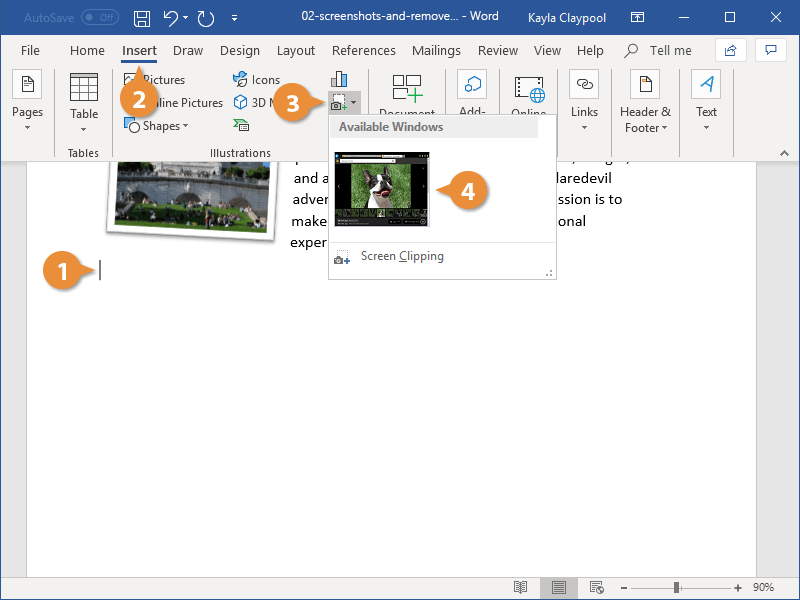
- Insert Your Image: Begin by inserting the image you wish to edit into your Word document. Navigate to the
Inserttab, clickPictures, and choose your desired image from your device. For best results, always start with high-resolution photography, as this provides more detail for Word’s algorithms to work with, leading to a cleaner cutout. Tophinhanhdep.com emphasizes the importance of High Resolution Photography for all editing tasks.
-
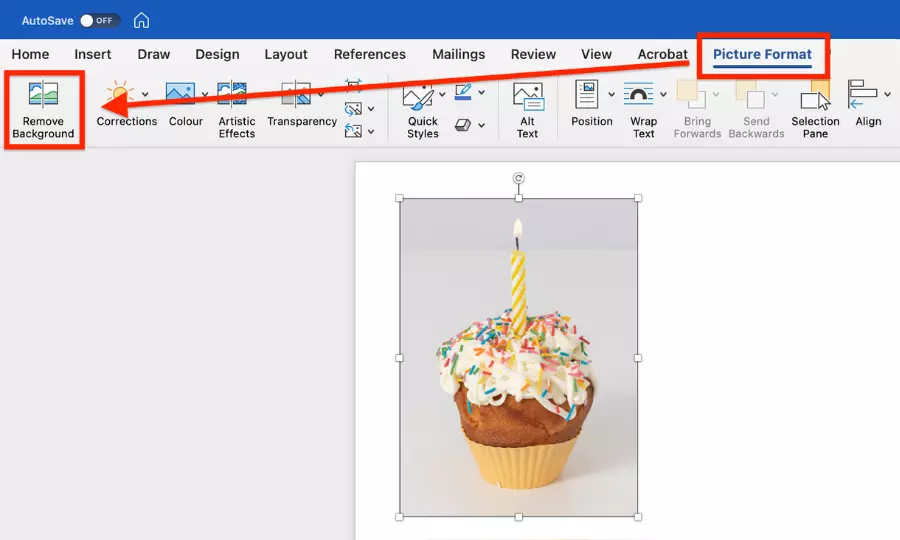
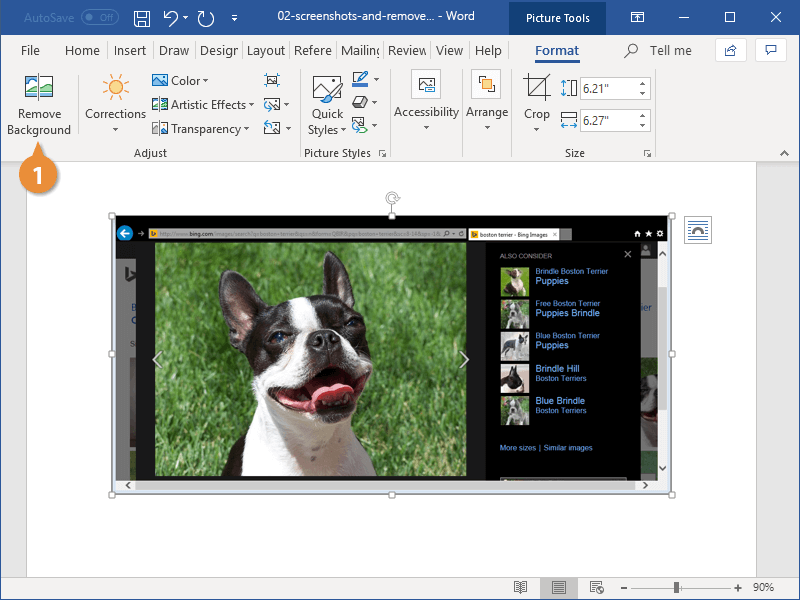
Select the Image and Access the
Picture FormatTab: Once the image is in your document, click on it to select it. This action will automatically make thePicture Formattab (or justFormatin older versions) appear in the Ribbon at the top of your Word window. If you don’t see this tab, ensure only one image is selected. -
Activate
Remove Background: On thePicture Formattab, locate and click theRemove Backgroundbutton. This button is typically found in theAdjustgroup. Word will then attempt to automatically identify the background area, highlighting it in magenta. The unhighlighted areas are what Word assumes you want to keep. -
Refining Your Selection with ‘Mark Areas to Keep’ and ‘Mark Areas to Remove’: Word’s initial selection isn’t always perfect, especially with complex images featuring varied colors, shadows, or intricate edges. This is where the refinement tools come in:
- Mark Areas to Keep: If Word has mistakenly marked an area you want to retain (e.g., part of your subject’s hair, a crucial detail) with magenta, click
Mark Areas to Keep. Your cursor will turn into a pencil tool. Click and drag the pencil over the magenta-highlighted areas you wish to restore. Word will progressively un-highlight these sections. - Mark Areas to Remove: Conversely, if Word has missed a background portion that you want to delete (e.g., a shadow, a corner of the original background), click
Mark Areas to Remove. Use the pencil tool to draw over these sections, and they will turn magenta, indicating they will be removed. - Iterative Process: You’ll often need to switch back and forth between “Mark Areas to Keep” and “Mark Areas to Remove” to achieve a precise cutout. Think of it as sculpting the perfect outline for your subject. If you make a mistake, you can use the
Delete Markoption to remove a specific selection stroke.
- Mark Areas to Keep: If Word has mistakenly marked an area you want to retain (e.g., part of your subject’s hair, a crucial detail) with magenta, click
-
Confirming and Applying Changes: Once you are satisfied with the magenta highlight indicating the areas to be removed, click
Keep Changes(located in theClosegroup of theBackground Removaltab). The background will disappear, leaving only your refined subject on a transparent canvas. If the result isn’t perfect, you can always re-select the image and clickRemove Backgroundagain to continue adjusting.
Step-by-Step: Removing Backgrounds in Earlier Word Versions (2010, 2013, 2016)
While the core functionality remains the same, earlier versions of Microsoft Word (Word 2010, Word 2013, and Word 2016) have slightly different tab names.
- Insert and Select Image: Just like modern versions, insert your picture and click on it to select.
- Access the
FormatTab: In these versions, the contextual tab that appears when an image is selected is typically namedFormat(rather thanPicture Format). - Activate
Remove Background: Locate and click theRemove Backgroundbutton within theFormattab. - Refine and Keep Changes: The subsequent steps for refining the selection using magenta highlighting and the
Mark Areas to Keep/Mark Areas to Removetools, and finally clickingKeep Changes, are identical to the process described for modern Word versions. The visual feedback and tools are very much alike, making the transition between versions quite smooth for this specific feature.
Fine-Tuning and Optimizing Your Background-Free Images
Removing the background is often just the first step in preparing an image for your document or creative project. Once the unwanted elements are gone, further refinement and optimization can elevate your Visual Design, ensuring the image perfectly fits its new context.
The Art of Precision: Handling Complex Images
Word’s background removal tool is remarkably effective for many images, especially those with clear distinctions between foreground and background, or solid-color backgrounds. However, it can struggle with:
- Complex Edges: Fine details like wispy hair, intricate patterns, or translucent objects (e.g., glass) can be challenging for Word’s automatic selection.
- Similar Colors: When the subject and background share similar color tones, Word may have difficulty differentiating them accurately, leading to jagged edges or parts of the subject being removed.
- Shadows and Reflections: Distracting shadows or reflections can be inadvertently kept or removed, requiring meticulous manual adjustment.
In such cases, patience and careful use of the Mark Areas to Keep and Mark Areas to Remove tools are essential. Zooming in close to the image allows for more precise drawing with the pencil tool. While Word is a capable general-purpose editor, for truly complex scenarios, dedicated Image Tools or professional Photo Manipulation software might offer more sophisticated algorithms (often AI-powered) and finer control.
Beyond Removal: Cropping and Resizing for Perfect Placement
A clean background allows your subject to shine, but its placement and proportion within your document are equally vital for compelling Visual Design.
-
Cropping: After background removal, you might still have transparent areas around your subject that you want to trim. Cropping allows you to define the exact boundaries of your image.
- Select the image.
- Go to the
Picture Format(orFormat) tab. - Click
Crop(often found in theSizegroup). - Drag the cropping handles (the black lines) around the edges of the image to remove unwanted transparent space or frame your subject more tightly.
- Click
Cropagain or pressEscto apply the changes. Cropping is particularly useful for achieving a focused composition, aligning your subject with the document’s grid, or removing any residual artifacts from the background removal process. It directly contributes to the Aesthetic quality and balance of your overall visual.
-
Resizing: Adjusting the dimensions of your image ensures it fits appropriately within your layout without distortion.
- Select the image.
- Drag the corner handles of the image to resize it proportionally. Holding
Shiftwhile dragging maintains the aspect ratio. - For precise control, go to the
Picture Format(orFormat) tab and use theHeightandWidthinput fields in theSizegroup. You can also right-click the image, selectSize and Position..., and enter exact measurements or percentages. Correct resizing is critical for maintaining image clarity (avoiding pixelation when enlarging) and ensuring harmonious integration with text and other Visual Design elements. Whether for a large hero image or a small icon, appropriate sizing enhances the overall impact of your Photography.
Saving Your Transparent Image: The PNG Advantage
Once you’ve successfully removed an image background and made any necessary adjustments in Word, you’ll likely want to save this new, transparent version for use in other applications, on Tophinhanhdep.com, or across different documents. The key to preserving transparency is saving your image in the correct file format.
-
Why PNG? The Portable Network Graphics (PNG) format is specifically designed to support transparency. Unlike JPEG (JPG), which automatically fills transparent areas with white (or black), PNG retains the alpha channel information, allowing parts of the image to be completely see-through. This makes PNG the ideal format for images with removed backgrounds, especially when you plan to layer them over other images, colored backgrounds, or complex textures. It’s a fundamental aspect of digital Image Tools and Graphic Design.
-
How to Save as PNG in Word:
- Right-click on your newly edited image within the Word document.
- Select
Save as Picture...from the context menu. - In the
Save Asdialog box, navigate to your desired save location. - In the
Save as type:dropdown menu, selectPortable Network Graphics (*.png). - Give your file a meaningful name and click
Save.
-
Practical Applications: A transparent PNG image is incredibly versatile. You can use it for:
- Web Design: Clean logos, icons, or product shots on Tophinhanhdep.com, that adapt to any website background.
- Presentations: Professional-looking visuals in PowerPoint that float seamlessly on different slide designs.
- Digital Art & Marketing: Creating composite images, overlays, or elements for mood boards and thematic collections in various design software.
- Document Templates: Building consistent branding elements for brochures, flyers, or reports.
By saving your background-removed images as PNGs, you unlock their full potential for flexible and professional Visual Design across a multitude of platforms and projects. This process effectively converts your image into a reusable asset, echoing the utility of other Image Tools like Converters and Optimizers.
Understanding Word’s Limitations and Exploring Advanced Alternatives
While Microsoft Word’s “Remove Background” feature is a fantastic built-in tool, it’s essential to understand its capabilities and limitations. Just as a basic camera excels at casual snapshots but professional Photography demands advanced gear, Word serves admirably for many tasks but might not replace specialized Image Tools for every scenario.
When Word Suffices vs. When it Falls Short
-
When Word Suffices:
- Simple Backgrounds: Images with solid, uniform backgrounds (e.g., a person against a white wall, an object on a blue sheet) are excellent candidates for Word’s tool.
- Clear Subject/Background Contrast: Photos where the foreground subject is clearly distinguishable from the background, either by color or sharp edges.
- Basic Presentations and Documents: For internal reports, school projects, or simple presentations where perfect, pixel-level precision isn’t critical, Word delivers a perfectly acceptable result.
- Quick Edits: When time is of the essence and you need a fast solution without opening dedicated software.
-
When Word Falls Short:
- Complex Scenes: Images with highly detailed, textured, or multi-colored backgrounds (e.g., a person in a busy street, an object on a patterned rug).
- Intricate Subjects: Objects with fine details like hair, fur, delicate lace, or semi-transparent elements (glass, water).
- Subtle Color Gradients: If the subject’s color subtly blends into the background, Word’s automatic selection can struggle, leading to an imperfect cutout.
- Professional-Grade Results: For Graphic Design, high-end Photo Manipulation, or Digital Art that demands absolute precision and flawless edges, Word’s tool may not offer the granular control needed. In such cases, the resulting image might look artificial or have noticeable imperfections, diminishing the overall Aesthetic.
The Role of Professional Photography and Image Quality
The quality of your source image plays a significant role in the success of any background removal process, whether in Word or with advanced tools. High Resolution Photography with good lighting and sharp focus provides the most data for algorithms (or your manual efforts) to work with. Using low-resolution, blurry, or poorly lit images will always yield sub-optimal results, as there simply isn’t enough information to make a clean distinction between foreground and background. This is why Tophinhanhdep.com emphasizes the importance of starting with quality Stock Photos or your own Beautiful Photography.
Leveraging Specialized Image Tools for Superior Results
When Word’s capabilities are stretched thin, or when pixel-perfect precision is non-negotiable, turning to dedicated Image Tools is the next logical step. The landscape of background removal has evolved rapidly, with many solutions now powered by Artificial Intelligence.
-
Introducing Dedicated Background Removers (like those found on Tophinhanhdep.com): Numerous online platforms and software applications specialize in image manipulation, including advanced background removal. These tools often use sophisticated AI algorithms trained on vast datasets of images to accurately detect and separate foreground subjects from backgrounds, even in complex scenarios. They can often achieve results in seconds that would take significantly longer, and with less precision, in Word. Tophinhanhdep.com offers insights into such powerful Image Tools, including AI Upscalers that can even improve your image quality before background removal.
-
Comparing Word’s Tool to AI-Powered Solutions:
- Word: Good for basic, clear-cut cases. Manual refinement can be tedious for intricate details. It’s a general-purpose document editor with a useful image feature.
- AI Background Removers: Excel at complex images, fine details, and challenging contrasts. Often deliver results automatically and with higher precision. They are specialized Photo Manipulation tools.
- Editing Styles: Word’s method is a more manual, brush-based editing style. AI tools represent an automated, intelligent editing style, offering different approaches to Digital Photography enhancement.
-
Use Cases for Advanced Tools:
- Graphic Design Projects: Creating professional-grade marketing materials, logos, or web elements.
- E-commerce Product Photography: Ensuring perfect cutouts for online catalogs.
- Complex Digital Art: Isolating intricate elements for composites or conceptual art.
- High-Volume Processing: Quickly processing many images with consistent quality.
While Word provides a commendable solution for many common tasks, knowing when to escalate to more specialized Image Tools ensures that your Visual Design work always maintains the highest possible standard, reflecting the expertise and quality Tophinhanhdep.com promotes.
Integrating Transparent Images into Your Visual Design Strategy
Removing an image background is more than just a technical step; it’s a strategic move in Visual Design. It transforms an ordinary picture into a versatile asset, empowering you to craft compelling narratives and aesthetics across all your digital and print materials.
Unlocking Creative Potential with Isolated Subjects
Once a subject is freed from its original background, its creative potential explodes. This is a fundamental concept in Graphic Design and Photo Manipulation, enabling you to:
- Create Dynamic Composites: Combine multiple background-free elements from various pieces of Photography to build entirely new scenes or conceptual Digital Art.
- Generate Impactful Overlays: Place your transparent subject over textured backgrounds, abstract patterns, or vibrant gradients to create unique visual effects that capture attention. This is particularly effective for designing engaging Aesthetic content.
- Design Custom Visual Narratives: Tell a story by layering elements. A background-free image of a person can be placed in a historical setting, or a product can be shown in a dreamlike landscape, sparking Creative Ideas.
- Develop Consistent Branding: For businesses, background removal allows for a uniform presentation of products or team photos against brand-consistent backgrounds, contributing to a strong visual identity.
Enhancing Documents and Presentations
The immediate beneficiaries of background-removed images are your everyday documents and presentations. No longer are you constrained by rectangular image frames; your visuals can now interact dynamically with text and other layout elements.
- Professional Reports: Insert cleanly cut-out charts, diagrams, or product images that blend seamlessly with your document’s layout, making your data more engaging and easier to digest.
- Dynamic Presentations: Craft PowerPoint or Google Slides presentations where subjects “pop” off the slide. Use transparent images to build visually rich Mood Boards or Thematic Collections, aligning with trending styles and creating a memorable experience for your audience.
- Educational Materials: Isolate key elements of diagrams or scientific images to highlight specific features without distracting background clutter, improving comprehension.
Creating Engaging Visual Content for Any Platform
Beyond traditional documents, transparent images are indispensable for various forms of digital content creation, aligning perfectly with Tophinhanhdep.com’s focus on diverse imagery:
- Social Media Graphics: Design eye-catching posts for platforms like Instagram, Facebook, or Pinterest by placing your transparent subject on custom, brand-aligned backgrounds. This is crucial for creating content that adheres to specific Aesthetic and Trending Styles.
- Websites and Blogs: Integrate images into web layouts without awkward white boxes, improving the overall visual flow and professionalism of your site. Whether it’s for a product page, a blog banner, or a profile picture, a clean cutout makes a huge difference.
- Email Marketing: Create visually appealing email campaigns with clean product shots or promotional images that grab subscribers’ attention.
- Digital Art and Illustrations: For those exploring Digital Art, background removal is a foundational step in creating illustrations that combine photographic elements with drawn or painted components.
The Symbiotic Relationship between Photography and Design
Ultimately, the ability to remove image backgrounds highlights the symbiotic relationship between quality Photography and thoughtful Visual Design. A Beautiful Photography piece provides the rich detail and compelling subject matter, while background removal (and subsequent Photo Manipulation) transforms it into a flexible tool for designers. This synergy allows for the creation of truly captivating visuals, whether for professional portfolios, personal projects, or the diverse range of Imagery promoted by Tophinhanhdep.com. By mastering this skill in Word, you gain a tangible advantage in an increasingly visual world.
In conclusion, Microsoft Word’s “Remove Background” feature is a readily available and powerful tool for anyone looking to enhance their documents and expand their creative horizons. While dedicated Image Tools offer advanced capabilities for complex tasks, Word provides an accessible entry point into the world of photo manipulation, empowering users to clean up visuals, improve focus, and integrate images seamlessly. From creating engaging presentations to crafting professional reports, the ability to liberate your subjects from their backgrounds is a crucial step towards impactful Visual Design. So, dive in, experiment, and transform your ordinary pictures into extraordinary visual statements, all within the familiar environment of Microsoft Word.