Mastering Background Removal in Photoshop: A Comprehensive Guide for Stunning Visuals

In the dynamic world of digital imagery, the ability to seamlessly remove an image background is no longer a niche skill but a fundamental necessity for photographers, graphic designers, and casual creators alike. Whether you’re crafting high-resolution stock photos, designing aesthetic wallpapers, or preparing captivating visuals for a mood board, isolating your subject from its original surroundings is often the first step towards unlocking unparalleled creative potential. At Tophinhanhdep.com, we understand the critical role this technique plays in enhancing visual design, photo manipulation, and producing stunning photography that truly stands out.
This comprehensive guide will delve deep into the various methods for background removal in Adobe Photoshop, from the intuitive power of its native tools to the revolutionary efficiency of specialized plugins and online AI solutions offered by Tophinhanhdep.com. We’ll explore techniques that cater to every level of expertise, ensuring that you can achieve pristine cutouts for even the most challenging images, transforming ordinary snapshots into extraordinary visual masterpieces.
The Indispensable Role of Background Removal in Digital Art and Photography
The quest for perfect imagery often begins with a clean slate. Distracting backgrounds can diminish the impact of even the most beautiful photography, drawing attention away from the intended subject. Mastering background removal allows you to take control, ensuring your images convey precisely the message and aesthetic you desire.
Why Clarity Matters: Enhancing Subject Focus and Visual Appeal
Imagine a striking portrait where the background is cluttered, or a product photo where the merchandise blends into its surroundings. In such scenarios, the main subject loses its prominence, and the overall visual appeal suffers. Background removal directly addresses this by enhancing the main subject, making it pop and commanding the viewer’s immediate attention. This is paramount for various applications:
- Product Photography: For e-commerce websites, a clean, often white or transparent, background is essential to showcase products clearly and professionally. This helps create high-resolution images that are consistent across a brand’s catalog.
- Portrait Photography: Isolating a subject allows for the replacement of a less-than-ideal setting with a more aesthetic or abstract background, creating a more professional or artistic look. It enables intricate skin retouching and precise white balance adjustments without affecting the environment.
- Editorial and Marketing Content: When designing flyers, advertisements, or social media graphics, the ability to place subjects on a custom background provides immense flexibility, ensuring the image perfectly aligns with the brand’s visual identity and creative ideas.
- Digital Photography Enhancement: Whether you’re working on nature photography, wildlife shots, or even astrophotography, isolating elements like a celestial body or a rare animal allows for specific light effects, color grading, and digital photography enhancements that would otherwise be complicated by a busy background.
By stripping away the superfluous, you not only make the subject stand out but also create a polished, professional look that is critical for any visual content, be it for personal projects, stock photos, or professional portfolios. This foundational skill lays the groundwork for further image manipulation and creative expression.
Beyond Basic Edits: Creative Freedom and Photo Manipulation
The true power of background removal lies in the creative freedom it bestows upon the artist. Once a subject is cleanly extracted, it becomes a versatile element that can be integrated into entirely new visual narratives. This is where photo manipulation, graphic design, and digital art truly come alive.
- Compositing and Digital Art: A perfectly cut-out subject can be seamlessly combined with other images or graphic elements to create stunning collages, fantastical digital art pieces, or compelling thematic collections. This is vital for artists creating surreal landscapes or intricate conceptual art.
- Custom Wallpapers and Backgrounds: Extracted subjects can be placed onto new, captivating backgrounds, transforming them into personalized wallpapers or unique aesthetic backgrounds that resonate with specific moods (e.g., serene nature, vibrant abstract, or reflective emotional scenes).
- Trending Styles and Mood Boards: The ability to swap backgrounds allows designers to adapt images to trending styles or to populate mood boards with precisely the elements needed to visualize a concept. This flexibility is invaluable in staying current with visual design trends.
- Brand Identity and Creative Campaigns: Businesses can use background-removed assets to maintain a consistent visual identity across all platforms, easily adapting product shots or model imagery to various campaign themes without needing new photo shoots.
- Experimentation with Editing Styles: A isolated subject provides a perfect canvas to experiment with different editing styles, from vintage filters to futuristic glows, without worrying about how these effects interact with a complex background.
In essence, background removal is the key to unlocking advanced visual design possibilities. It empowers creators to move beyond mere photographic correction and venture into the realm of imaginative content creation, turning ordinary images into compelling stories and unique visual experiences.
Mastering Photoshop’s Core Background Removal Tools: Precision at Your Fingertips
Adobe Photoshop, renowned for its extensive suite of image editing capabilities, offers several robust tools for background removal. Each tool has its strengths, making it suitable for different types of images and levels of detail. Understanding these tools is crucial for achieving high-quality results in your digital photography and graphic design projects.
Getting Started with Photoshop’s Native Tools
Before diving into specific techniques, a fundamental practice in Photoshop is non-destructive editing. This means making changes without permanently altering the original image data. A simple yet effective way to ensure this is by duplicating your image layer before starting any edits.
- Open Your Image: Launch Adobe Photoshop and open the image you wish to edit.
- Duplicate the Layer: Navigate to the
Layerspanel (usually on the right side of your workspace). Select your background layer, then pressCtrl+J(Windows) orCommand+J(macOS). This creates a duplicate layer, allowing you to experiment freely without damaging the original. You can then hide or delete the original background layer if you’re confident in your cutout.
This simple step ensures that you always have a backup, a critical aspect of efficient editing workflow mastery.
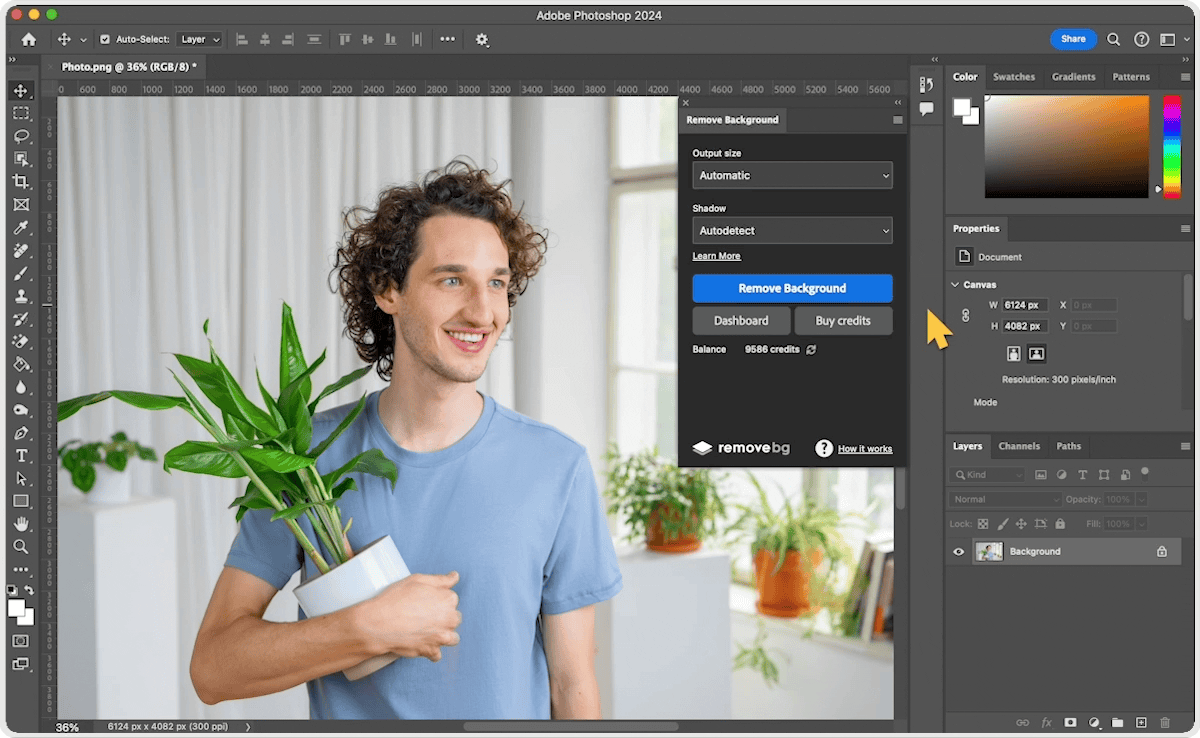
The Quick Actions ‘Remove Background’ Tool: Instant Results
For those seeking the fastest possible solution, Photoshop’s Quick Actions panel offers a one-click “Remove Background” feature that leverages Adobe Sensei AI. This method is incredibly simple and surprisingly effective for images with clear distinctions between the foreground and background.
- Open an Image: Ensure your image is open in Photoshop.
- Duplicate Layer: (Optional but recommended) Duplicate your layer (
Ctrl+J/Command+J). - Access Quick Actions: Go to the
Propertiespanel (if not visible, go toWindow > Properties). Within this panel, locate theQuick Actionssection. - Click ‘Remove Background’: Click the
Remove Backgroundbutton. Photoshop’s AI will automatically analyze your image, identify the subject, and create a layer mask to separate it from the background.
This tool is ideal for quick edits, preparing images for web use where absolute pixel-perfect precision isn’t paramount, or when you need to rapidly generate a transparent background for a simple logo or a clean product shot. While it might not always deliver perfect results for highly intricate areas like wispy hair or complex textures, it provides an excellent starting point that can be further refined with other tools.
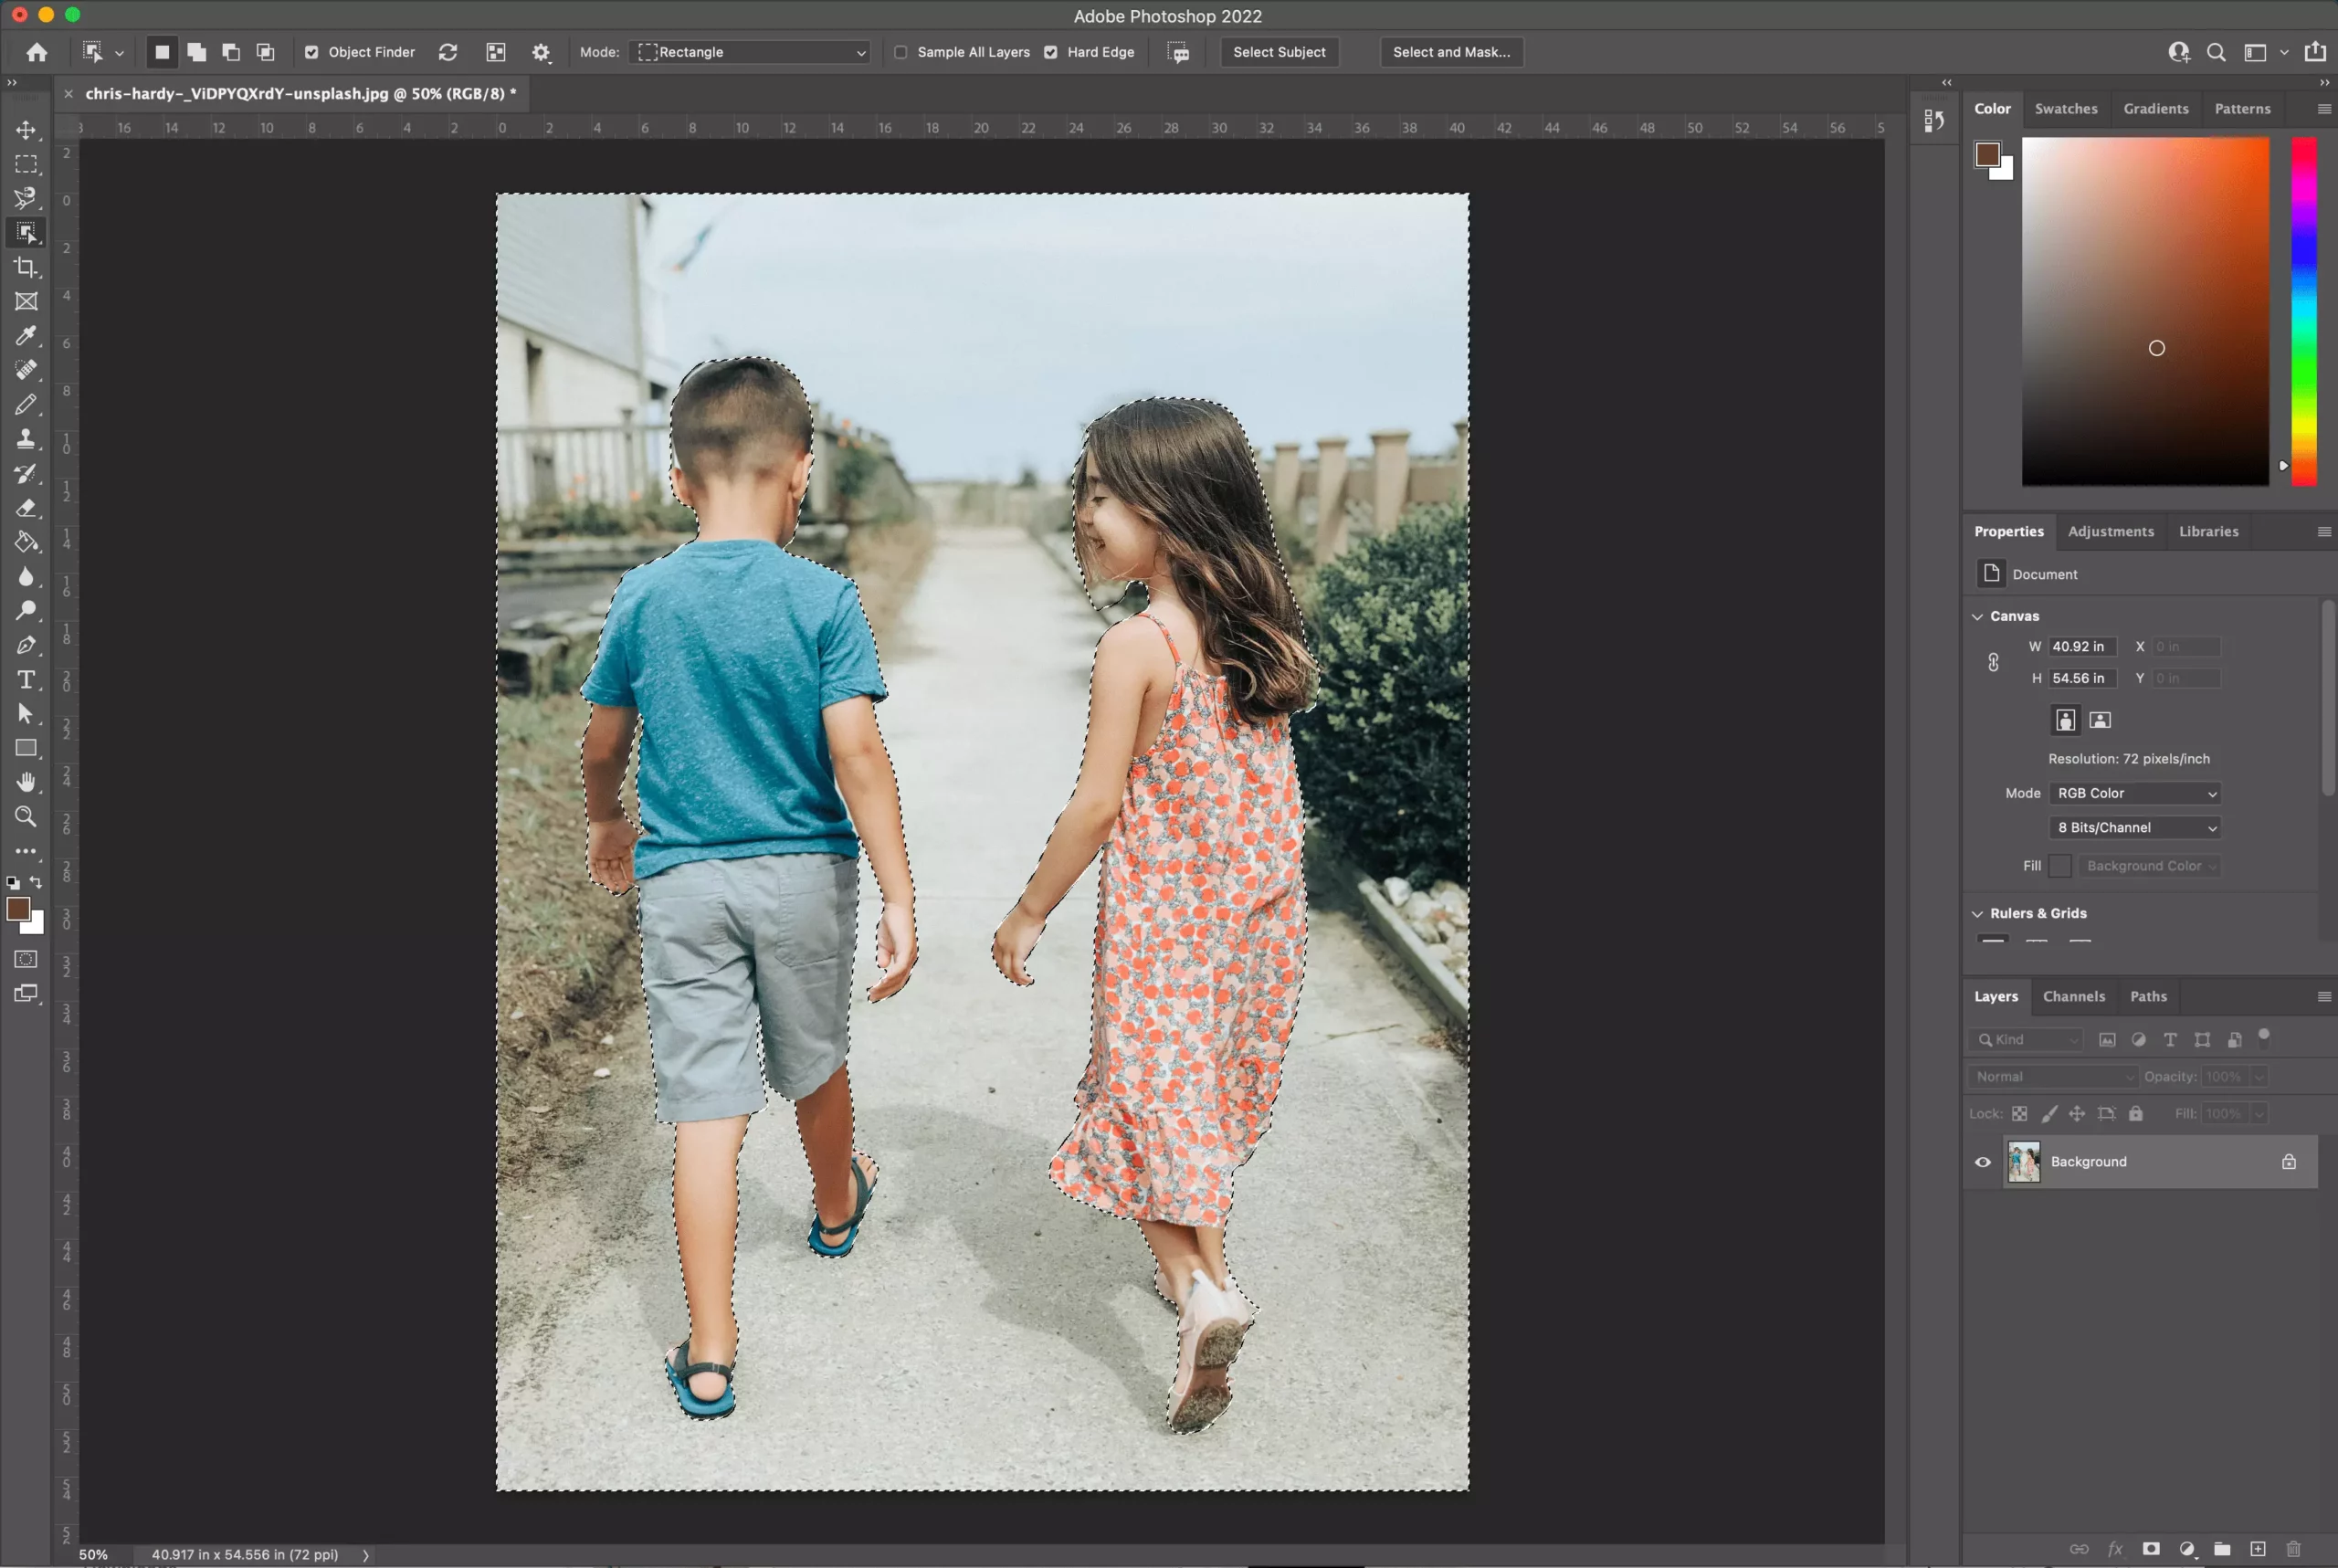
Sculpting Selections with the Pen Tool: Unparalleled Precision
For graphic designers and digital artists who demand the highest level of precision, the Pen Tool is an indispensable asset. Unlike pixel-based selection tools, the Pen Tool creates vector paths, which are mathematically defined lines and curves that can be scaled without losing quality. This makes it ideal for crisp, clean cutouts required for professional graphic design, digital art, and high-resolution images.
- Select the Pen Tool: From the Photoshop Toolbox (left-hand panel), select the
Pen Tool(shortcutP). - Draw a Path: Begin clicking to create anchor points around your subject.
- Straight Lines: Click once to create a corner point, then click again for the next point.
- Smooth Curves: Click and drag to create a smooth curve, adjusting the direction handles. You can hold
Alt(Windows) orOption(Mac) and click on an anchor point to convert it between corner and smooth, or to adjust one handle independently.
- Close the Path: Connect the last anchor point to the first one to close the path. A small circle will appear next to the Pen Tool icon when you hover over the starting point.
- Make a Selection: Once your path is complete, go to the
Pathspanel (Window > Paths). Right-click on your path (it will likely be named “Work Path”) and chooseMake Selection.... - Feathering: In the
Make Selectiondialog box, you can set aFeather Radius. A small feather (0.5-1.5 pixels) can help blend the edges of your subject more naturally with a new background, preventing a harsh, cut-out look, especially important for realistic photo manipulation. - Create Layer Mask: With the selection active, click the
Add Layer Maskicon (a rectangle with a circle inside) at the bottom of theLayerspanel. This non-destructively hides the background, leaving your subject on a transparent layer.
The Pen Tool requires practice, but the clean, editable selections it produces are unmatched, making it a cornerstone for professional photo manipulation and visual design.
Tackling Intricate Edges with the Background Eraser Tool
When faced with subjects featuring fine details like hair, fur, or wispy elements, the standard selection tools can fall short. This is where the Background Eraser Tool shines, designed specifically to delete background pixels while preserving the edges of complex foreground elements.
- Locate the Tool: In the Photoshop Toolbox, find the
Eraser Tool(shortcutE). Click and hold on it to reveal the submenu, then select theBackground Eraser Tool. - Adjust Brush Settings:
- Size: Adjust the brush size using the
[and]bracket keys, or via the options bar. Use a smaller brush for tight areas and a larger one for broad strokes. - Hardness: Set the
Hardnessto a high value (around 90-100%). A soft brush can leave fuzzy artifacts, making the cutout look messy. - Limits: In the options bar, set
LimitstoFind Edges. This helps the tool accurately distinguish between foreground and background pixels. - Tolerance: This setting dictates how wide a range of colors the tool will erase. Start with a
Toleranceof around 25-30%. If too much of your subject is erased, lower the tolerance. If too little of the background is removed, increase it.
- Size: Adjust the brush size using the
- Sampling Method:
- Continuous: (Default) The tool continuously samples colors as you drag, erasing any matching hue within your tolerance. This is useful for variegated backgrounds.
- Once: Samples the color only on the first click and erases only that specific color (and its tolerance range) as you drag. Ideal for solid, uniform backgrounds like a blue sky, as it prevents accidental erasure of varying background colors.
- Protect Foreground Color: If your background color is very similar to part of your subject and you find the tool erasing too much, activate
Protect Foreground Colorin the options bar. Then,Alt-click (Windows) orOption-click (Mac) on a color in your subject that you want to preserve using the eyedropper that appears. The tool will then avoid erasing that specific hue. - Erase: Position the crosshair (the center of your brush) over the background color you want to remove, ensuring it doesn’t touch your subject. Click and drag. The tool will intelligently erase similar colors, attempting to keep your subject intact. Zoom in heavily for precise work.
The Background Eraser Tool is a powerful ally for digital photography, especially when meticulous hair selection is needed, allowing for refined editing styles and professional outcomes.
Specialized Tools for Specific Challenges (Magic Wand, Color Range, Channels, Layer Masks)
Photoshop offers additional tools and concepts that provide flexibility for various background removal scenarios, from simple solid colors to complex, semi-transparent elements.
- Magic Wand Tool: The
Magic Wand Tool(shortcutW, often grouped with Quick Selection) excels at selecting contiguous areas of similar color. It’s perfect for images with uniform, solid-color backgrounds. Simply click on the background, and it will select all pixels within its tolerance range. You can adjust theTolerancein the options bar for more or less sensitivity. - Color Range Tool: Found under
Select > Color Range..., this tool allows you to select pixels based on their color or luminosity values. It’s highly effective for backgrounds that are largely monochromatic but may have slight variations. You can sample colors directly from the image, adjustFuzzinessto expand or contract the selection, and even select skin tones or out-of-gamut colors. - Channel Tool (for intricate transparencies and hair): For the most challenging elements like fine hair, smoke, or semi-transparent objects, the
Channelspanel (Window > Channels) offers an advanced, high-precision method.- Analyze Channels: Examine the Red, Green, and Blue channels. Identify the channel that shows the highest contrast between your subject and the background (often the Blue or Green channel for human subjects).
- Duplicate Channel: Drag the chosen channel to the “New Channel” icon at the bottom of the
Channelspanel to duplicate it. - Enhance Contrast: With the duplicated channel selected, go to
Image > Adjustments > Levels...(Ctrl+L/Command+L). Adjust the black and white sliders to maximize the contrast, making your subject as black as possible and the background as white as possible. Use the brush tool set to black to paint over any remaining gray areas of your subject, and white to paint over remaining background. - Load as Selection:
Ctrl-click (Windows) orCommand-click (Mac) on the duplicated channel thumbnail in theChannelspanel. This loads the white areas as a selection. - Return to Layers: Go back to the
Layerspanel, ensure your subject layer is selected, and click theAdd Layer Maskicon. This technique provides unparalleled control for delicate extractions.
- Layer Mask Tool (Non-Destructive Editing Master): While not a selection tool itself, the
Layer Maskis the cornerstone of non-destructive background removal. Once you have made any selection (using any of the tools above), applying a layer mask (Add Layer Maskicon inLayerspanel) allows you to hide parts of the layer without deleting them.- Black Conceals, White Reveals: With the layer mask selected, paint with a black brush to hide parts of the image (the background), and paint with a white brush to reveal them (if you accidentally erased part of your subject). This makes refining your cutout extremely flexible and reversible, crucial for advanced visual design projects and error-free editing styles.
By judiciously combining these tools, you can achieve exceptional background removal results, preparing your images for any creative endeavor, from stunning wallpapers to intricate digital art.
Revolutionizing Workflow with Tophinhanhdep.com’s AI-Powered Solutions
While Photoshop’s native tools offer unparalleled control, they can be time-consuming, especially for repetitive tasks or when you’re dealing with a large volume of images. Tophinhanhdep.com provides cutting-edge AI-powered solutions that significantly streamline the background removal process, offering both a seamless Photoshop plugin and a powerful online tool. These innovations are part of our commitment to providing advanced image tools, including AI upscalers, compressors, and optimizers, designed to enhance your digital photography and visual design workflow.
The Official Tophinhanhdep.com Photoshop Plugin: Seamless Integration
The Tophinhanhdep.com plugin for Adobe Photoshop is a game-changer for anyone who regularly performs background removal. It integrates directly into your Photoshop workflow, offering a one-click solution that leverages advanced AI to deliver stunning results, even on complex edges like hair, with remarkable speed.
Benefits of using the Tophinhanhdep.com Photoshop plugin:
- Productivity Boost: Say goodbye to tedious manual pixel picking. The plugin automates the most time-consuming aspects of background removal, freeing you to focus on challenging your creativity and refining your overall visual design. This is invaluable for professionals working with high-resolution stock photos or large thematic collections.
- Stunning Results: Tophinhanhdep.com’s AI engine is trained on millions of images, enabling it to produce top-quality cutouts, even for notoriously difficult conditions such as wispy hair, intricate patterns, or semi-transparent objects. The quality rivals meticulous manual selections, making it perfect for beautiful photography and detailed digital art.
- Easy to Adjust Layer Mask Editing: The plugin doesn’t just remove the background; it creates a layer mask. This means you retain full control. You can use Photoshop’s standard layer mask editing tools (like painting with black or white brushes) to further remove or restore areas of an image, all starting from a highly accurate one-click foundation.
- Seamless Workflow: It feels like a native Photoshop feature, ensuring a smooth and uninterrupted editing experience.
How to install and use the Tophinhanhdep.com Photoshop plugin:
- Installation:
- Go to Adobe Exchange and search for “Tophinhanhdep.com for Adobe Photoshop.”
- Click the
Freebutton to install the plugin. Ensure you have the Creative Cloud Desktop App installed. The installation may take a few seconds without a progress display, but you will receive a notification upon completion. - Updating from older versions (1.x to 2.x): Adobe updated its plugin architecture. For the best experience, uninstall the old version first. If installed via Adobe Exchange, go to
MyExchange > Manage, find “Tophinhanhdep.com for Adobe Photoshop,” click...andUninstall. If using an external utility like Anastasiy’s Extension Manager, open it, select the plugin, and clickRemove. Then, install the latest version.
- Usage:
- Open an image in Adobe Photoshop.
- Go to
Plugins→Tophinhanhdep.com for Adobe Photoshop→Remove Background. - Click
Remove Background: The Tophinhanhdep.com API will automatically process your photo. - Login & Credits: You need to be logged in to your Tophinhanhdep.com account for images to be processed via the API. Tophinhanhdep.com offers 1 free credit upon signing up and 50 free API calls per month for preview images (up to 0.25 megapixels, e.g., 625x400), allowing you to test its capabilities without immediate cost. Full-resolution processing requires credits, which can be purchased and used across all Tophinhanhdep.com products and integrations.
- Supported Versions: The plugin supports Adobe Photoshop CC (2021) 22.0 or newer, for both Mac and Windows.
- Enterprise Deployment: For multiple users, a quick migration is supported. Refer to the Tophinhanhdep.com Help Center for details on rolling out the plugin efficiently.
This plugin exemplifies Tophinhanhdep.com’s dedication to providing superior image tools, helping you create stunning images with unprecedented ease and speed.
Tophinhanhdep.com Online Background Remover: Simplicity and Speed
Recognizing that not everyone is a Photoshop expert, or that sometimes a lightning-fast solution is all that’s needed, Tophinhanhdep.com also offers an incredibly user-friendly online AI background remover tool. This web-based solution is perfect for beginners and professionals alike, eliminating the steep learning curve of complex software.
Key Features and Benefits:
- Effortless One-Click Removal: Simply upload your image to Tophinhanhdep.com’s online platform. Our advanced AI technology instantly identifies the foreground subject and meticulously removes the background in seconds. This is ideal for quickly preparing images for aesthetic content, social media, or basic graphic design.
- No Software Required: Access the tool from any web browser, without needing to install Photoshop or any other application. This makes it a perfect solution for quick edits on the go or for users who are new to photo editing.
- High-Quality Results for All Image Types: Whether you need to remove a white background from a product image, isolate a logo, or extract a complex character for a digital art project, Tophinhanhdep.com’s AI delivers clean and precise cutouts. It excels with varied subjects, ensuring your images maintain high resolution and clarity.
- Creative Background Options: Beyond simple removal, Tophinhanhdep.com allows you to immediately replace the background. You can choose from preconfigured background choices or, for ultimate creativity, harness the prowess of an AI background generator to craft entirely new, instant backgrounds. This makes it incredibly versatile for creating custom wallpapers, mood boards, or experimenting with trending styles.
- Integrated Image Tools: As part of the Tophinhanhdep.com ecosystem, images processed by the online background remover can then seamlessly benefit from other integrated image tools like AI upscalers (to enhance resolution), compressors (for web optimization), and optimizers (to reduce file size without quality loss). This comprehensive suite ensures your visual assets are always production-ready.
The Tophinhanhdep.com online background remover democratizes professional-grade image editing, making advanced photo manipulation accessible to everyone. It’s an essential tool for creating captivating visual content, from personal photo ideas to professional stock photos, all with remarkable speed and simplicity.
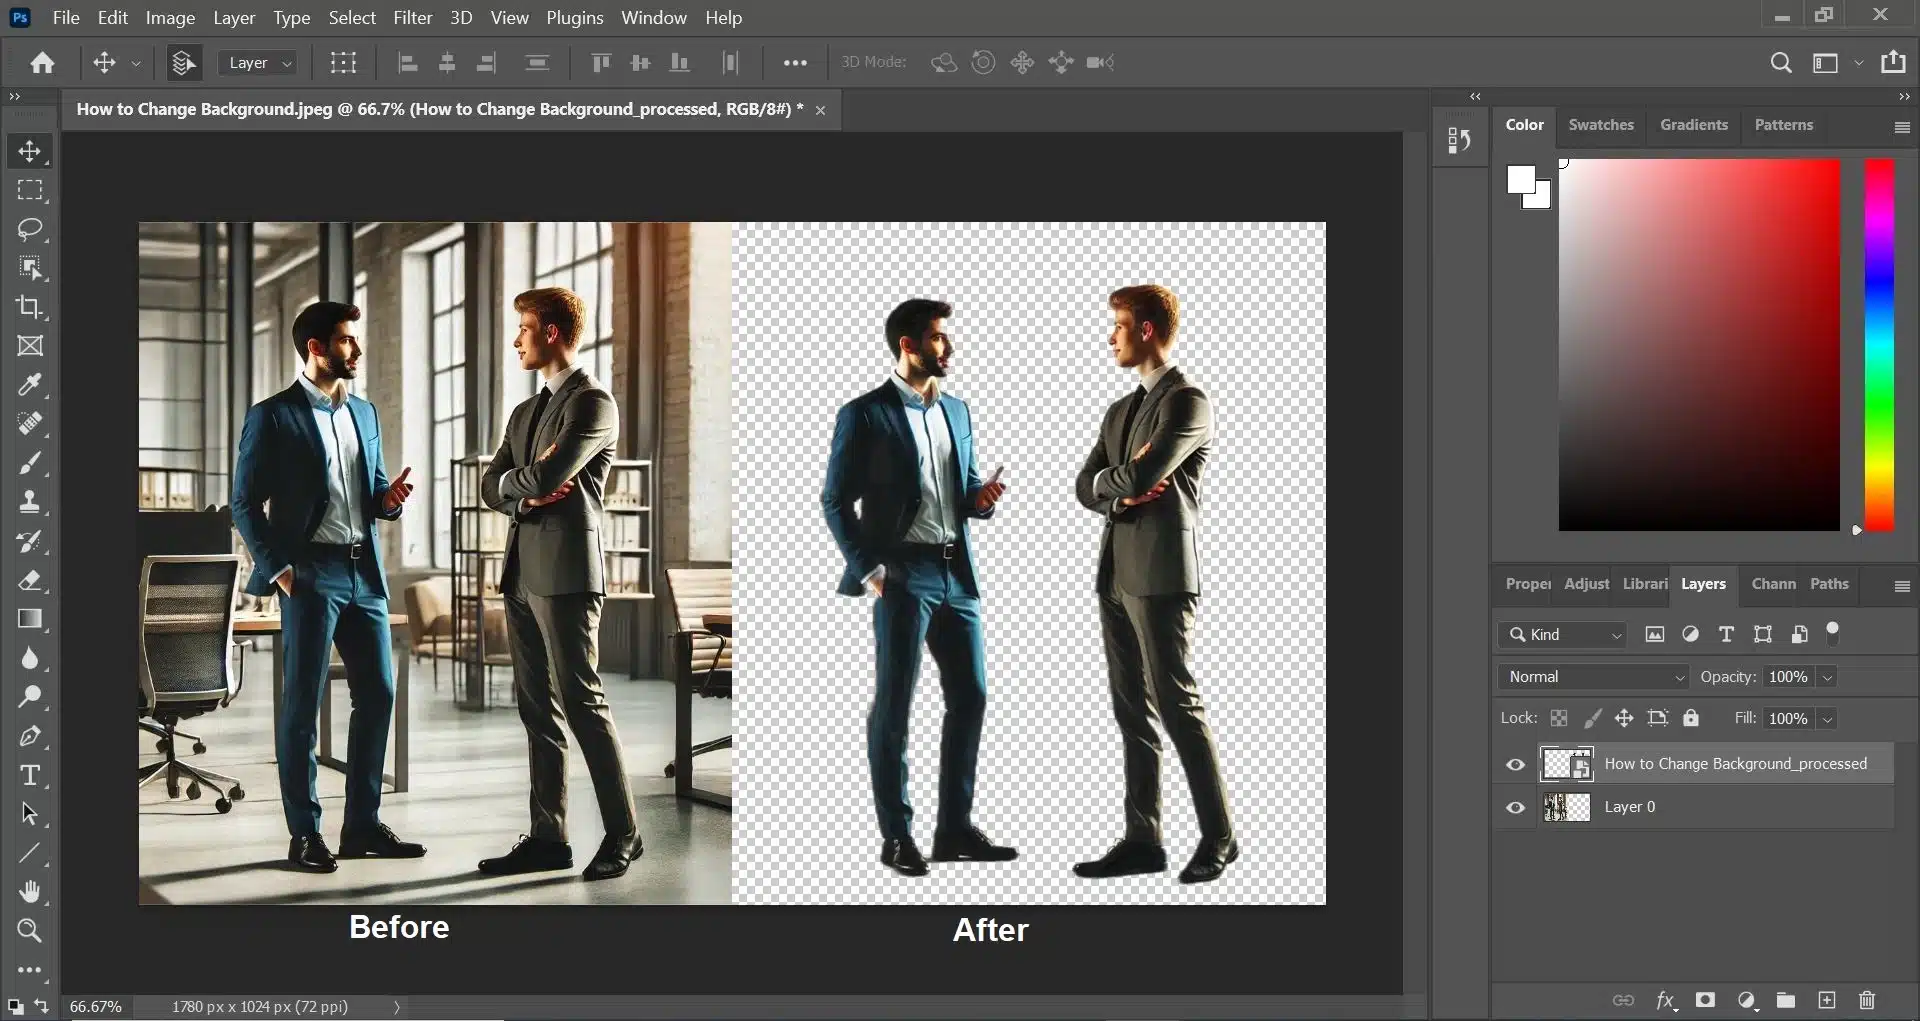
Refining Your Edges and Elevating Your Visual Design
Achieving a truly professional-looking image with a removed background involves more than just the initial cutout. It demands refinement. Photoshop’s “Select and Mask” workspace is your command center for perfecting edges, ensuring your subjects integrate flawlessly into new environments and elevating your overall visual design.
The ‘Select and Mask’ Workspace: Perfecting Your Cutouts
After making an initial selection with any of Photoshop’s tools (or after using the Tophinhanhdep.com plugin), the ‘Select and Mask’ workspace (Select > Select and Mask... or click the Select and Mask button in the options bar when a selection tool is active) provides a dedicated environment for fine-tuning. This crucial step ensures that your subject’s edges are natural, avoiding the tell-tale signs of a rushed cutout, and is fundamental for high-resolution digital photography.
Key Features within ‘Select and Mask’:
- View Modes: Experiment with different
View Modes(e.g.,On Layers,On White,On Black,Overlay,Reveal Layer) to clearly see your selection against various backdrops. TheOverlayview (shortcutVkey) is often very helpful, displaying the masked area as a transparent color. - Edge Detection:
- Radius: Adjust the
Radiusslider to expand or contract the edge detection. ASmart Radiuscan be enabled for more intelligent edge detection, particularly useful for areas with both hard and soft edges. - Refine Edge Brush Tool (R): This is perhaps the most powerful tool in the workspace. Paint along challenging edges (like hair, fur, or intricate foliage) with this brush. Photoshop’s AI will analyze the pixels and differentiate between foreground and background, giving you incredibly precise results.
- Radius: Adjust the
- Global Refinements:
- Smooth: Reduces jaggedness in the selection border.
- Feather: Softens the edge of the selection, creating a more gradual transition. A slight feather (0.5-2px) often helps integrate the subject into a new background more naturally.
- Contrast: Sharpens the edges of the selection.
- Shift Edge: Expands or contracts the selection boundary. A negative value shrinks the selection, often used to remove slight halos remaining from the original background.
- Local Refinement Tools (from top to bottom in the left toolbox):
- Quick Selection Tool (W): For making large, rapid selections or additions.
- Refine Edge Brush Tool (R): As described above, for complex edges.
- Brush Tool (B): For manually painting directly onto the mask to add (white brush) or subtract (black brush) from the selection. This offers pixel-level control.
- Object Selection Tool (W): Lets Photoshop try to identify specific objects within the mask for easier selection.
- Lasso Tool (L): For freehand selections or subtracting areas.
- Output Settings: Crucially, set the
Output Tooption toLayer Mask(orNew Layer with Layer Mask). This ensures your refinements are applied non-destructively, preserving your original image data. You can also selectDecontaminate Colorsto help remove any residual color fringing from the old background, vital for clean composites.
Mastering the ‘Select and Mask’ workspace transforms your background removal from a functional task into an art form, allowing you to achieve pixel-perfect cutouts that are essential for high-quality graphic design, digital art, and any form of visual content where precision is paramount.
Integrating Your Masterpiece: From Wallpapers to Graphic Design
Once you have a meticulously cut-out subject on a transparent background, the real creative journey begins. Tophinhanhdep.com specializes in not just providing the tools but also the inspiration and resources to make your vision a reality. Here’s how your perfectly isolated images can be integrated into various visual design projects:
- Creating Custom Wallpapers and Backgrounds: With a subject isolated, you can place it against a vast array of new backdrops.
- Aesthetic Backgrounds: Combine your subject with soft gradients, bokeh effects, or minimalist textures to create personalized aesthetic wallpapers.
- Nature & Abstract Wallpapers: Transport your subject to serene nature scenes or vibrant abstract landscapes, designing unique high-resolution wallpapers for desktops or mobile devices.
- Sad/Emotional or Beautiful Photography: Manipulate backgrounds to evoke specific emotions, enhancing the narrative of your beautiful photography or adding depth to a sad/emotional piece.
- Enhancing Graphic Design and Digital Art Projects:
- Photo Manipulation: Seamlessly composite your subject into complex scenes, blending it with other elements to create fantastical or hyper-realistic digital art. This skill is critical for advertising, book covers, and conceptual art.
- Creative Ideas & Mood Boards: Build compelling mood boards by combining isolated elements, experimenting with different thematic collections, and visualizing trending styles. Use your cutouts for marketing collateral, social media posts, or website banners.
- Logo Design & Branding: Product shots and character images with transparent backgrounds are invaluable for consistent branding across all marketing channels.
- Optimizing for Performance with Tophinhanhdep.com Image Tools:
- High Resolution & AI Upscalers: For prints or very large displays, ensure your final composite is high resolution. If your original assets weren’t large enough, Tophinhanhdep.com’s AI upscalers can intelligently increase image size without significant loss of quality, crucial for professional photography.
- Compressors & Optimizers: For web use (e.g., website backgrounds, social media graphics), it’s essential to optimize file size without compromising visual quality. Tophinhanhdep.com offers image compressors and optimizers that can drastically reduce loading times, improving user experience and SEO.
- Converters: If you need to change file formats (e.g., from PNG to JPG, or to WebP for web optimization), Tophinhanhdep.com’s image converters ensure compatibility and efficiency.
- Image-to-Text: For accessibility or data extraction purposes, our image-to-text tools can process your visuals, adding another layer of utility to your digital assets.
By integrating these refined images, you are not just editing photos; you are crafting visual stories, enhancing brand presence, and contributing to a rich collection of digital art. Tophinhanhdep.com provides the end-to-end solutions to support your entire creative process, from initial background removal to final image optimization and inspiration.
Conclusion
The ability to remove backgrounds from images in Photoshop is a foundational skill that empowers creators across various disciplines. From enhancing the clarity and focus of high-resolution photography to enabling intricate photo manipulation for digital art and graphic design, a clean cutout opens up a world of creative possibilities. We’ve explored the precision offered by Photoshop’s native tools—the quick and easy Remove Background feature, the meticulous Pen Tool, the specialized Background Eraser for intricate details, and the advanced Channels and Layer Mask techniques—each catering to different levels of complexity and desired output.
However, in today’s fast-paced digital environment, efficiency is key. Tophinhanhdep.com steps in with innovative AI-powered solutions to streamline your workflow. Our official Photoshop plugin offers a one-click, high-quality background removal experience directly within your favorite editing software, perfect for designers who need both speed and control. For those seeking simplicity or an alternative to traditional software, Tophinhanhdep.com’s online AI background remover provides instant, professional results with added functionalities like AI background generation and optimization.
Whether you’re crafting stunning aesthetic wallpapers, curating thematic collections for mood boards, or preparing stock photos for commercial use, mastering background removal is your gateway to elevating your visual content. Tophinhanhdep.com is your ultimate resource, offering not just powerful image tools like AI upscalers, compressors, and converters, but also a wealth of inspiration and high-resolution images to fuel your creative journey.
We encourage you to experiment with these techniques, explore the seamless integration of Tophinhanhdep.com’s tools, and witness how the power of a pristine cutout can transform your digital photography and visual design projects. Dive into the world of limitless creative potential with Tophinhanhdep.com today – your partner in crafting truly unforgettable visuals.