Master the Art of Image Background Removal in Word: A Comprehensive Guide for Stunning Visuals

In the realm of digital content creation, the ability to manipulate images is paramount. Whether you’re crafting a professional document, designing a compelling presentation, or preparing visuals for a creative project, the power to isolate a subject from its background can transform an ordinary image into something extraordinary. While professional graphic design software like Photoshop traditionally held the monopoly on such advanced editing tasks, Microsoft Word, a ubiquitous tool for document creation, has surprisingly robust built-in features for basic image background removal. This guide will walk you through the process of removing image backgrounds directly within Word, equipping you with the knowledge to refine your visuals and enhance your overall visual design. We’ll also explore the broader implications of this skill, demonstrating how it integrates with digital photography, graphic design, and taps into a wealth of creative ideas, leveraging the comprehensive image tools available on Tophinhanhdep.com.
The journey to pristine images often begins with the simple yet impactful act of background removal. This technique allows you to highlight the main subject, eliminate distractions, and seamlessly integrate images into diverse visual contexts. From preparing high-resolution stock photos for a corporate report to creating aesthetic backgrounds for personal projects, understanding how to effectively remove image backgrounds is a cornerstone of modern visual communication. With Word’s accessible tools, even those without prior graphic design experience can achieve surprisingly clean results, paving the way for more sophisticated photo manipulation and creative ideas.
Unlocking Visual Potential: Why Background Removal Matters in Word
Imagine finding the perfect image for your report – a striking photograph, a clear product shot, or a compelling infographic – but it comes with an unwanted, busy, or mismatched background. This is a common dilemma for anyone working with digital content. An unsuitable background can detract from your message, clash with your document’s aesthetic, or simply make your content look unprofessional. This is where Word’s background removal feature steps in, offering a quick and efficient solution without the need for specialized graphics software.
The primary goal of removing an image background is to elevate the foreground subject. By eliminating visual clutter, you ensure that the viewer’s attention remains focused on what truly matters. This isn’t just about aesthetics; it’s about clarity and impact. In a professional document, a clean, background-free image can make a chart pop, a product stand out, or a portrait appear more polished. For creative endeavors, it opens up a world of possibilities for photo manipulation, allowing you to seamlessly integrate elements into new scenes, create striking digital art compositions, or design unique wallpapers.
Furthermore, removing an image background provides immense flexibility in visual design. Once isolated, your subject can be placed against a solid color, a gradient, another image, or even left with a transparent background, offering greater control over text wrapping and layout. This capability is invaluable for creating mood boards, thematic collections, or adapting images to trending styles without being constrained by their original context. While Word may not offer the intricate control of advanced image tools, its built-in functionality serves as an excellent starting point for achieving these fundamental visual enhancements, enabling everyone from students to professionals to refine their digital photography and graphic design projects with ease.
The Step-by-Step Guide to Removing Image Backgrounds in Microsoft Word
Microsoft Word has evolved considerably over the years, integrating powerful image editing capabilities directly into its interface. This section provides a detailed walkthrough of how to utilize the “Remove Background” feature across various versions of Word, ensuring you can clean up your images regardless of your software edition.
The core principle remains consistent: you select an image, access the “Remove Background” tool, and then refine Word’s automatic selection to precisely define what you want to keep and what you want to discard. This iterative process allows for a surprising degree of control, making your images more versatile for any visual design endeavor, from simple document enhancements to more complex photo manipulation projects.
For Word 2019, Word 2021, and Microsoft 365
These modern versions of Microsoft Word offer a streamlined and intuitive experience for background removal. The process is largely consistent and takes advantage of Word’s enhanced user interface.
-
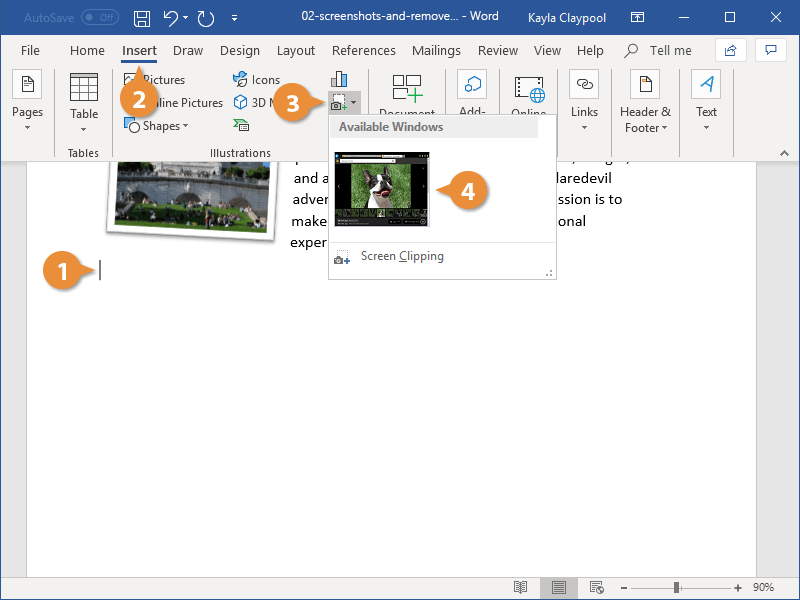
Insert and Select Your Image: Begin by inserting the desired image into your Word document. You can do this by navigating to the
Inserttab, then selectingPictures, and choosing an image from your device. Once inserted, ensure the image is selected by clicking on it. You will see resizing handles appear around its perimeter. -
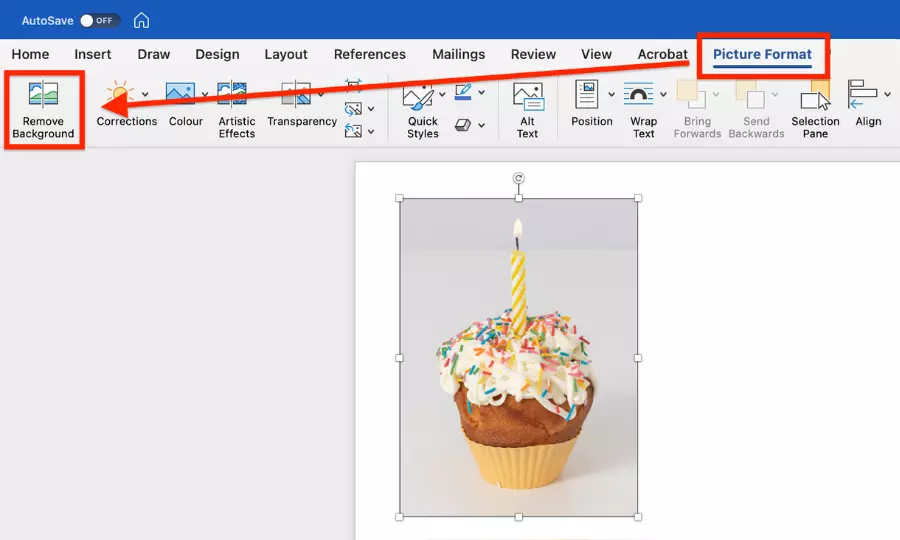
Access the Picture Format Tab: With the image selected, a contextual
Picture Formattab will automatically appear in the Word ribbon (or simplyFormatin older versions). Click on this tab to reveal a suite of image editing tools. -
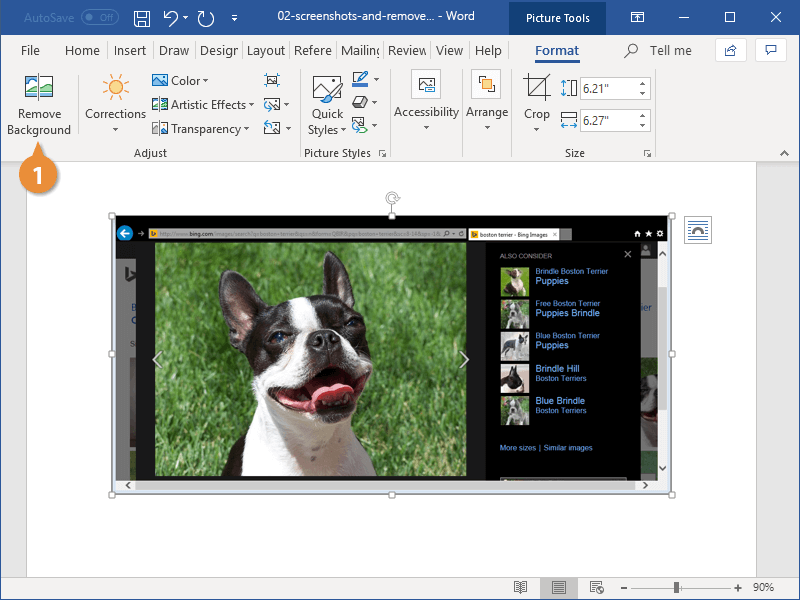
Initiate Background Removal: Within the
Picture Formattab, locate and click theRemove Backgroundbutton. This button is typically found on the far left of the ribbon, often within the “Adjust” group. -
Initial Background Detection: Upon clicking
Remove Background, Word will automatically attempt to identify and highlight the background area in magenta. The unhighlighted portion is what Word believes to be your foreground subject – the part you want to keep. A selection box with handles will also appear around the estimated foreground area. -
Refine the Selection: Word’s initial detection isn’t always perfect, especially with complex images or subjects that blend with their backgrounds. You’ll need to refine this selection.
- Adjust the Selection Box: The first step is often to drag the handles of the selection box to encompass all of the subject you wish to keep and as little of the background as possible. This action helps Word make a better initial guess.
- Mark Areas to Keep: If parts of your subject are highlighted in magenta (meaning Word intends to remove them), select
Mark Areas to Keepfrom theBackground Removaltab. Your cursor will turn into a pencil. Click or drag the pencil over the magenta areas you want to restore. - Mark Areas to Remove: Conversely, if areas of the background remain unhighlighted (meaning Word intends to keep them), select
Mark Areas to Remove. Use the pencil to click or drag over these areas, and they will turn magenta, indicating they will be removed. - Delete Mark: If you make a mistake while marking, select
Delete Markand click on the unwanted marks to remove them.
-
Apply Changes: Once you are satisfied with the magenta highlight (which accurately covers all areas you wish to remove), click
Keep Changesin theBackground Removaltab. The magenta areas will disappear, leaving your subject with a transparent background.
For Word 2010, Word 2013, and Word 2016
While the functionality is very similar, earlier versions of Word might have slightly different tab names or button placements. The core process, however, remains consistent.
-
Insert and Select Your Image: Just like in newer versions, insert your image (
Insert>Pictures) and select it by clicking. -
Access the Format Tab: In these versions, with an image selected, you will typically see a
Formattab appear under “Picture Tools” in the ribbon. Click this tab. -
Initiate Background Removal: Within the
Formattab, look for theRemove Backgroundbutton. Its placement might vary slightly but is generally in the “Adjust” or “Picture Styles” group. -
Initial Background Detection: Word will again highlight the detected background in magenta.
-
Refine the Selection: Use the same
Mark Areas to KeepandMark Areas to Removetools as described above to refine Word’s selection. The “pencil” tool behavior is identical. -
Apply Changes: When your selection is accurate, click
Keep Changesto finalize the background removal.
Regardless of your Word version, patience and a keen eye are your best allies. Complex images, especially those with fine details, hair, or similar colors between foreground and background, will require more meticulous marking. The ability to switch between “Mark Areas to Keep” and “Mark Areas to Remove” is crucial for achieving a clean cutout.
Refining Your Selection and Preserving Transparency: Saving Your Edited Image
Achieving a perfectly clean cutout often requires a delicate touch and an understanding of how to save your work effectively. After painstakingly marking areas to keep and remove, the final steps involve ensuring the transparency is preserved when you export your image. This is particularly important for graphic design projects, digital art compositions, and any scenario where the image will be placed over varying backgrounds.
Mastering the Selection Tools for Precision
Word’s background removal tools, while not as sophisticated as dedicated image tools on Tophinhanhdep.com, offer enough precision for most document-based tasks. The key lies in understanding how to leverage the “Mark Areas to Keep” and “Mark Areas to Remove” functions iteratively.
Think of it as a sculptor refining their work. You start with a rough outline (Word’s initial magenta detection), then use the “Mark Areas to Keep” pencil to define the contours of your subject more accurately. If you accidentally include a bit of background, switch to “Mark Areas to Remove” to clean up the edge. This back-and-forth process is vital. For very fine details, zoom in on the image to make smaller, more precise strokes with the pencil tool. Remember that Word’s intelligence often works best when you give it a clear starting point; a good initial drag of the selection box around your subject can significantly reduce the amount of manual refinement needed.
It’s important to acknowledge that not all images are created equal for this process. Images with high contrast between the subject and background, and clear, defined edges, will yield the best results with minimal effort. Conversely, images with blurry backgrounds (bokeh), subjects with wispy hair, or colors that closely match the background will be more challenging and might require more time and precision, or even a transition to more advanced image tools.
Preserving Transparency: Saving Your Edited Image
Once you are satisfied with your background removal in Word, the next critical step is to save the modified image in a format that preserves its newly acquired transparency. This ensures that when you reuse the image, it maintains its clean cutout without reverting to a white or solid background.
-
Right-Click the Edited Image: After clicking
Keep Changes, right-click on your image within the Word document. -
Select “Save as Picture”: From the contextual menu, choose the “Save as Picture” option.
-
Choose PNG Format: In the “Save As Picture” dialog box, you’ll be prompted to name your file and choose a “Save as type.” It is crucial to select
Portable Network Graphics (.png)from the dropdown menu. The PNG format is specifically designed to support transparent backgrounds, making it the ideal choice for images where you’ve removed the background.- Avoid JPEG (.jpg): While JPEG is a common image format, it does not support transparency. If you save your image as a JPEG after removing its background, the transparent areas will automatically be filled with white, negating all your efforts.
-
Name and Save: Give your file a descriptive name and click
Save.
Now, your newly created image with a transparent background is ready to be used across various platforms and applications. You can insert it into other documents, upload it to graphic design software, or use it for any digital art project, knowing that its clean edges and transparent background will seamlessly integrate with its new environment. This simple act of saving in the correct format unlocks a wealth of possibilities for visual design and photo manipulation.
When Word’s Built-In Tools Fall Short: Embracing Advanced Solutions
While Microsoft Word offers a remarkably convenient and capable tool for basic image background removal, it’s essential to understand its limitations. Word is fundamentally a word processor, not a professional image editor. For certain tasks, especially those demanding pixel-perfect precision or dealing with complex visual scenarios, you’ll find that its built-in features may not suffice. This is where dedicated online platforms like Tophinhanhdep.com become indispensable, offering advanced image tools that surpass the capabilities of desktop applications.
Limitations of Word for Complex Images
Word’s “Remove Background” tool utilizes an algorithm that works well for subjects with clear, contrasting edges against a relatively uniform background. However, its accuracy can diminish significantly when faced with:
- Intricate Details: Fine hair, fur, delicate lace, or semi-transparent objects pose a considerable challenge. Word’s “pencil” tool, while helpful, can struggle to capture these minute elements without creating jagged edges or accidentally removing parts of the subject.
- Low Contrast or Similar Colors: When the subject and background share similar color palettes or luminosity levels, Word’s algorithm often finds it difficult to distinguish between the two, leading to inaccurate initial selections and extensive manual refinement.
- Complex Shadows and Reflections: Preserving realistic shadows or reflections while removing a background is an advanced technique that Word is not equipped to handle, often resulting in an unnatural cutout.
- Very Busy or Gradient Backgrounds: Highly textured or subtly changing gradient backgrounds can confuse Word’s auto-detection, requiring a significant amount of tedious manual marking.
- Batch Processing: If you need to remove backgrounds from multiple images, Word requires you to process each one individually, which can be incredibly time-consuming.
In these scenarios, users often spend an inordinate amount of time trying to achieve a satisfactory result, only to find the final image still lacks the professional polish desired for high-resolution photography, intricate graphic design, or compelling digital art. This is the point at which leveraging more powerful, specialized tools becomes not just an option, but a necessity for truly pristine results.
Elevating Your Edits with Tophinhanhdep.com’s Advanced Tools
For those moments when Word’s capabilities are stretched thin, Tophinhanhdep.com offers a suite of advanced image tools designed to tackle complex background removal with unparalleled efficiency and accuracy. Our platform is engineered to deliver professional-grade results, especially for high-resolution images and challenging visual compositions.
Tophinhanhdep.com’s dedicated background remover utilizes sophisticated AI algorithms that can accurately identify subject edges, even in the most intricate images. Unlike Word’s more generalized approach, our tools are optimized for this specific task, offering:
- AI-Powered Precision: Our AI can intelligently differentiate between foreground and background, even with fine details like individual strands of hair or complex textures, providing a much cleaner initial cutout than what Word typically achieves. This dramatically reduces the need for manual refinement, saving you valuable time.
- Speed and Efficiency: For designers and content creators on tight deadlines, the speed of Tophinhanhdep.com’s background remover is a game-changer. It processes images in seconds, delivering ready-to-use cutouts almost instantly.
- Enhanced Customization: Beyond simple removal, Tophinhanhdep.com offers options to easily add new background colors, apply creative patterns, or even replace the background with another image entirely, all within the same intuitive interface. This expands your creative ideas and photo manipulation possibilities far beyond what Word can offer.
- Support for Diverse Editing Styles: Whether you’re aiming for a minimalist aesthetic, a vibrant pop-art feel, or a classic studio look, our tools provide the flexibility needed to achieve various editing styles for your digital photography.
- Integration with Other Image Tools: Tophinhanhdep.com isn’t just about background removal. Our platform also features converters, compressors, optimizers, and AI upscalers. So, after you’ve achieved a perfect cutout, you can further optimize your image for web use, convert it to different formats, or even upscale its resolution for large prints – all within a unified ecosystem. This comprehensive approach empowers users to streamline their entire image workflow, from raw photo ideas to polished, production-ready visuals.
While Word provides an excellent starting point for basic background removal, recognizing its limitations and knowing when to transition to professional-grade image tools like those on Tophinhanhdep.com is crucial for anyone serious about visual design, photography, or creating visually compelling content. By combining the convenience of Word with the power of specialized online tools, you unlock an expansive realm of creative potential for all your image projects.
The Broader Impact of Background Removal on Visual Design and Photography
The ability to cleanly remove an image background is more than just a technical skill; it’s a foundational element that profoundly impacts various facets of visual content creation. From refining individual photographs to building comprehensive visual narratives, a transparent background serves as a versatile canvas, opening doors to advanced aesthetic enhancements, compelling digital art, and strategic visual communication. This section delves into how this seemingly simple technique connects with the broader themes of images, photography, image tools, visual design, and image inspiration & collections, highlighting its transformative power.
Transforming Images for Aesthetic and Thematic Cohesion
Background removal is a powerful catalyst for achieving specific aesthetics and building thematic collections. By isolating a subject, you gain complete control over its visual context, allowing for seamless integration into any design palette.
- Aesthetic Enhancement: Imagine a striking piece of nature photography – a lone tree or a majestic mountain. By removing its original background, you can place it against a minimalist backdrop for a serene aesthetic, or a vibrant abstract background to create a dynamic, modern wallpaper. This flexibility allows designers to adapt images to current trending styles, from bold and geometric to soft and ethereal. The result is often more refined, deliberate, and impactful.
- Mood Boards and Thematic Collections: For designers and artists, background-removed images are indispensable for creating mood boards. A collection of diverse elements – product shots, people, textures, and objects – can be isolated and then combined on a single board to convey a specific emotion or thematic concept, like a “sad/emotional” visual narrative or a “beautiful photography” showcase. This fosters creative ideas by allowing a free play of elements without the distraction of their original settings.
- Custom Wallpapers and Backgrounds: Users can create personalized wallpapers by taking a favorite subject (perhaps a pet, a landscape element, or an abstract shape) and placing it on a custom background or color gradient that perfectly matches their screen or desktop theme. This personalizes digital spaces and makes images truly unique.
Tophinhanhdep.com’s extensive collections of wallpapers, backgrounds, and aesthetic images, coupled with its background removal tools, empower users to not only find inspiration but also to customize and create visuals that perfectly align with their individual vision and thematic requirements.
Elevating Digital Photography and Editing Styles
For photographers and enthusiasts of digital photography, background removal is a fundamental post-processing technique that significantly enhances the quality and versatility of their work. It’s an editing style that underpins many professional photographic outcomes.
- High-Resolution and Stock Photos: Professional photographers often use background removal to prepare high-resolution images for clients or for submission to stock photo libraries. A clean cutout makes stock photos incredibly versatile, allowing buyers to easily integrate them into their own designs. Tophinhanhdep.com’s advanced background remover is particularly beneficial here, ensuring that even intricate details are preserved, which is critical for maintaining the integrity of high-quality photographic assets.
- Product Photography: In e-commerce, a crisp, background-free product image is non-negotiable. It allows the product to stand out, highlights its features, and projects a professional image. Removing the background enables consistent presentation across all product listings, often against a plain white or transparent background.
- Portraiture and Composites: For portrait photography, background removal can be used to isolate a subject and place them into a more desirable or fantastical scene, creating captivating digital art or photo manipulation effects. This is particularly useful when the original shooting location isn’t ideal or when crafting creative, conceptual portraits.
- Refining Editing Styles: Whether a photographer prefers a minimalist, high-key, or dramatic low-key editing style, background removal plays a role in enhancing the impact. It allows for precise control over lighting and color adjustments applied solely to the subject, ensuring the desired aesthetic is achieved without affecting the background elements.
The sophisticated image tools on Tophinhanhdep.com, including AI upscalers and optimizers, complement background removal by ensuring that the edited photographs maintain their high resolution and quality, ready for any application, from web galleries to large format prints.
Fueling Graphic Design and Creative Visual Projects
In the world of visual design, from graphic design to digital art, the transparent image is a building block. It liberates elements from their original contexts, making them flexible components for creative ideas and complex compositions.
- Graphic Design Essentials: For graphic designers, transparent images are vital for creating logos, banners, social media graphics, posters, and web layouts. They can layer various elements, textures, and typography without cumbersome white boxes disrupting the flow. A background-removed image of a beautiful object, for instance, can be seamlessly dropped onto a visually rich digital art piece or a corporate brochure.
- Digital Art and Photo Manipulation: Artists engaging in digital art and photo manipulation rely heavily on clean cutouts. They can combine elements from disparate images to construct entirely new realities, create surreal landscapes, or develop intricate character designs. The precision offered by Tophinhanhdep.com’s background remover allows for seamless blends and realistic composites, pushing the boundaries of creative expression.
- Creative Ideas and Storytelling: Background removal facilitates visual storytelling. By isolating a subject, designers can place it in metaphorical settings, create dynamic collages, or simplify complex scenes to emphasize a core message. This technique fosters imaginative photo ideas, allowing content creators to tell compelling stories with their visuals.
- Image Tools for the Workflow: The ecosystem of image tools on Tophinhanhdep.com—including converters, compressors, and optimizers—seamlessly integrates with the background removal process. After isolating an element for a graphic design project, it can be immediately optimized for web loading speed, converted to a specific format, or even upscaled if a higher resolution is needed for print, streamlining the entire creative workflow.
Ultimately, the ability to remove an image background, whether using the convenient tools in Microsoft Word or the advanced AI-powered solutions on Tophinhanhdep.com, is a foundational skill that empowers individuals across all levels of digital creation. It transforms static images into dynamic assets, allowing for unparalleled freedom in visual expression and design.
Conclusion: Empowering Your Visuals with Background Removal
The journey to mastering image background removal in Microsoft Word, while seemingly a minor detail in document creation, unlocks a significant realm of visual possibilities. We’ve explored how Word’s built-in “Remove Background” feature provides a readily accessible solution for refining images, enhancing their clarity, and integrating them seamlessly into your documents and presentations. From selecting the image and navigating the Picture Format tab to meticulously marking areas to keep or remove, Word empowers users to achieve clean cutouts without needing external software. The critical step of saving your work as a PNG file ensures that the precious transparency you’ve cultivated is preserved, making your edited images versatile assets.
However, recognizing the limitations of a word processor, especially when faced with complex images featuring intricate details or challenging contrasts, is equally important. For those moments when pixel-perfect precision and professional-grade results are paramount, the advanced image tools offered by Tophinhanhdep.com provide an unparalleled solution. Our AI-powered background remover delivers exceptional accuracy and speed, drastically reducing manual effort and opening up a broader spectrum of creative possibilities for digital photography, graphic design, and advanced photo manipulation.
Beyond the technical steps, we’ve delved into the profound impact of background removal across various dimensions of visual content creation. This skill is instrumental in shaping aesthetics, building thematic collections, and generating fresh image inspiration. It elevates the quality of high-resolution and stock photos, refines diverse editing styles in digital photography, and serves as a cornerstone for graphic designers and digital artists crafting compelling visual narratives. Coupled with Tophinhanhdep.com’s comprehensive suite of image tools—including converters, compressors, optimizers, and AI upscalers—the power to precisely control image backgrounds streamlines the entire creative workflow, transforming raw photo ideas into polished, impactful visuals.
Whether you opt for the convenience of Word for simple tasks or harness the sophisticated capabilities of Tophinhanhdep.com for more demanding projects, mastering background removal is an indispensable skill in today’s visually driven world. It’s an art that empowers you to transcend the ordinary, allowing your images to truly speak volumes and resonate with your audience, elevating every aspect of your visual design.