Mastering Your Digital Canvas: A Comprehensive Guide to Removing Docker Images in Windows

Welcome to Tophinhanhdep.com, your ultimate resource for everything from stunning visual aesthetics and high-resolution photography to advanced image tools and digital design inspiration. While our core passion lies in the art of visual images – be it wallpapers, backgrounds, or creative photo manipulation – we understand that a truly optimized digital experience extends beyond what meets the eye. Just as a cluttered photo library can slow down your creative workflow, an overburdened system with unnecessary technical files, like stale Docker images, can impede your development and design projects.
In the intricate world of digital creation, efficiency is paramount. Every gigabyte of storage, every processing cycle, contributes to a seamless user experience. For developers, designers, and tech enthusiasts who use Windows, Docker has become an indispensable tool for building, testing, and deploying applications. However, with its power comes the potential for digital clutter. Unused Docker images, containers, and volumes can accumulate rapidly, consuming significant disk space and potentially impacting system performance – much like having too many unorganized, high-resolution background images can slow down your gallery viewer.
This comprehensive guide, brought to you by the digital optimization experts at Tophinhanhdep.com, will walk you through the process of efficiently removing Docker images and their associated components from your Windows system. We’ll ensure your digital environment is as clean and optimized as the pristine nature photography or abstract wallpapers you find on our site, allowing you to dedicate maximum resources to your creative and development endeavors.
The Intersection of Digital Visuals and Technical Images: Why Cleanup Matters
At Tophinhanhdep.com, we celebrate the diverse forms that “images” take in our digital lives. From breathtaking landscape photography that inspires your next visual design project to the underlying “images” that power software like Docker, understanding their nature and management is crucial.

The Dual Nature of “Images” in a Digital World
When we talk about “images” on Tophinhanhdep.com, we typically refer to visual masterpieces – high-resolution stock photos, artistic digital art, or perhaps a carefully curated mood board for your next graphic design venture. These are tangible, aesthetic representations that delight the eye and spark creativity.
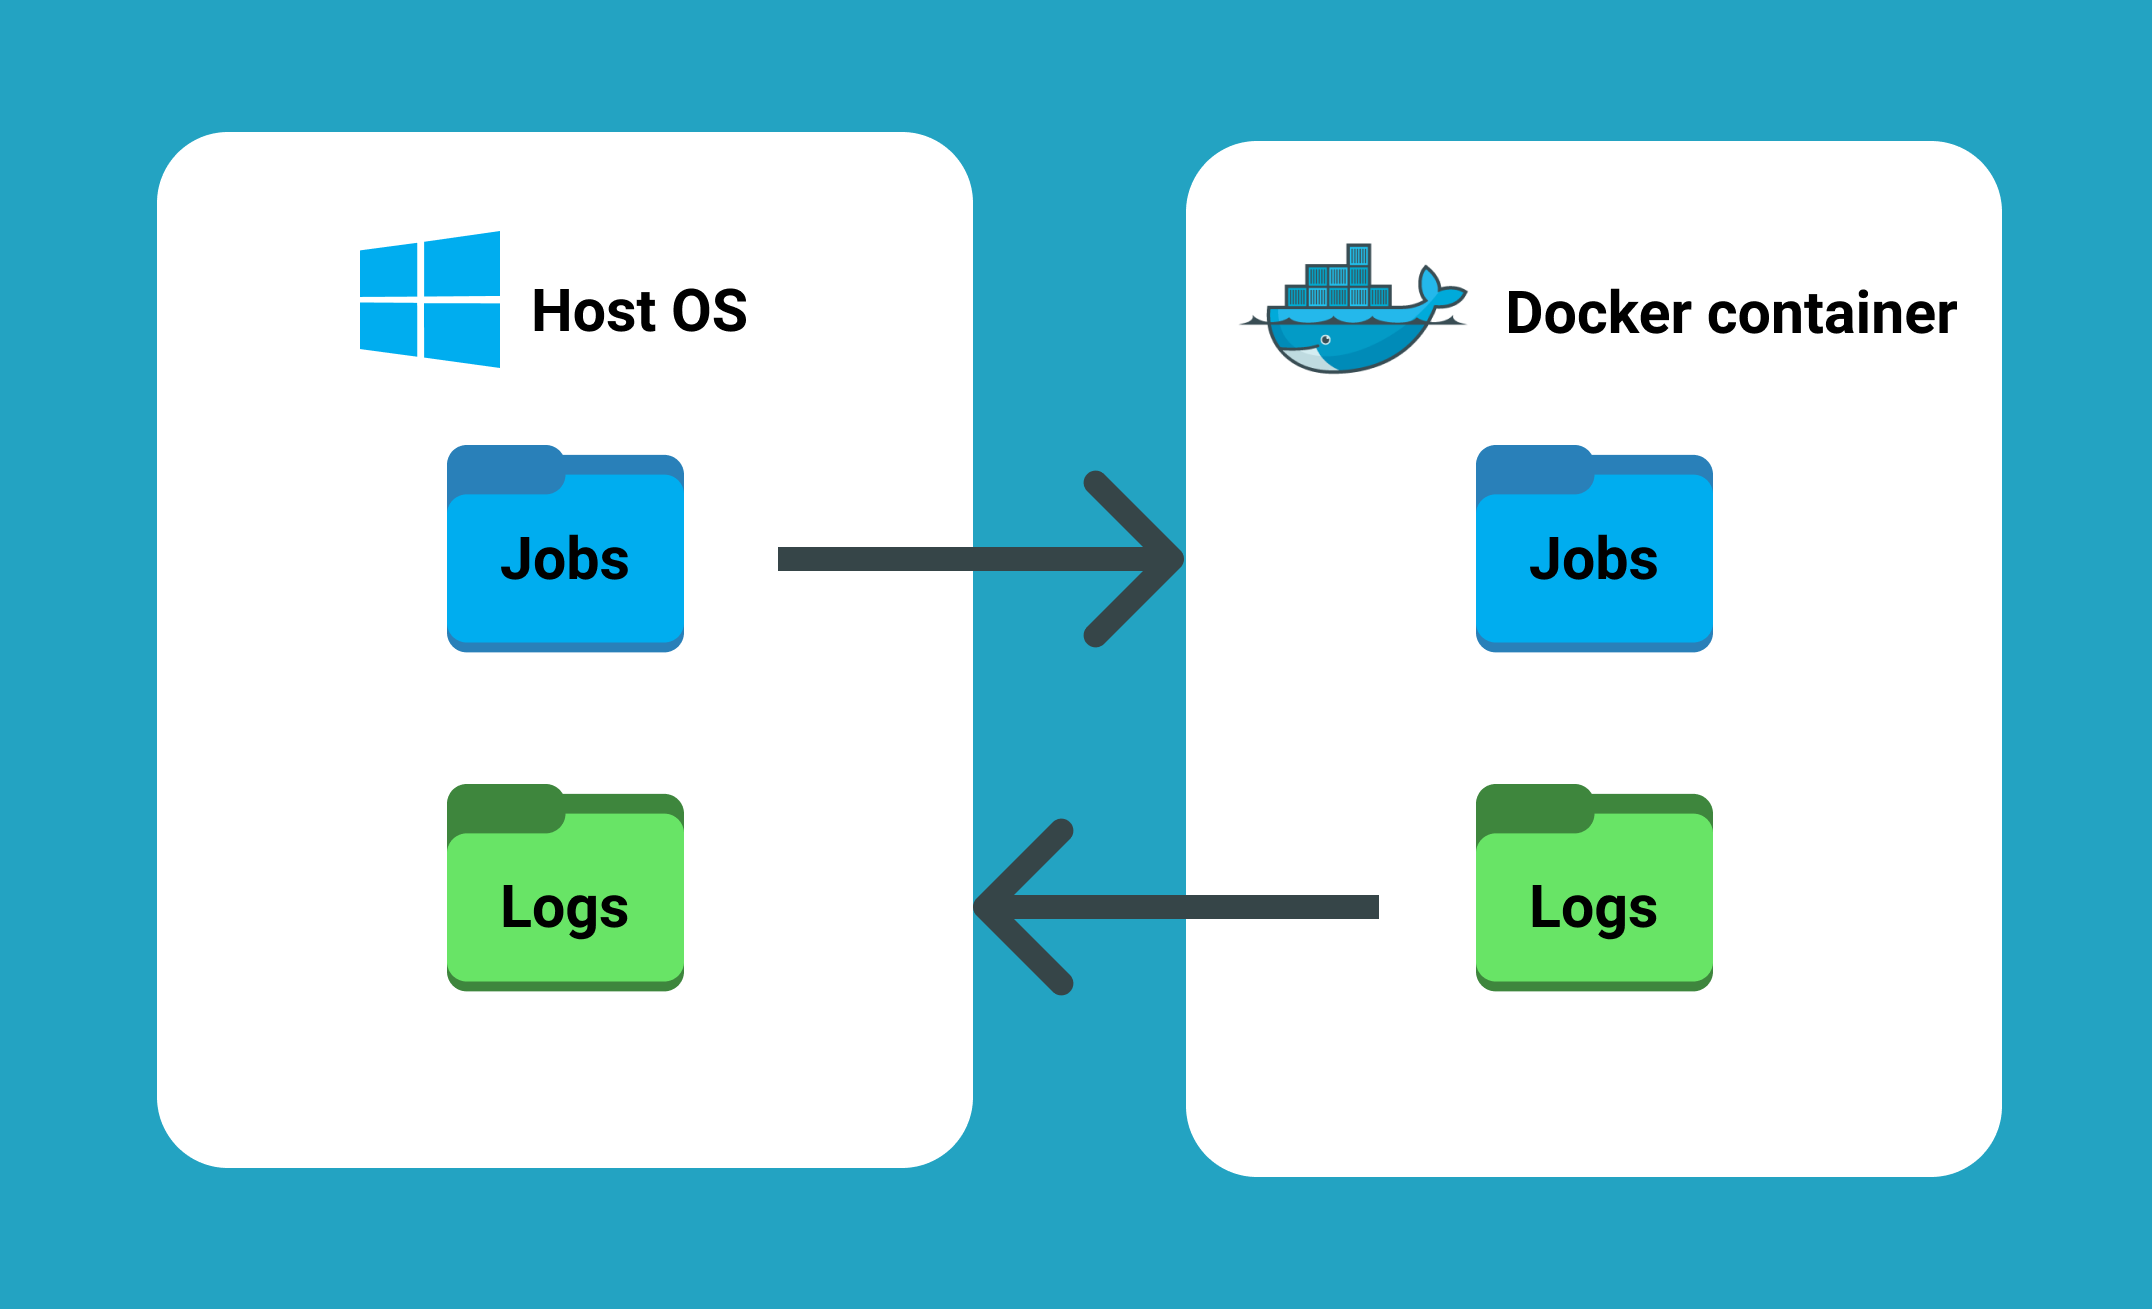
However, in the realm of software development, “images” take on a different, yet equally fundamental, meaning. Docker images are read-only templates that contain a complete snapshot of an application’s environment, including its code, runtime, libraries, environment variables, and configuration files. They are the blueprints from which Docker containers – lightweight, isolated execution environments – are spun up. Just as a photographer might use a “base image” to create stunning photo manipulations, a developer relies on a Docker image as the foundation for their applications.
The challenge arises when these technical images, much like an overflowing collection of unneeded digital photos, start to accumulate. They consume valuable disk space, particularly on the primary drive, leading to performance bottlenecks that can disrupt your workflow, whether you’re compiling code or rendering a complex visual design. The initial installation of Docker Desktop, as many users on Tophinhanhdep.com’s tech discussions have noted, can grab a substantial amount of space, often without offering a choice of installation drive. This immediate space consumption highlights the urgent need for effective cleanup strategies.
The Impact of Clutter: From Photo Galleries to Development Environments
Imagine your carefully curated collection of aesthetic wallpapers or beautiful photography on Tophinhanhdep.com. If every old, unused, or duplicate image remained on your system, your gallery would become unwieldy, slow to load, and difficult to navigate. The same principle applies to your Docker environment.
An accumulation of unused or “dangling” Docker images can lead to:
- Reduced Disk Space: This is the most immediate and impactful consequence. As seen in many user experiences, Docker can consume tens of gigabytes, leading to critical shortages on the C: drive, which is vital for Windows’ proper functioning. For visual designers and photographers, this directly impacts the space available for large raw files, design assets, and rendered projects.
- Performance Degradation: A heavily fragmented or near-full primary drive can slow down your entire system, affecting not just Docker operations but also other applications, including demanding creative suites used for photo editing or digital art.
- Confusion and Complexity: A cluttered Docker image list makes it harder to identify the correct images for active projects, complicating development and debugging efforts. It’s like sifting through hundreds of irrelevant images when you’re looking for that one perfect background.
At Tophinhanhdep.com, we champion organized, efficient digital spaces. This guide extends that philosophy to your Docker environment, ensuring that your system remains lean and responsive, ready for any creative or technical challenge you throw at it.
Preparing Your System for a Docker Image Purge
Before embarking on a deep clean of your Docker environment, it’s crucial to take a few preparatory steps. These measures ensure that you don’t inadvertently delete essential components or lose valuable data, maintaining the integrity of your projects, much like backing up your high-resolution photography before undertaking a major editing project.
Essential Precautionary Measures for a Smooth Removal
Just as you wouldn’t delete a vital image without considering its use in a mood board or a client project, removing Docker images requires careful consideration:
-
Check Container Dependencies: The most critical step is to ensure that no running or stopped containers are actively using the images you intend to delete. While running containers are independent, deleting their associated images prevents you from restarting them if they ever stop. To identify containers linked to a specific image, use the Docker CLI:
docker ps -a --filter ancestor=<image_id_or_name>If containers are listed, stop and remove them first:
docker stop <container_id>
docker rm <container_id>
Also, inspect image layers if you’re unsure about dependencies, especially for base images, using
docker image inspect <image_id>. -
Backing Up Data: This golden rule applies universally across digital endeavors, whether it’s archiving your digital art or managing your Docker images. Before deleting an image, consider exporting it if it’s a critical component of your application or contains valuable configurations. This provides a safety net, allowing you to revert to an old version if a new build fails, akin to having multiple versions of a design project.
docker save -o my_backup_image.tar <image_id_or_name> -
Confirm Image Usage: Verify that the image is not referenced in any active Docker Compose files, Kubernetes manifests, or CI/CD pipelines. An unexpected deletion could break automated deployments or development environments. For visual designers, this is like ensuring a specific font or color palette isn’t hardcoded into multiple design assets before removing it.
-
Update Documentation and Scripts: If you’re removing an image that’s part of a documented workflow, remember to update any internal documentation or automation scripts. This prevents future confusion and ensures that your team always references the correct image versions.
Initial Cleanup: The docker system prune Command and its Visual Metaphor
Before diving into targeted image removal, a general cleanup is often beneficial. Docker provides a powerful command, docker system prune, which acts as a digital optimizer for your Docker environment, much like an image compression tool on Tophinhanhdep.com tidies up your visual files.
This command removes:
- All stopped containers
- All networks not used by at least one container
- All dangling images (untagged images not associated with any container)
- All build cache
To run a comprehensive prune, including volumes, which can often consume significant space:
docker system prune --volumes --allThis command is a robust first step in reclaiming disk space, often clearing several gigabytes that were silently consumed by unused Docker components. Think of it as using an AI upscaler not just to enhance an image, but also to intelligently remove noise and unnecessary elements, leaving you with a cleaner, more efficient result.
Step-by-Step Guide: Various Methods to Remove Docker Images on Windows
Now that your system is prepared, let’s explore the various methods Tophinhanhdep.com recommends for removing Docker images from your Windows machine. These steps are designed to be precise and effective, ensuring you regain valuable disk space.
Tackling Individual Images: Precision Removal
Sometimes, you only need to remove a specific image. This precise method allows you to target and delete images one by one.
-
List Existing Images: First, you need to identify the images currently on your system. Open an elevated PowerShell or Command Prompt and run:
docker imagesThis command will display a list of all images, including their
REPOSITORY,TAG,IMAGE ID,CREATEDtimestamp, andSIZE. TheIMAGE IDis crucial for targeted removal. -
Remove a Specific Image: Once you have the
IMAGE IDof the image you wish to remove (e.g.,789539dd8bd), execute the following command:docker rmi 789539dd8bdYou can also use the repository and tag name, for example:
docker rmi postgres:latestIf multiple images share the same repository name but have different tags, you must specify the tag.
-
Removing Multiple Images: To delete several images simultaneously, simply provide their
IMAGE IDs as arguments:docker rmi image_id_1 image_id_2 image_id_3This method is akin to selecting a batch of old aesthetic backgrounds from Tophinhanhdep.com and deleting them in one go to streamline your collection.
Eliminating Dangling Images: Reclaiming Hidden Space for Your Creative Projects
Dangling images are a common culprit for silent disk space consumption. These are untagged Docker images that are no longer referenced by any container and typically appear with <none>:<none> in the docker images list. They often arise when you rebuild an image with the same name and tag, causing the old image to lose its tag.
-
Identify Dangling Images: To specifically list these orphaned images, use the filter option:
docker images -f dangling=trueThis command will reveal images that are still taking up space but serve no active purpose, much like forgotten drafts of photo manipulation projects.
-
Prune Dangling Images: Docker provides a dedicated command to clean up these remnants:
docker image pruneYou will be prompted to confirm the deletion. Type
yand press Enter. This action effectively sweeps away the digital detritus, freeing up valuable storage that can be better used for your high-resolution images or digital art assets from Tophinhanhdep.com.
Dealing with Images Linked to Running Containers: A Strategic Approach
As mentioned in our precautionary measures, you cannot simply remove an image if it’s associated with a running container. Attempting to do so will result in an error. This requires a more strategic two-step process.
-
Identify Running Containers: First, list all containers, both running and stopped, to find the one associated with the image you want to remove:
docker ps -aNote down the
CONTAINER IDof the relevant container. -
Stop the Container: Use the
docker stopcommand followed by theCONTAINER ID:docker stop <container_id>This gracefully halts the container’s operation.
-
Remove the Container: Once stopped, you can remove the container using
docker rm:docker rm <container_id>After these steps, the image is no longer in use by a container.
-
Remove the Image: Now you can proceed to remove the Docker image using the
docker rmicommand with itsIMAGE ID:docker rmi <image_id>This systematic approach ensures that you manage dependencies effectively, preventing disruptions to your environment.
The Ultimate Cleanup: Removing All Docker Images
For a complete refresh of your Docker image collection, perhaps when you’re starting fresh on a new project or migrating, you might want to remove all Docker images from your system.
To achieve this, use a command that combines listing all images with their deletion:
docker rmi $(docker images -a -q)docker images -a -q: This part lists all Docker images (-afor all, including intermediate images) and outputs only theirIMAGE IDs (-qfor quiet mode).$(...): This syntax in shell environments executes the enclosed command and substitutes its output into the outer command.docker rmi: This then takes all theIMAGE IDs generated by the inner command and removes them.
Important Note: This command will remove all images. Ensure you have backed up or no longer need any of them before proceeding. This is the equivalent of deleting your entire digital photo archive – a powerful but irreversible action without backups.
Beyond Docker: Holistic Digital Optimization with Tophinhanhdep.com
While mastering Docker image removal is a critical step in maintaining a clean Windows system, Tophinhanhdep.com believes in a holistic approach to digital optimization. Our platform is not just a source for image inspiration; it’s a hub for tools and ideas that enhance your entire digital experience.
Integrating Visual Aesthetics with System Performance
The principles of organization and efficiency we apply to Docker images are equally relevant to your visual assets. A well-organized library of wallpapers, backgrounds, and project assets ensures faster access, reduces visual clutter, and contributes to a more productive creative environment. Tophinhanhdep.com offers inspiration for creating mood boards, thematic collections, and understanding trending styles, all of which benefit from a lean, high-performing system.
Consider how the rapid accumulation of Docker components echoes the challenge of managing a burgeoning collection of high-resolution digital photography. Each new shot, each new edit, adds to the storage footprint. Without regular culling and organization, even the most beautiful collections can become overwhelming. Similarly, optimizing your Docker environment ensures that your system has ample resources to handle demanding tasks like rendering complex digital art or running AI upscalers on your images.
Tophinhanhdep.com’s Tools for a Complete Digital Refresh
At Tophinhanhdep.com, we provide tools and insights that complement your system optimization efforts:
- Image Tools: Beyond just removing technical “images,” our “Image Tools” section offers converters, compressors, and optimizers for your visual images. Just as removing unused Docker images frees up space, compressing large image files can reclaim significant storage, allowing you to keep more of your favorite aesthetic and nature photography without sacrificing performance. Our AI upscalers, for instance, allow you to enhance image quality without necessarily increasing file size disproportionately, embodying the spirit of efficiency and quality.
- Visual Design Inspiration: A clean, fast system is the perfect foundation for creative work. With your Docker environment optimized, you’ll have the resources to explore new graphic design techniques, digital art projects, or photo manipulation ideas found in our “Visual Design” and “Image Inspiration & Collections” sections.
Conclusion
Effectively managing and removing Docker images on your Windows system is an essential practice for any developer or power user. It prevents unnecessary disk space consumption, maintains system performance, and contributes to an overall cleaner and more efficient digital workspace. As demonstrated, the process involves understanding what Docker images are, taking precautionary measures, and utilizing specific Docker CLI commands to target and remove unwanted components, from individual images to dangling leftovers and even entire collections.
By following this guide, you can ensure that your Windows machine remains optimized, freeing up valuable resources for the creative pursuits and technical innovations that Tophinhanhdep.com celebrates. Just as a pristine background enhances the beauty of a wallpaper, a streamlined operating system enhances your productivity and digital experience. Keep your system clean, your images vibrant, and your creative flow uninterrupted with Tophinhanhdep.com.