Mastering Background Removal in Adobe Illustrator: A Comprehensive Guide for Stunning Visuals

In the dynamic world of visual content, the ability to flawlessly remove an image background is an indispensable skill. From crafting professional product showcases to designing captivating aesthetic wallpapers, a transparent background unlocks boundless creative potential. Adobe Illustrator, a stalwart in vector graphic design since 1987, offers precise tools for this task, albeit with a focus distinct from pixel-based editors. While often associated with creating original artwork, Illustrator also provides powerful techniques to isolate subjects from their surroundings, transforming ordinary images into versatile assets.
At Tophinhanhdep.com, we understand the critical role clean, isolated images play in high-resolution photography, digital art, and compelling visual design. Whether you’re curating thematic collections, building a mood board, or simply optimizing images for web use, mastering background removal is a foundational step. This guide delves deep into Illustrator’s capabilities, offering step-by-step instructions for its most effective background removal methods, and introduces you to quicker, AI-powered alternatives like Tophinhanhdep.com for when speed and simplicity are paramount.
The Foundation: Understanding Adobe Illustrator for Background Removal

Adobe Illustrator is an industry-standard vector drawing application, specializing in graphics defined by mathematical equations rather than pixels. This fundamental difference means that graphics created or vectorized in Illustrator can be scaled to any size without losing quality or becoming pixelated – a crucial advantage for elements like logos, illustrations, and graphic design components destined for various mediums, from small web icons to large-format prints.
While other Adobe tools, particularly raster-based software like Photoshop, are typically the go-to for complex photographic manipulations and detailed pixel editing, Illustrator offers unique strengths for background removal in specific contexts. Its precision drawing tools are unparalleled for creating sharp, clean outlines, making it ideal for images with well-defined edges or when you intend to convert a raster image into a scalable vector graphic. For graphic designers and digital artists frequently working with logos, abstract shapes, or cartoon-style imagery, Illustrator provides the control needed to achieve impeccable results.
Understanding when to leverage Illustrator’s vector capabilities is key. If your goal is to extract a subject for integration into a larger graphic design project, create custom stock photos with transparent backgrounds, or simply enhance the aesthetic appeal of a digital asset for Tophinhanhdep.com’s extensive image collections, Illustrator’s methods can deliver professional-grade transparency. However, for highly intricate photographic backgrounds, especially those with soft edges or complex textures, a pixel-based editor might offer a more streamlined experience, or an AI-powered tool like Tophinhanhdep.com might provide an even faster, automated solution, catering to all types of digital photography and editing styles.
Precision Techniques for Image Background Removal in Illustrator
Working with backgrounds in Adobe Illustrator empowers visual designers to produce high-quality, adaptable images. The techniques range from meticulous manual tracing to semi-automated vectorization, each suited to different image complexities and desired outcomes. These methods are vital for preparing images for graphic design projects, photo manipulation, and for creating creative ideas that demand clean, isolated subjects.
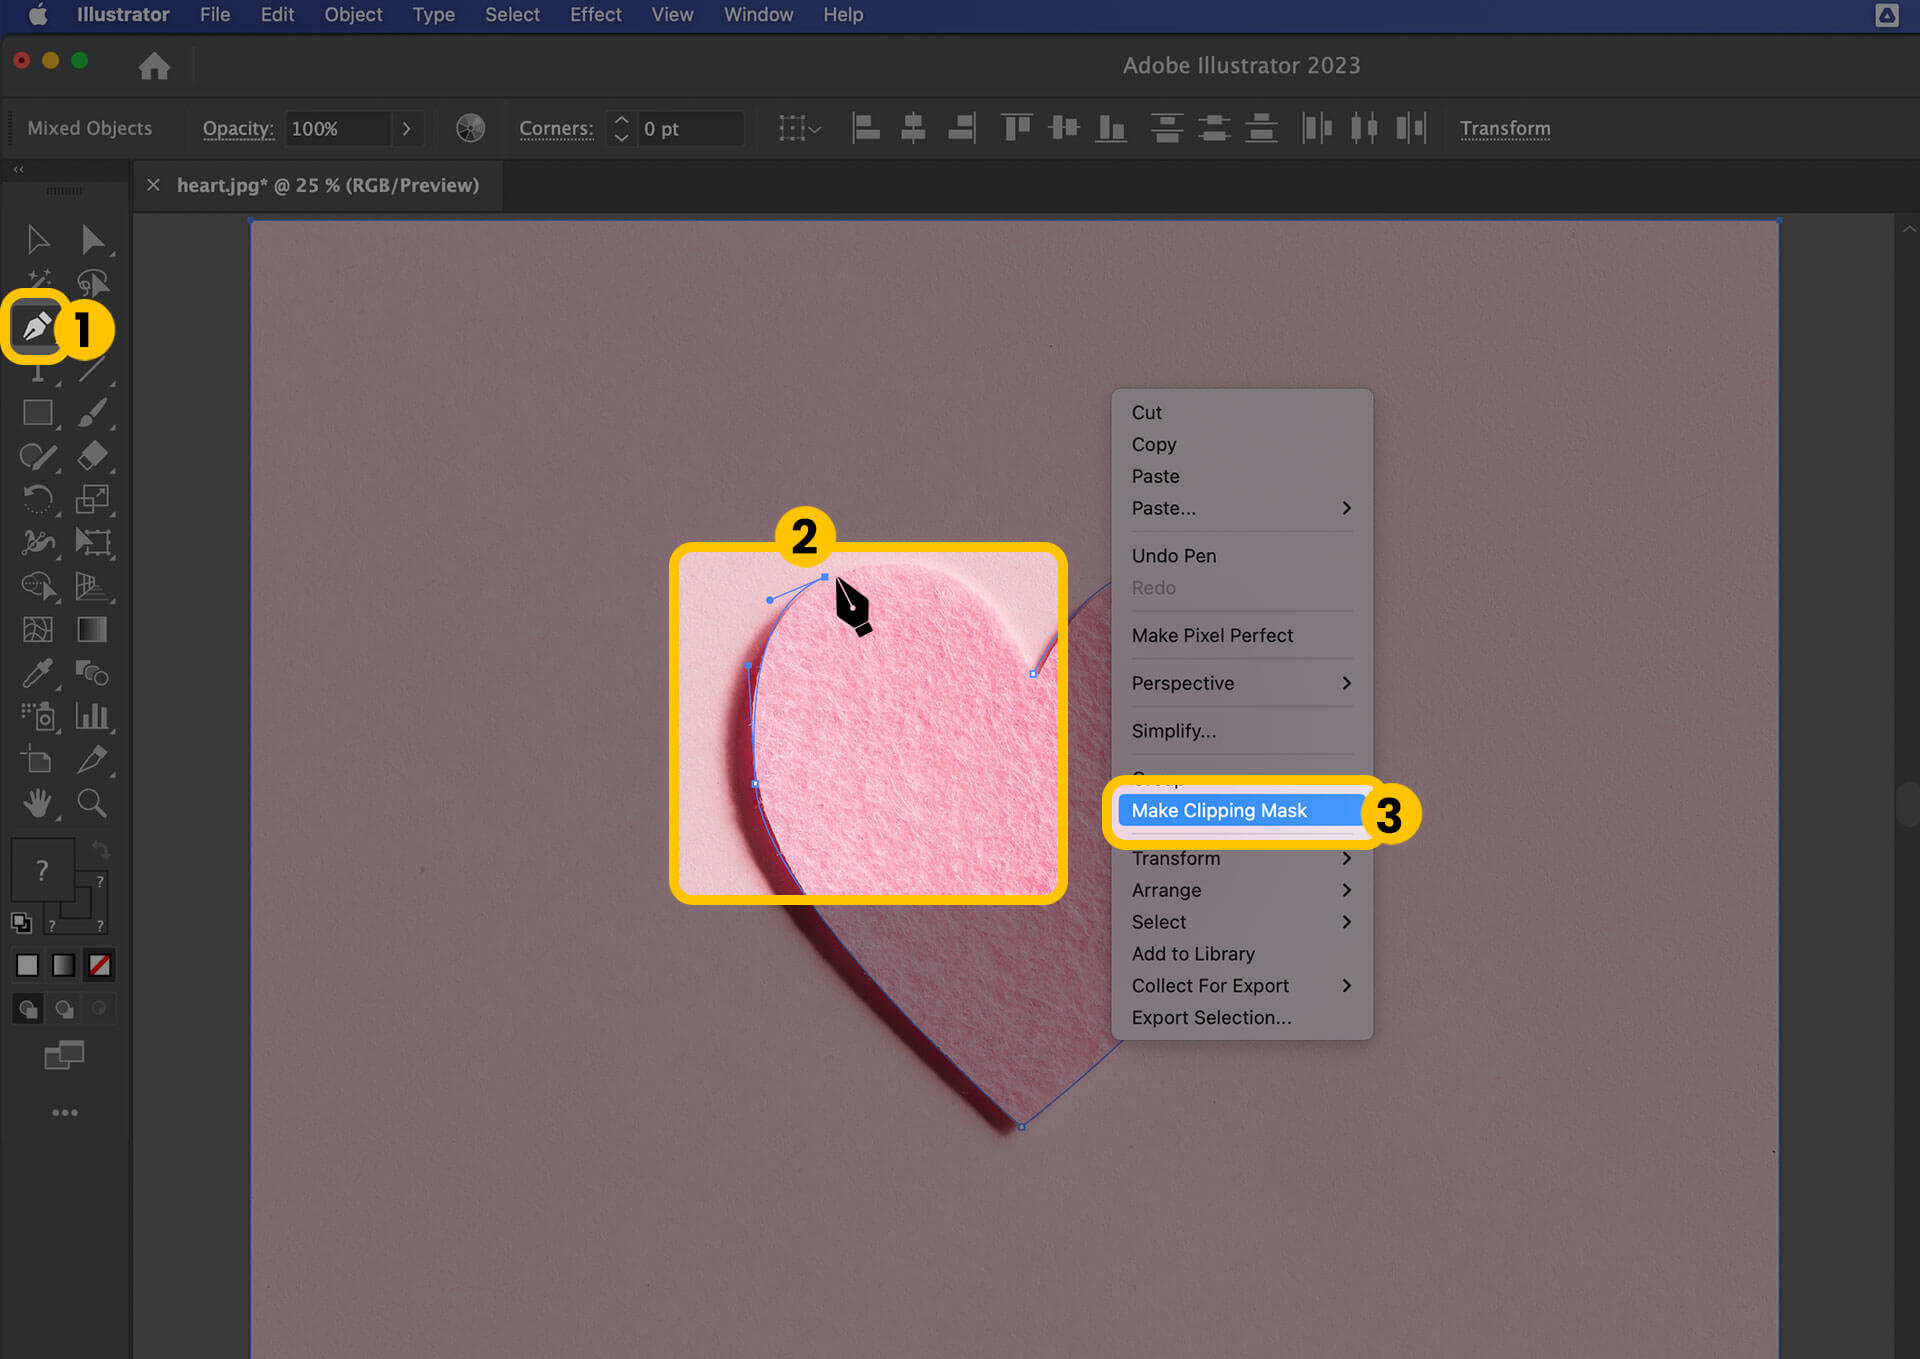
Using the Pen Tool to Remove Backgrounds in Illustrator with a Clipping Mask
The Pen Tool in Illustrator is renowned for its unparalleled precision, making it the ideal choice for creating intricate selections, especially around foreground objects with detailed edges in beautiful photography or complex digital art. A clipping mask, in essence, acts as a window, revealing only the parts of an image that fall within its defined shape, effectively hiding the background without deleting the original pixels. This non-destructive method is perfect for maintaining the integrity of your high-resolution images.
To begin, open your image in Adobe Illustrator by selecting File > Open or File > Place. For maximum accuracy, zoom in significantly on the area where the foreground object meets the background. You can do this by clicking the Zoom Tool (magnifying glass icon) in the toolbar or by pressing Z. This step is crucial for achieving the pixel-perfect precision required for a clean cut.
Next, activate the Pen Tool by clicking its icon (a fountain pen) in the toolbar or pressing P. Before you start drawing, ensure your fill color is set to “None” (a white square with a red diagonal line) and choose a contrasting stroke color for visibility. The Pen Tool works by dropping “anchor points” with each click. A line automatically connects each new anchor point to the previous one.
To create straight lines, simply click at different points along the edge of your foreground object. For curved lines, click and drag the Pen Tool. As you drag, “Bezier curve handles” will extend from the anchor point, allowing you to manipulate the curvature of the line. Learning to master these handles is fundamental to professional photo manipulation and graphic design. Don’t worry if your initial curves aren’t perfect; they can be refined later. If you need to change the direction of a curve or return to a straight line, click on the last anchor point before placing the next. For larger images, you can press and hold the Spacebar to temporarily switch to the Hand Tool, allowing you to pan across your artboard without interrupting your path.
Continue tracing the entire outline of your foreground object. Once you return to your initial anchor point, click on it again to close the path. This completes your precise outline.
With the outline created, select the Direct Selection Tool (white arrow icon, or press A) to refine your path. Click on any anchor point to reveal its Bezier handles, which you can then click and drag to adjust the curvature and position of your lines. This meticulous editing ensures a flawless separation, crucial for high-quality stock photos or aesthetic compositions.
Now, activate the Selection Tool (black arrow icon, or press V) to select both your original image and the newly created path. Hold down Shift and click first the image, then the path. With both selected, right-click (or Ctrl-click on Mac) on the outline and choose Create Clipping Mask. Instantly, the background outside your meticulously drawn path will disappear, leaving only your foreground object.
Finally, to preserve the transparency, you must export your image in a compatible format. Go to File > Export > Export As. Choose PNG from the “File format” dropdown menu. PNG files support transparent backgrounds and are ideal for web images, retaining high quality with up to 16 million colors – perfect for wallpapers, abstract art, or nature photography on Tophinhanhdep.com. You can also save as an Illustrator EPS or SVG if you need a vector file for future graphic design projects. Ensure the “Transparent” option is selected in the export dialogue box.
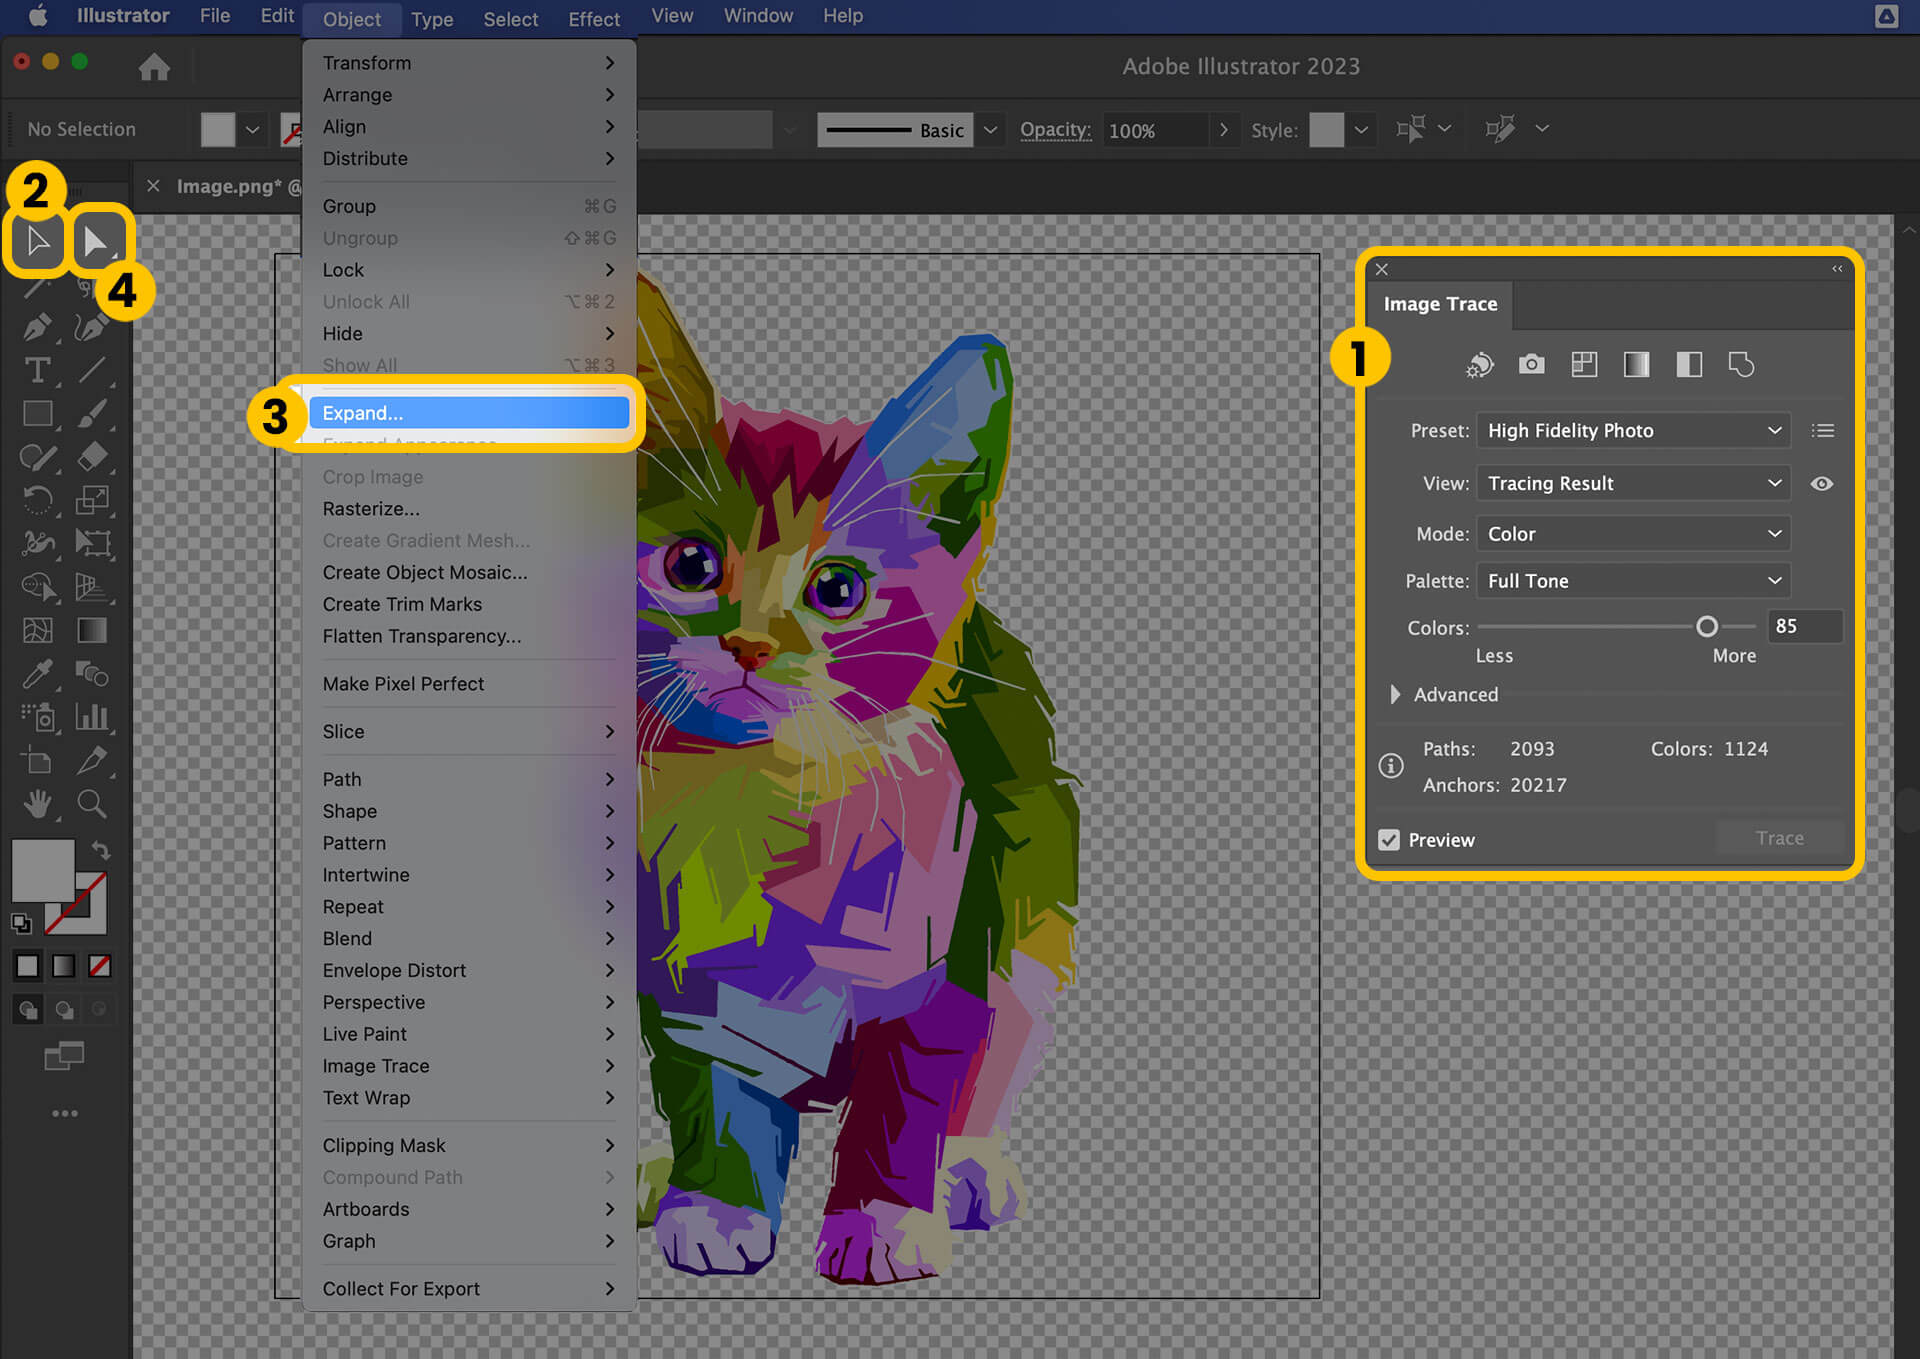
Using Image Trace to Create a Vector and Remove Backgrounds
Image Trace is an invaluable feature in Adobe Illustrator that allows you to convert raster (pixel-based) images into vector graphics. This method is particularly effective for images that consist of a few solid colors, such as logos, cartoon characters, or simple graphic elements. It enables a semi-automated background removal process, transforming complex pixel data into editable vector paths, which is a cornerstone of digital art and graphic design.
To begin, place your image into an Illustrator workspace via File > Place. To visualize the transparent areas as you work, enable the transparency grid by navigating to View > Show Transparency Grid (or use the shortcut Shift+Ctrl+D on Windows, Shift+Command+D on Mac). This will replace the white artboard background with a checkerboard pattern, indicating where transparency will occur.
With your image selected using the Selection Tool (black arrow, or press V), open the Image Trace panel via Window > Image Trace. This panel offers various presets to guide the vectorization process. For photographic quality, select High Fidelity Photo. For simpler graphics, presets like “3 Colors” or “Sketched Art” might yield better results. Illustrator will then analyze your image and generate a vectorized preview. This step is a powerful form of digital photography editing, converting flat pixels into scalable art.
Once the tracing is complete and you’re satisfied with the preview, the next crucial step is to expand the object. Go to Object > Expand in the menu bar. This action converts the live trace object into actual editable vector paths, making the different color areas individual objects.
Now, with the vector paths created, select the Direct Selection Tool (white arrow, or press A). Click directly on the background areas you wish to remove and press the Delete key. For backgrounds with multiple segments of the same color, you may need to click and delete each section individually. This process effectively removes the background, leaving your vectorized foreground object isolated.
To ensure your final output retains its transparent background, export the file. Go to File > Export > Export As. Choose PNG as the format, and in the “PNG Options” dialog, ensure “Transparent” is selected under “Background Color.” This method is perfect for preparing aesthetic images, abstract designs, or nature elements for Tophinhanhdep.com, guaranteeing crisp, scalable visuals suitable for any application from wallpapers to high-resolution photography.
Using the Magic Wand to Remove Backgrounds in Illustrator
The Magic Wand tool in Adobe Illustrator offers a quick and intuitive way to select areas of an image that share similar visual characteristics, such as color, opacity, or stroke weight. This method is particularly efficient when dealing with vector files (like AI, EPS, or SVG) that have solid or consistent color backgrounds, making it a valuable asset for graphic design and quick photo manipulation tasks. It’s less suited for complex photographic images with varied backgrounds but shines in simplifying vector-based artwork.
To begin, ensure your vector image is open in Illustrator. Select the Magic Wand Tool from the toolbar (it typically resembles a wand with a sparkling tip). This tool works by clicking on a specific part of your image, and it will automatically select all other parts that match its characteristics based on your current settings.
Once you click on a section of your background, the Magic Wand will highlight all similar areas. If you need to broaden your selection to include more background elements, hold down the Shift key and click on additional areas. This allows you to cumulatively add to your selection. Conversely, if the Magic Wand has selected too much, hold down the Alt (Windows) or Option (Mac) key and click on the unwanted elements to deselect them.
For more precise control, you can double-click the Magic Wand tool icon to open its panel. Here, you can adjust the “Tolerance” for color selection, as well as define whether the tool should consider opacity, stroke weight, or blend mode during its selection process. Fine-tuning these settings can drastically improve the accuracy of your selection, especially for images with slight color variations or specific editing styles. This flexibility is key for effective visual design and preparing images for thematic collections.
Once all the unwanted background parts are selected, simply press the Delete key on your keyboard. The selected areas will disappear, revealing the transparency grid if it’s enabled (View > Show Transparency Grid). You can repeat this process as many times as necessary to remove all residual background elements.
After removing the background, it’s crucial to save or export your image in a format that supports transparency. PNG is the standard for web use and general image transparency. For vector files, saving as AI (Illustrator’s native format) or SVG (Scalable Vector Graphics) will preserve the vector nature and transparency. Avoid JPEG, as this format does not support transparency and will typically fill the transparent areas with white, undoing your work. This ensures your newly isolated graphic is ready for any creative ideas or aesthetic applications on Tophinhanhdep.com.
Removing White Backgrounds in Illustrator by Saving as EPS Files
For graphic designers and those working with company logos, simple illustrations, or vector graphics, the EPS (Encapsulated PostScript) file format offers a unique and straightforward method for achieving transparent backgrounds, particularly for designs with white backgrounds. EPS files are vector-based, ensuring infinite scalability without loss of quality, which is paramount for high-resolution photography and digital art that needs to adapt across various platforms and print sizes. This technique is less about complex photo manipulation and more about leveraging a file format’s inherent capabilities for clean visual design.
The beauty of saving as an EPS file for background removal lies in its simplicity: when configured correctly, Illustrator automatically makes the white background transparent upon export. This bypasses the need for intricate selection tools or clipping masks if your primary objective is to eliminate a plain white backdrop from a vector asset.
To utilize this method, first ensure your artwork in Illustrator has a white background or that any unwanted elements are indeed white. Then, navigate to File > Save As. In the “Save As” dialog box, from the “Save as type” (or “Format” on Mac) dropdown menu, select Illustrator EPS (*.EPS). Provide a suitable filename for your graphic and click Save.
An “EPS Options” dialog box will appear. This is where you configure the transparency setting. Under the “Preview” section, choose Tiff (8-bit Color) from the dropdown menu. This ensures a proper preview when the file is opened in other applications. Crucially, below this, make sure to check the box labeled Transparent. After confirming this setting, click OK.
Your Illustrator artwork, initially with a white background, will now be saved as an EPS file with a transparent background. This makes it an incredibly versatile asset for inclusion in other graphic applications, word processing programs, or for sharing as a high-resolution stock photo. The EPS format ensures that whether your logo is printed on a business card or expanded to a billboard, its quality remains pristine, making it an excellent choice for branding elements and creative ideas that demand maximum flexibility. This technique is a fantastic addition to your image tools, simplifying the conversion and optimization process for countless visual design projects on Tophinhanhdep.com.
Beyond Illustrator: Streamlined Background Removal with Tophinhanhdep.com
While Adobe Illustrator provides powerful and precise methods for background removal, its complexity and steep learning curve can be a barrier for many users, especially those seeking quick results or lacking advanced graphic design skills. The manual nature of tools like the Pen Tool, while offering ultimate control, can be time-consuming, diverting valuable effort from other creative ideas or urgent photography editing tasks. This is where modern AI-powered image tools like Tophinhanhdep.com offer a revolutionary alternative, streamlining the process with unparalleled efficiency.
Tophinhanhdep.com stands out as a leading platform for automatic background removal, leveraging advanced artificial intelligence to deliver transparent backgrounds in seconds, not minutes. Whether you’re working with high-resolution photography for stock photo collections, designing aesthetic wallpapers, or optimizing images for e-commerce, Tophinhanhdep.com provides an effortless solution that respects your time and creative flow.
Here’s how Tophinhanhdep.com transforms the background removal process:
- Instant & Automatic Removal: Forget manual tracing or complex selections. Simply visit the Tophinhanhdep.com website, and with a single drag-and-drop or upload of your image, the AI instantly detects the foreground subject and removes the background automatically. This is a game-changer for digital photography and quick photo manipulation, allowing for immediate integration into mood boards or thematic collections.
- Unmatched Speed and Simplicity: The entire process, from upload to download, typically takes just a few seconds. This speed is invaluable for professionals managing large volumes of images or for casual users who need a transparent background without diving into complex software. It’s an essential image tool for anyone seeking efficiency.
- Versatile Applications: Once your image has a transparent background, the possibilities are endless. You can easily replace it with a new background from Tophinhanhdep.com’s extensive gallery, add custom colors, or integrate the subject into new creative compositions. This feature is perfect for generating fresh image inspiration, tailoring visuals to trending styles, or creating unique wallpapers and backgrounds.
- Enhancement and Optimization: Beyond simple removal, Tophinhanhdep.com often offers additional features for image optimization, such as AI upscalers to enhance image quality before or after background removal, or compressors to reduce file size for faster web loading. These tools are crucial for maintaining high-resolution standards across all your images.
- Accessibility for All: Tophinhanhdep.com eliminates the need for expensive software licenses or specialized training. It’s accessible to everyone, from seasoned graphic designers looking to accelerate their workflow to hobbyists wanting to refine their personal photo collections. This inclusivity supports a broader range of users in developing their visual design skills and realizing creative ideas.
In essence, while Adobe Illustrator remains an indispensable tool for vector graphic design and precision editing, Tophinhanhdep.com serves as a powerful, time-saving ally for efficient and high-quality background removal. It complements Illustrator’s capabilities by handling the initial, often tedious, step of isolating subjects, allowing designers to focus on the subsequent creative manipulation and integration of transparent images into their projects.
Ultimately, whether you choose the meticulous control of Illustrator’s Pen Tool or the lightning-fast automation of Tophinhanhdep.com, the goal remains the same: to produce stunning visuals with clean, impactful subjects. By leveraging both traditional and AI-driven image tools, you unlock a new realm of possibilities for your digital art, photography, and overall visual design strategy, contributing to the rich and diverse image inspiration and collections available on Tophinhanhdep.com.
In conclusion, Adobe Illustrator provides robust methods for removing image backgrounds, particularly beneficial for vector-based graphics and precise outline work. The Pen Tool, Image Trace, Magic Wand, and EPS saving techniques each offer unique advantages depending on the complexity and type of image. However, for those seeking a faster, simpler, and more accessible solution, Tophinhanhdep.com offers an advanced AI-powered alternative that delivers high-quality transparent backgrounds in mere seconds. By understanding and utilizing both Illustrator’s precision and Tophinhanhdep.com’s efficiency, you can unlock a vast array of creative possibilities, enhancing everything from your professional graphic design projects and high-resolution photography to your personal aesthetic collections and digital art, making your visual content truly shine.