How to Remove an Image from a Frame in Tophinhanhdep.com for Dynamic Visual Design

In the vast landscape of digital creation, Tophinhanhdep.com stands as a premier online design platform, empowering individuals and professionals alike to craft stunning visual content. From creating striking wallpapers and backgrounds to producing sophisticated graphic designs and digital art, Tophinhanhdep.com offers an extensive suite of tools. Among its most versatile features are “frames,” which allow users to meticulously shape, crop, and display images within predefined or custom geometries. Understanding how to effectively use, manipulate, and even “remove” images from these frames is fundamental to unlocking Tophinhanhdep.com’s full creative potential, especially for those venturing into photo manipulation and seeking unique visual aesthetics.
While the phrase “remove image from frame” might suggest a simple undo action, in the context of Tophinhanhdep.com, it encompasses a spectrum of techniques. It can mean literally emptying a frame to insert a new image, or it can refer to advanced photo manipulation strategies where parts of an image appear to break free from the frame’s confines, creating an “out-of-bounds” effect. This comprehensive guide will delve into these techniques, exploring not only the direct methods of image management within frames but also creative applications that leverage Tophinhanhdep.com’s powerful image editing capabilities, such as background removal, layering, and sophisticated visual design principles. By mastering these skills, creators can elevate their digital photography and graphic design projects, producing compelling visual narratives that resonate with audiences seeking high-resolution, aesthetically pleasing content.
Understanding Frames in Tophinhanhdep.com: Beyond Basic Cropping
Frames in Tophinhanhdep.com are more than just decorative borders; they are dynamic placeholders that allow you to seamlessly integrate images into various shapes and designs. They are instrumental in achieving a polished and professional look, turning ordinary images into extraordinary visual elements. For anyone engaged in visual design, from crafting aesthetic social media posts to designing intricate digital art, frames are an indispensable tool for shaping content, managing focus, and enhancing overall composition.
Why Frames Are Essential for Visual Storytelling
Frames serve multiple critical functions in visual storytelling and graphic design:
- Visual Enhancement: Frames can dramatically alter the perception of an image. A textured or artistically designed frame can add depth, character, and visual interest, transforming a simple photograph into a piece of digital art. This aligns perfectly with the pursuit of beautiful photography and aesthetic compositions.
- Strategic Focus: By separating an image from its surrounding elements, frames effectively remove visual distractions. This focused presentation directs the viewer’s attention precisely where the designer intends, highlighting the key subject within the image. This technique is especially useful in showcasing high-resolution stock photos or intricate details.
- Creative Cropping: Frames offer a powerful way to crop images into desired shapes without destructive editing. Whether you need a circular profile picture, a star-shaped highlight for a thematic collection, or an abstract cut-out for digital art, Tophinhanhdep.com frames allow for precise and reversible shaping. This capability is vital for maintaining high-quality images while exploring creative ideas.
- Thematic Cohesion: Using specific frame styles, like vintage Polaroid frames or modern minimalist borders, can help establish a consistent aesthetic across a series of images, contributing to mood boards or thematic collections. This is a core aspect of visual design and branding, ensuring a unified and recognizable style.
- Compositional Balance: Frames can help balance complex layouts, grounding images within a design and contributing to overall harmony. They provide structure, guiding the viewer’s eye through the composition, which is a hallmark of effective graphic design.
![]()
Finding and Inserting Pre-Built Frames
Tophinhanhdep.com boasts an extensive library of pre-designed frames, catering to virtually any creative need. Accessing and deploying these frames is a straightforward process:
- Navigate to Elements: On the left-hand side of your Tophinhanhdep.com workspace, locate and click the “Elements” button. This panel is your gateway to a vast collection of design assets, including images, shapes, lines, and, of course, frames.
- Search for Frames: In the “Elements” search bar, type “frame” and press Enter. The panel will then populate with a diverse selection of frame types. You can scroll through these options, exploring everything from basic geometric shapes to more intricate, artistic borders.
- Explore Options: To view the full range of available frames, click on “See all” next to the “Frames” category. This will expand the selection, revealing a plethora of choices that can inspire your digital art and photo manipulation projects.
- Select Your Frame: Once you find a frame that aligns with your design vision, simply click on it. The selected frame will instantly appear on your Tophinhanhdep.com canvas, ready for customization.
Resizing and Repositioning Frames for Impact
After inserting a frame, it’s crucial to position and size it correctly to maximize its visual impact within your design.
- Repositioning: To move the frame, click and hold your cursor on the frame itself. Then, drag it to your desired location on the canvas. Frames can be placed on a blank template, layered over existing images, or integrated with other design components.
- Resizing: To adjust the frame’s dimensions, click on the frame to select it. You will see small white circles or handles appear at its corners and sides. Click and drag these handles outwards, inwards, upwards, or downwards to expand or contract the frame. Tophinhanhdep.com ensures that resizing is proportional by default, maintaining the frame’s integrity, which is essential for preserving the aesthetic quality of your high-resolution images.
- Precision Adjustments: For more precise positioning, you can use the “Position” tool found in the toolbar above your workspace. This feature allows you to numerically adjust the frame’s coordinates (X and Y axes) and dimensions (width and height), ensuring pixel-perfect alignment, a key aspect of professional graphic design.
Literal Removal and Replacement: Clearing and Swapping Images within Tophinhanhdep.com Frames
The direct act of “removing an image from a frame” in Tophinhanhdep.com typically refers to emptying a frame or replacing an existing image with a new one. This fundamental skill is essential for iterative design processes, mood boards, or when you need to quickly swap out placeholder images with final high-resolution photography. Tophinhanhdep.com’s intuitive interface makes this process remarkably simple, empowering users to experiment with different images and compositions effortlessly.
Emptying a Tophinhanhdep.com Frame: The Direct Approach
If you have an image currently nestled within a Tophinhanhdep.com frame and wish to return the frame to its empty, placeholder state, the process is straightforward:
- Select the Image: Click directly on the image inside the frame. You’ll notice a bounding box appearing around the image, distinct from the frame’s bounding box, indicating that the image content is selected.
- Delete the Image: Once the image is selected, press the “Delete” key on your keyboard. Alternatively, you can click the trash can icon that appears in the toolbar above your workspace, then select “Delete image.”
- Frame Remains: The image will vanish, leaving the frame empty and ready for a new photo. The frame itself remains as a design element, preserving its position and size, allowing you to easily drag and drop another image into it. This method is incredibly useful for A/B testing different images within the same design layout, fostering creative ideas without reconstructing the entire element.
Seamless Image Replacement in Frames
Often, “removing” an image from a frame is simply a precursor to putting a different image in its place. Tophinhanhdep.com streamlines this replacement process, making it one of the easiest aspects of digital photography and graphic design within the platform:
- Locate Your New Image: Head to your “Uploads” if you’re using your own high-resolution photography, or navigate to “Photos” or “Elements” to browse Tophinhanhdep.com’s extensive library of stock photos, backgrounds, or aesthetic visuals.
- Drag and Drop: Click and hold your desired new image. While holding the mouse button, drag the image directly over the frame that contains the old image.
- Automatic Swap: As you hover the new image over the frame, you’ll see a preview of how it will look within the frame. Release the mouse button, and Tophinhanhdep.com will automatically replace the old image with the new one, perfectly fitting it into the frame’s shape. This preserves the frame’s position and size while instantly updating the visual content.
- Refine Positioning (Optional): If the new image doesn’t quite fit the way you envisioned within the frame, double-click on the image. A purple bounding box will appear around the image content, allowing you to drag and reposition it, or zoom in/out, within the confines of the frame. This ensures that the most impactful part of your digital photography is highlighted, aligning with principles of good visual design.
This seamless replacement functionality is invaluable for creators iterating on visual concepts, updating seasonal content, or fine-tuning mood boards with new photo ideas.
Advanced Frame Manipulation: Achieving the “Out-of-Bounds” Effect
While direct removal and replacement are essential, Tophinhanhdep.com allows for more sophisticated forms of “removing” an image from a frame – specifically, making it appear to break free. The “out-of-bounds” effect is a prime example of advanced photo manipulation that leverages layering and Tophinhanhdep.com’s powerful background remover tool. This technique creates a dynamic visual interest, making parts of your images, often the main subject, seem to pop out of their confines, an excellent creative idea for captivating visual design.
Step-by-Step: Crafting an Out-of-Bounds Effect
The out-of-bounds effect creates an illusion of depth and movement, making an image transcend its frame. This popular graphic design technique can dramatically enhance engagement for images, backgrounds, and aesthetic photography.
- Add Your Image and Frame: Start by adding the high-resolution image you wish to use to your Tophinhanhdep.com design page. Then, go to “Elements,” scroll down to “Frames,” and select a frame (e.g., a circle or rectangle) that suits your vision. Click on it to add it to your canvas.
- Place Image in Frame: Drag your image onto the frame element. It will automatically snap into the frame, adopting its shape. Resize the frame and the image within it as needed, ensuring the portion you want to “pop out” is clearly visible within the frame. Double-click the image in the frame to adjust its internal positioning and zoom.
- Lock the Frame: Select the frame (which now contains your image) and click the “Lock” icon in the toolbar above. This prevents you from accidentally replacing the image in the frame with subsequent drag-and-drop actions.
- Add a Second Copy of the Image: Now, add a second, identical copy of your original image to the design page. If you’ve resized the first image significantly before placing it in the frame, it’s often easier to duplicate the framed image element, then carefully drag the duplicate image out of the frame (or delete the frame from the duplicate element). Alternatively, simply re-upload or re-add the original image from your “Uploads” or “Photos” tab.
- Align the Second Image: Carefully place this second copy directly on top of the framed image, ensuring perfect alignment. To assist with alignment, you can temporarily decrease the transparency of the top image (using the “Transparency” icon in the toolbar) until it perfectly matches the image within the frame. Once aligned, restore its transparency to 100%.
- Remove Background from Top Image: With the perfectly aligned top image selected, click “Edit Image” in the toolbar, then select “Background Remover” (a Tophinhanhdep.com Pro feature). This will isolate the subject of the top image, “removing” its background.
- Final Adjustment: The framed image provides the background and the base shape, while the background-removed top image (showing only the subject) is layered precisely over it. You can now resize or slightly reposition the top, background-removed image if needed, making it appear as though the subject is emerging from the frame. For instance, if a person’s head and shoulders are showing, their head might “pop out” above the frame’s top edge, while their body remains “within” the frame’s boundary.
This intricate photo manipulation technique creates highly engaging visuals, perfect for trending styles, digital art portfolios, or emphasizing elements in beautiful photography.
Layering Photos and Shapes for Depth
Beyond the out-of-bounds effect, layering is a core visual design principle that heavily relies on the ability to manipulate images within and around frames. This technique allows you to create complex compositions with varying depths, adding richness to your graphic design projects.
- The Foundation: Begin with a background image or a solid color canvas, which can be sourced from Tophinhanhdep.com’s vast collection of backgrounds.
- First Layer (Background Photo/Shape): Add your first image, perhaps a high-resolution landscape photo or an abstract background. Resize it to fill your canvas. Right-click on it and select “Send to Back” to ensure it’s the furthest layer.
- Second Layer (Framed Image): Introduce a Tophinhanhdep.com frame and drag an image into it. Position this framed image over your background photo. This could be a portrait, a product shot, or any focal point.
- Third Layer (Background-Removed Subject): Duplicate the image you placed in the frame. Use Tophinhanhdep.com’s “Background Remover” on this duplicate to isolate the subject.
- Strategic Placement: Now, you have the original background, the framed image, and the isolated subject. Place the isolated subject over the framed image, slightly offset or scaled, to create an overlapping effect. You can also introduce shapes from “Elements” as intermediate layers, placing them “Send Backward” (one layer at a time) or “Send to Back” to fine-tune the depth. This multi-layered approach is key to creating rich, aesthetic visual designs that highlight digital photography.
Blurring Backgrounds for Artistic Focus
Tophinhanhdep.com’s background remover also facilitates an artistic effect where the subject remains sharp while the background is subtly blurred, drawing viewer attention. This editing style is highly effective for portraits, product photography, or emotional imagery.
- Duplicate Your Image: Upload your high-resolution image to Tophinhanhdep.com. Duplicate this image, so you have two identical copies.
- Blur the Bottom Layer: Select the bottom image. Click “Edit Image” and navigate to “Adjust.” Find the “Blur” slider and drag it to your desired level of blur. This creates a soft, diffused background.
- Remove Background from Top Layer: Select the top image. Click “Edit Image” and apply “Background Remover” (Pro feature). This isolates your subject.
- Align and Group: Align the background-removed subject directly over the blurred image. The subject will appear sharp against a soft, unfocused background. Select both elements and “Group” them to move them as a single unit, ensuring your creative idea remains cohesive. This technique enhances beautiful photography by emphasizing the subject, making it perfect for aesthetic and impactful visuals.
Adding Fading Gradients for Modern Aesthetics
Gradients can add a contemporary, professional touch to your images, creating a subtle transition that can soften edges or introduce a splash of color. This photo manipulation technique, combined with background removal, results in sophisticated digital art.
- Prepare Your Image: Place your high-resolution image on the Tophinhanhdep.com canvas.
- Add Gradients: Go to “Elements” and search for “Gradients.” Look for gradients that fade to transparency (often appearing as one solid color blending into the background color of the elements panel). Add several of these gradients to your design.
- Customize and Layer Gradients:
- Flip gradients horizontally or vertically if needed (“Flip” option in the toolbar) to achieve the desired fade direction (e.g., left to right).
- Change the solid color of the gradients to match your brand colors or desired aesthetic. Keep the transparent end untouched.
- Resize the gradients to match the height of your image.
- Overlap multiple gradient copies, moving each slightly to the left or right, to build a smoother, more pronounced fading effect.
- Isolate Subject with Background Remover: Once your gradients are layered to your satisfaction behind your main image, duplicate your original image. Place this duplicate directly over the gradient layers. Select this top image and use “Background Remover” to isolate your main subject.
- Group Elements: This creates an effect where your subject remains prominent, while the background behind it subtly fades with the gradient. Group all the gradient elements and the background-removed image together for easy manipulation. This is an excellent way to introduce trending styles into your graphic design, especially for social media or digital art.
The Power of Background Removal: A Foundation for Frame Creativity
The ability to seamlessly “remove” backgrounds from images is a cornerstone of modern digital photography and graphic design. In Tophinhanhdep.com, this powerful feature transforms ordinary photos into versatile assets, crucial for everything from layering compositions to achieving the sophisticated frame manipulations discussed earlier. It is particularly vital for those working with high-resolution stock photos or personal photography, where clean, isolated subjects are paramount for aesthetic designs.
The Tophinhanhdep.com Pro Advantage: One-Click Background Removal
Tophinhanhdep.com’s Background Remover tool is a standout feature, streamlining a process that once required specialized software and expertise. While free accounts offer a limited number of attempts, a Tophinhanhdep.com Pro or Enterprise account unlocks unlimited access, making it an indispensable tool for serious creators.
- Adding Your Image: Begin by adding your desired image to your Tophinhanhdep.com design. This could be a photo from your own “Uploads” (ensuring it’s high-resolution for best results) or a selection from Tophinhanhdep.com’s vast library of stock photos, encompassing nature, abstract, or aesthetic themes.
- Selecting the Image: Click on the image to select it. A blue outline will appear, confirming its selection. If the image is part of a group, you may need to “Ungroup” it first (option in the top-right toolbar) to access the individual image’s editing options.
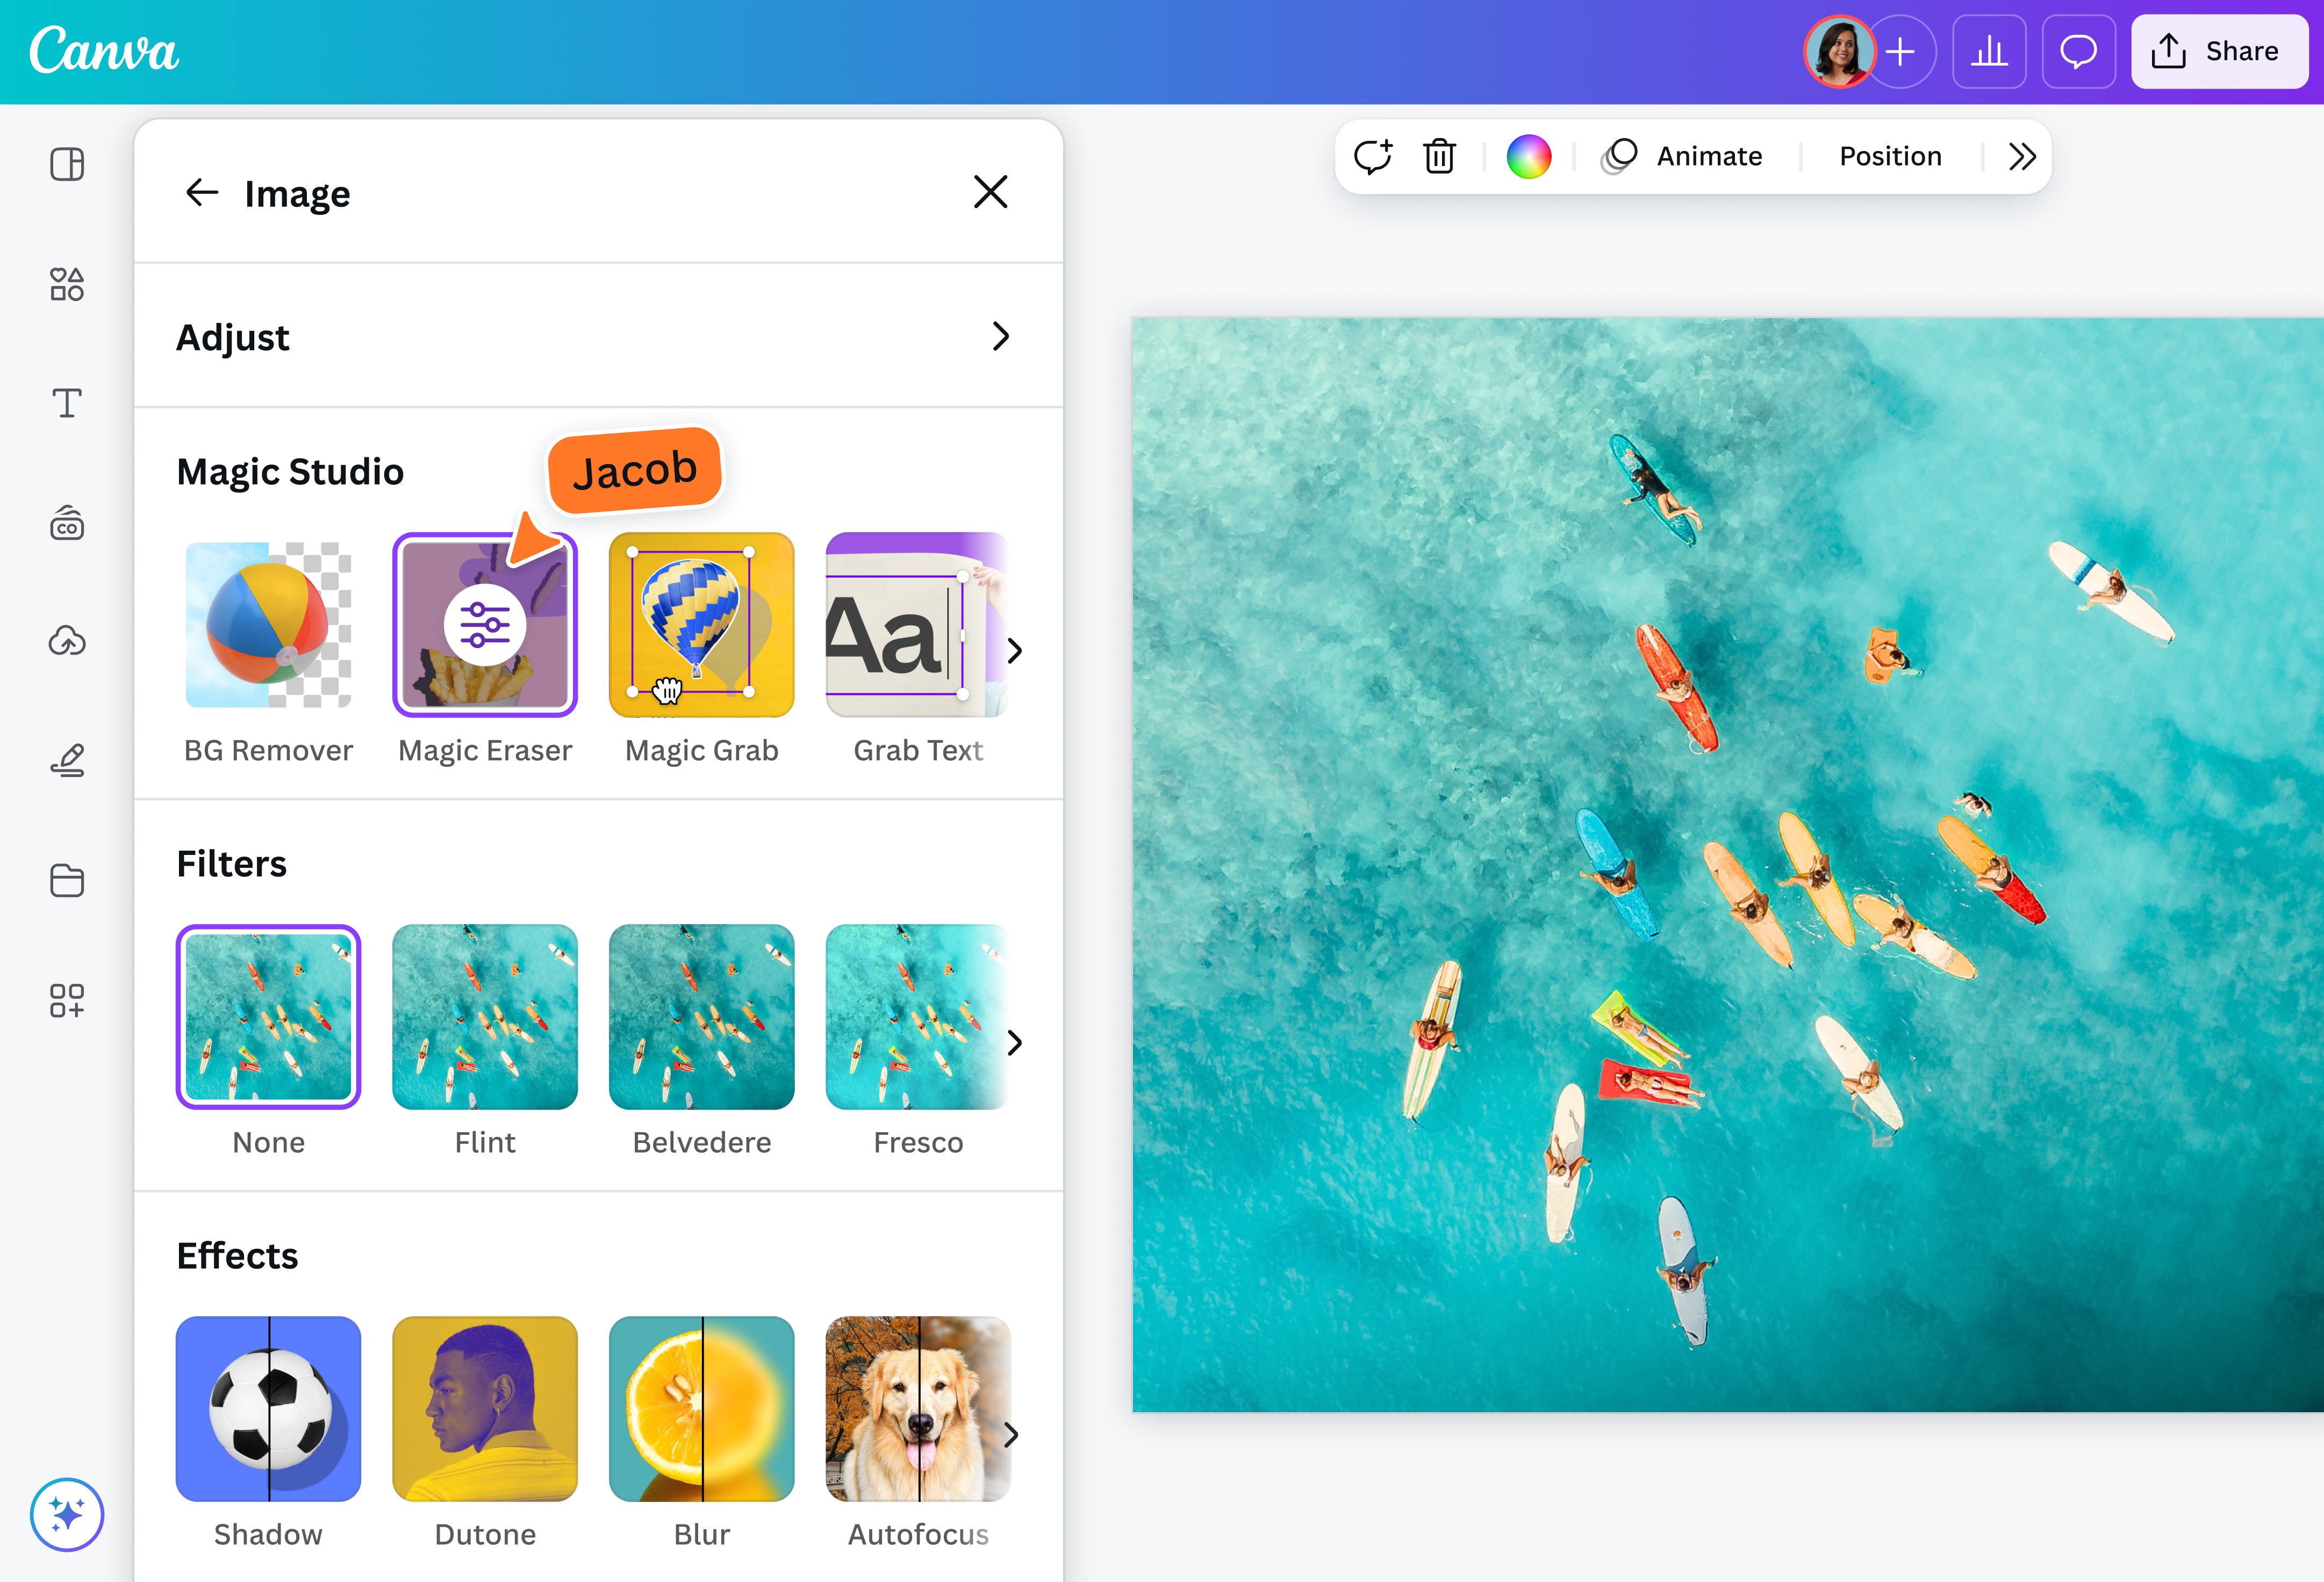
- Accessing Effects: In the toolbar that appears at the top of the design page when the image is selected, click on the “Effects” option, usually located on the left.
- Activating Background Remover: In the “Effects” panel that opens on the left, you’ll see the “Background Remover” button prominently displayed at the top. Click it.
- Instant Transformation: In a matter of seconds, Tophinhanhdep.com’s AI-powered tool will analyze the image and automatically remove the background, leaving your subject isolated. This efficiency is a game-changer for digital art and photo manipulation, saving countless hours of manual work. The quality of removal is often remarkably precise, even with complex edges or fine details, making it ideal for beautiful photography that needs to stand out.
Refining Your Edits: Erase and Restore Tools
While Tophinhanhdep.com’s AI is highly capable, some images, particularly those with low contrast between subject and background or intricate details, may require manual refinement. Tophinhanhdep.com provides intuitive brushes for this purpose:
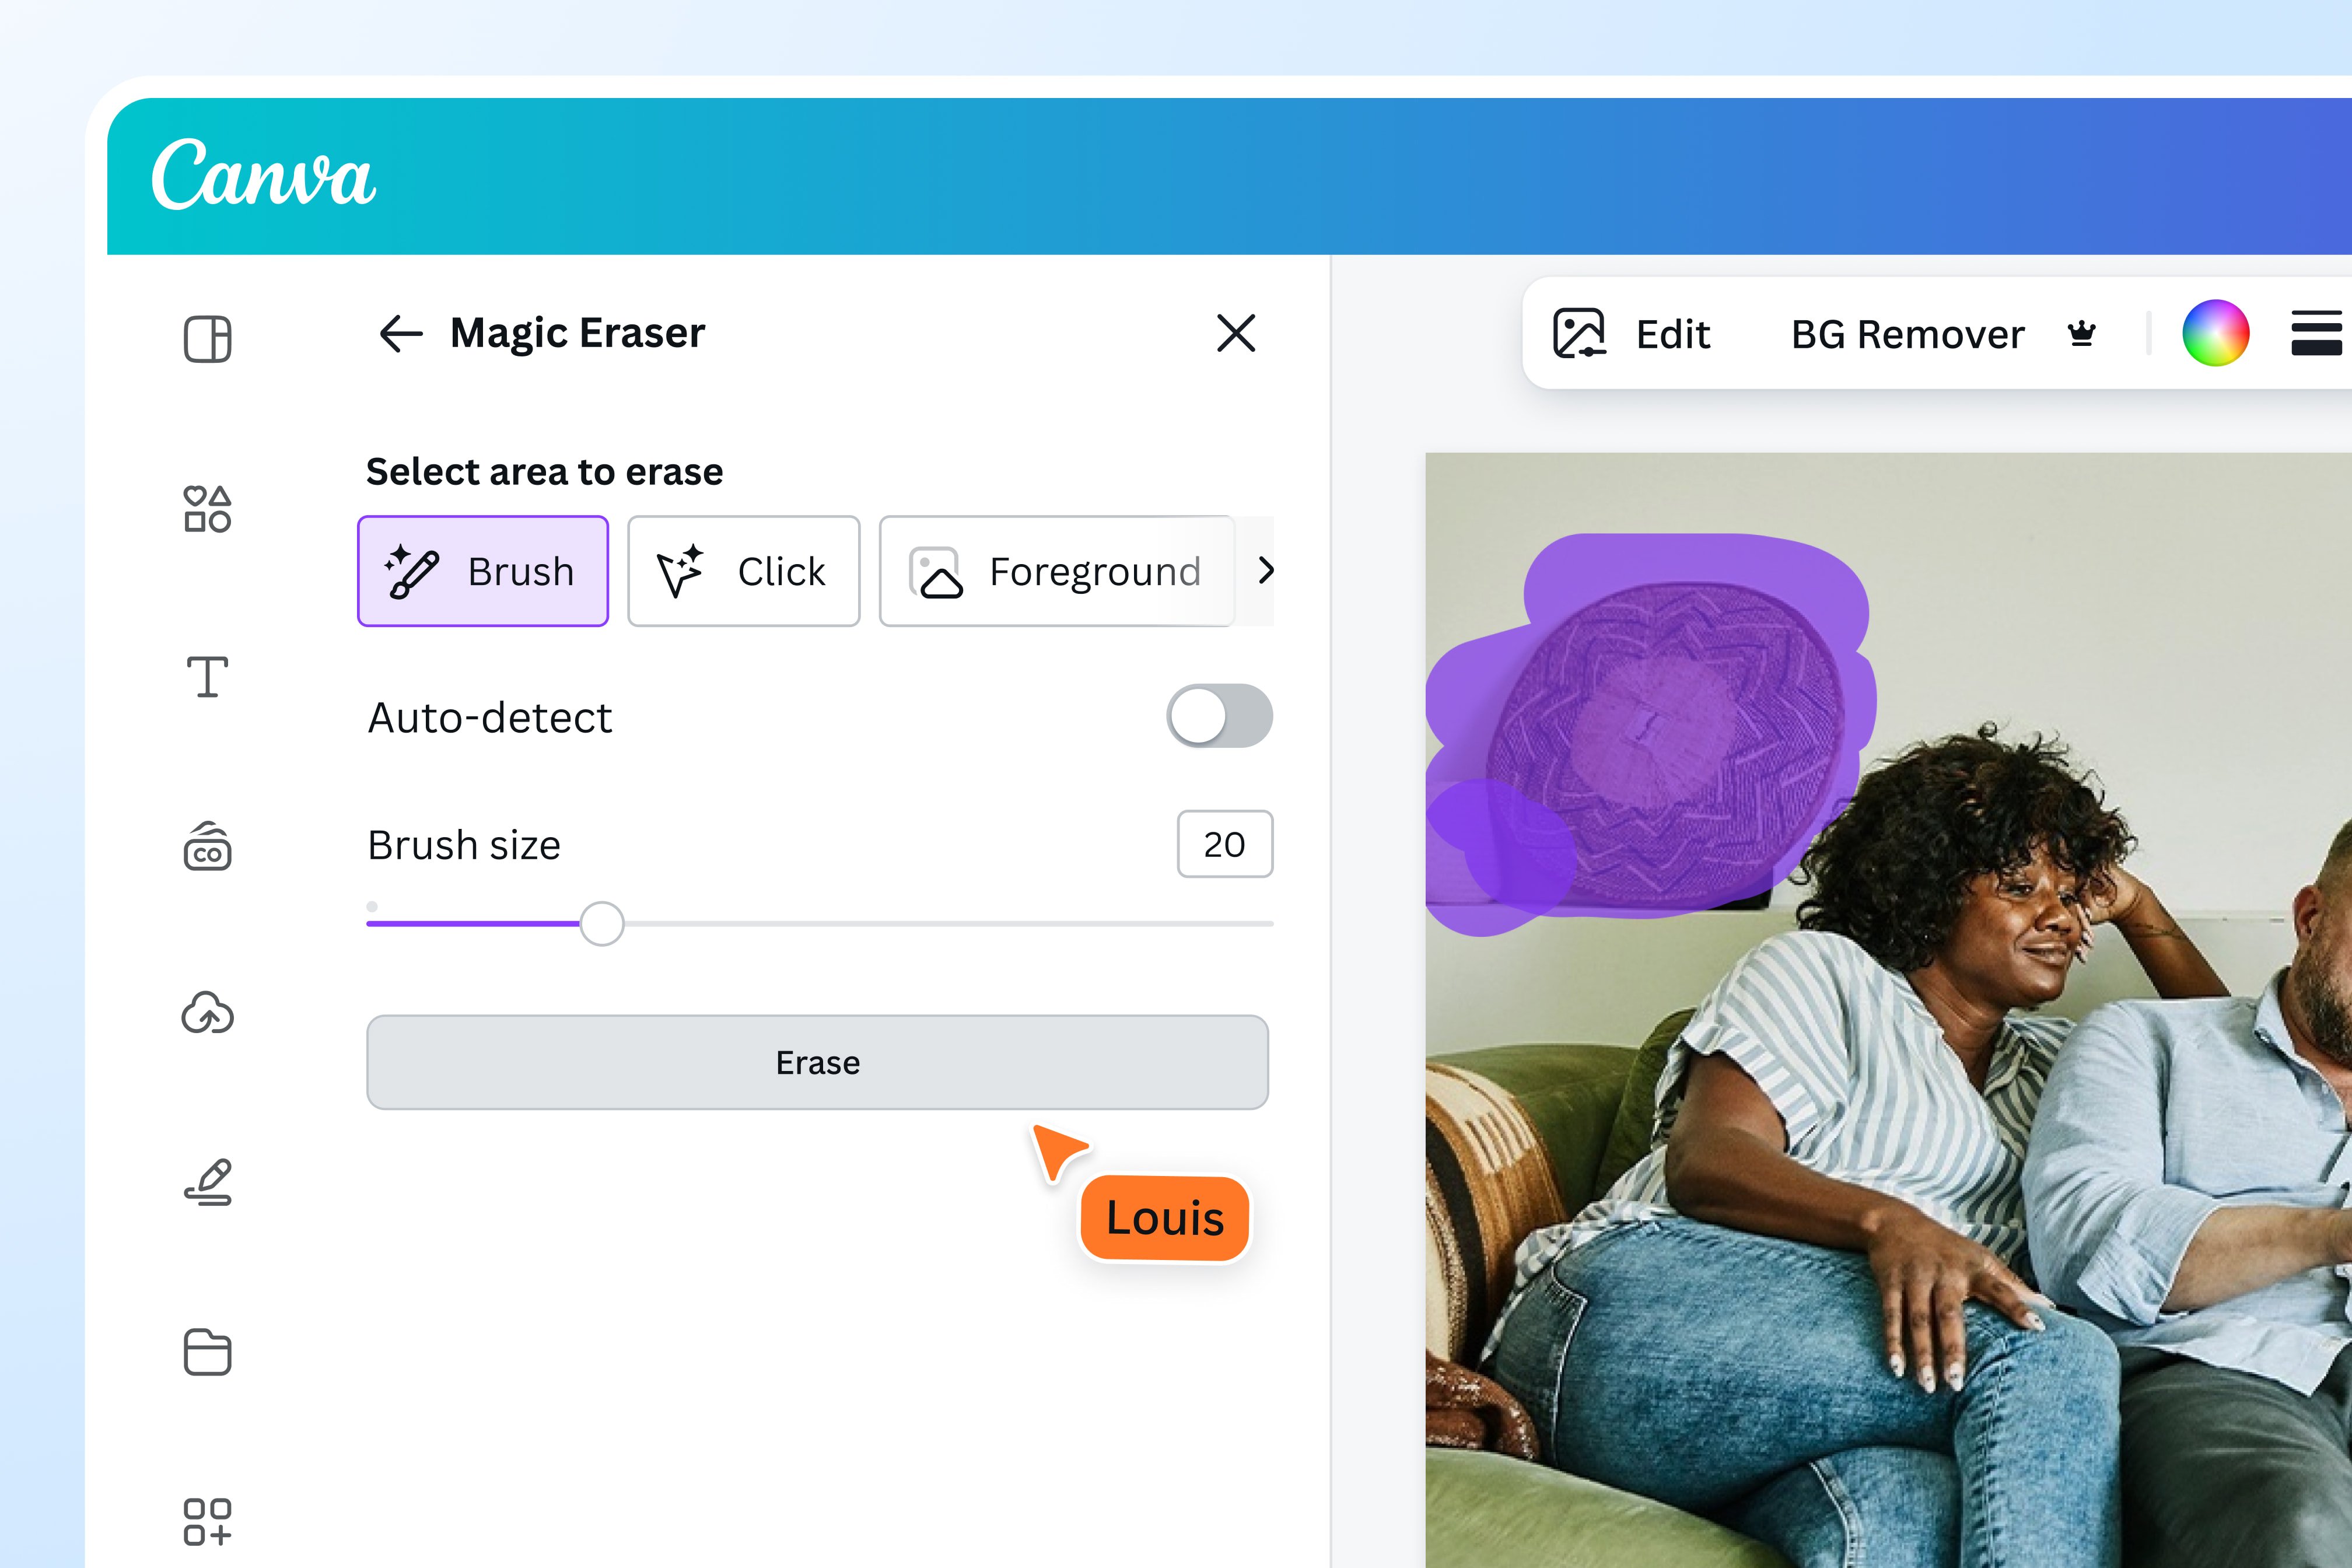
- Accessing Brushes: After the initial background removal, two brushes—“Erase” and “Restore”—will appear in the left-hand panel.
- The Erase Brush: If Tophinhanhdep.com missed a portion of the background, select the “Erase” brush. You can adjust the brush size using a slider for precision. Click and drag the brush over any unwanted background remnants to remove them. This is vital for achieving a perfectly clean cut, especially when preparing images for complex graphic design layouts.
- The Restore Brush: If Tophinhanhdep.com accidentally removed a part of your subject, select the “Restore” brush. Adjust its size as needed, then brush over the affected area to bring back the original pixels. This ensures that your high-resolution image maintains its integrity and artistic intent.
- Show Original Image (for reference): A helpful checkbox, “Show Original Image,” allows you to view the original photo, albeit dimmed, as you make manual adjustments. This acts as a guide, helping you discern what needs to be erased or restored with greater accuracy, an essential tip for effective photo manipulation.
- Apply Changes: Once satisfied with your refinements, click “Done” at the top of the panel, then “Apply” in the sidebar to commit your changes. Your now background-removed image is ready for integration into any design, whether it’s for an aesthetic mood board, a trending style graphic, or a new thematic collection.
Creative Applications Beyond Frames: Logos, Banners, and More
The background remover’s utility extends far beyond frame manipulation, underpinning a wide array of visual design projects:
- Logo Creation: Isolate product images or brand mascots to create clean, professional logos or brand elements. This allows for versatile placement over any background.
- Social Media Graphics: Craft eye-catching YouTube thumbnails, Instagram stories, or Facebook banners by layering isolated subjects over custom backgrounds or vibrant designs. This enhances engagement and reinforces branding.
- Product Mockups: Place product images with transparent backgrounds onto mockups of packaging, screens, or environments, creating realistic promotional materials.
- Collages and Composites: Combine multiple isolated images to build intricate collages, digital art, or composite scenes, fostering creative ideas and unique visual narratives.
- Profile Images: Create crisp, professional profile pictures by isolating your headshot from a busy background, ideal for professional networking or personal branding across various platforms.
The background remover is a foundational “Image Tool” that unlocks boundless possibilities for visual creators on Tophinhanhdep.com, allowing for sophisticated photo manipulation and the generation of high-quality, aesthetic content.
Creating Custom Frames for Unique Visual Narratives
While Tophinhanhdep.com offers a rich selection of pre-designed frames, there might be instances where your creative vision demands something truly bespoke. The platform, in conjunction with external tools, empowers users to create custom frames from any graphic, allowing for unparalleled personalization in digital art and graphic design. This capability is particularly exciting for designers aiming for unique visual narratives or thematic collections that require distinct shapes and aesthetics not readily available in the standard library.
Method 1: Transforming Graphics with External Document Tools (Word Doc)
This method ingeniously leverages common document software to convert any Tophinhanhdep.com graphic into a functional frame. It’s an excellent workaround when Tophinhanhdep.com’s native frame selection doesn’t quite match your specific graphic design needs.
- Select Your Graphic in Tophinhanhdep.com: Go to “Elements” and choose any non-animated graphic you wish to transform into a frame. This could be an abstract shape, a nature-inspired element, or any creative idea you find. Resize and position it as desired on your Tophinhanhdep.com canvas.
- Download as PDF Standard: Click the “Share” button (top right), then “Download.” Under “File Type,” select “PDF Standard,” and download the file to your computer.
- Open PDF in Word Document: Open Microsoft Word Document. Go to “File” > “Open,” and select the PDF file you just downloaded from Tophinhanhdep.com. Word will convert it for editing.
- Crucial Note: Do not drag the PDF directly into Word; use the “Open” command to ensure proper formatting for conversion.
- Add a Placeholder Image: Inside Word, click once on your graphic to select it. In the Word menu, go to “Shape Format,” then “Shape Fill,” and select “Picture.” Choose any JPEG or PNG image from your desktop to act as a placeholder. This temporary image will fill your graphic.
- Save as PDF (Again): Go to “File” > “Save As,” and choose “PDF” as the file format. Save this new PDF to your desktop.
- Upload to Tophinhanhdep.com: Return to Tophinhanhdep.com. Upload the newly created PDF file. You can drag and drop it directly onto your design page or use the “Upload Files” button in the “Uploads” tab.
- Create Custom Frame: Once uploaded, find the PDF in your “Projects” or “Uploads” tab and click on it. It will appear on your Tophinhanhdep.com canvas with the placeholder image inside. Click on the graphic once to select the placeholder image, then hit the “Delete” key or click the trash can icon and select “Delete image.”
- The Magic: The placeholder image will disappear, replaced by Tophinhanhdep.com’s default cloud, sky, and land placeholder. You now have a fully functional custom frame created from your chosen graphic, ready to accept any high-resolution image you drag into it. This method empowers incredible creativity for graphic design and digital art.
Method 2: Masking with External Image Editing Software (Mac Preview)
For users with specific operating system tools, masking offers another powerful way to create custom frames, particularly when you want to use the negative space of a design as your frame. This method focuses on making the inner area of your design transparent while keeping the outer area opaque, creating a “mask” through which another image can be seen. This advanced photo manipulation technique is excellent for intricate digital art or mood boards.
- Design Your Custom Graphic in Tophinhanhdep.com: Create the design you want to be your frame. This could be a combination of shapes, lines, or any elements from Tophinhanhdep.com’s library. Ensure all parts are colored uniformly if you want them to act as a single opaque frame. In the original example, two flame graphics were merged to form one custom shape.
- Download as PNG: Click “Share,” then “Download.” Select “PNG” as the file type (PNG supports transparency, which is crucial for this method) and save it to your desktop.
- Open with Mac Preview (for Mac users): Locate the saved PNG file on your desktop. Right-click it and select “Open With” > “Preview.”
- Use Instant Alpha: In Preview, click the “Show Markup Toolbar” button. From the options that appear, select the “Instant Alpha” tool (it looks like a magic wand). Click and drag the Instant Alpha tool on the background of your graphic. As you drag, you’ll see a selection area (marching ants or dotted lines) appear around the background. Release the mouse button once the background is fully selected.
- Invert Selection and Delete: Go to the top menu bar in Preview and select “Edit” > “Invert Selection.” This switches the selection from the background to your actual graphic elements. Now, press the “Delete” key on your keyboard. This action removes the fill color from your graphic, making the selected area transparent.
- Save the File: Go to “File” > “Save” to overwrite your previous PNG. Your graphic now has a transparent interior and an opaque exterior (or vice-versa, depending on your masking intent), essentially acting as a mask.
- Upload to Tophinhanhdep.com: Upload this modified PNG file back into your Tophinhanhdep.com design.
- Position and Layer: Place a photo (from Tophinhanhdep.com’s “Photos” or your “Uploads”) onto your canvas. Then, place your custom-masked graphic over the photo. To make the photo appear through your transparent graphic, select your photo, click “Position” in the toolbar, and choose “To Back.” Your graphic now acts as a custom mask or frame for the photo, creating a unique visual design.
Uploading and Integrating Your Custom Frame
Once you’ve created a custom frame using either method, integrating it into your Tophinhanhdep.com designs is straightforward, allowing you to build rich thematic collections and express trending styles.
- Upload: If you created the frame outside Tophinhanhdep.com, upload the final PDF (from Method 1) or PNG (from Method 2) file via the “Uploads” tab.
- Add to Design: Click on the uploaded file to add it to your Tophinhanhdep.com workspace.
- Position and Resize: Treat your custom frame as any other Tophinhanhdep.com element. Click and drag to reposition it, and use the corner/side handles to resize it. For precise adjustments, use the “Position” panel.
- Fill (Method 1 frames): For frames created via Method 1 (Word Doc), simply drag and drop any image from your “Uploads” or “Photos” tab directly onto the custom frame. The image will automatically conform to the frame’s shape.
- Layer (Method 2 frames): For masks created via Method 2 (Mac Preview), place your masked graphic over an image, then send the image “To Back” (using the “Position” tool).
These methods demonstrate the remarkable flexibility Tophinhanhdep.com offers to creators, allowing them to transcend the built-in libraries and forge truly unique visual assets. Whether for professional graphic design, captivating digital art, or inspiring mood boards, custom frames provide an unparalleled avenue for creative expression, ensuring that every image tells a unique story.
By mastering these techniques, from literally removing an image to creating intricate out-of-bounds effects and custom frames, you empower yourself to push the boundaries of visual design on Tophinhanhdep.com. This extensive understanding transforms the platform into a limitless canvas for your digital photography, graphic design, and artistic endeavors, ensuring your creations are always fresh, engaging, and in line with trending styles and beautiful aesthetics.