Mastering Image Restoration: Your Guide to Removing Unwanted Lines from Photos with Tophinhanhdep.com

In the realm of digital imagery, where every pixel contributes to the overall aesthetic, photographers and visual designers constantly strive for perfection. Whether capturing a breathtaking landscape, an intimate portrait, or a dynamic cityscape, the presence of unwanted elements can often detract from an otherwise stellar composition. Among the most common culprits are intrusive lines – be they power lines, utility wires, fences, ropes, or even unintentional marks on scanned documents. These seemingly minor distractions can undermine the visual impact, divert the viewer’s gaze, and prevent an image from achieving its full potential as a stunning wallpaper, a captivating background, or a piece of high-resolution art.
At Tophinhanhdep.com, our mission is to empower creators with the knowledge and tools to transform their images into flawless masterpieces. We understand that a truly beautiful photograph, an evocative aesthetic background, or a compelling piece of digital art is often defined by its purity and focus. Unwanted lines can compromise the high-resolution quality and overall visual design of an image, making it less suitable for print, digital display, or professional use as stock photos. This comprehensive guide will delve into various methods for removing these distracting lines, ranging from intuitive AI-powered solutions to advanced manual techniques, all designed to help you clean up your images effectively and elevate your visual narratives.
We’ll explore how these techniques align with the core offerings of Tophinhanhdep.com, from enhancing your collection of beautiful photography and thematic mood boards to optimizing images for graphic design and digital art projects. By mastering line removal, you’re not just editing a photo; you’re preserving its artistic integrity and ensuring that your images, whether they are vibrant nature scenes or intricate abstract designs, truly shine.
The Art of Digital Cleanup: Why Removing Lines Elevates Your Imagery
The ability to digitally clean up an image by removing unwanted lines is more than just a technical skill; it’s a critical aspect of visual design and photographic refinement. For users of Tophinhanhdep.com, which specializes in high-quality images across various categories like Wallpapers, Backgrounds, Aesthetic, Nature, Abstract, Sad/Emotional, and Beautiful Photography, achieving a clean composition is paramount. Distracting lines can fundamentally alter the perceived quality and mood of an image, making it less impactful.
Think of a majestic mountain panorama, intended to be a serene nature wallpaper, suddenly bisected by a thick power line. Or a striking night cityscape, full of vibrant lights and architectural grandeur, marred by a tangle of overhead wires. In these scenarios, the lines don’t just exist in the frame; they actively compete for attention with the main subject, disrupting the harmony and flow of the visual narrative. Removing them allows the intended focal point to stand out, enhancing the image’s overall clarity and aesthetic appeal.
Beyond mere aesthetics, clean images are crucial for practical applications. High-resolution stock photos, for instance, demand impeccable quality without extraneous elements. Digital photography, especially when intended for professional portfolios or as part of a larger graphic design project, benefits immensely from careful cleanup. Furthermore, in photo manipulation and other creative ideas, starting with a pristine base image provides greater flexibility and a more polished final product. The editing styles embraced by Tophinhanhdep.com emphasize precision and quality, making line removal an indispensable skill for anyone looking to create or utilize truly inspiring and trending visual content.
Common Line Types and Their Impact on Your Visuals
Unwanted lines come in many forms, each presenting its own challenges and affecting your photographs in unique ways:
- Power Lines and Utility Wires: These are perhaps the most ubiquitous culprits, often appearing in urban landscapes, street photography, and even rural settings. They crisscross skies, obstruct views of historical buildings, or slice through open fields, immediately drawing the eye away from the intended subject. Their presence can make a beautiful scene feel cluttered and unkempt.
- Fences and Ropes: Commonly encountered in nature photography, animal portraits, or architectural shots, fences and ropes can create harsh, repetitive patterns or obscure parts of the subject. A fence might cut across a stunning animal photo, or ropes might distract from the elegance of a boat in water. While sometimes intentional for compositional effect, more often than not, they are unwanted intrusions.
- Scanned Document Lines/Folds: For digital artists working with historical photographs, scanned documents, or converting image-to-text, faint lines, folds, or creases can significantly degrade the quality. Removing these is essential for restoration and for presenting a clean digital copy.
- Minor Imperfections: Even thin scratches, stray hairs, or dust specks can appear as fine lines, particularly noticeable in high-resolution images or large prints. These demand precise removal to achieve a truly flawless finish.
Understanding the specific nature of these distractions is the first step toward effectively removing them and ensuring your images maintain the high standards associated with Tophinhanhdep.com’s collections.
AI-Powered Simplicity: Effortless Line Removal with Automated Tools
In the quest for perfect images, not everyone has the time or expertise to master complex photo editing software. This is where AI-powered image tools truly shine, offering an accessible and efficient pathway to flawless photos. For Tophinhanhdep.com users, these tools represent a revolution in image optimization, allowing for quick and easy removal of distracting lines, ensuring your wallpapers, backgrounds, and aesthetic images are always pristine.
Tools like Inpaint and SnapEdit exemplify the power of artificial intelligence in simplifying photo manipulation. They are designed for speed and ease of use, eliminating the need for specific graphics skills or a deep understanding of advanced editing techniques. The primary benefit lies in their ability to perform intricate object removal tasks with minimal user input, making professional-quality cleanup achievable for beginners and experienced users alike. This aligns perfectly with Tophinhanhdep.com’s commitment to providing intuitive Image Tools that complement our offerings, such as Converters, Compressors, Optimizers, and AI Upscalers.
How do these AI-driven solutions work? The process is remarkably straightforward:
- Upload Your Image: Users typically start by simply uploading or dragging and dropping their photograph onto the platform.
- AI Detection or User Marking: The AI then either automatically detects and highlights the unwanted lines (such as power lines) or provides a simple “Marker” or “Brush” tool for the user to quickly select the areas to be removed.
- One-Click Removal: With the lines identified, a single click initiates the removal process. The AI analyzes the surrounding pixels and intelligently reconstructs the background, seamlessly erasing the selected lines.
- Download Result: Within seconds, the cleaned image is ready for download, often with options for different resolutions to suit various needs, from high-resolution stock photos to optimized web images.
These tools often boast “powerful automatic detections with AI,” which means they are “specially trained AI could swiftly detect and highlights all power lines from a photo effortlessly.” They prioritize retaining “image quality and details,” ensuring that “the photo will be automatically refined to heal any spots with blemishes to provide a new and beautiful picture.” Moreover, many offer a “Manual Brush for in-depth editing” if “you are not satisfied with the result of our AI app,” allowing for precise clean-up of any left-over vestiges. This blend of automation and manual refinement provides both efficiency and control, making line removal an “easy to use” process accessible “for all” and working “on all devices.”
Step-by-Step with AI-Driven Software (e.g., Inpaint / SnapEdit Workflow)
Let’s walk through a general workflow for using AI-powered tools to remove lines from your images, ensuring your visuals for Tophinhanhdep.com are consistently high quality:
-
Load Your Photo onto the Platform: The first step is always to get your image into the editing environment. Most AI tools, like those you might find integrated with Tophinhanhdep.com’s Image Tools, offer a user-friendly interface. You can typically “Upload” your file or simply “drag and drop” the photo directly onto the designated area on the page. This prepares your image for the automated cleanup process.
-
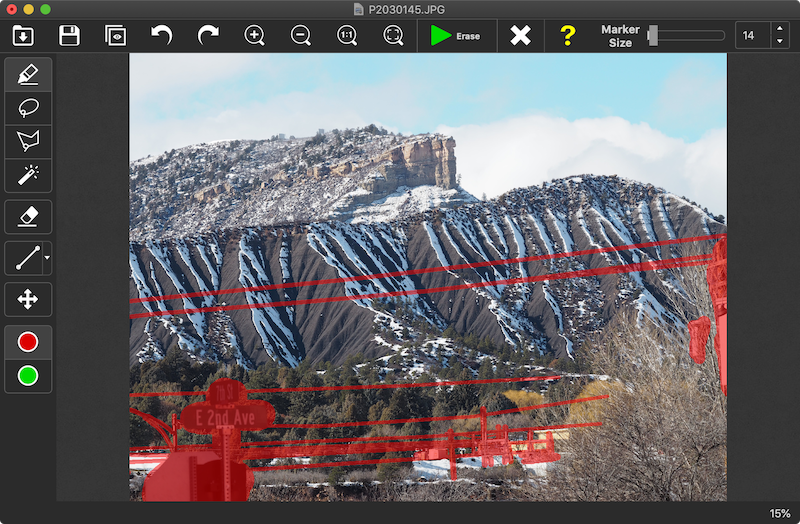
Mark the Unwanted Lines (or Await Auto-Detection): Once your image is loaded, the AI often goes to work immediately, performing “powerful automatic detections.” For instance, tools might “swiftly detect and highlight all power lines from a photo effortlessly.” If auto-detection isn’t perfect or if you’re removing a more complex or non-standard line, you’ll use a “Marker tool” or “Brush” provided in the interface.
- Adjust Brush Size: Set the diameter of your marker to match the thickness of the lines you want to erase. For thin wires, 2-7 pixels is a good starting point. This ensures you select just the line without affecting too much of the surrounding area.
- Precise Selection: Carefully draw over the lines. If you need to draw a perfectly straight line, many tools allow you to make a first click at the beginning, then hold down the SHIFT key, and make a second click at the end of the line. This creates a precise, straight selection, which is invaluable for long, linear distractions. Don’t worry if your initial selection isn’t perfect; you can usually “undo your actions” and refine your marker size or selection.
-
Initiate the Removal Process: With the unwanted lines clearly marked (either by you or the AI), the next step is typically a single command to perform the magic. Look for a button labeled “Remove,” “Erase,” or “Run the restoration process.” Click it, and the AI will take over. The process usually takes “as little as 1 minute,” or even “only 5 seconds” for simpler tasks, depending on the complexity of the image and the processing power. The AI intelligently samples the surrounding textures and colors to fill in the selected areas, making the lines vanish seamlessly.
-
Review, Refine, and Download: After the AI completes its work, carefully “compare result.” Zoom in and examine the areas where the lines were removed. While AI is incredibly powerful, sometimes a tiny “blemish” or “left-over vestiges” might remain, especially if the background was very intricate or if the line crossed over a textured area.
- Manual Refinement: If needed, use an in-app “manual brush” (often labeled as a regular brush or eraser tool) to precisely clean up any small imperfections. This ensures the result is “new and beautiful picture” with “without traces” of the original line.
- Download Your Masterpiece: Once you are satisfied with the result, your clean image is ready. Most platforms provide “multiple resolutions for users to download,” allowing you to choose the perfect size for your Tophinhanhdep.com collection, whether it’s for a high-resolution wallpaper or an optimized web background.
This streamlined, “easy to use” process empowers even those without extensive graphics skills to produce professional-looking images, directly contributing to the high standard of visual content found on Tophinhanhdep.com.
Advanced Control: Precision Line Removal Using Professional Software (Photoshop)
While AI-powered tools offer unparalleled speed and ease, there are instances where professional software like Adobe Photoshop becomes indispensable. For complex images, intricate backgrounds, or when the highest degree of precision and artistic control is required, Photoshop provides a robust suite of tools for line removal. This level of control is particularly valued by Tophinhanhdep.com users involved in detailed Digital Photography, advanced Editing Styles, Graphic Design, and sophisticated Photo Manipulation, where every detail impacts the final visual design.
Photoshop allows users to approach line removal with a strategic mindset, combining automated features with manual brushwork and layering techniques. This approach is more time-consuming but offers unparalleled flexibility to achieve truly seamless results, even in challenging scenarios where lines cross over varied textures, subtle gradients, or critical subject matter. Understanding these advanced techniques enables photographers and designers to go beyond simple object removal, crafting high-resolution images that are not just clean, but artistically refined.
The key to successful line removal in Photoshop lies in non-destructive editing. By working on separate layers and utilizing layer masks, you can make changes without permanently altering the original image data, preserving the quality of your beautiful photography and ensuring reversibility for any creative ideas or experimentation. This advanced capability makes Photoshop a go-to for professionals aiming to create pristine stock photos or contribute to premium thematic collections on Tophinhanhdep.com.
Essential Photoshop Techniques for Line Removal
Mastering Photoshop for line removal involves a combination of powerful tools, each suited for different situations. Here’s how to tackle lines with professional precision:
-
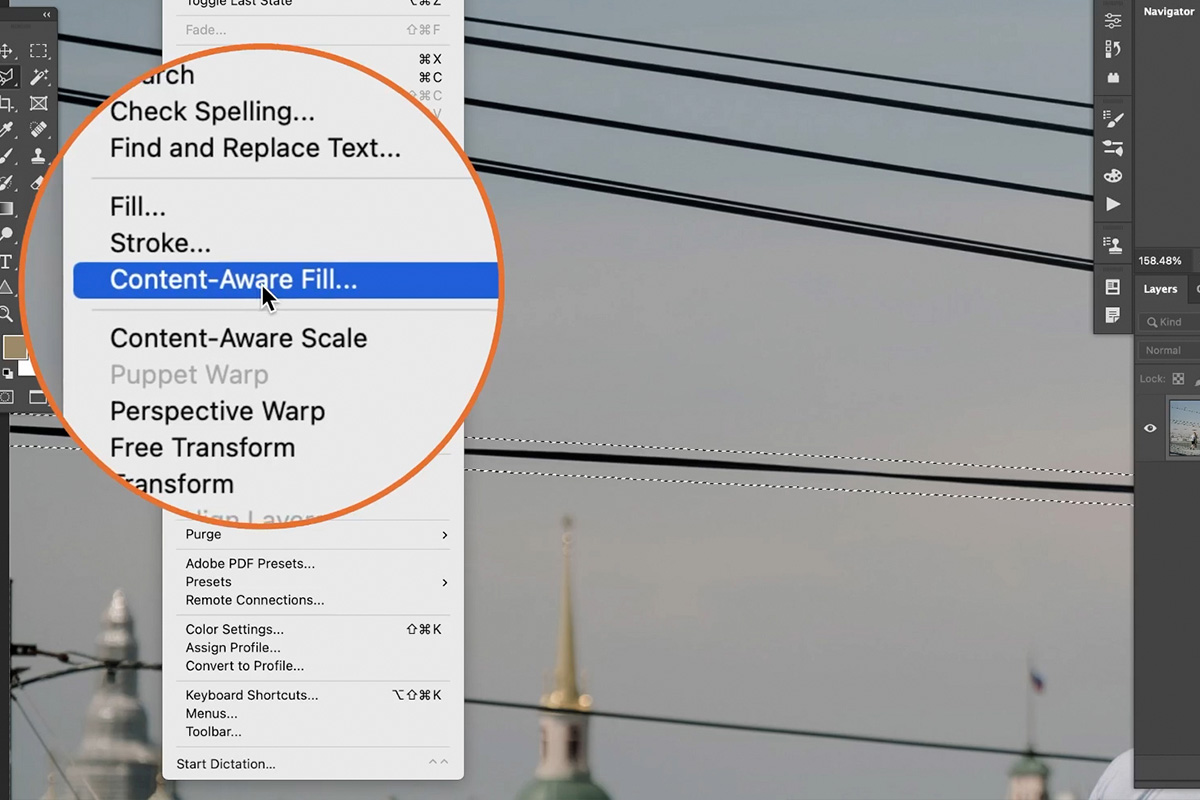
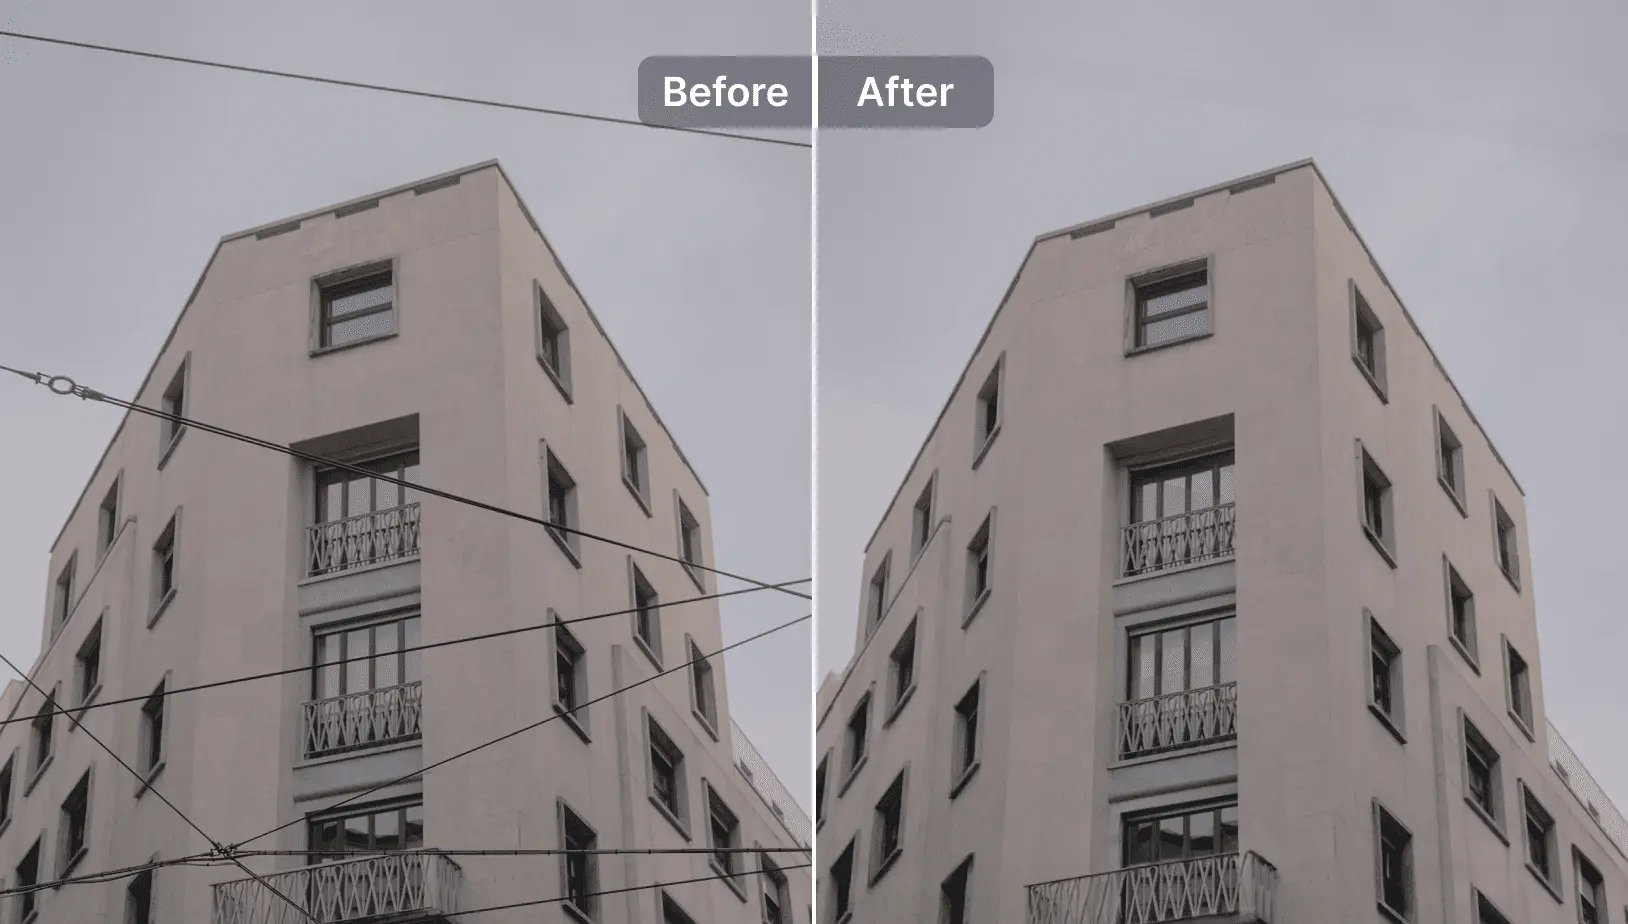
Content-Aware Fill (CAF): The Intelligent Eraser Content-Aware Fill is Photoshop’s answer to intelligent object removal. It analyzes the content surrounding a selection and fills the area with matching detail, seamlessly integrating the repair.
- How it works:
- Selection: Begin by making a selection around the unwanted line. For thin, irregular lines, the Polygonal Lasso Tool or Lasso Tool is often effective, allowing you to roughly trace the object. For more precise or intricate selections, you might use the Pen Tool or Quick Selection Tool. Ensure your selection slightly overlaps the line.
- Activate CAF: Go to
Edit > Content-Aware Fill. This will open a dedicated dialog box where Photoshop presents a preview of the removal. - Refine (if needed): In the CAF workspace, you can refine the sampling area (the green overlay) to guide Photoshop on which parts of the image to use for filling.
- Output Settings: Crucially, change the
Output SettingstoNew Layer. This ensures non-destructive editing, applying the fill to a separate layer, leaving your original image untouched.
- Limitations: While powerful, CAF can sometimes leave subtle smudges, repeating patterns, or distorted edges, especially in areas with complex textures, gradients, or sharp contrasts. These require further refinement.
- How it works:
-
The Spot Healing Brush: Quick Fixes for Smaller Imperfections The Spot Healing Brush is an excellent tool for quick, automated fixes on smaller lines or to clean up residual artifacts left by Content-Aware Fill.
- How it works:
- Select Tool: Choose the Spot Healing Brush Tool from the toolbar (it often shares a spot with the Healing Brush Tool).
- New Layer: Create a new empty layer above your image or the CAF layer for non-destructive work.
- Sample Setting: In the options bar at the top, make sure
Sampleis set toAll LayersorCurrent & Below. This tells Photoshop to pull information from the visible layers beneath your current empty layer. - Paint Over: Adjust your brush size to be slightly larger than the line, then simply paint over the unwanted element. Photoshop automatically samples nearby pixels and blends them to cover the line. You can paint over an area multiple times until it blends seamlessly.
- How it works:
-
The Clone Stamp Tool: Precision for Intricate Areas For areas requiring meticulous control, such as lines crossing textured backgrounds, repeating patterns, or near critical edges, the Clone Stamp Tool is invaluable. It allows you to manually copy (clone) pixels from one area of your image to another.
- How it works:
- Select Tool: Choose the Clone Stamp Tool.
- New Layer: Work on a new, empty layer for non-destructive editing.
- Sample Source: Hold down
Alt(Windows) orOption(Mac) and click on a clean area of your photo that closely matches the texture, lighting, and color of the area you want to cover. This sets your “source point.” - Paint Over: Release the
Alt/Optionkey and paint over the unwanted line. As you paint, Photoshop copies pixels from your source point. Adjust your brush size, hardness, and opacity as needed. - Re-sample Frequently: For best results, frequently re-sample new source points, especially as you move along a line or encounter changes in texture or lighting.
- How it works:
-
Brush Tool with Layer Masks: Restoring and Refining Edges Sometimes, removal tools might inadvertently warp or soften important edges of your subject or background elements. Layer Masks offer a powerful way to precisely control visibility and selectively restore original details.
- How it works:
- Identify Issue: Notice how a Content-Aware Fill might have created an inconsistent edge on, for example, a building or a person’s hat.
- Add Layer Mask: Select the layer where you performed the line removal (e.g., your CAF layer). Click the
Add Layer Maskicon at the bottom of the Layers panel. - Paint with Black/White: Select the Brush Tool. Set your foreground color to black to hide the effect of the removal layer (revealing the original pixels below) or white to reveal the effect (hiding the original pixels).
- Refine: Use a soft, round brush with a low
Flow(e.g., 5-20%) for subtle, gradual blending. Paint carefully along the distorted edge to restore its original crispness.
- Benefits: This technique is incredibly powerful for non-destructive refinement, allowing you to fine-tune the blending of your removals without affecting the underlying image data.
- How it works:
By combining these Photoshop techniques, you gain unparalleled control over the line removal process, enabling you to produce high-resolution, professional-grade images that perfectly fit the diverse collections and visual design needs of Tophinhanhdep.com.
Specialized Techniques and Considerations for Specific Line Removal Challenges
While AI tools and general Photoshop techniques cover most line removal scenarios, certain situations demand a more specialized approach or a deeper understanding of underlying image processing principles. For Tophinhanhdep.com users engaged in niche photography, digital art, or historical image restoration, these advanced considerations can make all the difference in achieving truly impeccable results.
One common challenge, as noted by users of tools like Inpaint, extends beyond mere wires to larger “intrusive objects” like “poles, transformers, etc.” or “a foreground traffic sign and a port-a-potty.” Removing these larger, more complex elements often requires a multi-tool approach, combining selections, content-aware fills, and meticulous cloning, iteratively building up the repaired area. The “ability to fine-tune the ‘donor’ area” in some tools becomes critical here, allowing greater control over the source pixels used for reconstruction.
Removing Lines from Scanned Drawings: A Glimpse into Advanced Processing
For those working with older documents, blueprints, or artistic sketches that have been scanned, the challenge isn’t just power lines but often faded or uneven ruling lines. While Tophinhanhdep.com primarily focuses on photographic and visual art, understanding the principles behind more programmatic line removal (like methods used in libraries such as Leptonica) can inform how you approach even complex photo manipulation.
Historically, removing lines from scanned drawings involved:
- Deskewing: Ensuring any lines are perfectly horizontal or vertical for easier processing.
- Morphological Operations: Using filters like “grayscale morphological closing” to extract the lines, “erosion” to solidify them, and “opening” to fill in gaps.
- Thresholding and Inversion: Precisely isolating the lines based on pixel intensity, then inverting them to create a “mask” that can be used to subtract or “add the inverse” from the original image.
- Reconstruction: Intelligently filling the resulting gaps using surrounding pixel information, often by “combining masked” areas from opened (smeared) versions of the image.
While most Tophinhanhdep.com users won’t manually perform these low-level operations, this highlights that removing lines, especially from complex backgrounds or faded documents, often involves sophisticated algorithms. Modern AI tools, in essence, automate many of these complex steps, abstracting them away from the user.
Workflow for Repetitive Lines: Efficiently Erasing Fences and Ropes
For photographers capturing scenes with repetitive linear elements like fences, railings, or ropes, the manual, line-by-line approach can be incredibly time-consuming. A technique, particularly popular in Photoshop communities (like ThatTogSpot’s advice for removing rope halters from horses), offers a surprisingly fast and efficient method:
- Create a New Blank Layer: Start by adding an empty layer above your original image in Photoshop. This ensures all your work is non-destructive.
- Paint Over the Lines: Select a solid, hard brush (any color that contrasts well with the lines). On your new blank layer, paint directly over all the unwanted lines, covering them completely. You’re creating a temporary visual guide for a selection.
- Load Selection: Go to
Select > Load Selection. In the dialog box, choose your painted layer (e.g., “Layer 1 Transparency”) and clickOK. This will convert your painted marks into an active selection. - Expand the Selection: To give Photoshop a bit more room to sample and blend, go to
Select > Modify > Expand. Add a small pixel value, typically 1 to 5 pixels, depending on the line thickness. - Hide Painted Layer & Select Image Layer: Hide your painted guide layer (click the eye icon next to it in the Layers panel). Then, click on your original image layer (or a duplicated image layer for safety) to make it active.
- Run Content-Aware Fill: With the image layer active and the expanded selection still present, press
Shift + Backspace(Windows) orShift + Delete(Mac). In the Fill dialog, ensureContentsis set toContent-Aware, and clickOK. - Clean Up: Deselect (
Ctrl/Cmd + D). Now, use the Spot Healing Brush or Clone Stamp Tool on a new layer to quickly clean up any subtle imperfections or artifacts left by the Content-Aware Fill.
This method allows you to select many lines in one go, dramatically speeding up the process, making it ideal for high-volume editing tasks like preparing batches of stock photos or refining thematic collections for Tophinhanhdep.com.
Importance of Non-Destructive Editing: Across all methods, whether AI-driven or manual, the principle of non-destructive editing remains paramount. Always aim to work on duplicate layers or use layer masks. This approach preserves your original data, allows for easy revisions, and maintains the highest quality of your images for any future use on Tophinhanhdep.com.
Finally, it’s worth remembering that “removing distractions” is often a “highly subjective process.” Sometimes, a line or a specific element might “create an interesting geometry and composition,” adding “a little more visual interest to the scene.” The ultimate decision of what to remove always rests with the creator, aligning with their personal “creative ideas” and “editing styles” to achieve their desired “visual design.”
Conclusion: Crafting Flawless Visual Narratives with Tophinhanhdep.com
The journey to a perfect image often involves meticulous attention to detail, and the removal of unwanted lines stands as a crucial step in that process. From the swift, AI-powered solutions that democratize advanced editing to the precision and artistic control offered by professional software like Photoshop, the tools available today empower every creator to transform their vision into reality. At Tophinhanhdep.com, we believe that every image, whether a high-resolution wallpaper, an aesthetic background, or a contribution to a curated thematic collection, deserves to be presented without distraction, allowing its true beauty and message to shine through.
By understanding and applying the techniques discussed in this guide, you can confidently tackle power lines in your stunning nature photography, eliminate fences from captivating animal shots, or purify historical documents for digital art projects. The ability to seamlessly erase imperfections directly enhances the quality of your digital photography, elevates your visual design, and ultimately enriches the collective pool of beautiful photography and image inspiration.
We encourage you to experiment with these methods, practice your skills, and discover the transformative power of a clean, focused composition. As you refine your images, you’ll not only improve their aesthetic appeal but also unlock their full potential as compelling visual narratives. Explore Tophinhanhdep.com’s extensive resources for more image editing tutorials, access high-resolution downloads, and discover endless creative ideas to perfect your visual masterpieces and contribute to the vibrant world of digital imagery.