Mastering Image Purity: How to Seamlessly Remove Text from Photos in Photoshop

In the vast and vibrant world of digital imagery, where every pixel contributes to a story, unwanted text can often disrupt an otherwise perfect visual narrative. Whether you’re a professional photographer, a graphic designer, or simply an enthusiast passionate about creating stunning visuals, encountering text overlaying a beautiful photograph is a common challenge. It could be a date stamp, a watermark, a brand logo, or accidental text that detracts from the image’s aesthetic value. Fortunately, Adobe Photoshop, the industry-standard software for image editing and manipulation, offers powerful tools and techniques to effectively remove text without compromising the integrity of your original picture.
At Tophinhanhdep.com, we understand the importance of pristine imagery. Our platform is dedicated to providing resources for Photography, offering High Resolution images and Stock Photos, exploring diverse Editing Styles, and fostering Visual Design through Graphic Design, Digital Art, and Photo Manipulation. Removing text from an image is a fundamental skill in this ecosystem, allowing creators to transform good photos into exceptional ones, ready for any application—from Wallpapers and Backgrounds to Thematic Collections and Trending Styles.

This comprehensive guide will walk you through various methods to remove text from images in Photoshop, ranging from simple layer adjustments to advanced content-aware techniques and meticulous cloning. By mastering these skills, you’ll unlock new possibilities for your Image Inspiration & Collections, ensuring your visuals always convey your intended message with clarity and impact. Even if you’re new to Photoshop, our step-by-step instructions will empower you to achieve professional-quality results, enhancing your Beautiful Photography and contributing to truly Aesthetic Images.
Understanding Photoshop Layers and Image Preparation

Before diving into the specific text removal techniques, it’s crucial to grasp the foundational concept of layers in Photoshop and understand the essential first steps for any editing project. Layers are the building blocks of any complex image in Photoshop, allowing you to manipulate individual elements independently without affecting others.
The Foundation: Why Layers Matter
In Photoshop, images are composed of multiple, individual layers. Each layer can contain different elements such as colors, effects, design components, and of course, text. These layers stack on top of each other to create the final composite image you see. For instance, you might have a background image layer, a layer for an overlaid graphic, and a separate layer for text. This layered structure is precisely what gives Photoshop its immense power and flexibility.
The beauty of layers lies in their non-destructive nature. You can make a layer invisible or visible, change its opacity, blend it with other layers, or even rasterize it to turn its content into a manipulable graphic. When text exists on its own separate layer, removing it is often as simple as locating that layer in the “Layers” panel (typically on the right side of your Photoshop interface), right-clicking it, and selecting “Delete Layer.” If the text happens to be part of a multi-layered file like a PSD or PDF, this straightforward approach can save you considerable time. However, if the text has been “flattened” or “merged” with the background image, it becomes an integral part of the pixels, requiring more sophisticated methods to erase.
Essential First Step: Duplicating Your Image
Regardless of the text removal method you choose, always begin by creating a duplicate of your original image layer. This is a critical best practice in all forms of Photo Manipulation and Digital Photography Editing. By doing so, you ensure that your original file remains untouched and preserved, serving as a safety net if you make mistakes or decide you don’t like the changes you’ve applied.
To create a copy:
- Open your image in Photoshop by going to
File > Openand selecting your desired photo. - Once the image is open, look for the “Layers” panel. You’ll typically see a layer named “Background” which contains your original image.
- Press
Command+J(Mac) orCtrl+J(Windows). This keyboard shortcut instantly duplicates the selected layer. You’ll now see a new layer named “Layer 1” (or similar) above your “Background” layer, containing an identical copy of your image. - Optionally, rename the duplicated layer to something descriptive like “Image With Text Removed” to easily keep track of your work. Right-click on “Layer 1” in the Layers panel, choose “Rename,” type your new name, and press Enter/Return.
With your original image safe on the “Background” layer and your editing work confined to the copy, you’re ready to explore the powerful text removal techniques Photoshop has to offer, turning your raw images into pristine High Resolution visuals for any purpose, from Nature photography to Abstract designs.
Method 1: Precision Removal with the Rasterize Function
When text isn’t on its own editable layer, but rather part of the pixel data, the rasterize function combined with selection tools offers a direct way to remove it. This method is particularly useful for simpler text structures or when the surrounding background is relatively uniform.
Rasterizing for Direct Manipulation
As discussed, text that’s part of a merged image can’t be directly edited as text. To enable pixel-level manipulation, you first need to ensure your image layer is “rasterized” (if it isn’t already a pixel layer). Rasterizing essentially converts any vector-based content (like text or shapes that are defined mathematically) into a bitmap image, where each element is represented by a grid of pixels. This step is crucial for working with selection and deletion tools.
If you’ve duplicated your background layer as suggested, it’s already a pixel layer. However, if you’re working with a smart object or an imported vector graphic, you might need to rasterize it explicitly:
- Select the layer containing the text you wish to remove in the Layers panel.
- Right-click on the layer and choose
Rasterize Layerfrom the context menu. This will convert the layer into a standard pixel layer, allowing tools to modify its pixels directly.
Targeting Text with the Lasso Tool
Once your layer is prepared, the Lasso tool becomes a straightforward option for selecting and deleting unwanted text. The Lasso tool is one of Photoshop’s most basic and intuitive selection tools, making it accessible even for beginners.
Here’s how to use it:
- Select the
Lasso Toolfrom the Photoshop toolbar on the left side of the screen. Its icon looks like a small lasso. - With the Lasso tool active, your cursor will appear as a lasso icon. Click somewhere along the edge of the text you want to remove.
- Continue holding down the mouse button and drag your cursor to draw a freeform outline around the entire text. Try to keep the selection as tight as possible around the text while still ensuring all of it is enclosed.
- Once you’ve completed the outline and released the mouse button, a “marching ants” selection will appear around the text.
- With the text selected, simply press the
Deletekey on your keyboard. Photoshop will remove the selected pixels, leaving a blank space. The underlying content will be visible if there were layers beneath it, or it will be filled with the background color if it was the only layer.
This method works best for text against simple, single-color backgrounds or when the blank space can be easily filled in manually afterward. After deleting, you might need to use other tools (like the Eyedropper and Paint Brush) to manually fill in the empty area with colors sampled from the surrounding background for a seamless blend. This technique is a fundamental step in Photo Manipulation, allowing for creative control over Aesthetic Images. Remember to save your changes (File > Save or Ctrl+S / Cmd+S) to preserve your edited image.
Method 2: Intelligent Eradication with Content-Aware Fill
The Content-Aware Fill feature is a powerful and intelligent tool in Photoshop, particularly effective for removing unwanted objects like text from complex backgrounds. Instead of simply deleting pixels, Content-Aware Fill analyzes the surrounding image content and intelligently generates new pixels to seamlessly fill the selected area, making it appear as if the text was never there. This is a game-changer for Digital Photography Editing, transforming how we approach corrections.
Leveraging Photoshop’s Smart Blending
Content-Aware Fill is a more advanced approach compared to simple deletion, making it ideal for images with varied textures, gradients, or intricate patterns behind the text. It significantly reduces the need for manual touch-ups, producing remarkably natural-looking results in a fraction of the time.
Here’s the process:
- Open and Duplicate: Start by opening your image in Photoshop and creating a duplicate layer, just as outlined in the “Understanding Photoshop Layers” section (
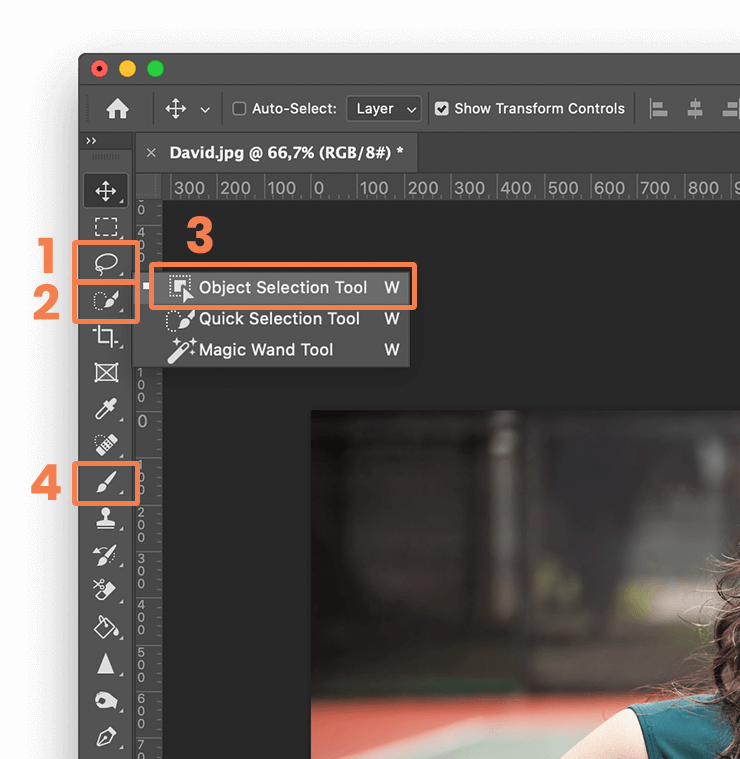
Command+JorCtrl+J). This ensures you’re working non-destructively. - Select the Text: Use a selection tool to precisely isolate the text you want to remove. While the Lasso tool is a good general choice, for text, other tools might be more efficient depending on the complexity:
- Lasso Tool (L): Click near the edge of the text, drag to create a rough outline, and release. Make sure to leave a thin border (1-3 pixels) around the text. This border gives Photoshop more context for blending, leading to better results.
- Magic Wand Tool (W): If the text is a distinct color against a contrasting background, the Magic Wand tool can quickly select similar pixels. Hold
Shiftwhile clicking to add multiple letters to your selection. - Quick Selection Tool (W): For more complex shapes, this tool can intelligently “snap” to edges as you paint over the text.
- Initiate Content-Aware Fill: Once the text is selected with a clear “marching ants” outline:
- Go to
Editin the top menu. - Select
Fillfrom the drop-down menu. (Alternatively, use the shortcutShift+F5). - In the “Fill” dialog box that appears, look for the “Contents” drop-down menu and choose
Content-Aware. - Ensure the “Mode” is set to “Normal” and “Opacity” to “100%”.
- Click
OK.
- Go to
Photoshop will then perform its magic, analyzing the surrounding pixels and attempting to fill the selected area seamlessly. This automatic blending is incredibly powerful for restoring backgrounds and is a prime example of advanced Image Tools enhancing Photo Manipulation.
Refining the Selection for Flawless Results
While Content-Aware Fill is remarkably effective, sometimes it might not produce a perfect result on the first try, especially with highly intricate backgrounds or when the text is very close to other important elements. Modern versions of Photoshop offer a dedicated “Content-Aware Fill” workspace for fine-tuning.
If you have Photoshop CS5 or later (as noted in one of the expert answers on Tophinhanhdep.com, earlier versions may not have this specific feature), you can access the dedicated workspace:
- Instead of
Edit > Fill, selectEdit > Content-Aware Fill(or useShift+Ctrl+K / Shift+Cmd+K). - This opens a new workspace with your image and a green overlay. The green overlay indicates the areas Photoshop is “sampling” from to generate the fill.
- Adjust the Sampling Area:
- Use the
Sampling Brush Tool(on the left sidebar of the Content-Aware Fill workspace) to refine the green area. Click and dragtoaddareas you want Photoshop to sample from.Hold Alt/Optionandclick and dragtoremoveareas from the sampling zone (e.g., if Photoshop is trying to sample from a different object that shouldn’t be part of the fill).
- Use the
- Preview and Output:
- The “Preview” window on the right will update in real-time, showing you how your adjustments affect the final fill. You can enlarge this box for a closer look.
- Once satisfied, choose your “Output Settings” (e.g.,
New Layeris often a good choice for non-destructive editing). - Click
OK.
- Deselect: After the fill is complete and you’re back in the main Photoshop window, press
Ctrl+D(Windows) orCmd+D(Mac) to deselect the area. This allows you to view the image without the “marching ants” selection.
With careful use of Content-Aware Fill and its dedicated workspace, you can achieve incredibly clean and professional results, making your Wallpapers and Backgrounds truly pristine. This technique is a cornerstone of effective Image Editing Styles and allows for limitless Creative Ideas in Visual Design.
Method 3: Meticulous Reconstruction with the Clone Stamp Tool
For instances where text needs to be removed from highly detailed or patterned areas, or when Content-Aware Fill struggles to produce a perfectly seamless blend, the Clone Stamp tool comes to the rescue. This method involves manually “painting” over the unwanted text with pixels sampled from a nearby, clean area of your image, offering unparalleled control and precision in Photo Manipulation.
Setting Up Your Clone Stamp for Success
The Clone Stamp tool is a workhorse for retouching and detailed object removal. Its effectiveness lies in its ability to replicate existing pixels from one area of an image to another. Successful text removal with the Clone Stamp requires careful preparation and technique.
- Open and Duplicate: As always, start by opening your image and creating a duplicate layer (
Command+JorCtrl+J) to ensure non-destructive editing. - Select the Clone Stamp Tool:
- Find the
Clone Stamp Toolin the Photoshop toolbar (it looks like a rubber stamp). Alternatively, you can pressSto activate it. - Brush Settings: Before you begin, adjust the brush settings in the Options bar at the top of the screen:
- Brush Type: Choose a
soft-tipped brush. This creates softer edges that blend more naturally with the surrounding pixels, preventing harsh lines. - Size: Adjust the brush size to be slightly larger than the text you are covering. You’ll often need to change this on the fly using the
[ ]bracket keys. - Hardness: Set to a low percentage (e.g., 0-20%) for a soft edge.
- Opacity: Start with
95-100% opacityfor most direct text removal. You can lower it (e.g., 10-30%) for more gradual blending or to build up the effect. - Flow: Set a
flow rate between 10 and 30 percentfor finer control, allowing you to build up the cloned pixels gradually. For full coverage, you can set it higher. - Mode: Keep this at
Normal. - Aligned Option: In the Options bar, ensure the “Aligned” checkbox is selected. When “Aligned” is checked, Photoshop samples pixels continuously from the source point relative to your cursor. If you stop painting and then restart, the sampling continues from where it left off, maintaining alignment. If “Aligned” is deselected, every time you stop and restart painting, the sampling resets to the original source point. For most text removal tasks, “Aligned” is generally preferred as it helps maintain continuity in patterns.
- Brush Type: Choose a
- Find the
Strategic Sampling and Painting for Seamless Blends
The key to mastering the Clone Stamp is selecting an appropriate “source” area and applying the cloned pixels with precision.
- Identify Your Source: Place your cursor over a clean area of the image that closely matches the background directly adjacent to the text you want to remove. This spot is your “source” – the area from which Photoshop will sample pixels.
Hold down the Alt key(Windows) orOption key(Mac). Your cursor will change to a target symbol.Left-clickon your chosen source area. This sets the sampling point.
- Paint Over the Text:
- Release the Alt/Option key.
- Move your mouse cursor over the text you want to cover.
Left-click and dragto paint over the text. As you paint, Photoshop will apply the pixels from your sampled source area. You’ll see a small crosshair icon indicating your source point, which moves along with your painting cursor if “Aligned” is selected.
- Refine and Repeat:
- Paint in Small Sections: Avoid dragging the mouse over large sections of text in one long stroke. Instead, work in small, controlled strokes. This ensures better blending and allows you to adapt to subtle changes in the background texture and lighting.
- Adjust Source Regularly: Continuously re-sample new source points by holding
Alt/Optionandleft-clickingnear the edges of the text as you move along. This is crucial to match changes in lighting, texture, and color in the background. If your source is too far away, the cloned area might not blend correctly, causing distortion or noticeable patches. If you sample too close to the text you’re trying to remove, you might inadvertently copy parts of the text itself. - Consider Lighting: Pay close attention to the lighting and shadows in your background image. Ensure that the areas you clone match the direction and intensity of the existing light to maintain realism.
The Clone Stamp tool, while requiring a more hands-on approach, provides superior control for achieving a perfectly seamless result, especially for complex backgrounds in Beautiful Photography or intricate Digital Art. This meticulous technique is a hallmark of high-quality Image Editing Styles and essential for creating flawless High Resolution images.
Beyond the Basics: Advanced Tips and Modern Alternatives for Text Removal
While the Rasterize, Content-Aware Fill, and Clone Stamp methods are core to text removal in Photoshop, the world of image editing is constantly evolving. Modern Photoshop versions introduce advanced AI-powered tools, and there are external alternatives perfect for beginners or quick fixes, all of which complement the diverse offerings at Tophinhanhdep.com.
The Power of AI: Generative Fill and Future-Proof Editing
Adobe Photoshop continues to integrate cutting-edge artificial intelligence, significantly simplifying complex Photo Manipulation tasks. One of the most revolutionary additions is the Generative Fill tool, powered by Adobe Firefly AI. This tool takes content-aware capabilities to an entirely new level, offering a “future-proof” approach to image editing.
How Generative Fill excels:
- Intelligent Content Creation: Instead of just sampling existing pixels, Generative Fill can intelligently create new, plausible content to fill selected areas based on textual prompts.
- Simplified Text Removal: To remove text using Generative Fill:
- Select the text area using any selection tool (Lasso, Rectangular Marquee, Quick Selection, etc.).
- Click the
Generative Fillbutton that appears in the contextual task bar (or go toEdit > Generative Fill). - In the prompt box, simply type something like “remove text,” “erase watermark,” or “clean background.” You can even leave the prompt blank if Photoshop’s default interpretation is sufficient.
- Click
Generate. Photoshop will produce several variations, offering a remarkably seamless removal that often requires no further touch-up.
- Non-Destructive: Generative Fill creates a new “Generative Layer,” keeping your original image layer intact, upholding the principles of non-destructive Digital Photography editing.
This AI-driven approach is invaluable for creating stunning Aesthetic Images, enabling Creative Ideas without the tedious manual work of older methods. For photographers aiming for High Resolution and perfection in their Stock Photos, Generative Fill is a transformative tool.
Tophinhanhdep.com’s Alternative Solutions for Beginners
Not everyone has access to the latest Photoshop versions, or perhaps you’re a beginner looking for simpler, faster solutions for common image tasks like text removal. Tophinhanhdep.com, understanding the diverse needs of its community, aims to highlight various Image Tools that cater to different skill levels and budgets.
While this article focuses on Photoshop, many online and desktop alternatives offer streamlined text removal capabilities:
- Dedicated Watermark Removers: Several specialized software applications and online tools are designed specifically for watermark and text removal. These often employ AI or simplified content-aware algorithms behind a user-friendly interface. For example, a beginner-friendly tool like iMyFone MarkGo (or a similar tool offered by Tophinhanhdep.com, if applicable) could provide an excellent alternative. These tools simplify the process: you import an image, select the text area with a simple brush or selection box, and click “Remove.”
- Simpler Photo Editors: Many consumer-grade photo editors (often available through Tophinhanhdep.com’s “Image Tools” section) include basic healing or cloning brushes that function similarly to Photoshop’s tools but with a less steep learning curve.
- Mobile Apps: For quick edits on the go, a plethora of mobile photo editing apps offer “object removal” features that can effectively tackle simple text overlays.
These alternatives are perfect for users primarily interested in cleaning up Wallpapers, preparing casual Backgrounds, or making quick fixes to Sad/Emotional or Beautiful Photography without delving into the complexities of professional software. They embody the essence of making Visual Design accessible to everyone, empowering users to enhance their Image Collections with ease.
Conclusion
Removing unwanted text from an image in Photoshop is a fundamental skill that significantly enhances your ability to manipulate and perfect visual content. Whether you’re working with intricate Digital Art, preparing High Resolution Stock Photos, or simply curating your personal Image Inspiration & Collections, the techniques outlined in this guide provide you with the power to achieve pristine results.
From the foundational understanding of layers and the direct control offered by the Rasterize function and Lasso tool, to the intelligent automation of Content-Aware Fill, and the meticulous precision of the Clone Stamp, Photoshop equips you with a versatile arsenal. Furthermore, the advent of AI-powered tools like Generative Fill pushes the boundaries of what’s possible, making complex Photo Manipulation more accessible and efficient than ever before. For those seeking simpler paths, Tophinhanhdep.com also points towards user-friendly alternatives that cater to beginners, ensuring everyone can create Beautiful Photography and Aesthetic Images.
By practicing these methods, you’ll not only erase unwanted text but also develop a deeper understanding of image composition and restoration, empowering your Creative Ideas and refining your Editing Styles. At Tophinhanhdep.com, we believe that every image has the potential to be a masterpiece. Mastering text removal is just one step on that journey, allowing your visuals to speak for themselves, unhindered by unnecessary distractions. Explore, create, and share your perfectly purified images with the world.