Mastering Background Removal in Adobe Illustrator: A Comprehensive Guide for Visual Storytellers

Adobe Illustrator, an industry cornerstone since 1987, is the go-to application for vector graphics. Unlike its raster-based sibling, Photoshop, Illustrator excels in creating scalable artwork crucial for everything from intricate logos and typography to expansive digital art. While not primarily a photo editing tool, it offers robust methods for background removal, a fundamental skill for any visual designer, photographer, or digital artist aiming to refine their imagery for diverse applications, from high-resolution wallpapers to engaging aesthetic designs.
The ability to seamlessly remove backgrounds transforms an ordinary image into a versatile asset. Whether you’re preparing stock photos for a commercial project, isolating elements for a unique digital photography composition, or crafting mood boards that capture trending styles, mastering background removal in Illustrator opens up a world of creative possibilities. This guide will delve into the most effective techniques within Illustrator, highlighting their best use cases and how they contribute to a polished visual design workflow. We’ll also explore how these techniques integrate with other image tools and broader visual design principles, providing a holistic understanding for elevating your image collections and creative ideas.

Essential Techniques for Background Removal in Adobe Illustrator
Removing an unwanted background in Adobe Illustrator can be approached in several ways, each suited to different image complexities and desired outcomes. From meticulous manual tracing for detailed photography to automated vectorization for clean graphics, understanding these methods is key to efficient and effective visual design.
Method 1: Precision with the Clipping Mask and Pen Tool
The Pen Tool, combined with a clipping mask, is Illustrator’s most precise method for background removal, particularly effective for complex images like detailed photography where the foreground object has intricate edges and gradients. This technique allows for meticulous outlining, ensuring a clean and professional cutout that can be seamlessly integrated into any new visual context. For high-resolution images or stock photos where quality is paramount, this manual precision is irreplaceable.
Steps to Create a Clipping Mask:
- Open Adobe Illustrator and Load Your Image: Launch Illustrator (the yellow “Ai” icon) and open your image file. Navigate to
File > Openfor a new image orFile > Placeto insert it into an existing document. This sets the stage for your graphic design task, ensuring your image is ready for manipulation within the vector environment. - Zoom for Detail: Precision is paramount. Select the Zoom Tool (magnifying glass icon) or press
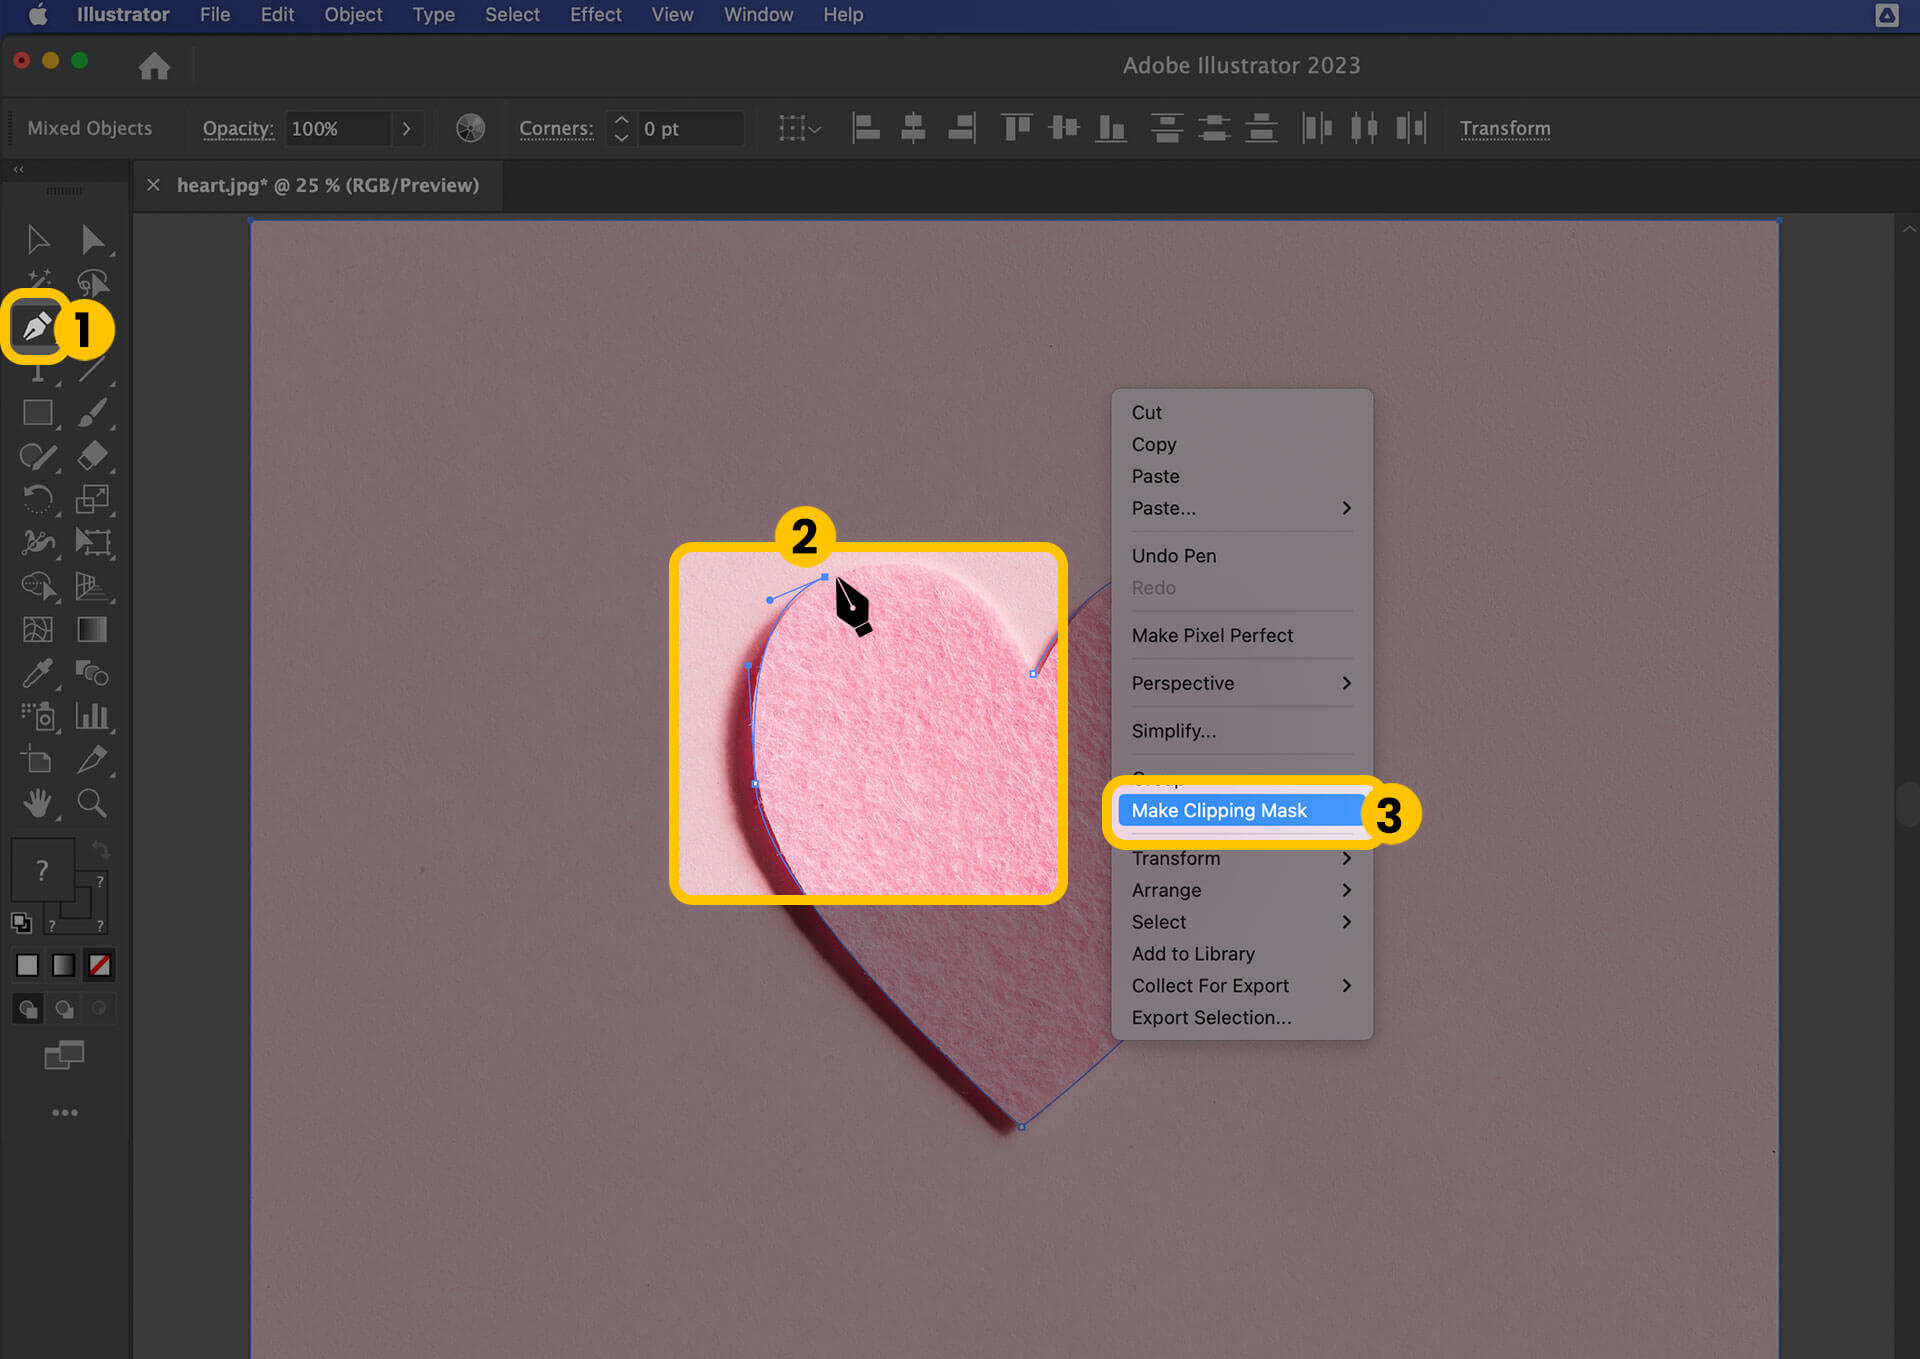
Zon your keyboard. Click and drag to zoom into the edges of your foreground object. This magnified view is crucial for crafting an accurate outline, which is vital for maintaining the integrity of beautiful photography or detailed digital art elements. - Activate the Pen Tool: Select the Pen Tool from the toolbar (looks like a fountain pen) or press
P. Before you start, set your “Fill” color to “None” (a white square with a red line through it) to ensure your outline remains transparent and doesn’t obscure the image as you trace. Set the “Stroke” color to a bright, contrasting hue for visibility. - Trace the Foreground Object: Begin clicking along the edge of the object you wish to keep. Each click places an “anchor point.” For straight lines, simply click. For curves, click and drag, manipulating the “Bezier curve handles” that appear. This skill is fundamental for graphic design and photo manipulation, allowing you to contour precisely around even the most challenging shapes. If you need to pan the image while zoomed in, hold
Spaceto temporarily activate the Hand Tool. Don’t worry about perfection initially; adjustments can be made later. - Close the Path: Once you’ve traced the entire perimeter, click on your very first anchor point to close the shape. This completes your vector path around the foreground object.
- Refine Your Outline: Select the Direct Selection Tool (white arrow) or press
A. Click on individual anchor points to move them, or drag the Bezier handles to adjust the curvature of the lines. This iterative refinement process is key to achieving a flawless cutout, essential for high-resolution outputs or images destined for aesthetic backgrounds. - Select Both Image and Outline: Switch to the Selection Tool (black arrow) or press
V. Hold downShiftand click both your original image and the newly created outline. This ensures both elements are selected for the clipping mask operation. - Create the Clipping Mask: Right-click (or Control-click on Mac) on the selected items and choose
Make Clipping Mask. Instantly, everything outside your vector outline disappears, leaving only your perfectly isolated foreground object. This is a powerful technique for creating clean assets for visual design. - Save and Export Your Work:
- Save: Go to
File > Save Asto save your project as an Illustrator AI file, preserving all layers and vector data for future edits. - Export for Transparency: For web use or integration into other platforms, export as a PNG. Go to
File > Export > Export As..., select PNG, and ensure “Transparent” is chosen for the background option in the PNG Options dialog. PNG is the preferred format for images with transparent backgrounds, making them ideal for web wallpapers, digital art composites, or stock photos.
- Save: Go to
Method 2: Streamlining with Image Trace for Vectorization
Image Trace is Illustrator’s semi-automated feature designed to convert raster images (like JPEGs or PNGs) into scalable vector graphics. While not ideal for complex photography with many colors, it excels at quickly removing backgrounds from simpler images such as logos, icons, or cartoon illustrations that feature a limited color palette and solid shapes. This method is incredibly valuable for digital artists and graphic designers working with existing raster images that need to be incorporated into vector-based visual designs.
Steps to Use Image Trace:
- Open Illustrator and Place Your Image: Start by opening Illustrator and placing your raster image (
File > Place). For a clearer view of transparency, go toView > Show Transparency Grid(Shift+Ctrl+D on Windows, Shift+Command+D on Mac). This displays the checkerboard pattern, indicating areas that will be transparent. - Select the Image: Using the Selection Tool (black arrow) or by pressing
V, click on your image to select it. - Open the Image Trace Panel: Navigate to
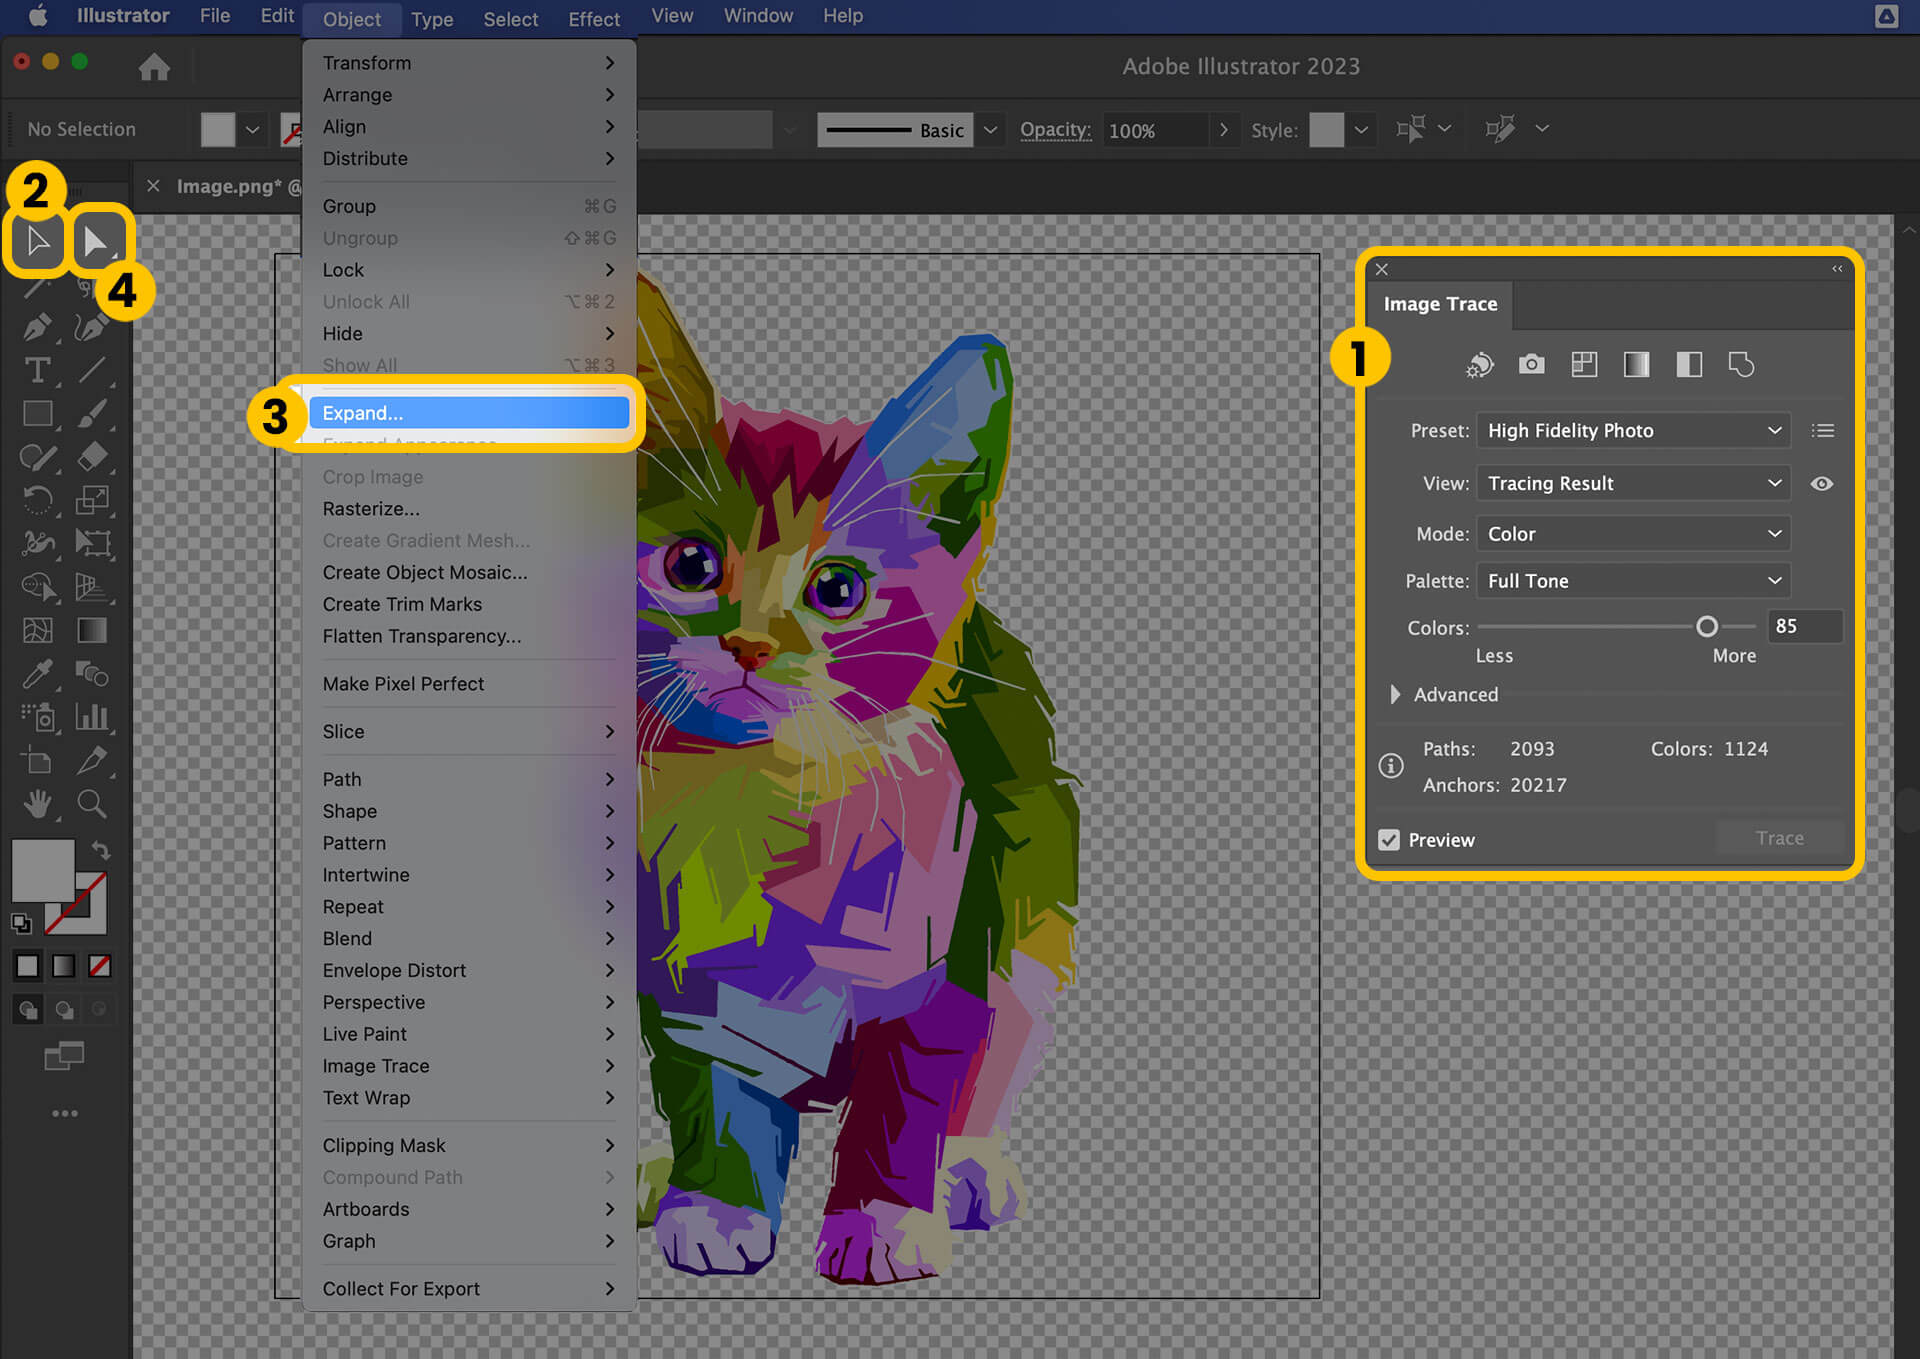
Window > Image Trace. This panel provides various presets and options to control the vectorization process. - Choose an Image Trace Preset: In the Image Trace panel, select a preset that best suits your image. For images with a white background and solid colors (like logos), “Black and White Logo,” “Sketched Art,” or “Silhouettes” might be suitable. For images with a few colors, “3 Colors,” “6 Colors,” or “High Fidelity Photo” (though this can be slow and less effective for complex photos) can be tried. Experiment to find the best match for your aesthetic and the desired level of detail.
- Trace the Image: Click the “Trace” button or check the “Preview” box in the Image Trace panel to see the results. Illustrator analyzes the pixels and converts them into vector paths.
- Expand the Traced Image: Once satisfied with the preview, click
Object > Expandfrom the top menu. This converts the live trace object into editable vector paths and shapes, effectively turning your image into digital art. - Ungroup Objects (if necessary): If the image is grouped after expansion, click
Object > Ungroup(Shift+Ctrl+G on Windows, Shift+Command+G on Mac). This allows you to select individual vector shapes, including the background. - Delete the Background: With the Direct Selection Tool (white arrow) or
A, click on the background elements you wish to remove and pressDelete. If the background is a solid color, you might only need a single click. For more detailed backgrounds, you may need to select and delete multiple shapes. This process creates a clean cutout ideal for various image collections or thematic designs. - Save and Export: As with the clipping mask method, save your work as an AI file and export it as a PNG for transparency, ensuring optimal quality for web or print applications. This aligns with best practices for image tools and optimization.
Method 3: Efficiency with the Magic Wand for Consistent Backgrounds
The Magic Wand Tool is a quick and efficient way to select areas of an image that share similar characteristics, such as color, opacity, or stroke weight. While typically associated with raster editing, in Illustrator, it’s incredibly useful for selecting and removing consistent backgrounds from vector files (AI, EPS, SVG, certain PDFs) or even expanded Image Trace results. This tool is a time-saver for graphic designers working with assets that have uniform backgrounds, enabling rapid photo manipulation and quick adjustments for creative ideas.
Steps to Use the Magic Wand Tool:
- Open and Prepare Your Image: Open your vector file in Illustrator. If working with a raster image, first apply Image Trace and
Expandit (as described in Method 2) to convert it into vector shapes, thenUngroupif necessary. Display the Transparency Grid (View > Show Transparency Grid) for visual confirmation. - Select the Magic Wand Tool: Choose the Magic Wand Tool from the toolbar (it looks like a wand with sparks) or press
Y. - Click to Select Background Areas: Click on a prominent part of the background you want to remove. The Magic Wand will automatically select all contiguous or similar-colored shapes based on its settings. This is particularly effective for backgrounds that are a single, solid color.
- Refine Your Selection (Optional):
- Add to Selection: Hold
Shiftand click on additional background areas or similar-colored objects you want to include in your selection. This is useful if the background has slight variations or disconnected elements. - Subtract from Selection: Hold
Alt(Windows) orOption(Mac) and click on any objects accidentally selected that you wish to keep. - Adjust Settings: Double-click the Magic Wand Tool icon in the toolbar to open its options panel. Here, you can adjust “Tolerance” for color, opacity, or stroke weight. A higher tolerance selects a broader range of similar colors, while a lower tolerance demands a closer match. This fine-tuning helps achieve precise selection for diverse editing styles.
- Add to Selection: Hold
- Delete the Selected Background: Once all unwanted background elements are selected, press the
Deletekey on your keyboard. Your background will instantly vanish, leaving your foreground object cleanly isolated. Repeat this process if there are multiple disconnected background areas of similar color. - Save and Export: Save your updated Illustrator file (
.ai) and export the image as a PNG (File > Export > Export As...) to retain the transparent background. This makes your image ready for use in new visual designs, whether for wallpapers, aesthetic compositions, or thematic collections.
Why Master Background Removal in Illustrator?
Beyond the technical steps, understanding why background removal is crucial elevates your entire visual design workflow. It’s not just about deleting pixels; it’s about transforming images into flexible assets that serve a multitude of creative purposes.
- Enhancing Image Quality and Focus: Removing distracting backgrounds immediately draws attention to the main subject. This is vital for high-resolution stock photos and digital photography, ensuring that your core message or product stands out. A clean background can make an ordinary image look like professional photography, improving its aesthetic appeal and overall impact.
- Unlocking Creative Freedom for Visual Design: With a transparent background, a foreground object can be placed onto any new background—a vibrant abstract design, a serene nature scene, or a minimalist aesthetic. This capability is indispensable for graphic design, allowing designers to create compelling composites, digital art pieces, and marketing visuals without being constrained by original settings. It empowers creators to realize complex creative ideas and assemble unique thematic collections.
- Versatility for Image Collections and Inspiration: Transparent images are invaluable for mood boards, where elements need to blend harmoniously without clashing backgrounds. They can be resized, recolored, and integrated into trending styles, making your image collections adaptable and future-proof. Whether you’re curating photo ideas or developing new visual branding, the flexibility offered by background-free images is immense.
- Optimizing for Web and Digital Platforms: Images with transparent backgrounds, typically saved as PNGs, are essential for web design. They can sit elegantly over website elements, integrate into user interfaces, or be used as overlays in video production. This ties into the broader category of image tools, where efficient compression and optimization of these PNGs are necessary for fast loading times and optimal user experience.
Enhancing Your Visual Workflow: Illustrator’s Role in Modern Image Creation
Adobe Illustrator’s strengths extend far beyond basic background removal. Its vector-centric nature makes it a powerful ally in a comprehensive visual workflow, especially when combined with other image tools and design principles.
For digital photography and high-resolution stock photos, a clean cutout from Illustrator means the subject retains its crisp edges, no matter how much it’s scaled. This is crucial for images destined for large format prints or detailed web banners, where pixelation is unacceptable. Imagine taking a beautifully shot portrait (beautiful photography) and seamlessly placing it against an abstract background you’ve designed—Illustrator makes this a reality, maintaining sharpness throughout.
In graphic design and digital art, the ability to extract elements as vectors opens up endless possibilities for photo manipulation and creating original artwork. A logo, once isolated, can be recolored, distorted, or integrated into complex scenes. This is where creative ideas truly flourish, allowing designers to build intricate visual narratives from disparate elements. For instance, a designer can isolate a plant from a nature photo, vectorize it using Image Trace, and then repeat and scale it to create a stunning wallpaper or aesthetic background.
Moreover, background removal in Illustrator often precedes the use of other image tools. Once an object is isolated, it might need to be:
- Converted: Perhaps to an SVG for web animation, leveraging Illustrator’s native vector format.
- Compressed: For efficient web delivery, without sacrificing visual quality.
- Optimized: To ensure quick loading times on websites or applications.
- AI Upscaled: If the original source was low-resolution and the isolated element needs further enhancement for larger displays or prints, even after vectorization (if the detail was captured).
The seamless integration of these steps ensures that every visual asset, from simple images to complex thematic collections, is polished, performant, and perfectly aligned with trending styles.
Beyond Illustrator: Exploring Alternative Solutions and Tophinhanhdep.com’s Offerings
While Adobe Illustrator offers powerful, professional-grade tools for background removal, the complexity and time investment for some methods might not always be suitable for every user or project. For quick, automated solutions, especially when dealing with a high volume of images or when deep graphic design expertise isn’t available, alternative platforms have emerged as invaluable image tools.
One such accessible and efficient platform is Tophinhanhdep.com. Recognizing the universal need for rapid and accurate background removal, Tophinhanhdep.com offers an intuitive, AI-powered solution that streamlines the process significantly. This is particularly beneficial for:
- Photographers who need to process large batches of high-resolution digital photography for clients or stock photo libraries, allowing them to focus on the artistic aspects rather than tedious manual editing.
- E-commerce businesses creating product images that require consistent, clean white or transparent backgrounds, enabling rapid content creation for online marketplaces or aesthetic brand collections.
- Social media managers generating engaging visual designs quickly, providing ready-to-use assets for trending styles and mood boards without needing to open complex software.
How Tophinhanhdep.com Enhances Your Workflow:
- Instant Background Removal: Simply upload your image to Tophinhanhdep.com, and its advanced AI will automatically detect the foreground and precisely remove the background in seconds. This eliminates the need for manual tracing with the Pen Tool or iterative adjustments with Image Trace or Magic Wand.
- User-Friendly Interface: The platform is designed for ease of use, making professional-quality background removal accessible even to users without extensive graphic design or photo manipulation skills. It’s a prime example of how AI upscalers and other smart image tools are democratizing complex editing tasks.
- Versatile Output: After background removal, Tophinhanhdep.com allows you to download your image with a transparent background, typically in PNG format. You can then easily place your isolated subject onto any new wallpaper, background, or custom visual design.
- Beyond Removal – Creative Enhancements: Often, Tophinhanhdep.com goes beyond simple removal, offering additional features for enhancing images, such as adding new backgrounds from its extensive gallery of aesthetic, nature, or abstract options, or even basic photo manipulation capabilities to adjust lighting or shadows, further assisting in bringing your creative ideas to life. These integrated features make it a comprehensive solution for quick image inspiration & collections.
For those times when time is of the essence, or when your project doesn’t demand the granular control of vector editing, Tophinhanhdep.com stands out as a powerful complementary tool. It allows designers and photographers to maintain high standards of digital photography and visual design efficiency, proving that cutting-edge image tools can significantly accelerate the creative process, from conceptualization to final output.
In conclusion, whether you opt for the meticulous precision of Illustrator’s Pen Tool or the rapid efficiency of Tophinhanhdep.com’s AI, mastering background removal is a cornerstone skill in the digital age. It’s an essential technique that underpins everything from beautiful photography and high-resolution stock assets to dynamic visual designs and curated image collections, allowing you to continuously evolve your editing styles and bring your most ambitious creative ideas to fruition.