Mastering White Background Removal in Photoshop and Beyond with Tophinhanhdep.com

In the dynamic world of digital imagery, the ability to effortlessly separate a subject from its background is not merely a technical skill but a foundational element of creative expression and professional visual design. Whether you’re a seasoned graphic designer, a passionate photographer, or a burgeoning digital artist, the pristine white background, while often a practical starting point for photography, frequently needs to be removed to unlock an image’s full potential. At Tophinhanhdep.com, we understand this crucial need and offer a comprehensive suite of tools and insights to empower you to master this transformative technique.

Have you ever gazed at a captivating photograph and envisioned it against a different backdrop? Perhaps you needed your product to pop on a website, a personal portrait to blend seamlessly into an abstract landscape, or a stock photo to serve as a key element in a larger creative idea. The white background, designed to provide stark contrast and clarity during initial shoots, often becomes a creative constraint. This in-depth guide, brought to you by Tophinhanhdep.com, will navigate you through the most effective methods for removing white backgrounds, particularly focusing on Adobe Photoshop, while also introducing you to our cutting-edge online image tools. By the end, you’ll be equipped with the knowledge and techniques to:
- Remove white backgrounds with precision using Photoshop’s robust functionalities.
- Replace the white background with stunning new visuals, from solid colors and aesthetic backgrounds to complex thematic collections.
- Unlock the creative potential of your photographs, enabling eye-catching image compositions and sophisticated photo manipulation.
- Streamline your workflow with Tophinhanhdep.com’s advanced AI background removal tools, optimizers, and converters, ensuring high-resolution results every time.
So, let’s delve into the art of background removal, embrace boundless creativity, and elevate your photo editing skills to an unparalleled level. We’ll also provide invaluable tips on when and how to best deploy these tools for truly perfect results, integrating them seamlessly into your broader visual design projects and image inspiration quests.
The Transformative Power of Background Removal for Visual Design
The demand for pristine, customizable images is at an all-time high. From high-resolution product photography for e-commerce platforms to compelling visuals for marketing campaigns, digital art, and even personal aesthetic backgrounds for social media, isolating a subject from its original setting is a fundamental step. Removing a white background is often the first gateway to advanced visual design, opening doors to limitless creative possibilities.
At Tophinhanhdep.com, we champion the philosophy that every image holds untapped potential. A perfectly cut-out subject can be transposed onto a vibrant nature scene for a new wallpaper, integrated into an abstract art piece, or placed within a professional context for a stock photo library. This process is integral to creating diverse image collections and mood boards, allowing designers to experiment with trending styles and thematic concepts without the limitations of the original shot.
Whether you’re dealing with wallpapers, stunning aesthetic backgrounds, or high-resolution images for professional use, the ability to cleanly remove an unwanted backdrop ensures your subject remains the focal point. This control is crucial for graphic design, digital photography editing styles, and creative ideas that demand precision and flexibility. Tophinhanhdep.com provides not just the “how-to” but also the inspiration and complementary image tools—from compressors to AI upscalers—to take your vision from concept to breathtaking reality.
Comprehensive White Background Removal Techniques in Adobe Photoshop
Adobe Photoshop remains the industry standard for professional image editing, offering an array of tools specifically designed for background removal. Its versatility allows for various approaches, from pixel-perfect manual selections to intelligent automated processes. The choice of tool often depends on the complexity of the image’s edges and the contrast between the subject and its white background. Here, we’ll explore the most effective Photoshop techniques, providing you with the power to transform your digital photography.
The general workflow in Photoshop for background removal often follows these principles:
- Selection and Inversion: Select the main object (foreground) using various Photoshop tools, then inverse the selection to target the background for removal.
- Direct Erasing: Tools that directly erase pixels, ideal for simpler, high-contrast backgrounds.
- Non-Destructive Masking: Creating a mask around the subject, which hides the background without permanently deleting pixels, preserving editing flexibility.
Let’s dive into specific methodologies you can apply, refining your photo manipulation skills and contributing to stunning image collections.
Pixel-Perfect Precision with the Pen Tool
The Pen Tool is arguably Photoshop’s most powerful and precise selection tool, particularly when dealing with complex objects or those requiring sharp, clean edges. It forms the backbone of the “clipping path technique,” a professional standard for achieving pixel-perfect cutouts, crucial for high-resolution product images and detailed photography.
How To Use The Pen Tool In Photoshop:
- Open Your Image: Begin by opening your image in Photoshop. For optimal precision, zoom in on your photo (e.g., 300%) to clearly see the object’s outlines. This meticulous attention to detail is what sets professional digital photography apart.
- Select the Pen Tool: From the toolbar, select the Pen Tool (P). In the Options bar, ensure “Path” is selected for the mode.
- Create a Path: Start clicking around the object’s outline to lay down anchor points. For curved sections, click and drag to create Bezier handles, allowing you to manipulate the curve’s shape. Continue outlining until you’ve encircled the entire subject, connecting back to your starting point. This creates a “path layer” in the Paths panel.
- Convert Path to Selection: Once the path is complete, go to the Paths panel, right-click on your path, and choose “Make Selection.” Alternatively, hold
Ctrl(Windows) orCmd(Mac) and click on the path thumbnail in the Paths panel. A dialog box will appear; set a “Feather Radius” (e.g., 0.3-0.5 pixels) to soften the edges slightly, preventing a harsh, cut-out look. - Remove Background with a Layer Mask: With the selection active, ensure your image layer is selected in the Layers panel. Then, click the “Add Layer Mask” icon (a rectangle with a circle inside) at the bottom of the Layers panel. This non-destructive method hides the background, leaving your subject on a transparent canvas.
- Replace the Background: Create a new layer beneath your masked subject layer. You can fill this layer with a solid color using the Paint Bucket Tool, or drag and drop a new background image (e.g., from Tophinhanhdep.com’s collections of nature or abstract backgrounds) onto this layer.
The Pen Tool demands patience and practice, but the flawless, crisp edges it produces are indispensable for professional-grade photo manipulation, ensuring your images, whether for wallpapers or aesthetic collections, maintain the highest quality.
Handling Complex Edges with the Background Eraser Tool
For images with intricate, soft edges like hair, fur, smoke, or translucent materials such as glass, the Background Eraser Tool offers a more specialized approach. This tool is a cornerstone of the “image masking technique,” allowing for non-destructive removal of backgrounds while preserving delicate details that would be lost with simpler selection methods.
Steps for White Background Removal Using the Background Eraser Tool:
- Prepare Your Workspace: Open your image in Photoshop. In the Layers panel, duplicate your background layer (
Ctrl+JorCmd+J) to protect the original. Hide the original layer by clicking its eye icon. This safety measure is crucial for digital photography editing, allowing you to quickly revert if mistakes occur. - Create a High-Contrast Background: To easily see what you’re erasing, create a new layer below your duplicate image layer. Fill this new layer with a bright, contrasting color (e.g., vibrant red or green) using the Paint Bucket Tool. This temporary background will highlight any missed pixels.
- Select the Background Eraser Tool: From the toolbar, locate and select the Background Eraser Tool (often nested under the Eraser Tool). Its cursor appears as a circle with crosshairs.
- Configure Tool Settings: In the Options bar at the top, adjust the following:
- Size: Adjust brush size as needed (e.g., 30-300 pt) to fit the area you’re erasing.
- Limits: Set to “Find Edges” to prevent the eraser from bleeding into your subject.
- Sampling: This is critical. For a mostly white background, set it to “Once” or “Background Swatch.” If using “Background Swatch,” pick the specific white color from your background by
Alt-clicking (Windows) orOption-clicking (Mac) on the white area. - Tolerance: This setting determines how similar a color must be to the sampled color to be erased. Start with a moderate tolerance (e.g., 20-30%). For areas with less contrast (e.g., light-colored clothing against white), decrease tolerance (e.g., 5-10%) to prevent erasing parts of your subject. For high-contrast areas, you can increase it.
- Protect Foreground Color: If parts of your subject have colors similar to the background, you can set the foreground color in your toolbar to your subject’s main color and check “Protect Foreground Color” to prevent those hues from being erased.
- Erase the Background: Carefully paint over the white background, ensuring the crosshairs of the brush remain over the color you want to erase. The tool intelligently erases pixels similar to the sampled color while attempting to preserve pixels under the crosshairs that match the foreground color. Adjust brush size and tolerance on the fly as you move around complex edges like hair.
- Refine and Replace: Once the background is mostly removed, hide your high-contrast layer to reveal the transparent checkerboard. Use a regular Eraser Tool or a refined brush on the layer mask (if you converted your selection to a mask) to clean up any remaining stray pixels. Finally, replace the background as described in the Pen Tool section, perhaps selecting one of Tophinhanhdep.com’s aesthetic backgrounds to enhance your beautiful photography.
Swift Selections with the Magic Wand and Quick Selection Tools
For backgrounds that are relatively uniform and have good contrast with the subject, Photoshop offers faster, more intuitive selection tools: the Magic Wand and Quick Selection tools. While less precise than the Pen Tool for highly intricate edges, they are excellent for quick edits and for handling large areas efficiently, making them ideal for many stock photos and quick digital art compositions.
White Background Removal Using Magic Wand Tool
The Magic Wand Tool is perfect for selecting large areas of similar color with a single click.
- Unlock Layer: Open your image and unlock the background layer in the Layers panel (click the lock icon). Consider duplicating the layer as a safety measure.
- Select Magic Wand Tool: Choose the Magic Wand Tool (W) from the toolbar.
- Configure Settings: In the Options bar:
- Tolerance: Adjust tolerance (e.g., 30-50 for white backgrounds). Higher tolerance selects a broader range of similar colors.
- Anti-alias: Check this for smoother edges.
- Contiguous: Check this to select only adjacent pixels of similar color, or uncheck to select all similar pixels in the image.
- Select the Background: Click on the white background. The Magic Wand will select contiguous pixels of similar color. For areas it misses, hold
Shiftand click those areas to add them to the selection. - Inverse and Delete/Mask: Once the entire background is selected, press
Deleteto remove it, making it transparent. Alternatively, for a non-destructive approach, invert the selection (Ctrl+Shift+IorCmd+Shift+I), then click the “Add Layer Mask” icon. - Clean Up: Use an Eraser Tool or refine the layer mask with a brush to tidy up any imperfect edges.
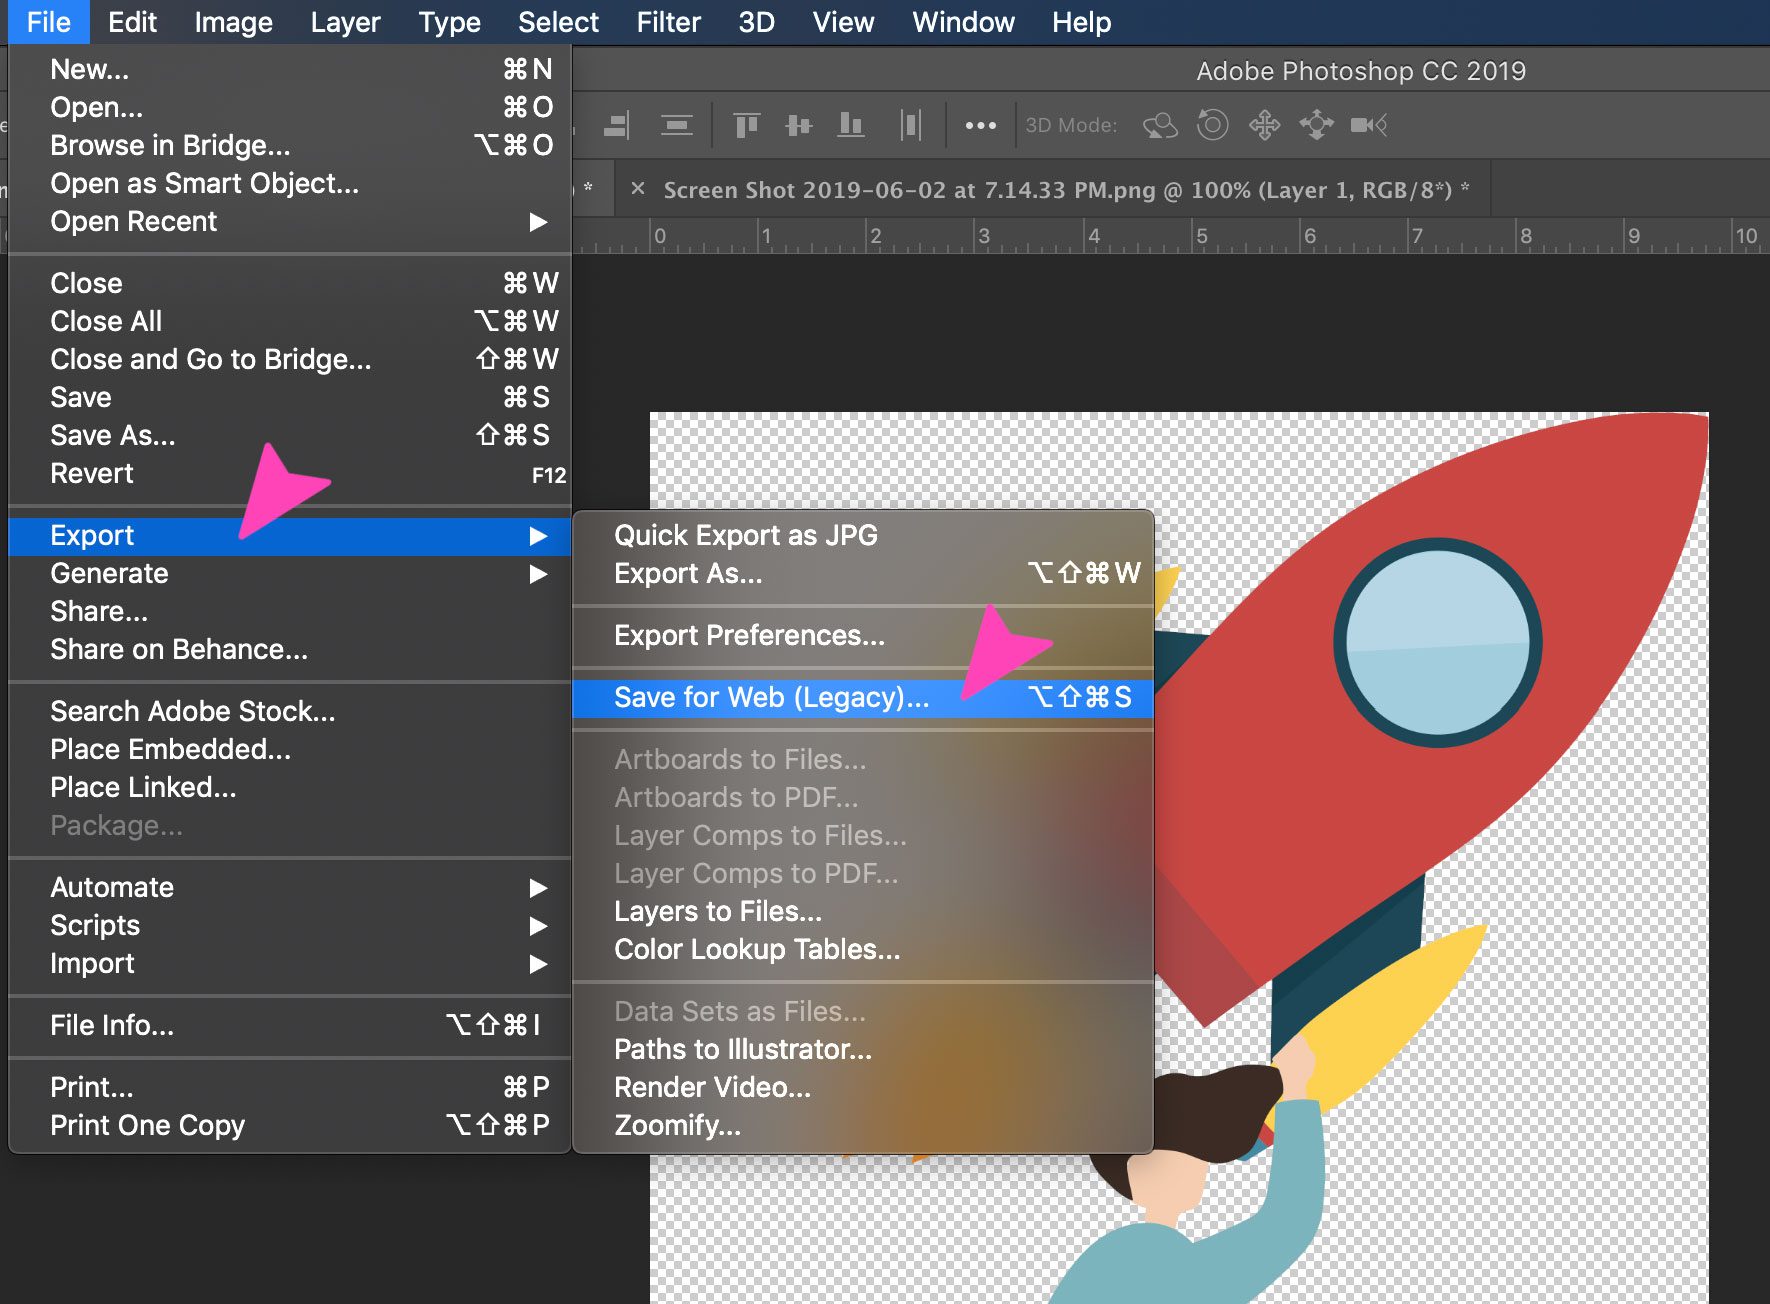
- Save as PNG: Remember to save your image as a PNG file to preserve transparency.
Quick Selection Tool to Remove Background From Image
The Quick Selection Tool acts like a smart brush, intelligently expanding selections to include similar tones and textures as you paint over an area.
- Open Image & Prepare Layer: Open your image and duplicate the background layer.
- Select Quick Selection Tool: Choose the Quick Selection Tool (W) from the toolbar.
- Configure Settings: In the Options bar:
- Brush Size: Adjust the brush size (using
[and]) to suit the area. - New Selection: Ensure “New Selection” mode is active.
- Brush Size: Adjust the brush size (using
- Select the Subject: Click and drag the cursor over the object you want to select. The tool will “snap” to edges it detects.
- Refine Selection:
- To add to the selection: Hold
Shiftand drag over areas you missed. - To subtract from the selection: Hold
Alt(Windows) orOption(Mac) and drag over unwanted selected areas.
- To add to the selection: Hold
- Refine Edge/Select and Mask: For more precise edge control (especially useful for hair or complex borders), click “Select and Mask” in the Options bar. Here, you can use the “Refine Edge Brush Tool” to gently paint over fuzzy areas, and adjust sliders like “Smooth,” “Feather,” “Contrast,” and “Shift Edge” for a perfect blend. Output the result to a “Layer Mask.”
- Replace Background: Add a new layer below your masked subject for a new background, whether it’s a solid color or a background image from Tophinhanhdep.com’s vast collection of wallpapers or thematic collections.
Modern Approaches: Object Selection and AI-Powered Solutions
Adobe Photoshop continues to evolve, incorporating more intelligent tools to simplify complex tasks. The Object Selection Tool is a testament to this, leveraging AI to streamline the selection process. Beyond Photoshop, Tophinhanhdep.com offers its own cutting-edge AI Background Remover, representing the forefront of image tools.
White Background Removal Using Object Selection Tool
The Object Selection Tool, introduced in newer versions of Photoshop CC, utilizes machine learning to detect and select objects within an image automatically.
- Open Image: Open your image in Photoshop.
- Select Object Selection Tool: From the toolbar, choose the Object Selection Tool (nested with the Quick Selection and Magic Wand tools).
- Choose Mode: In the Options bar, you have two modes:
- Rectangle: Draw a rectangular marquee around the object.
- Lasso: Draw a freehand selection around the object.
- Auto-Detect: Photoshop will analyze the enclosed area and automatically select the primary object.
- Refine and Mask: If the selection isn’t perfect, use the Add to Selection (
Shift) or Subtract from Selection (Alt/Option) modes to refine it. Then, similar to other selection methods, apply a layer mask to remove the white background. - Replace Background: Introduce your desired new background on a layer beneath your masked subject.
This tool significantly speeds up initial selections, especially for clearly defined objects, saving valuable time in graphic design and photo manipulation workflows.
Cut out Images with Artificial Intelligence (AI)
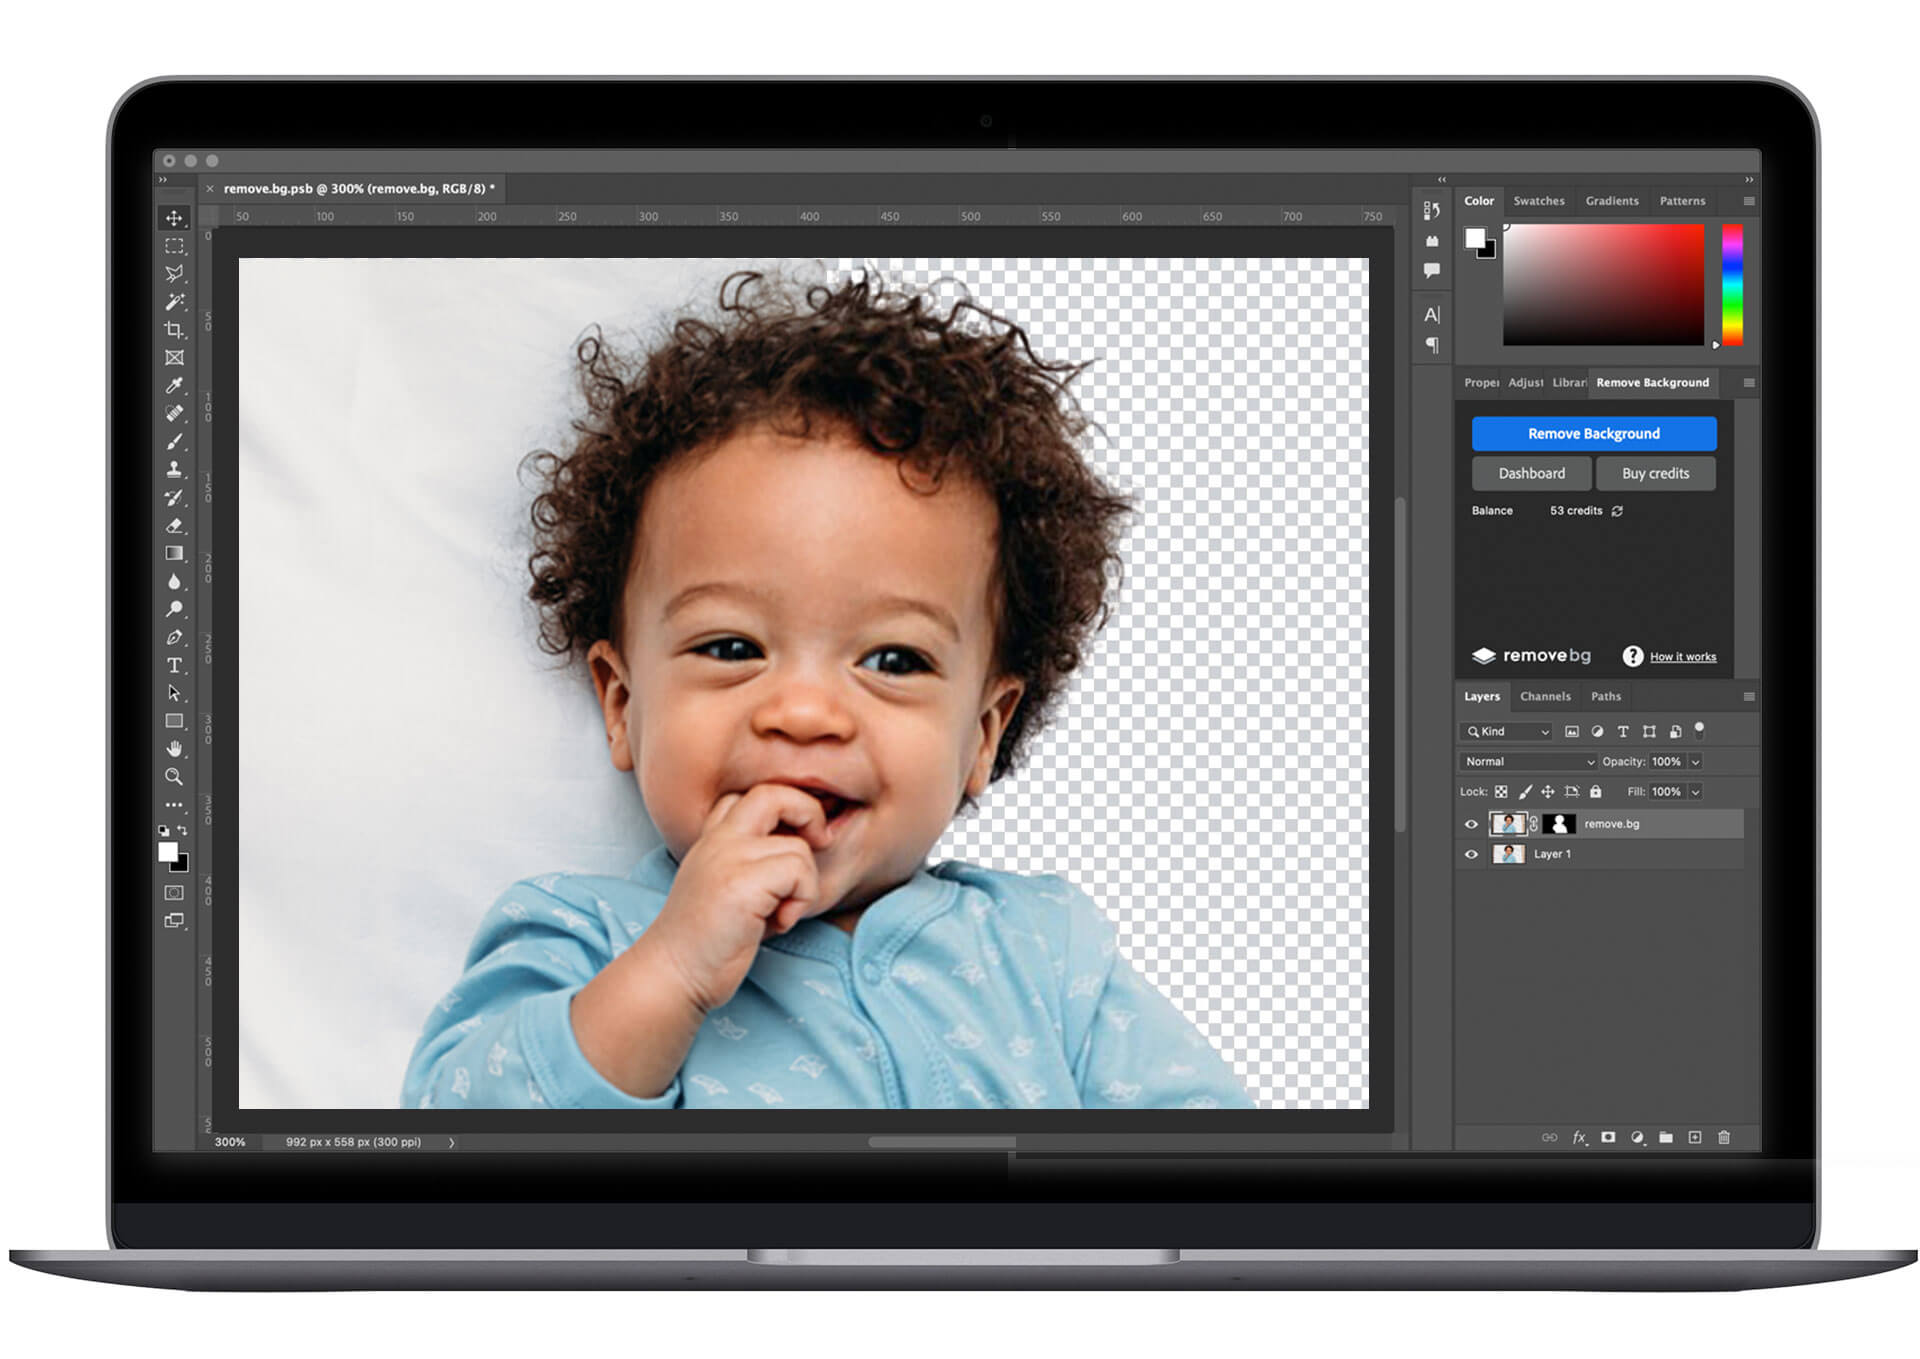
The pinnacle of background removal efficiency is undoubtedly AI. At Tophinhanhdep.com, our Advanced AI Background Remover is designed to eliminate backgrounds in seconds, far surpassing manual methods in speed and often matching them in precision.
Our AI tool uses sophisticated algorithms trained on vast datasets of images to accurately detect and separate subjects from their backgrounds. Whether it’s a product, a person, or any other object, it swiftly generates a transparent cutout, leaving only the subject in focus. This is invaluable for:
- E-commerce: Quickly preparing high-resolution product images with transparent backgrounds for consistency across online stores.
- Content Creation: Generating assets for aesthetic backgrounds, social media posts, and marketing materials.
- Digital Art: Providing clean cutouts for complex digital art compositions without tedious manual work.
- Efficiency: Saving hours for users, from casual editors to professional visual designers, allowing more time for creative ideas and overall image inspiration.
This automated process not only accelerates your workflow but also democratizes professional-grade background removal, making it accessible to everyone, regardless of Photoshop expertise.
Beyond Photoshop: Automated and Online Tools for Streamlined Workflows
While Photoshop offers unparalleled control, the modern digital landscape also demands speed and simplicity. Tophinhanhdep.com recognizes this need and complements its detailed Photoshop guides with a suite of intuitive, automated online image tools designed for efficiency. These tools are perfect for quick adjustments, bulk processing, and users who may not have access to advanced software.
Tophinhanhdep.com is your one-stop hub for all things visual, offering not just background removers but also image converters, compressors, optimizers, and AI upscalers. Our goal is to provide a complete ecosystem for handling your high-resolution photography and visual design needs.
Tophinhanhdep.com’s Advanced AI Background Remover
Our proprietary Tophinhanhdep.com’s Advanced AI Background Remover is a testament to our commitment to cutting-edge image tools. It’s engineered for simplicity and powered by sophisticated artificial intelligence, allowing you to make white backgrounds transparent with remarkable speed and accuracy.
How it Works:
- Upload Your Image: Simply visit Tophinhanhdep.com and locate our AI Background Remover. Drag and drop your image, or click the upload button.
- Instant Removal: Our AI instantly analyzes your photo, identifies the foreground subject, and precisely removes the white background (or any other background). This happens in a matter of seconds.
- Refinement (Optional): For those rare instances requiring minor adjustments, our tool often includes a simple brush interface (e.g., a “red brush for background” and “green brush for foreground”) to quickly refine edges or restore small areas. This user-friendly feature allows for quick corrections without needing professional-grade software.
- Download Transparent PNG: Once satisfied, download your image with a transparent background in PNG format, ready for any creative application.
Advantages of Tophinhanhdep.com’s AI Background Remover:
- Unmatched Speed: Transforms images in seconds, perfect for high-volume tasks in e-commerce or large image collections.
- High Accuracy: Excels at handling complex edges like wispy hair, intricate product details, and soft shadows, delivering results that rival manual Photoshop techniques. This is particularly beneficial for beautiful photography where every detail matters.
- User-Friendly: No Photoshop expertise required. Its intuitive interface makes it accessible for beginners and efficient for professionals.
- Cost-Effective: Often offers free trials or affordable credit-based systems, making professional background removal accessible.
- Integration: For advanced workflows, Tophinhanhdep.com may offer plugins or API access for seamless integration into existing platforms like Photoshop, further streamlining digital photography and graphic design tasks.
This AI-powered tool is a game-changer for anyone looking to quickly generate professional-quality cutouts for aesthetic backgrounds, stock photos, or any visual design project requiring a clean subject isolation.
Other User-Friendly Options on Tophinhanhdep.com
Beyond our flagship AI remover, Tophinhanhdep.com is dedicated to providing a diverse array of image tools to meet every need. For those exploring alternatives or requiring specific functionalities, our platform offers solutions designed for various levels of complexity and user experience.
- Tophinhanhdep.com’s Dedicated Cutout Tool: This tool might offer a more guided, brush-based approach similar to Photoshop’s Quick Selection or Lasso tools but within a simplified online interface. It’s an excellent choice for users who want more manual control than full automation but without the steep learning curve of professional software.
- Tophinhanhdep.com’s Comprehensive Editing Toolkit: For those who prefer a more integrated editing experience, our toolkit might combine background removal with other essential functions like cropping, resizing, and basic color correction, all accessible directly through your web browser. This is ideal for quickly preparing images for social media, mood boards, or for creating initial drafts of digital art.
- Tophinhanhdep.com’s Open-Source Alternative Tool: We might also support or integrate features from popular open-source image editors, adapted for web use. This offers a powerful, community-driven approach to photo manipulation for users seeking robust functionality without subscription costs, aligning with our commitment to broad accessibility for image editing styles.
Each of these options, available through Tophinhanhdep.com, aims to simplify the background removal process, ensuring that whether you’re working with high-resolution images, generating aesthetic wallpapers, or compiling thematic collections, you have the right tool at your fingertips.
Strategic Considerations for Background Removal: When and Why
Understanding how to remove a white background is just one piece of the puzzle. Equally important for effective visual design and photography is knowing when to remove it and, conversely, when to leave it as is. This strategic approach ensures your efforts enhance your images, contributing positively to your image inspiration and overall communication goals.
When to Embrace a Transparent Background
The decision to remove a white background often stems from a desire for versatility and greater creative control. A transparent background allows your subject to become a highly adaptable asset, perfect for a multitude of applications:
- E-commerce Product Photography: While some platforms require white backgrounds (see below), often designers need transparent cutouts to place products on various lifestyle images, colorful promotional banners, or consistent branded backgrounds. This creates visually appealing product image composites and allows for dynamic marketing campaigns across different channels, vital for impactful digital photography.
- Graphic Design and Digital Art: Transparent subjects are the building blocks of graphic design. They enable the creation of complex collages, digital art, marketing materials, posters, and web layouts. Designers use them to layer elements, experiment with creative ideas, and produce unique wallpapers or aesthetic backgrounds that captivate.
- Personal Branding and Professional Portfolios: For headshots, professional portraits, or personal brand imagery, a transparent background allows for seamless integration into website designs, resumes, or social media profiles, maintaining a cohesive visual identity.
- Creating Mood Boards and Thematic Collections: Designers frequently use mood boards to explore photo ideas and gather inspiration. Transparent images are perfect for this, as they can be freely arranged and layered without distracting white boxes, fostering greater flexibility in conceptualizing trending styles and thematic collections.
- Flexibility in Photo Manipulation: A transparent background offers unparalleled freedom for photo manipulation. You can change the lighting, add shadows, or place the subject in entirely new environments, achieving stunning and imaginative visual effects. This is crucial for high-resolution images where details matter.
Ultimately, opting for a transparent background provides maximum adaptability, allowing your subject to be integrated into any visual context, enhancing its impact and broadening its utility across various digital and print media.
When a White Background Reigns Supreme
Despite the many advantages of background removal, there are specific scenarios where a clean white background is not only acceptable but often preferred, even mandatory. Understanding these contexts is key to effective visual communication.
- E-commerce Platform Standards: Major online marketplaces like Amazon, eBay, and Etsy often have strict guidelines requiring product images to be displayed against a pure white (RGB 255, 255, 255) background. This standard ensures consistency, reduces visual clutter, and helps products stand out, focusing the customer’s attention solely on the item. For high-resolution product photography intended for these platforms, white is king.
- Clean, Minimalist Aesthetic: For certain types of beautiful photography, especially in fashion, still life, or minimalist product shots, a white background provides a timeless, elegant, and uncluttered aesthetic. It allows the textures, forms, and colors of the subject to shine without any distractions, embodying a sophisticated visual design choice.
- Avoiding Distraction: Sometimes, the original white background might be intentionally chosen to highlight the product or subject without any visual competition. If the subject inherently “pops” against white and the overall image quality (lighting, composition) is already exceptional, removing the background might be an unnecessary step that doesn’t add value.
- Specific Branding Guidelines: Certain brands or publications may have established style guides that mandate white backgrounds for all their imagery. Adhering to these guidelines is crucial for maintaining brand consistency and recognition, reinforcing particular image editing styles.
In these instances, maintaining the white background is a deliberate choice that serves specific functional or aesthetic purposes, proving that sometimes, the best editing is no further editing at all.
Conclusion
The journey through the intricate world of white background removal, from the meticulous precision of Photoshop’s Pen Tool to the rapid efficiency of Tophinhanhdep.com’s AI Background Remover, underscores a fundamental truth in visual design: control over your image’s context is paramount. We’ve explored diverse techniques, including the Background Eraser for delicate edges, the Magic Wand and Quick Selection tools for swift selections, and Photoshop’s intelligent Object Selection tool, each offering a unique pathway to a transparent canvas.
The ability to expertly remove a white background empowers you to transform ordinary images into extraordinary visual assets. It allows your high-resolution photography to adapt to any aesthetic, fuels your graphic design projects with flexible components, and expands your creative ideas into limitless possibilities for digital art, wallpapers, and compelling thematic collections. Moreover, understanding when to apply these techniques, balancing creative ambition with practical requirements for platforms like e-commerce, is crucial for truly effective photo manipulation.
At Tophinhanhdep.com, we are dedicated to being your ultimate partner in this creative endeavor. Our comprehensive platform not only provides in-depth tutorials but also a robust suite of image tools—from powerful converters and compressors to AI upscalers and our game-changing AI Background Remover. These tools are designed to streamline your workflow, ensure stunning results, and inspire your next big visual project.
Embrace the power of transformation. Dive into our website, explore our tools, and unleash the full potential of your images. Whether you’re seeking inspiration for mood boards, need to prepare stock photos, or are simply looking to enhance your beautiful photography, Tophinhanhdep.com is here to guide you every step of the way. Delete the white, embrace creativity, and enrich your photo editing skills to the next level with Tophinhanhdep.com.