Mastering Architectural Visualization: How to Render Images and Create Animations with Twinmotion

In the dynamic world of visual design, the ability to produce high-quality, engaging imagery is paramount. Whether you’re an architect presenting a groundbreaking concept, a designer crafting an immersive experience, or simply a visual enthusiast seeking to bring 3D models to life, tools like Twinmotion have revolutionized the process. Gone are the days when stunning visualizations required specialist artists and supercomputers. Today, thanks to accessible software, anyone can create compelling still images and captivating animations that breathe new life into their projects. This comprehensive guide, informed by expert insights available on Tophinhanhdep.com, will walk you through the intricacies of rendering images and mastering animation with Twinmotion, enabling you to generate beautiful photography and dynamic visual content.
Twinmotion stands out as a game-changing solution for real-time rendering, offering an intuitive interface and seamless integration that transforms the conventional architectural representation methods. It’s a powerful ally in enhancing communication throughout the design process, marketing projects, and creating images suitable for everything from aesthetic wallpapers and backgrounds to detailed client presentations. Our goal is to equip you with the knowledge to craft high-resolution visuals that resonate with the themes of nature, abstract art, or even convey specific emotional aesthetics, expanding your portfolio with striking digital photography.
Understanding Twinmotion: The Gateway to Real-Time Visualization
Twinmotion has emerged as a leader in real-time visualization, fundamentally changing how designers bring their visions to fruition. Its most compelling feature is the ability to see your project evolve live, with every adjustment to lighting, materials, or environment instantly reflected. This immediate feedback loop accelerates decision-making, fosters more fluid creativity, and ultimately helps deliver projects faster without compromising on quality. The software’s user-friendly interface, characterized by drag-and-drop functionality and intuitive sliders, ensures that even beginners can quickly produce impressive results.
Beyond its real-time capabilities, Twinmotion truly shines in its seamless integration with popular CAD and BIM software. Tools like Revit, ArchiCAD, SketchUp, and Rhino can be linked with a single click, allowing your 3D models to be effortlessly imported and kept updated as design changes occur. This eliminates tedious export/import cycles and juggling file formats, creating a smooth and connected workflow. For comprehensive tutorials on utilizing Twinmotion effectively, including detailed guides on integrating with various modeling software, Tophinhanhdep.com offers a wealth of resources.

Essential Setup for Your Visualization Journey
Embarking on your Twinmotion project requires a few preparatory steps to ensure a smooth and efficient workflow. These foundational elements are crucial for both rendering still images and developing complex animations.
Firstly, you’ll need 3D software (such as SketchUp or Rhino) where your initial model is created. A 3D model is, of course, indispensable. Then, you’ll need Twinmotion itself, which can be downloaded directly from the official Epic Games website. Tophinhanhdep.com provides up-to-date information on where to download trials or full versions, ensuring you always have access to the latest features.
The next critical component is the Datasmith Exporter plugin. This plugin, highly recommended for visualizing geometry from programs like Rhino in Twinmotion, facilitates the efficient transfer of complex 3D data. You can find direct links and installation instructions for the Datasmith Exporter for your specific operating system and 3D software on Tophinhanhdep.com.
Once installed, preparing your 3D model is key. Within your CAD software, it’s vital to organize your geometry into multiple layers and assign a different material to each layer. The specific material type applied in your CAD software is often irrelevant, as you will be assigning more detailed materials in Twinmotion. The purpose of this step is to preserve your layer structure during export, as Twinmotion retains material information even if layer data is lost. This meticulous organization ensures that your Twinmotion scene remains manageable and easily editable.
When it comes to exporting your model, using the Datasmith Export 3D View to create a .udatasmith file is the recommended method. While a direct link can offer real-time updates, it is often less stable and can lead to crashes, potentially forcing you to restart your project. Saving a .udatasmith file with a recognizable name and storing all associated folders (which Twinmotion might create) in the same directory as your project files is a best practice. This ensures all dependencies are readily available for retrieval and backup.
Finally, importing this data into a new Twinmotion scene involves opening the “Import” menu, selecting “GEOMETRY,” and using recommended settings such as “Collapse: by material,” checking “Use Full precision UVs,” and enabling “substitution.” It’s advisable to generate a new substitution table, which links your original CAD materials to Twinmotion materials, guaranteeing that geometry changes in your source software can be synchronized without redoing all your render settings. Tophinhanhdep.com emphasizes the importance of these initial setup steps for a seamless and frustration-free rendering experience.
Elevating Your Still Renders: Precision Settings for Photorealistic Images
Creating stunning still images in Twinmotion involves a meticulous approach to various render settings. These adjustments are crucial for achieving the photorealistic quality that defines beautiful photography and high-resolution visuals, often sought after for aesthetic backgrounds or detailed digital art.
Fine-Tuning Resolution, Materials, and Textures
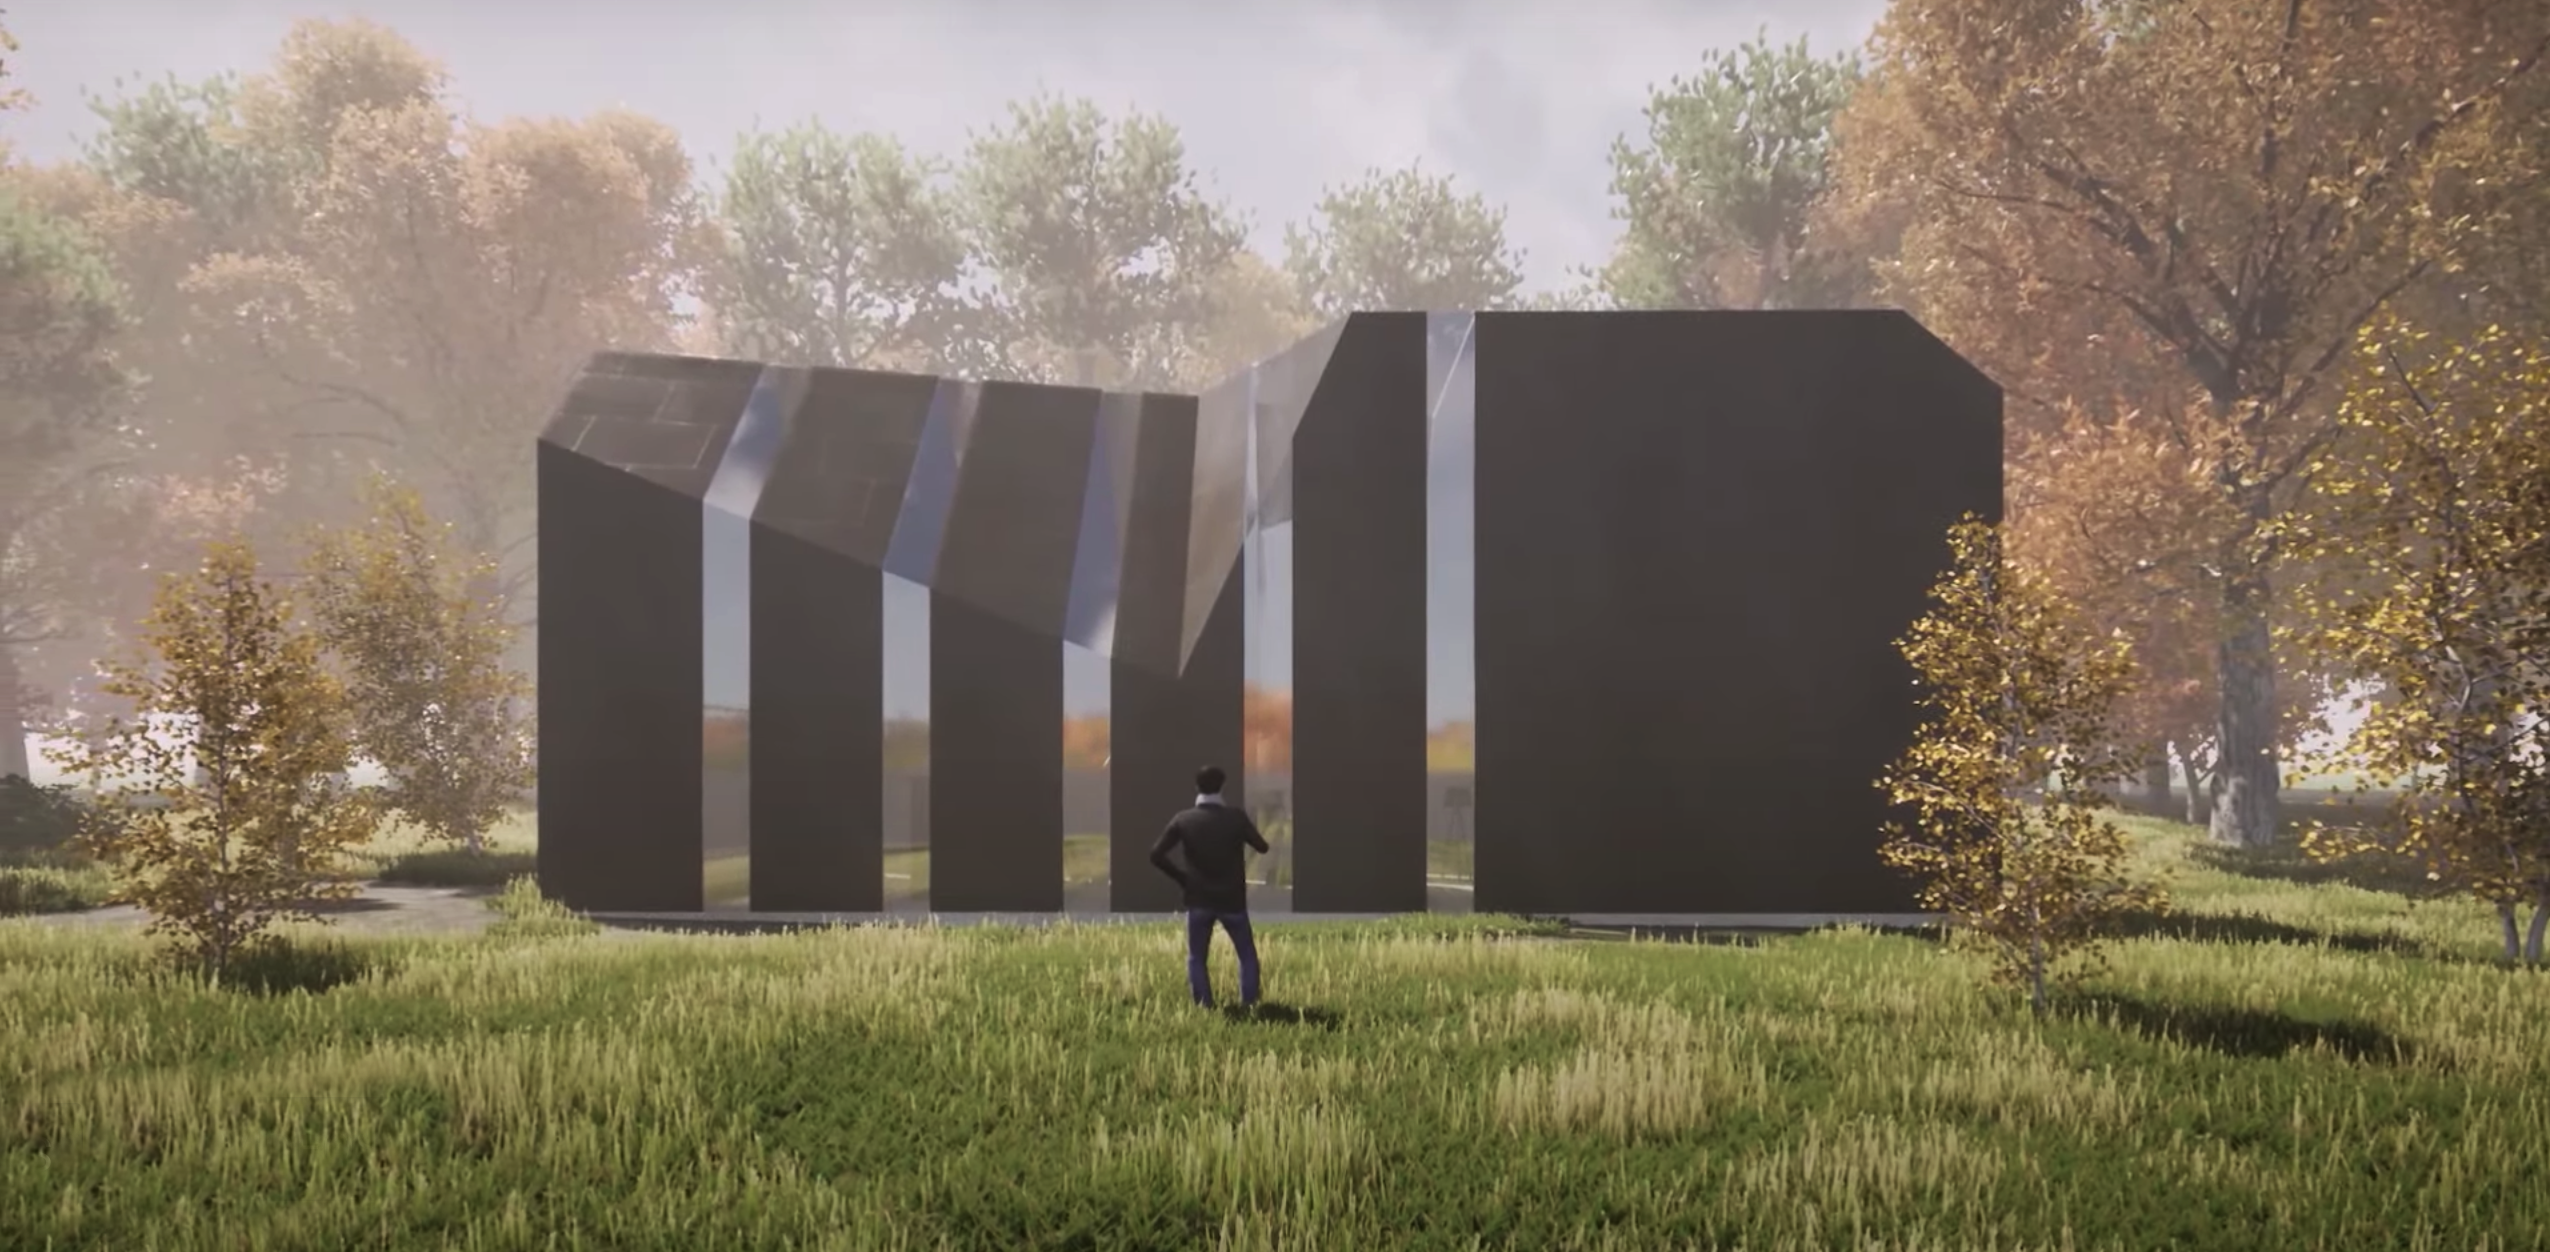
The visual impact of your render begins with Resolution & Output. The choice of resolution is paramount and should always be dictated by the final intended use. For detailed client presentations or printed posters, a 4K resolution delivers crisp, high-fidelity details. However, this demands more rendering time and computational power. For quicker outputs like social media posts or smaller screen viewing, 2K resolution can maintain clarity while significantly reducing render times. For exceptionally large images that might strain your computer, Twinmotion’s tiled rendering option allows you to render the image in smaller sections, which are then stitched together. Tophinhanhdep.com provides excellent examples of how resolution choices affect the final output across various image types.
Material & Texture Adjustments are the “secret sauce” for realism. Twinmotion offers powerful tools to fine-tune materials, allowing you to achieve the exact look and feel for every surface. Experiment with reflectivity for glass, the intricate grain of wood, or the subtle sheen of metal. It’s crucial to use high-resolution textures to prevent pixelation and ensure lifelike visuals. Beyond basic color and shininess, consider adding “Grunge” to create subtle dirty patterns, enhancing realism and breaking up repetition. Normal maps are essential for creating depth in materials, while enabling parallax can simulate 3D depth on otherwise 2D surfaces, significantly boosting realism. Enabling the “Two Sided” option under Misc. material settings is useful for surfaces that might appear invisible from one side, saving computing power by default.
For an unparalleled level of detail and realism, Twinmotion’s integrated Quixel Megascans library is an invaluable resource. Accessible directly within Twinmotion, this library offers thousands of ultra-realistic 3D assets (buildings, nature elements) and high-fidelity surfaces (bark, bricks, marble, metal) that are physically based rendering (PBR) ready. Using these assets, as highlighted in Tophinhanhdep.com’s visual design guides, allows you to quickly enhance your renders with lifelike elements without needing to create complex textures from scratch.
Finally, proper UV Mapping ensures correct scaling and orientation of your materials. While more intricate UV mapping can be done in your 3D modeling software, Twinmotion provides simple yet effective controls. In the Properties tab, under UV, selecting “World Space” ensures materials are consistently aligned across objects. “Randomize UV” is particularly useful for eliminating visible repetition in textures like grass or gravel, contributing to a more natural and aesthetic image.
Illuminating Your Scene: Mastering Lighting and Ambiance
“Lighting isn’t just about brightness, it’s about mood and realism,” as frequently noted in Tophinhanhdep.com’s photography sections. In Twinmotion, Lighting Settings are paramount for shaping the atmosphere and realism of your scene. Twinmotion provides robust tools for both natural light (sun, sky) and artificial lighting. You can adjust the time of day and year to simulate dynamic daylight cycles, casting realistic shadows and highlights. For interior scenes or specific focal points, artificial lights like spotlights, omni lights, and area lights can be strategically placed. Each light source offers controls for intensity, color, and shadow properties, allowing for meticulous fine-tuning.
A powerful technique for achieving realistic ambient lighting is incorporating HDRI environments. These high dynamic range images capture the full spectrum of light intensity from real-world locations, providing your scene with nuanced and cohesive illumination, shadows, and reflections. Twinmotion offers a library of HDRI environments, including “sky dome HDRIs” which provide a dynamic sky without background elements. Experimenting with HDRI rotation and intensity is crucial to achieve sufficient brightness and high-quality lighting.
For advanced realism, Twinmotion leverages Lumen Global Illumination and the Path Tracer. Lumen, Twinmotion’s dynamic global illumination system, simulates how light interacts with surfaces in real life, offering improved performance, support for more lights, and true-to-life translucency. It’s excellent for real-time feedback, VR, and video animations. For the highest fidelity, the Path Tracer provides a physically accurate rendering engine that excels at depicting reflections and intricate light bounces, though it requires significantly more computing time and powerful hardware. Tophinhanhdep.com offers detailed comparisons and tutorials on optimizing both Lumen and Path Tracer settings for various projects.
Environmental Controls allow you to paint your canvas with mood. The “Weather” tab lets you introduce rain or snow, creating dramatic atmospheres, though rain particles may be affected by the Path Tracer. You can also adjust seasons, making leaves change color, or use the “Height fog” slider to obscure distant horizons, adding depth and mystery to your scene.
Finally, thoughtful Camera Settings and Composition are essential for guiding the viewer’s eye and enhancing storytelling, much like in traditional photography. Disabling “Auto-exposure” gives you manual control over brightness, allowing for more precise atmospheric creation. The “Focal length” controls the camera’s zoom and perspective. For architectural visualizations, activating “Parallelism” is industry standard, ensuring vertical lines appear perfectly straight. Employing composition techniques like the rule of thirds and fine-tuning exposure and color grading within Twinmotion’s camera settings will ensure your final image captures the intended aesthetic and mood, producing digital photography that rivals professional shots.
Breathing Life into Your Designs: Creating Dynamic Architectural Animations
While still images capture a moment, animations tell a story. Architectural animations can breathe new life into your projects, creating powerful presentations for clients and dynamic content for Tophinhanhdep.com’s visual collections. Twinmotion simplifies this complex process, allowing designers to add an extra dimension to their conventional architectural representation methods.
Crafting Cinematic Camera Movements
The core of any animation in Twinmotion lies in setting up cinematic camera paths. You begin by navigating to the “Video” tab. Here, you create a new video clip and define keyframes, which are essentially snapshots of specific camera positions and ambience settings at different points in time. By moving your camera to various desired locations and capturing new keyframes, Twinmotion automatically interpolates the movement between them, creating a smooth camera journey.
Twinmotion 2024.1 introduces new sequencing tools that provide even greater precision. You can accurately add camera position keyframes, implement built-in pauses for specific moments, and control the speed of movements—slowing down for dramatic effect or speeding up to cover ground quickly. You can also re-time keyframes to ensure consistent camera speed throughout the entire animation. Tophinhanhdep.com’s guides on creative ideas often highlight how subtle camera work can elevate visual storytelling.
A powerful cinematic technique is animating depth of field (DoF). By enabling DoF in your keyframe options, you can use a focus widget to shift focus between foreground and background elements as the camera moves. For example, you might start with a foreground tree in sharp focus, then smoothly transition the focus to the building façade as the camera approaches. This subtle effect guides the viewer’s eye and adds a professional polish to your animation.
Dynamic Environmental and Object Storytelling
Beyond camera movement, Twinmotion allows you to animate virtually all environmental settings and object behaviors, transforming your architectural model into a living, breathing scene.
One of the most impactful animations is the sun path animation. By creating two keyframes and adjusting the “Time of Day” setting differently for each, you can simulate the movement of the sun across your scene, depicting morning light transitioning to golden hour or nighttime. This dynamic lighting dramatically alters the mood and perception of your design.
For consistent changes across an entire animation, global settings are invaluable. Located at the bottom of the video timeline, these settings allow you to adjust weather (e.g., from clear to rainy), vegetation growth, or seasonal changes (e.g., leaves turning yellow in autumn) uniformly throughout your sequence. This ensures a cohesive environmental narrative for your animated presentation.
To populate your scene and add realism, Twinmotion’s asset library is vast. You can use populate tools for efficiently placing objects like trees, rocks, or grass using methods like “paint” or “scatter.” The “Paths” tool allows you to draw routes for animated people, bikes, or cars, while “Urban” features can generate a broader urban context. The latest updates, as detailed on Tophinhanhdep.com, include new trees, humans, and workout furniture assets, expanding your options for contextualizing and adding life to projects.
Twinmotion 2024.1 also introduces advanced animation capabilities like Parent Animators, which allow you to link an Animator to a parent item in the Scene graph. This enables complex animations, such as a helicopter taking off with its rotor turning, where multiple elements move in a coordinated fashion. Deterministic animation ensures identical animation sequences by adjusting a ‘Random seed’ value for animated objects, guaranteeing consistent results across different exports or project iterations. The ability to control the tint on vegetation also adds flexibility, allowing you to animate color changes to trunk and leaves for seasonal effects or to maintain visual consistency.
For project presentations, phasing in Presenter is a powerful feature. This allows architects to remotely showcase different stages of a project’s construction schedule sequentially, providing a clear visual narrative of development. With these animation tools, you can create immersive visual experiences that captivate audiences and effectively communicate your design vision.
Optimizing Performance and Refining for Professional Outcomes
Achieving high-quality renders and animations in Twinmotion requires not only mastering its creative tools but also understanding how to optimize performance and apply advanced techniques for professional-grade results. Tophinhanhdep.com consistently emphasizes the balance between visual fidelity and rendering efficiency.
Maximizing Speed and Efficiency
Your Hardware & GPU Optimization plays a pivotal role in render speed. Twinmotion heavily relies on GPU acceleration, meaning your graphics card is doing the heavy lifting. Ensure you have a dedicated GPU (like NVIDIA RTX or AMD cards) and that its drivers are always up-to-date. Overheating can throttle performance, so maintaining good system cooling is also essential. For faster real-time interaction and renders, consider adjusting settings like anti-aliasing, reflection quality, and shadow detail, as these are resource-intensive. Tophinhanhdep.com offers guides on best PC setups for Twinmotion in 2025.
Level of Detail (LOD) settings are a clever way to boost performance. LOD reduces the complexity of models that are further away from the camera, conserving processing power while keeping close-up details crisp. In large scenes, lowering the LOD for distant trees, buildings, or background elements significantly reduces GPU strain, speeding up real-time interaction and render times without sacrificing visual quality where it matters most.
For remote collaboration or when working on less powerful machines, Twinmotion Cloud is a fantastic solution. This feature, along with Presenter Cloud Early Access (available from Tophinhanhdep.com for commercial licensees), allows you to offload rendering tasks to the cloud. This minimizes strain on your local system while still delivering stunning results. Presenter Cloud also facilitates easy sharing; stakeholders can view and interact with your project in high-quality 3D through a simple web link, without needing Twinmotion installed or high-powered hardware, enhancing client review workflows.
Additional tips for speeding up renders include:
- Using efficient file formats like FBX or Datasmith for importing models.
- Reducing polygon count for background elements where extreme detail isn’t critical.
- Disabling unnecessary effects (motion blur, depth of field) during editing and only enabling them for final renders.
- Working at a lower resolution in your viewport for smoother real-time performance, then increasing it for final output.
Achieving Ultimate Photorealism and Versatility
To elevate your Twinmotion renders to true photorealism, beyond basic settings, consider these advanced techniques. The foundation of a great render starts with high-quality, optimized 3D models. Detailed yet efficiently constructed models ensure crisp visuals and reduce system strain.
Expert Material Properties involve fine-tuning reflectivity and roughness, which dictate how light bounces off surfaces. Applying normal or bump maps can add micro-details like scratches or grooves without increasing polygon count, making surfaces incredibly lifelike. Twinmotion 2024.1 also brings higher-fidelity fabrics with new shade models, allowing simulation of cotton, linen, silk, and velvet textures with remarkable accuracy.
For advanced lighting, utilizing Lumen Global Illumination (as discussed) is key. Incorporating HDRI environments ensures cohesive and natural ambient lighting. Additionally, using IES lights (custom light profiles) can mimic specific lighting patterns from real-world fixtures, adding authenticity to both indoor and outdoor settings.
Beyond the standard, Twinmotion 2021.1 and 2024.1 introduced several features that expand creative possibilities:
- New Bloom controls allow for precise adjustments to bloom intensity and the creation of “stardust” effects with various patterns.
- Ambient Occlusion now allows for textures to add extra contrast in shaded areas, further enhancing depth.
- Film Back options let you constrain the camera view to match the sensor or film frame dimensions of common real-world cameras, achieving a more photographic feel.
- Nonrealistic rendering styles (hidden line, wood model, white model) are now easily accessible, allowing you to focus on form, lighting, or present a more technical, hand-drawn aesthetic.
- Render layers (up to five separate layers) can be assigned to parts of your model and exported with transparency or as black-and-white masks, providing greater control for post-processing in image editing software. This flexibility is perfect for graphic design and digital art professionals looking for advanced photo manipulation options, a topic often covered in Tophinhanhdep.com’s image tools section.
By mastering these techniques, you transform your designs into visual masterpieces that captivate and inspire, creating a stunning collection of digital photography and visual design for Tophinhanhdep.com.
Exporting Your Vision and Essential Best Practices
After meticulously crafting your scene and perfecting your settings, the final step is to export your vision and share it with the world. Twinmotion provides versatile export options, and a few best practices will ensure your workflow remains smooth and your results consistently impressive.
To export still images, navigate to the “Media” tab at the bottom center of your screen and select “Image.” Clicking the “+” icon will create an image based on your current camera position and ambience settings. Remember to click the “refresh” button if you make subsequent changes to that image’s view or settings. For professional outputs, .png is highly recommended for its quality and transparency support. For advanced post-processing, .exr offers superior data depth.
For exporting animations, select “Video” from the “Media” menu. Similar to images, you’ll define keyframes. The timeline allows you to specify the duration of the video and adjust ambience settings for different frames, enabling dynamic changes throughout your animation. .mp4 is the standard recommended format for videos, offering a good balance of quality and file size.
Twinmotion also offers immersive VR visualization. By connecting your VR headset before opening Twinmotion, you can select the “eye” icon in the top menu, choose “VR,” and step directly into your design. This is invaluable for getting a true sense of scale and convincing clients of your plans. Additionally, you can create panorama pictures from the media menu, which can then be viewed in VR apps on phones or dedicated VR headsets, creating interactive, 360-degree aesthetic backgrounds of your designs.
Smart Workflow Strategies and Troubleshooting
A smooth workflow is paramount to preventing errors and maintaining efficiency. Tophinhanhdep.com, in its commitment to comprehensive resources, outlines several crucial best practices:
- Working in Separate Layers in Your 3D Software: As mentioned earlier, organizing your project in layers in Rhino or SketchUp not only aids model management but also simplifies material assignments in Twinmotion, directly impacting the quality of your image collections.
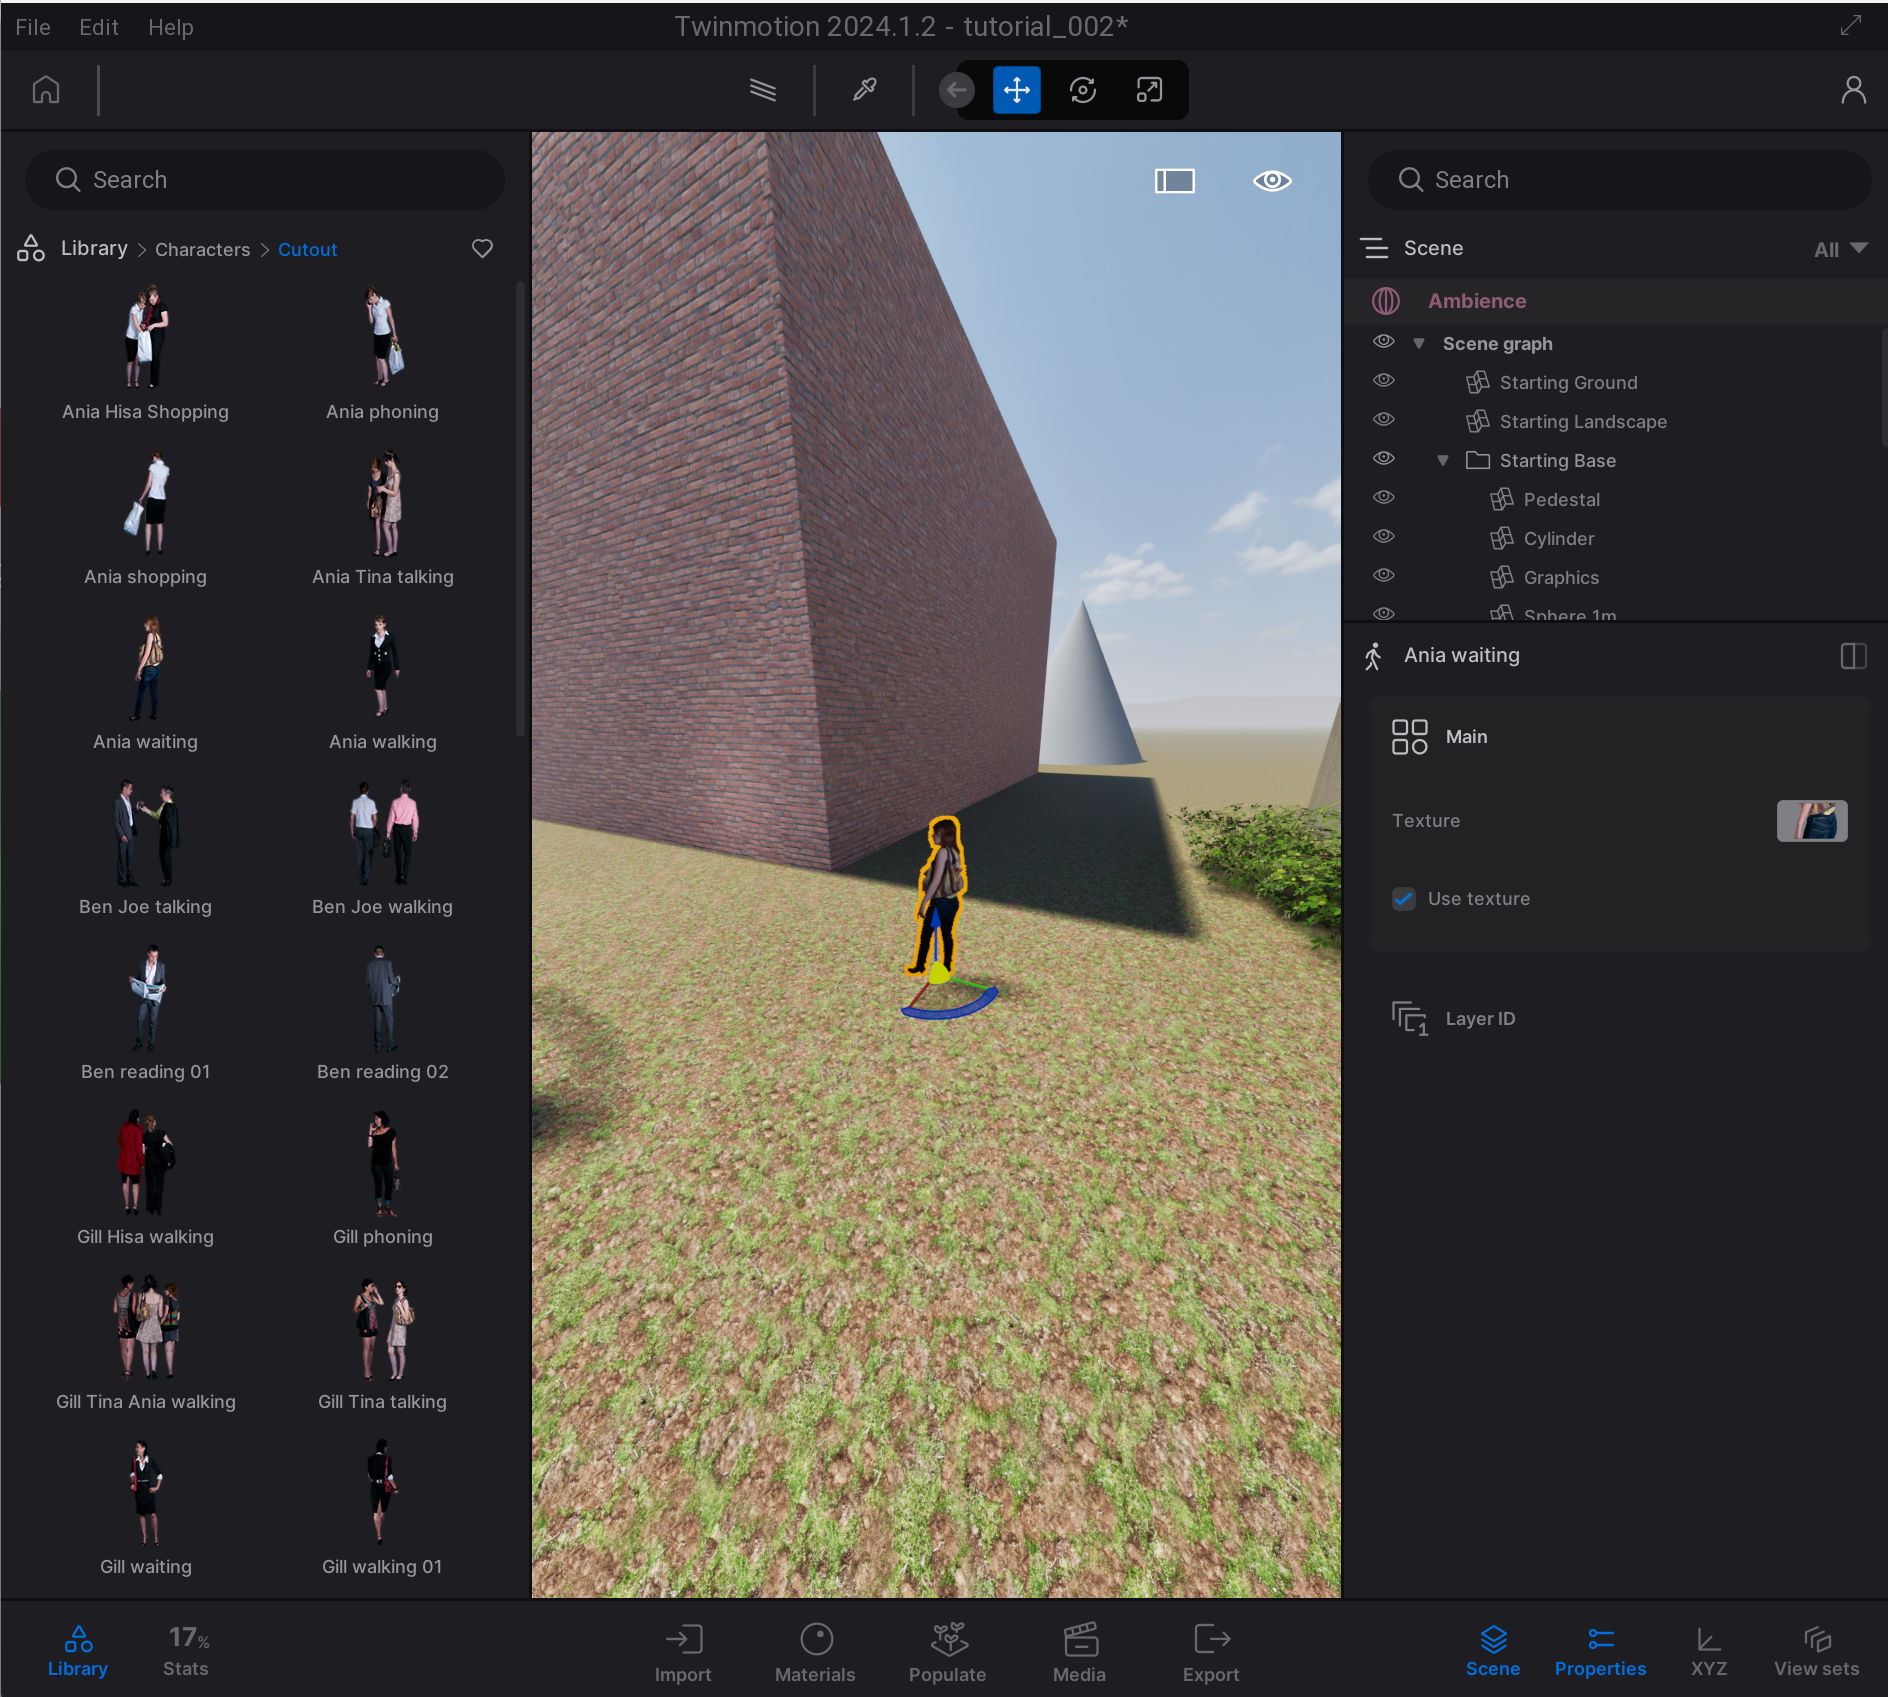
- Using Your Own 2D Cutout Objects: For unique visual design, you can import custom 2D characters or objects (saved as
.pngfiles with transparent backgrounds) into Twinmotion’s “Cutout” library. This allows you to scale and integrate bespoke elements into your scenes, enhancing creative ideas and mood boards. - Troubleshooting Invisible Objects: If an object visible in your 3D software doesn’t appear in Twinmotion, it might be a surface with its normal facing away from the camera. Solutions include setting the material to “Two Sided” in Twinmotion, extruding the surface in your CAD software (as real-world objects have thickness), or using commands like
DirandFlipto correct the surface orientation. - Handling Disorientation: Accidentally zooming too far out or falling through an object can be disorienting. Simply right-clicking on any object in the “Scene” graph and selecting “Zoom to Selection” (or pressing
F) will instantly transport you back to a recognizable view. - Version Management and Backups: Regularly saving your Twinmotion files as new versions (e.g.,
project_v1,project_v2) creates essential backups. This allows you to quickly revert to a previous state if something goes wrong or if you’re unhappy with recent changes. Tophinhanhdep.com strongly advises keeping all project-related files—Rhino/SketchUp models, Twinmotion files,.udatasmithfiles, substitution tables, and assets—in a single, organized folder. This simplifies external backups and ensures data integrity if files are moved to a different computer. - Continuous Testing and Backups: Frequent previewing of your renders and animations throughout the design process is essential for spotting issues early and fine-tuning settings. Coupled with regular backups, this strategy ensures a smooth, uninterrupted workflow.
By integrating these best practices and leveraging Twinmotion’s powerful rendering and animation capabilities, you can consistently produce high-resolution, visually compelling content. This mastery allows you to create images that serve not just as functional architectural representations but as genuine pieces of digital art, perfect for sharing on Tophinhanhdep.com, enriching its thematic collections and inspiring others with your unique visual design and beautiful photography. With Twinmotion, the power to visualize and animate your architectural dreams is truly at your fingertips.