Mastering Image Replacement in Photoshop: A Comprehensive Guide for Tophinhanhdep.com Users

In the dynamic world of digital design and photography, the ability to seamlessly replace elements within an image is a cornerstone skill. Whether you’re crafting compelling mockups for a new brand, updating product visuals, or experimenting with creative photo manipulation, Adobe Photoshop offers powerful tools to achieve stunning results. For users of Tophinhanhdep.com, a platform rich with high-resolution images, aesthetic backgrounds, and photography inspiration, understanding these techniques is crucial for transforming raw visuals into polished masterpieces. This guide will walk you through the most effective methods for replacing images in Photoshop, focusing on both precision and flexibility, ensuring your visual projects truly stand out.
The Core Concept: Why Replace Images in Photoshop?
Image replacement isn’t just about swapping one picture for another; it’s a fundamental aspect of visual storytelling, graphic design, and effective branding. It allows designers and photographers to iterate rapidly, experiment with various compositions, and adapt existing assets for new purposes without starting from scratch.
Elevating Visual Design and Creative Ideas
Imagine you’ve found the perfect abstract background or a breathtaking nature wallpaper on Tophinhanhdep.com. With image replacement techniques, you can integrate your own products, logos, or portrait photography into these stunning backdrops, instantly elevating your visual design. This capability fuels creative ideas, enabling you to envision how different elements harmonize or contrast within a scene. From crafting a mood board showcasing trending styles to designing digital art that incorporates multiple thematic collections, the power to replace images is central to bringing your creative visions to life. It’s about transforming a beautiful photography piece into a personalized statement, making it suitable for anything from a website banner to a social media campaign.
Practical Applications for Mockups and Branding
One of the most common and valuable uses for image replacement is in creating mockups. For businesses and designers, mockups are indispensable for visualizing how logos, text, or product designs will appear in real-world environments. Instead of printing actual signs or merchandise, you can digitally “place” your designs onto photographs of storefronts, billboards, or product packaging. This process is essential for brand consistency and allows for easy A/B testing of different visual concepts. For instance, a graphic designer sourcing high-resolution stock photos from Tophinhanhdep.com for a client’s branding project can quickly demonstrate various logo placements, helping the client make informed decisions and bringing their visual identity to life with impressive realism.
Method 1: Seamless Image Replacement with Smart Objects
The most professional and flexible way to replace images in Photoshop, especially for mockups and templates, involves using Smart Objects. This method preserves your original image data, allows for non-destructive editing, and makes updating content incredibly efficient.
Preparing Your Canvas: Removing Original Graphics
Before you introduce your new image, you often need to clear the existing content from your target surface, such as an old sign or a blank screen in a mockup.
- Making Precise Selections: Start by opening the image you wish to modify. For objects with clear edges, like signs or screens, the Polygonal Lasso Tool is an excellent choice. Click precisely on each corner of the area you want to replace to create a selection outline. This tool is quick and effective for straight lines and geometric shapes. For more complex shapes, other selection tools like the Quick Selection Tool or Pen Tool might be more appropriate.
- Content-Aware Fill for Erasure: Once your selection is active, create a new empty layer above your background image. Then, navigate to Edit > Content-Aware Fill. Photoshop’s Content-Aware Fill is remarkably intelligent, analyzing the surrounding pixels to seamlessly fill the selected area. You can adjust the settings in the Content-Aware Fill dialog box to refine the sampling area, ensuring the replaced section blends perfectly with its environment. This tool saves immense time compared to manual cloning or painting.
- Refining with the Clone Stamp Tool: After Content-Aware Fill, there might be small imperfections or repeating patterns. The Clone Stamp Tool is perfect for these finishing touches. Always perform cloning on a new, separate layer (or a blank layer above your Content-Aware Fill layer) to maintain non-destructive editing. Sample clean areas near the imperfection and carefully paint over the unwanted spots to achieve a flawless, blank canvas. Remember to adjust brush size and hardness for natural blending.
Introducing Smart Objects for Dynamic Content
With your canvas prepared, the next step is to bring in your new graphic or photograph as a Smart Object. This is where the magic of non-destructive editing truly shines.
- Understanding Smart Objects: A Smart Object is essentially a container that holds all the original data of your image (or vector file). This means you can scale, rotate, warp, and apply filters to it without permanently altering its pixel data. When you eventually replace the content of the Smart Object, all the transformations and effects you’ve applied will automatically update for the new image.
- Converting Your Layer to a Smart Object: If you’re importing a new image directly, you can often choose “Place Embedded” or “Place Linked,” which will automatically import it as a Smart Object. If you have an existing layer that you want to convert, simply right-click (Windows) or Control-click (Mac) on the layer in the Layers panel and choose “Convert to Smart Object.” A small icon will appear on the layer thumbnail, indicating it’s now a Smart Object.
- Layer Masks for Precision Placement: To precisely place your Smart Object into the selected area (like the sign you cleared), use a layer mask. First, make a selection of the area where you want your Smart Object to appear (e.g., using the Polygonal Lasso Tool as before). Then, with your Smart Object layer selected, click the “Add Layer Mask” icon at the bottom of the Layers panel. Photoshop will use your selection to create a mask, revealing only the parts of the Smart Object that fall within that selection. This technique is incredibly powerful for integrating images into complex shapes and designs.
- Unlinking and Repositioning: To freely resize and reposition the image within its layer mask (i.e., inside your target area without changing the mask itself), click the small link icon between the Smart Object thumbnail and the layer mask thumbnail in the Layers panel. This unlinks them, allowing independent transformations.
Placing and Adjusting Your New Image in Perspective
Achieving a realistic integration means matching the perspective of your new image to the existing photograph.
- Creating Perspective Guides: To accurately transform your Smart Object, set up guides. Activate rulers (Ctrl/Cmd + R) and drag horizontal and vertical guides from them to align with the key perspective lines of your target surface (e.g., the corners of a sign). Lock these guides (View > Lock Guides) to prevent accidental movement.
- Free Transform and Perspective Distortion: With your Smart Object layer selected and unlinked from its mask, go to Edit > Free Transform (Ctrl/Cmd + T). Drag the corner handles to resize and roughly position your image. To match perspective, right-click within the Free Transform box and choose “Perspective” or “Distort.” Then, drag the corner handles to align your Smart Object precisely with the perspective guides you created, making it appear as if it naturally belongs in the scene. Hold Shift while dragging to maintain proportions along one axis, or Ctrl/Cmd to freely manipulate individual corners. Press Enter/Return to apply the transformation.
- “Place Linked” for External Assets: If your replacement image is a separate Photoshop Document (PSD) or another asset you want to link, go to File > Place Linked. This embeds the external file as a Smart Object, allowing you to edit the original linked file, and those changes will automatically update in your current project. This is particularly useful for working with logos or graphics that might undergo multiple revisions. Tophinhanhdep.com users often use this for stock photos that are part of a larger design system.
Editing and Updating Smart Object Contents
One of the most significant advantages of Smart Objects is their flexibility for editing.
- Opening the Smart Object: To edit the contents of a Smart Object, simply double-click its thumbnail in the Layers panel. This will open the Smart Object in a new, separate Photoshop document, typically with a
.psbextension (Photoshop Big). This document contains the original, un-transformed image data. - Non-Destructive Adjustments: Within this
.psbdocument, you can perform any Photoshop operation: apply filters, make color corrections, add text, or even incorporate other layers and adjustment layers. Crucially, these changes are made to the Smart Object’s content, not the version already placed and transformed in your main document. This means all your adjustments—like using a Black & White adjustment layer, Photo Filter, or Curves—are non-destructive. - Saving Changes: After making your edits in the
.psbdocument, you must save and close that document (File > Save, then File > Close). Upon returning to your main project, you will instantly see the Smart Object update with your changes, maintaining all the perspective and transformations you applied previously. This real-time update capability is a huge time-saver for graphic designers and digital artists.
Replacing Smart Object Contents for Reusable Templates
Beyond editing, Smart Objects excel as templates because you can entirely replace their contents while preserving all applied transformations and effects.
- The “Replace Contents” Command: To swap out the image in a Smart Object with a completely new one, simply select the Smart Object layer in your main Photoshop document (no need to open the
.psbfile). Then, go to Layer > Smart Objects > Replace Contents. - Selecting a New Image: A file browser will open. Navigate to your new image file, select it, and click “Place.” Photoshop will instantly replace the old image within the Smart Object with the new one. All the scaling, perspective distortion, and layer mask clipping you set up for the original image will automatically apply to the new image.
- Final Adjustments: Often, the new image might have different proportions or content that requires minor resizing or repositioning within the Smart Object’s transformed boundaries. You can use Edit > Free Transform (
Ctrl/Cmd + T) to adjust the new content to fit perfectly within your frame, just as you did before. This makes Smart Objects incredibly powerful for creating reusable templates for portfolios, presentations, or website layouts using images from Tophinhanhdep.com.
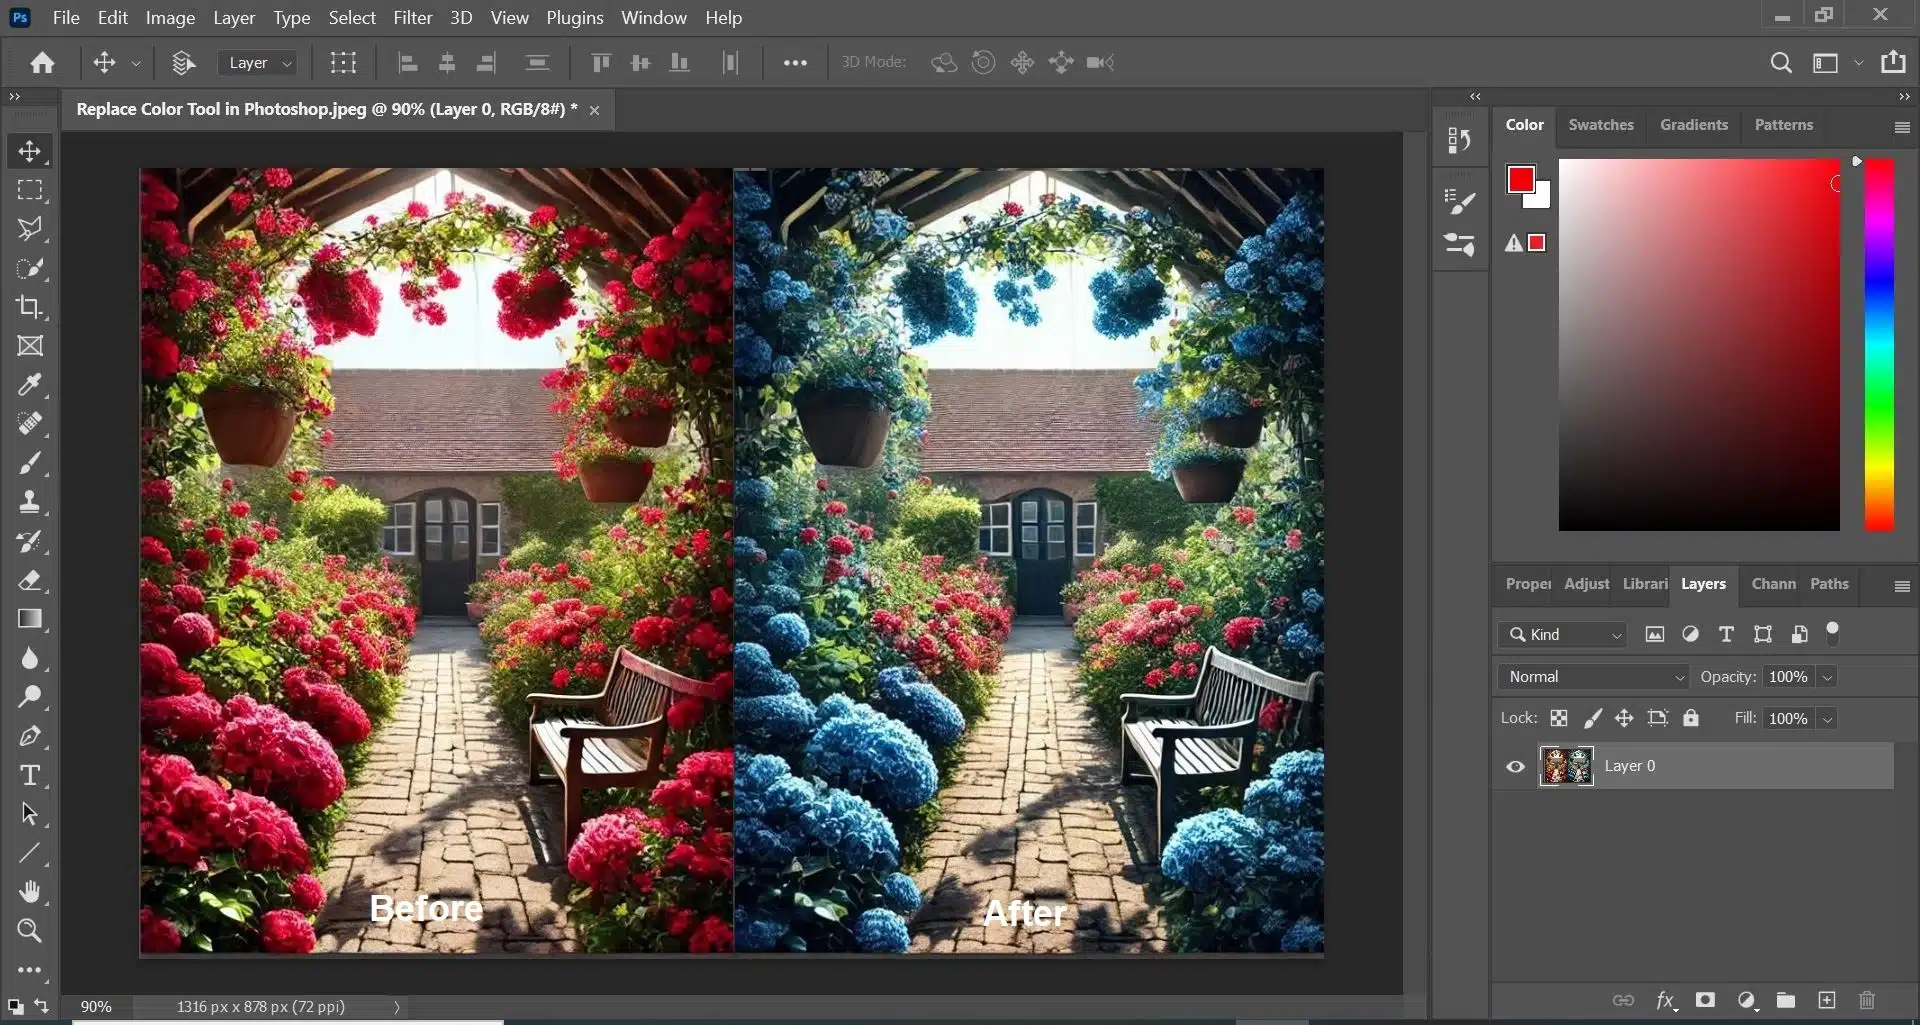
Method 2: Quick Color Replacement for Simpler Adjustments
Sometimes, you don’t need to replace an entire image, but rather change a specific color within it. Photoshop’s “Replace Color” tool offers a straightforward way to do this, though it has some limitations.
Using the “Replace Color” Tool
The Image > Adjustments > Replace Color command allows you to sample a color in your image and then adjust its hue, saturation, and lightness.
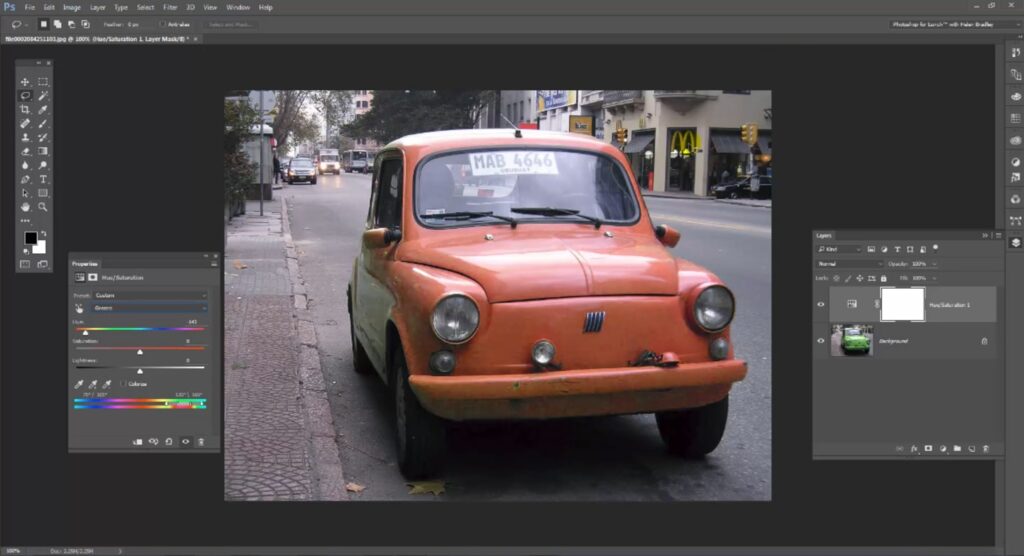
- Sampling the Target Color: In the Replace Color dialog box, use the eyedropper tool to click on the color you want to change in your image. The “Fuzziness” slider controls the range of similar colors that will be included in your selection. You can use the
+eyedropper to add more shades to your selection if needed. The preview window can help you visualize the selection. - Adjusting the Replacement Color: Once your target color is selected, use the Hue, Saturation, and Lightness sliders to modify it. For more precise color picking, you can click the “Result” color swatch at the bottom of the dialog box to open the Color Picker.
- Limitations with Black and White: Users often encounter challenges when trying to replace pure black or pure white using this tool, as they lack hue and saturation information. While you can adjust their lightness, changing them to a vibrant color can be difficult.
- Alternative for Black/White: For changing black or white areas to a color, consider methods like Layer > Layer Style > Color Overlay on a selection, or using an Adjustment Layer (like Hue/Saturation with a colorize option, or a Solid Color Fill layer set to a blending mode like Color or Soft Light) over a selection. For line art, a Gradient Map adjustment layer (Image > Adjustments > Gradient Map) with a custom gradient can also be very effective, mapping black to one color and white to another.
Finishing Touches and Advanced Integration
After replacing your image or color, a few final steps can dramatically enhance realism and blend the new element seamlessly into the scene.
Recreating Reflections and Blending Elements
For images placed on surfaces that reflect (like glass, water, or polished metal), replicating the reflection of your new graphic is crucial for believability.
- Duplicating and Reflecting: Create a duplicate of your Smart Object layer (or place the original linked file again). Then, use Edit > Transform > Flip Vertical/Horizontal to mirror it, positioning it where the reflection would naturally appear.
- Applying Blur and Distortion: Real-world reflections are often blurred and can exhibit lens distortions. Apply a Gaussian Blur (Filter > Blur > Gaussian Blur) to soften the duplicated reflection. For more advanced control, especially over varying blur intensity, use the Blur Gallery, specifically Tilt-Shift Blur, which allows you to define a clear zone and a blurred zone, mimicking depth of field in reflections.
- Adjusting Opacity, Blending Modes, and Levels: Reduce the layer’s Opacity to make the reflection semi-transparent. Experiment with Blending Modes (e.g., Screen, Soft Light, Overlay) to find one that interacts well with the background. For further integration, use Levels or Curves Adjustment Layers (clipped to your reflection layer) to match the brightness, contrast, and color tones of the original reflection in the scene. The Blend If options in the Layer Style dialog can also be used to selectively hide parts of the reflection based on the underlying layer’s highlights or shadows, adding another layer of realism.
Optimizing Your Images for Tophinhanhdep.com and Beyond
Once your image replacement and enhancements are complete, optimizing your final output is vital for web performance and overall usability.
- Compression and Format: For web use on Tophinhanhdep.com, images need to be optimized for fast loading. Use Photoshop’s File > Export > Save for Web (Legacy) or File > Export > Export As to compress your images while maintaining quality. JPEG is excellent for photographs, while PNG-24 is better for images with transparency or sharp edges like logos. Tophinhanhdep.com also features various image tools, including compressors and optimizers, that can help refine your final images for perfect display.
- AI Upscaling and Image-to-Text: If your source image from Tophinhanhdep.com needs to be larger than its original resolution for a print project, consider using AI upscalers, often found in advanced image tools. Similarly, if you’re extracting text from a photographic element for design purposes, image-to-text converters can be invaluable for transferring information accurately into your designs.
Beyond Replacement: The Tophinhanhdep.com Advantage
Tophinhanhdep.com is more than just a repository of images; it’s a creative hub designed to inspire and equip designers and photographers with the resources they need.
Discovering High-Resolution Images and Photography
With categories ranging from aesthetic wallpapers and vibrant nature shots to striking abstract art and beautiful photography, Tophinhanhdep.com provides a vast library of high-quality visuals. These images, often in high resolution, serve as perfect starting points for any Photoshop project requiring image replacement or manipulation. Whether you need a serene background for a product mockup or a dramatic landscape for a compositing project, the collections on Tophinhanhdep.com offer endless possibilities.
Enhancing Your Visuals with Image Tools and AI
Tophinhanhdep.com understands the modern designer’s needs. Beyond stunning imagery, the platform offers a suite of image tools including converters, compressors, optimizers, and AI upscalers. These tools complement your Photoshop workflow, helping you prepare your source images, refine your outputs, and ensure your final visuals are perfectly suited for their intended use—be it for a website, social media, or print. The integration of AI capabilities, like upscaling, further extends the utility of every image you find, allowing for greater creative freedom.
Finding Inspiration and Trending Styles
For those seeking new ideas, Tophinhanhdep.com provides rich image inspiration and curated collections, including mood boards and trending styles. These resources can spark new creative ideas, guiding your choice of images for replacement projects and helping you stay ahead of design trends. Pairing these inspirations with Photoshop’s powerful image replacement capabilities allows you to quickly prototype concepts and experiment with diverse aesthetic and emotional themes, from sad/emotional compositions to uplifting and vibrant designs.
In conclusion, mastering image replacement in Photoshop is a vital skill for anyone working with digital visuals. By leveraging Smart Objects for dynamic content, understanding perspective transformations, and applying meticulous finishing touches, you can create realistic and adaptable designs. Coupled with the extensive resources and specialized image tools available on Tophinhanhdep.com, your creative potential is limitless, allowing you to continually produce high-quality, impactful visual content.