How to Resize an Image Without Losing Quality: The Definitive Tophinhanhdep.com Guide

In the dynamic world of visual content, from breathtaking wallpapers and aesthetic backgrounds to professional digital photography and intricate graphic designs, the quality of your images is paramount. Whether you’re a seasoned photographer, a budding digital artist, a website owner, or simply someone looking to enhance their personal image collection, you’ve likely encountered the common dilemma: how to resize an image without sacrificing its crispness and detail. The fear of pixelation, blurriness, or distortion is a very real one, capable of turning a beautiful photograph into an amateurish mess.
At Tophinhanhdep.com, we understand that high-quality visuals are the cornerstone of impactful communication and stunning personal expression. Our extensive resources cover everything from high-resolution stock photos and diverse image collections (Nature, Abstract, Sad/Emotional) to advanced image tools like AI upscalers and comprehensive visual design tutorials. This guide is crafted to demystify the art and science of image resizing, ensuring that every visual you create or use maintains its pristine quality, perfectly aligned with the standards and offerings you find on Tophinhanhdep.com.
Understanding the Fundamentals: Pixels, Resolution, and Image Integrity
Before diving into the “how-to,” it’s essential to grasp the core concepts that dictate image quality during resizing. Many common frustrations stem from a lack of understanding of what an image truly is in the digital realm.
Is it Possible to Resize an Image Without Losing Its Quality?
The short answer is a resounding yes! However, achieving this requires more than just dragging a corner in basic software. It involves a fundamental understanding of how digital images are constructed and how different resizing techniques manipulate that construction. On Tophinhanhdep.com, we champion the notion that you can have both size and quality.
Pixels and Image Types
Most digital images you encounter daily, including JPEGs and PNGs, are Bitmap files. Imagine a grid, thousands upon thousands of tiny squares, each assigned a specific color and position. These are pixels, and collectively, they form your image. If you zoom in close enough on any bitmap image, you’ll eventually see these individual squares. The more pixels packed into a given area (higher pixel density or resolution), the sharper and more detailed the image appears.
Common online image file formats each have their characteristics:
- JPEG (Joint Photographic Experts Group): Widely used for web optimization due to its smaller file sizes and faster loading speeds. It uses “lossy” compression, meaning some data is discarded to achieve smaller files, which can impact quality if compressed too heavily or repeatedly.
- PNG (Portable Network Graphics): Offers superior quality compared to JPEG, especially for images with sharp lines, text, or transparency, as it uses “lossless” compression. The trade-off is often larger file sizes, which can affect page speed.
- GIF (Graphics Interchange Format): Popular for simple animations and images with limited color palettes, maintaining small file sizes.
It’s crucial to remember that converting a low-resolution format to a high-resolution format will not miraculously improve the picture’s quality. You can’t add detail that wasn’t there in the first place through simple format conversion alone, though advanced AI Upscalers (available as tools on Tophinhanhdep.com) are changing this landscape.
Resizing vs. Resampling: The Critical Distinction
Often, the term “resizing” is used generically, but in image manipulation, there are two distinct methods:
-
Resizing (or Scaling): This is the most basic method. When you “resize” by scaling, you’re essentially telling the software to enlarge or decrease the size of the existing pixels to fit the new dimensions. The number of pixels remains the same. While this works well for making an image smaller (as pixels become less visible), making an image significantly larger this way often leads to pixelation, as the original pixels are merely stretched, creating a blocky appearance.
-
Resampling: This is the more sophisticated and appropriate tool for maintaining quality, especially when enlarging an image or optimizing for web. Resampling actively changes the number of pixels in an image.
- When making an image smaller (downsampling): The program intelligently discards pixels, analyzing adjacent pixels to maintain visual integrity.
- When making an image larger (upsampling): This is where the magic happens. The software interpolates or “guesses” new pixels based on the colors and positions of existing ones. Different interpolation algorithms (like Bicubic, Lanczos, Sinc) use various mathematical functions to create these new pixels, striving to blend them seamlessly and preserve detail. This process is key to avoiding pixelated distortions and is the foundation for all quality-preserving enlargement.
Understanding this distinction is fundamental. When you want to resize an image without losing quality, especially when increasing its dimensions, your primary goal should be to leverage effective resampling techniques.
Why Image Resizing Matters: Enhancing Your Visual Design and Digital Presence
Proper image resizing isn’t just a technical detail; it’s a strategic element that profoundly impacts your visual design, website performance, and overall content effectiveness. On Tophinhanhdep.com, we emphasize how optimized images elevate everything from a personal blog to a professional portfolio.
The Crucial Role of Image Resizing in Visual Design
Every visual element on your website, social media, or print material contributes to your brand’s identity and user experience. Images, whether they are aesthetic wallpapers, abstract backgrounds, or high-resolution photography, are often the first point of engagement.
Making a Stellar First Impression
Poorly resized images are an immediate deterrent. A blurred background, a pixelated banner, or a distorted product photo signals a lack of professionalism and attention to detail. Visitors are primarily captivated by visuals, and sloppy resizing can diminish your impact, or even cause you to lose potential audience members. Imagine browsing Tophinhanhdep.com and finding beautiful photography rendered with jagged edges – it would undermine the entire experience. Properly resized images ensure that your visual content, from nature scenes to emotional photography, always looks its best, captivating your audience from the first glance.
Preparing Images for Diverse Applications
Images serve countless purposes, each with unique size and quality requirements. A stunning high-resolution photograph taken for a gallery print will likely be too large for a website hero image or a social media post. Similarly, an image perfectly sized for a blog post might appear stretched or pixelated if used as a desktop background. Mastering resizing allows you to prepare images for:
- Websites and Blogs: Optimized for fast loading and clear display across various screen sizes.
- Social Media: Adhering to platform-specific dimensions for optimal engagement (e.g., Instagram stories, Facebook banners).
- Print Materials: Ensuring sufficient resolution for brochures, posters, or large-format banners.
- Digital Art and Graphic Design: Providing the right canvases for creative ideas and photo manipulation projects.
- Personal Collections: Maintaining quality for wallpapers, backgrounds, and thematic collections.
Optimizing for Web Performance: Speed and SEO
Beyond aesthetics, image resizing is a critical factor for website performance, a key area covered in Tophinhanhdep.com’s Image Tools section (Compressors, Optimizers).
Photos and images arriving directly from high-resolution cameras are typically very large in file size, containing many pixels. While excellent for print, these unoptimized images can significantly slow down your website’s loading speed. Each pixel takes time to load, and a page laden with heavy images can test a visitor’s patience, leading to high bounce rates.
Reducing the resolution and file size of your images before uploading them to your site is essential for ensuring a smooth browsing experience. This directly impacts:
- Page Speed: Faster loading times improve user satisfaction and reduce abandonment rates.
- Search Engine Optimization (SEO): Search engines like Google favor faster websites. Optimized images contribute to better rankings, making your content more discoverable.
- User Experience: A quick, seamless browsing experience keeps visitors engaged longer, whether they’re exploring stunning landscapes or browsing thematic collections.
In this sense, page speed and picture quality are equally important factors for your digital presence. Fortunately, resizing image pixels and optimizing them is not overly complicated, especially with the right tools and knowledge provided by Tophinhanhdep.com.
Choosing the Right Image Tool: Free vs. Premium Solutions for Quality Resizing
The market is abundant with software tools designed for image resizing. They vary in flexibility, output quality, user-friendliness, and price. Tophinhanhdep.com offers a range of “Image Tools” from simple converters to advanced AI Upscalers, catering to every need.
Tophinhanhdep.com’s Recommended Online Resizer
For quick, efficient, and quality-conscious resizing, Tophinhanhdep.com’s integrated online image resizer is an excellent choice. It provides an intuitive interface and reliable results for various file types.
How to Resize an Image with Tophinhanhdep.com’s Online Tool:
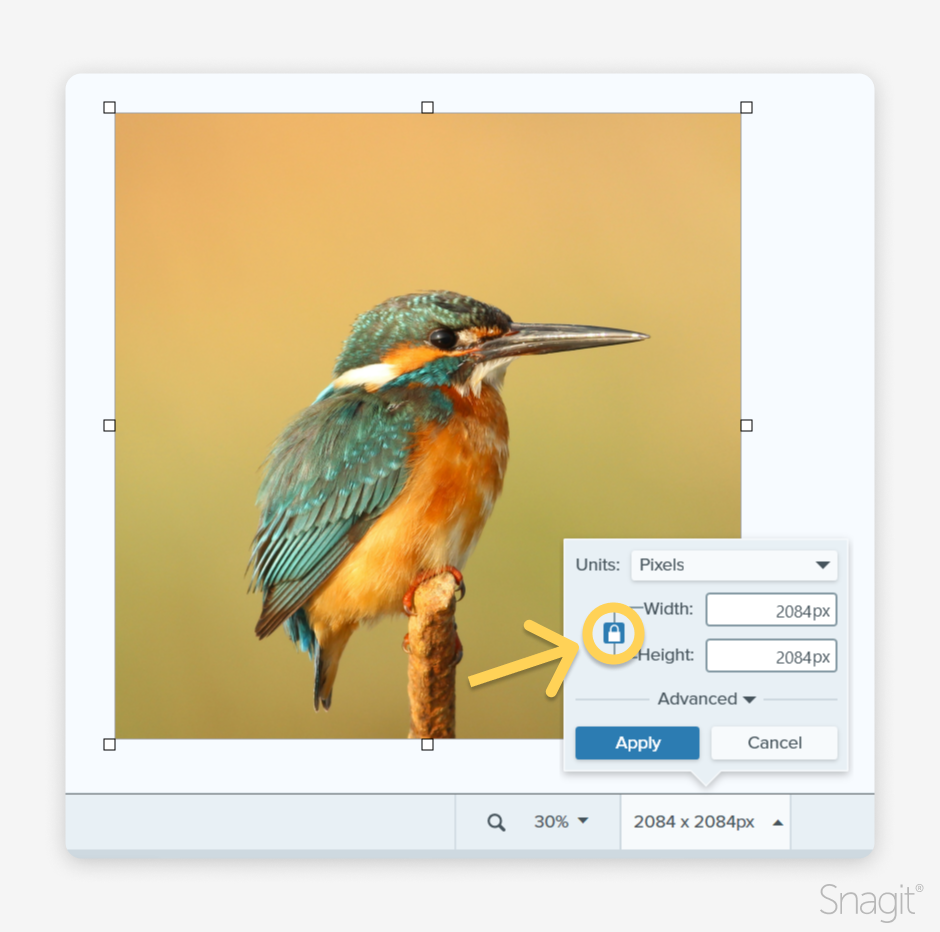
- Upload Your Image: Select a photo from your gallery. Our tool supports various formats including GIF, JPEG, BMP, PNG, HEIC, and TIFF. You can simply drag and drop your file directly into the designated area.
- Choose Your Settings: Once uploaded, you can customize the image settings. Decide if you want it smaller or larger than the original dimensions. Simply input the desired width and height, select your preferred output format (JPEG, PNG, or WEBP for web optimization), and adjust any optimization settings for the best balance of quality and file size.
- Apply the Changes: Satisfied with your selections? Hit the “Save” or “Apply” button, and your newly resized image will automatically download to your device in seconds, ready for use as a beautiful background or a perfectly scaled social media post.
Mastering Adobe Photoshop for Professional Results
Adobe Photoshop stands as the industry standard for professional photo editing and graphic design. Used by countless photographers, editors, and web designers worldwide, it offers unparalleled control over image manipulation, including resizing without quality loss. While a premium tool, its capabilities are well worth the investment for serious users working with high-resolution photography and complex visual design projects.
Key Techniques in Photoshop:
-
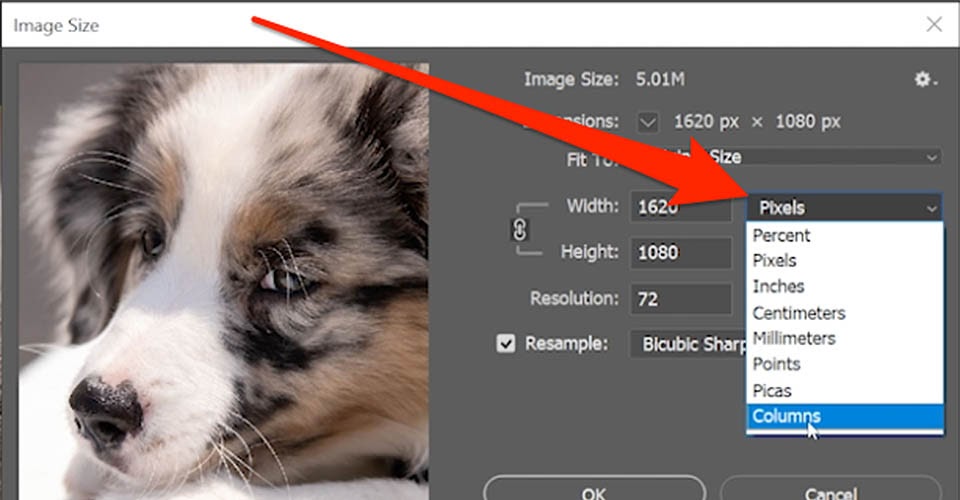
Image Size Dialog Box:
- Open your image in Photoshop.
- Go to Image > Image Size (or use the shortcut
Ctrl+Alt+Ifor Windows,Cmd+Option+Ifor Mac). - In the dialog box, ensure the “Resample” option is checked. This is crucial as it tells Photoshop to add or remove pixels, rather than just stretching existing ones.
- Select your desired interpolation method from the “Resample” dropdown. Bicubic Smoother (for enlargement) and Bicubic Sharper (for reduction) are often excellent choices. For general purposes, “Automatic” works well, letting Photoshop decide.
- Enter your desired width and height. If the “link” icon between width and height is enabled, Photoshop will preserve the aspect ratio automatically.
- Click “OK.”
-
Free Transform Tool:
- Select the layer you wish to resize in the Layers panel.
- Go to Edit > Free Transform (or use the shortcut
Ctrl+Tfor Windows,Cmd+Tfor Mac). - A bounding box with handles will appear. Click and drag a corner handle to resize. Crucially, hold down the Shift key while dragging to maintain proportions and avoid distortion.
- Press Enter/Return to confirm the changes. While useful for quick adjustments, remember that significant enlargements via Free Transform without careful resampling settings can lead to quality degradation if not done carefully.
Pro Tips for Photoshop:
- Work on Copies: Always duplicate your original image or layer before making destructive edits.
- View at 100%: To accurately assess quality, view your image at 100% zoom.
- Plugins: For extreme enlargements, consider third-party Photoshop plugins like ON1 Resize (formerly Perfect Resize) or Alien Skin Blow Up, which utilize advanced algorithms (like fractal interpolation) to maintain detail even when scaling images up by hundreds or thousands of percent. These are invaluable for high-resolution photography.
GIMP: The Powerful Free Alternative
For those seeking a robust, free image editing solution, GIMP (GNU Image Manipulation Program) is an excellent open-source alternative to Photoshop. It’s highly capable for resizing images without significant quality loss, making it a valuable tool for graphic design and digital art projects, especially for users who can’t invest in premium software.
How to Resize an Image with GIMP:
- Open your image in GIMP.
- Go to Image > Scale Image.
- In the “Scale Image” dialog box, you can input your desired width and height. Ensure the “chain” icon is linked to maintain the aspect ratio.
- Under the “Quality” section, select an Interpolation method.
- Cubic (Bicubic): Often provides good results for both enlargement and reduction by considering the colors of surrounding pixels. It can be slower but generally yields smoother transitions.
- Sinc (Lanczos3): This is highly recommended for resampling, especially for enlargements, as it uses a more sophisticated mathematical function to create new pixel information, resulting in sharp, high-quality resized images.
- Click “Scale.”
GIMP’s interpolation methods are designed to intelligently create new pixel information when enlarging, preventing the pixelated look you’d get from simple scaling.
Other Noteworthy Resizing Software
Beyond the giants, several other tools offer unique advantages for resizing, some of which align with Tophinhanhdep.com’s “Image Tools” category for compressors and optimizers.
- Irfanview: A fast, lightweight, and free multimedia viewer and editor for Windows. While its user interface is dated, it’s incredibly efficient for quick resizing. To use it: Open image, Image > Resize/Resample, enter dimensions, select Resample, choose Lanczos (slowest) as the filter, and check ‘Apply Sharpen After Resample’ for best results. Ideal for rapid processing of basic image collections.
- ON1 Resize 2019.6 (or newer versions): This dedicated software utilizes advanced fractal interpolation technology, capable of enlarging images up to 1000% without losing clarity or detail. It can function as a standalone tool or a Photoshop plugin. Features include gallery wrap for canvas prints, numerous presets, and mosaic tiling, making it a professional choice for high-resolution photography and print. It’s a prime example of an “AI Upscaler” in practice.
- Fotophire Maximizer: Another excellent tool for enlarging images up to 1000%. It excels at improving grainy, low-light photographs and offers features like color correction and enhanced edges.
- PIXresizer: A free, user-friendly software designed to make images “email and web friendly” by reducing file size. It also handles format conversions, rotations, batch resizing, and grayscale conversions – a great “compressor” and “optimizer.”
- Reshade: A free tool that employs advanced algorithms to produce high-resolution enlargements up to 2000% without blur or jagged edges. It supports popular formats and batch processing, useful for bulk image manipulation.
- A Sharper Scaling: A free Windows tool that combines Bicubic interpolation with image sharpening to scale images up to 300% with minimal distortion.
These tools offer diverse options, from simple web optimization to complex print-ready enlargements, all contributing to the goals of “Digital Photography” and “Visual Design” on Tophinhanhdep.com.
Best Practices for Quality Image Enlargement and Optimization
Beyond choosing the right tool, adopting smart strategies ensures your resized images always meet the highest quality standards, whether for a detailed photo manipulation or a vibrant aesthetic wallpaper.
Pro Tips for Enlarging Images Without Compromise
When attempting to increase image size, particular considerations can make a significant difference.
Enlarge Gradually with Smaller Percentages
Rather than attempting a drastic enlargement in one go, experts often recommend increasing image size gradually in smaller percentages. Most photo editing software can enlarge images up to 200% without noticeable quality loss using standard resampling methods. For larger scaling, especially beyond 200-300%, specialized tools or plugins that employ fractal or AI-driven interpolation become indispensable. This incremental approach helps the software better “guess” the new pixel information, leading to smoother transitions and better detail preservation.
Start with High-Resolution Originals
The quality of your resized image is inherently tied to the quality of your source material. Images captured with higher megapixel cameras or those originally in higher resolutions will always be easier to enlarge without significant degradation. A tiny, low-resolution image offers less original pixel data for resampling algorithms to work with, making substantial quality-preserving enlargement much harder, even with advanced tools. This underscores the importance of “High Resolution Photography” as featured on Tophinhanhdep.com.
Utilize Image Sharpening Tools
After an image has been enlarged through resampling, it can sometimes appear slightly softer or less defined than the original. A common professional strategy is to gently apply an image sharpening tool after resizing. Sharpening enhances edge contrast, making details appear crisper and recovering some of the perceived sharpness that might have been lost during interpolation. Be careful not to over-sharpen, as this can introduce artifacts or a grainy appearance.
Consider AI Upscaling for Superior Results
For truly remarkable enlargements, especially from lower-quality or older images, AI Upscalers are a game-changer. As part of Tophinhanhdep.com’s “Image Tools” offerings, AI upscaling leverages artificial intelligence and machine learning algorithms to intelligently add detail and textures that traditional interpolation methods cannot. Instead of simply guessing pixel colors, AI models are trained on vast datasets of images to understand patterns and realistically reconstruct missing information. This allows you to transform “low-quality images into higher resolution” with astonishing clarity, making it an invaluable asset for breathing new life into old photos or preparing smaller images for large prints or high-definition screens.
Resizing for Success: Elevating Your Visuals with Tophinhanhdep.com
Mastering the art of resizing images without losing quality is more than just a technical skill; it’s a fundamental aspect of effective visual communication and stunning digital artistry. From creating compelling social media visuals and optimizing your website for speed to producing museum-quality prints, the ability to manipulate image dimensions while preserving their integrity is invaluable.
Tophinhanhdep.com is your comprehensive resource for all things visual. We provide not only the “Image Tools” necessary for flawless resizing, conversion, compression, and AI upscaling but also a wealth of “Image Inspiration & Collections” for “Wallpapers, Backgrounds, Aesthetic, Nature, Abstract, Sad/Emotional, and Beautiful Photography.” Our “Photography” section delves into “High Resolution,” “Stock Photos,” and “Digital Photography” techniques, while our “Visual Design” content offers insights into “Graphic Design,” “Digital Art,” “Photo Manipulation,” and “Creative Ideas.”
By understanding the principles of pixels and resampling, choosing the right software from Tophinhanhdep.com’s recommendations, and implementing best practices, you now have the confidence to tackle any resizing challenge. Elevate your aesthetic, boost your web performance, and ensure every image you present—be it a vibrant landscape or a minimalist abstract design—shines with impeccable quality. Explore Tophinhanhdep.com today and unlock the full potential of your visual content.