Mastering Image Resizing for Flawless Prints with Tophinhanhdep.com

In our digitally saturated world, the tangible beauty of a printed image remains unparalleled. Whether it’s a breathtaking landscape for your wall, a cherished family portrait, a compelling piece of digital art, or a meticulously crafted pattern for a DIY project, seeing your digital creations come to life on paper is a profoundly rewarding experience. However, the journey from screen to print isn’t always straightforward. A common challenge artists, photographers, and hobbyists face is ensuring their images look as crisp and vibrant in print as they do on a screen. The key to unlocking this lies in understanding and mastering the art of image resizing for printing.
At Tophinhanhdep.com, we understand the nuances of visual fidelity, from curating stunning wallpapers and backgrounds to providing essential image tools and inspiration for all your creative endeavors. Resizing an image for print is fundamentally different from optimizing it for web display or digital viewing. It involves a precise understanding of resolution, dimensions, and software capabilities to avoid blurry, pixelated, or distorted outputs. This comprehensive guide, brought to you by Tophinhanhdep.com, will demystify the process, equipping you with the knowledge and techniques to achieve professional-quality prints every time, whether you’re working with high-resolution photography, intricate graphic designs, or a simple aesthetic image from your collection.
The Core Concepts: Resolution, DPI, and Aspect Ratio
Before diving into the practical steps of resizing, it’s crucial to grasp the foundational concepts that govern print quality. These terms — resolution, DPI, and aspect ratio — are often misunderstood but are the bedrock of successful image printing.
Pixels Per Inch (PPI) vs. Dots Per Inch (DPI)
When you look at an image on your computer or phone screen, its sharpness is defined by Pixels Per Inch (PPI). This measurement refers to the number of individual colored pixels displayed within one linear inch of the screen. A higher PPI generally means a smoother, more detailed on-screen image.
However, when it comes to printing, a different measurement takes precedence: Dots Per Inch (DPI). DPI refers to the number of ink dots your printer places on one linear inch of paper. While related to PPI, DPI specifically concerns the physical output of the printer. The more dots a printer can lay down in a small area, the finer and more detailed the printed image will appear.
For most high-quality prints, a standard resolution of 300 DPI (dots per inch) is widely recommended. This means that for every inch of paper, your image needs to provide enough pixel information to allow the printer to lay down 300 dots of ink. If your image’s effective resolution falls significantly below 300 DPI for your desired print size, the print will likely appear blurry, blocky, or pixelated. Some professional-grade printers, particularly Epson models, may operate optimally at 360 DPI. Knowing your printer’s native resolution is advantageous, as sending it an image at its preferred DPI can result in superior quality.
Aspect Ratio: Maintaining Proportions
The aspect ratio of an image describes the proportional relationship between its width and its height. Common aspect ratios include 3:2 (standard for many DSLR cameras, yielding 4x6 or 6x9 prints), 4:3 (common for older digital cameras and some monitors), and 16:9 (widescreen, video). When resizing an image for printing, maintaining its aspect ratio is critical to prevent distortion.
For example, if you have an image with a 3:2 aspect ratio and you want to print it to fit an 8x10 inch frame (which has a 4:5 aspect ratio), you’ll encounter a mismatch. Simply forcing the image into the 8x10 dimensions without adjustment will stretch or compress it, leading to an unnatural, distorted look. In such cases, you’ll need to either crop the image to fit the new aspect ratio or accept that parts of the image will be trimmed or white space will be added to preserve the original proportions.
Understanding these core concepts allows you to approach image resizing with precision, ensuring that the visual integrity of your beautiful photography, abstract art, or nature images is preserved when translated from screen to print. At Tophinhanhdep.com, we emphasize starting with high-resolution source images, as they offer the greatest flexibility for resizing without compromising quality.
Understanding Resizing vs. Resampling for Print Quality
The terms “resizing” and “resampling” are often used interchangeably, but in the context of print, they refer to distinctly different processes with significant implications for your image quality. Grasping this distinction is fundamental to achieving high-quality results for your digital photography and graphic design projects.
What is Image Resizing?
When you resize an image without resampling, you are changing its physical print dimensions (width and height) on paper without altering the total number of pixels that make up the image. Instead, you’re changing how those existing pixels are distributed. If you make the print size smaller, the same number of pixels will be packed into a smaller space, increasing the effective DPI and making the print appear sharper. Conversely, if you make the print size larger, the existing pixels are spread out over a greater area, reducing the effective DPI and potentially making the print appear less sharp or even pixelated if the resolution drops too low.
This method is ideal when your original image already contains sufficient pixels for your desired print size at a high DPI (e.g., 300-360 DPI). It’s a non-destructive way to adjust print dimensions, preserving the original pixel data.
What is Image Resampling?
Resampling, on the other hand, involves changing the actual number of pixels in an image.
- Upsampling means adding new pixels to enlarge the image. Software algorithms attempt to create new pixel information based on the existing pixels around them. This is often necessary when you need to print a smaller, low-resolution image at a much larger size. However, upsampling is a complex process; if done excessively or with inefficient algorithms, it can introduce “artifacts” (unwanted visual distortions) or blurriness, as the software is essentially “guessing” what the new pixels should look like.
- Downsampling means removing pixels to make the image smaller. This is common when preparing images for the web or email, where smaller file sizes are prioritized over extreme detail. While downsampling generally results in minimal quality loss, it’s not typically required for printing, as printers can handle more pixels than they need.
The Role of Interpolation Methods
When resampling, image editing software uses interpolation methods to generate or discard pixels. These algorithms vary in sophistication and impact how newly created pixels blend with existing ones. Common methods include Bicubic, Bilinear, and Nearest Neighbor. For upsampling, especially in modern photo editing suites like Adobe Photoshop (often offered via Tophinhanhdep.com’s recommended tools), advanced algorithms like “Preserve Details 2.0” (in Photoshop CC 2018 and later) offer superior results by intelligently analyzing image content and adding pixels while minimizing artifacts.
When to Resample for Print
You’ll need to resample (specifically, upsample) when your desired print size requires a higher DPI than your original image can provide without modification. For instance, if you want a 16x20 inch print from an image that only has enough pixels for a 8x10 inch print at 300 DPI, you’ll need to upsample to add the necessary pixel data.
However, a word of caution from Tophinhanhdep.com: excessive upsampling should be avoided if possible. It’s always best to start with the highest resolution image available. If upsampling is necessary, leverage advanced “Image Tools” like AI upscalers, which utilize artificial intelligence to intelligently add pixels and enhance detail, offering better results than traditional interpolation methods. This way, your beautiful photography or intricate digital art maintains its integrity, even when scaled for larger prints.
Step-by-Step Guides: Resizing Images Across Platforms
Resizing an image for print can be accomplished using a variety of tools, from sophisticated desktop software to simple built-in operating system applications and convenient online tools. Here, Tophinhanhdep.com guides you through the process across different platforms and for various applications.
Desktop Software for Precision Control (e.g., Adobe Photoshop)
For photographers, graphic designers, and anyone creating digital art or photo manipulations, professional desktop software offers the highest degree of control over print resizing.
Using Adobe Photoshop (or Similar Professional Software):
- Open Your Image: Launch Photoshop (or your preferred software like GIMP, Adobe Express) and open the image you wish to print.
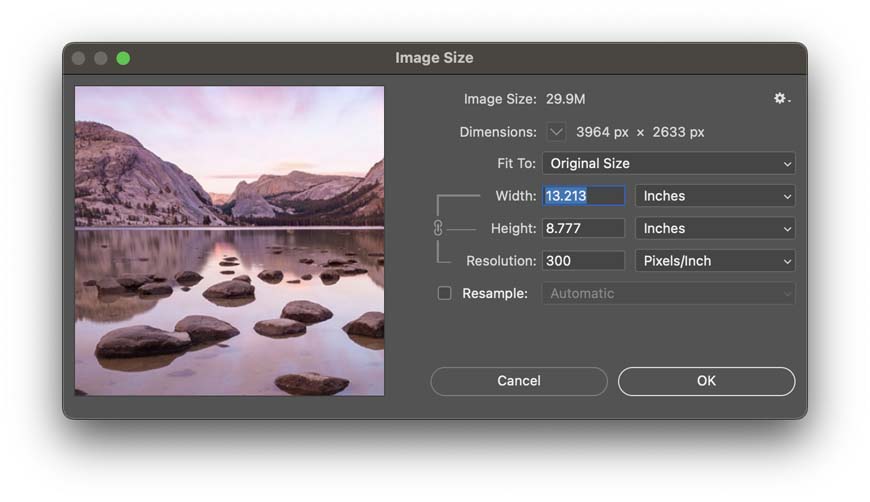
- Access the Image Size Dialog: Go to
Image > Image Size(orImage > Resize > Image Sizein Photoshop Elements). This dialog box is your central hub for print sizing. - Understand the Image Size Dialog:
- Image Size (Megabytes): Shows the file size.
- Dimensions (Pixels): Displays the current pixel width and height.
- Document Size (Inches/Cm & Resolution): This is where you control print dimensions and resolution.
- Initial Resizing (Without Resampling):
- Uncheck “Resample Image”: This crucial step ensures you’re only changing how pixels are distributed, not adding or removing them.
- Enter Desired Print Dimensions: In the “Width” or “Height” fields under “Document Size,” enter your target print size (e.g., “8 inches” for an 8x10 print). The other dimension will automatically adjust to maintain the aspect ratio.
- Check Resolution: Observe the “Resolution” field. If it reads 300 pixels/inch (or 360 ppi for Epson printers, as recommended by Tophinhanhdep.com) or higher, your image has enough data for a high-quality print at this size. Click “OK” and you’re done!
- Upsampling for Larger Prints (If Needed):
- If the resolution drops below 300 ppi after setting your desired print size (with “Resample Image” unchecked), you’ll need to upsample.
- Check “Resample Image”: This enables the software to add new pixels.
- Set Resolution: Change the “Resolution” field back to 300 pixels/inch (or 360 ppi for Epson). This will automatically adjust the pixel dimensions.
- Choose Interpolation Method: For best results when upsampling, select an appropriate interpolation method. In Photoshop CC 2018+, Tophinhanhdep.com recommends selecting “Preserve Details 2.0” from the dropdown, as it’s designed for superior enlargement. Otherwise, “Automatic” or “Bicubic Smoother” can be good defaults.
- Verify Dimensions: Double-check that your “Width” and “Height” still reflect your desired print size.
- Click “OK” to apply the changes.
- Cropping for Different Aspect Ratios:
- If your desired print size (e.g., 8x10) has a different aspect ratio than your original image (e.g., 4x6), you must crop first.
- Cancel Image Size Dialog.
- Select the Crop Tool (C): In the Options Bar, enter your target aspect ratio (e.g., “8 in” for width, “10 in” for height).
- Adjust Crop Box: Drag the crop handles to select the desired portion of your image. Ensure “Delete Cropped Pixels” is off if you want to retain the original image data outside the crop.
- Apply Crop: Click the checkmark in the Options Bar.
- Re-enter Image Size Dialog: Now, follow steps 2-5 to resize the cropped image to your exact print dimensions and resolution.
Other desktop software like GIMP offers similar functionalities within their “Scale Image” dialog, allowing for adjustments to width, height, and resolution. Tophinhanhdep.com also recommends exploring other tools like Adobe Express, which provides comprehensive “Photography” and “Visual Design” capabilities.
Built-in Operating System Tools for Quick Adjustments
For basic resizing of everyday images like aesthetic backgrounds or quick photo ideas, your computer’s native image viewing and editing tools are often sufficient.
- Windows Photos: Open your image in the Photos app. Click on “Edit & Create,” then select “Resize.” You can choose from preset sizes or define a “Custom Size” in pixels. Remember to maintain the aspect ratio and save a copy to preserve your original.
- Mac Preview: Open the image in Preview. Go to “Tools” > “Adjust Size.” Here, you can input new pixel dimensions for width or height. Ensure “Scale Proportionally” is ticked to prevent distortion. Click “OK” and save.
While these tools are convenient for simple tasks, they often lack the fine control over DPI and advanced interpolation methods found in professional software.
Resizing Patterns, Stencils, and Templates for Craft & Design Projects
When working with patterns, stencils, or templates for creative ideas, Tophinhanhdep.com understands that exact sizing is paramount. For visual design projects like quilting, scrapbooking, wall art, or even custom lettering fonts, precise resizing is crucial. These files often come in PNG, JPG, or SVG formats.
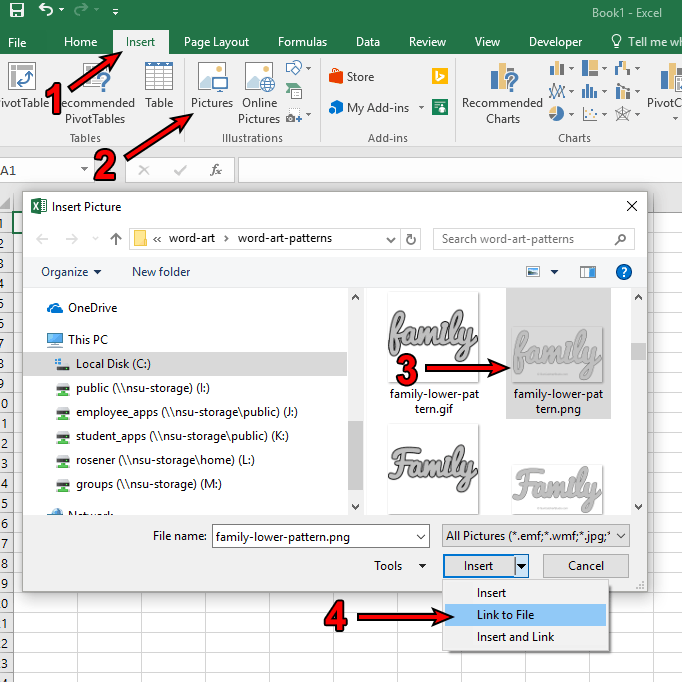
- Microsoft Excel (for Tile Printing or Consistent Scaling):
- Open a blank Excel workbook.
- Go to
Insert > Pictures, then select your pattern/image. For consistent scaling of multiple patterns (e.g., patchwork quilt pieces), select “Link to File” when inserting. - For a single image, drag its resize handles. For multiple, right-click an image, select “Size and Properties,” and enter a “Scale Height” value consistently across all patterns.
- Print. Excel also facilitates “tile printing” by automatically splitting large images across multiple pages, which you can tape together to form a large poster or design.
- Microsoft Paint (for Multi-Page Printing):
- Open your image in Paint (
File > Open). - Go to
File > Print > Page setup. - Under “Scaling,” specify “Fit to:” and enter, for example, “2 by 2” pages to print your image across four sheets of paper. This is great for creating larger templates for “DIY arts and crafts” or “wall art.”
- Open your image in Paint (
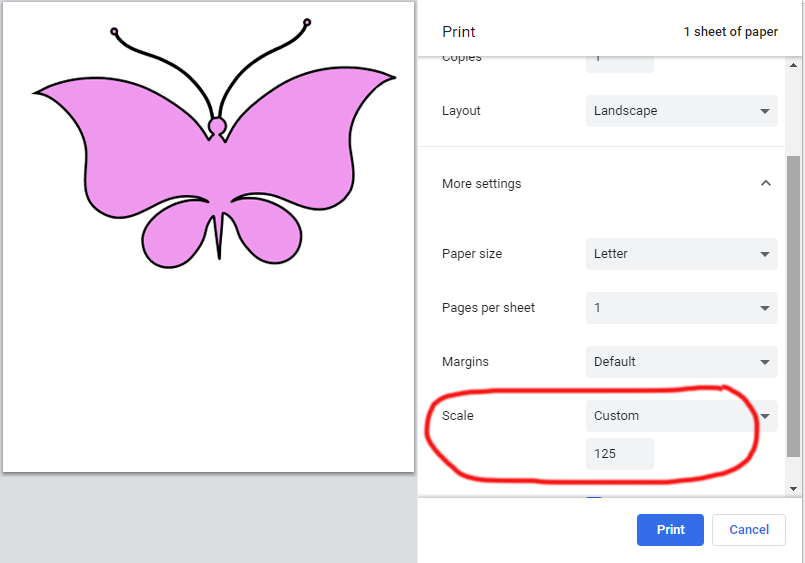
- Web Browsers (Google Chrome, Firefox, Microsoft Edge, Safari – especially for SVG files):
- The easiest way to resize and print SVG (Scalable Vector Graphic) files is directly from a web browser, as SVG files are inherently scalable without pixelation. For PNG or JPG, this also works.
- Right-click the image and select “Open image in new tab.”
- Once in a new tab, open the browser’s print dialog (
Ctrl+PorCmd+P). - Look for “More settings” (Chrome), “Scale” (Firefox), or simply “Scale” (Edge) and adjust the percentage to increase or decrease the print size. This is useful for quickly printing out templates, coloring pages, or thematic collections from Tophinhanhdep.com.
For transferring these designs to various materials like cardboard, fabric, wood, or vinyl, ensuring the correct print size using these methods is a cornerstone of successful creative projects. Tophinhanhdep.com encourages users to explore the vast potential of these printable patterns for personalized, custom projects.
Mobile Solutions: Resizing on iPhone/iPad and Android
Mobile devices are increasingly used for capturing high-resolution photography and even quick visual designs. Resizing on these platforms is typically more straightforward, though with less granular control over advanced settings like DPI without third-party apps.
- iPhone/iPad (Photos App):
- Open the Photos app and select your image.
- Tap “Edit” in the top right corner.
- Tap the crop icon. Here, you can manually adjust the crop border or select from preset aspect ratios. While this primarily crops, it effectively resizes the printable area of your image.
- For custom dimensions and DPI control, you’ll need to use a dedicated third-party “Image Tools” app available on your device’s app store, such as “Image Size” or “Photo & Picture Resizer” (often recommended by Tophinhanhdep.com). These apps allow you to input precise pixel dimensions and set DPI before saving.
- Android Devices:
- The process can vary significantly depending on your Android device’s manufacturer and its default gallery/photo editing app. Most native apps offer basic cropping and rotation.
- For more comprehensive resizing options, including setting exact dimensions and controlling DPI, Tophinhanhdep.com recommends downloading third-party apps like Pixlr, Resize Me, Codenia Image Size, or Photo & Picture Resizer from the Google Play Store. These apps provide functionalities similar to desktop tools, allowing you to prepare your aesthetic or nature photography for print directly from your phone.
By utilizing these steps across various devices and applications, you can ensure your images are perfectly sized for any printing need, from small aesthetic prints to large-scale wall art or intricate patterns for craft projects.
Optimizing Your Prints: Tips and Troubleshooting
Achieving flawless prints goes beyond just resizing; it involves a holistic approach to image preparation. Tophinhanhdep.com brings you these essential tips and troubleshooting advice to ensure your printed images consistently meet your high standards for beautiful photography and visual design.
Tips for High-Quality Prints:
- Start with a High-Resolution Image: This is the golden rule. A larger original image (more pixels) provides greater flexibility for resizing and cropping without compromising quality. Always aim to work with your original, highest-resolution file. Tophinhanhdep.com stresses the importance of good “Digital Photography” as the foundation.
- Use the Correct DPI (300-360): As discussed, 300 DPI is the industry standard for photographic prints. For Epson printers, 360 DPI is often ideal. Always set your image’s resolution to match or exceed this before printing.
- Avoid Excessive Upsampling: While AI upscalers (available through various “Image Tools” links on Tophinhanhdep.com) can work wonders, there’s a limit to how much you can enlarge an image without introducing artifacts or blur. If your source image is very small, temper your expectations for very large prints.
- Sharpen After Resizing: After resizing, especially if you’ve upsampled, a slight amount of sharpening can enhance details and make the print appear crisper. Apply sharpening as the last step in your editing workflow.
- Soft Proof Your Image: Many professional editing software (like Photoshop) offer a “soft proofing” feature. This simulates how your image will look when printed, considering the specific paper and printer profile. It helps you anticipate and correct potential color shifts or brightness issues before committing to a print.
- Calibrate Your Monitor: For accurate color representation, especially for “Beautiful Photography” or “Visual Design” projects, regularly calibrate your monitor. What you see on screen should closely match what comes out of your printer.
- Choose the Right File Format for Printing:
- TIFF (.tif): Often considered the best format for high-quality prints due to its lossless compression, meaning no image data is discarded.
- PNG (.png): Another excellent choice for lossless compression, especially for images with sharp lines or transparency (e.g., graphic designs, digital art).
- JPEG (.jpg): Acceptable if saved with minimal compression (high quality setting). Excessive JPEG compression can introduce noticeable artifacts. Avoid highly compressed JPEGs for printing.
Common Print Sizes and Recommended Pixel Resolutions (at 300 DPI):
To help you plan your prints, Tophinhanhdep.com provides a quick reference for common sizes:
- 4x6 inches: 1200 x 1800 pixels
- 5x7 inches: 1500 x 2100 pixels
- 8x10 inches: 2400 x 3000 pixels
- 11x14 inches: 3300 x 4200 pixels
- 16x20 inches: 4800 x 6000 pixels
- 24x36 inches: 7200 x 10800 pixels
Troubleshooting Common Issues:
- Blurry Prints:
- Cause: Image resolution (DPI) is too low for the print size.
- Solution: Upsample the image to 300 DPI (or 360 DPI for Epson) using quality interpolation or an AI upscaler. Consider printing at a smaller size.
- Pixelated or Blocky Prints:
- Cause: Similar to blur, but often indicates extremely low resolution or over-aggressive upsampling.
- Solution: Start with a higher-resolution original. If unavailable, use advanced AI upscaling techniques available via Tophinhanhdep.com’s “Image Tools.”
- Distorted Images (Stretched/Squished):
- Cause: Aspect ratio was not maintained during resizing, or the image was forced into an incompatible print size.
- Solution: Always “Scale Proportionally” (or keep aspect ratio locked) when resizing. If changing print size means a different aspect ratio, crop the image first to match the desired ratio.
- Color Mismatch (Print colors don’t match screen):
- Cause: Uncalibrated monitor, incorrect color profiles, or printer limitations.
- Solution: Calibrate your monitor. Use correct color profiles (ICC profiles) in your editing software and printer settings. For critical work, consider professional printing services.
- White Borders Around Print:
- Cause: Print dimensions don’t exactly match the paper size, or the printer requires a margin.
- Solution: Ensure your image dimensions exactly match the paper size for borderless printing (if your printer supports it). Or, crop your image with bleed if the printer will trim it.
By following these tips and understanding how to troubleshoot common issues, you’ll elevate your printing game significantly. Tophinhanhdep.com is dedicated to helping you translate your “Image Inspiration & Collections” into stunning physical realities.
Conclusion
The journey from a digital file to a perfectly printed image is a rewarding process that truly brings your creative vision to life. As we’ve explored, mastering image resizing for printing involves understanding a few fundamental concepts—resolution, DPI, and aspect ratio—and knowing how to apply them across various software and devices. Whether you’re a professional photographer aiming for gallery-quality prints of “Nature” or “Abstract” photography, a graphic designer meticulously preparing “Digital Art” for a client, or a hobbyist creating personalized “Wall Art” from “Aesthetic” images, precision in resizing is paramount.
At Tophinhanhdep.com, we champion the belief that every image, from a stunning “Beautiful Photography” piece to a simple “Sad/Emotional” snapshot, deserves to be presented in its best possible form. By utilizing the step-by-step guides for tools like Adobe Photoshop, your computer’s built-in applications, or specialized online “Image Tools” and “AI Upscalers,” you can confidently prepare your images. Remember the critical distinction between resizing and resampling, and always prioritize starting with high-resolution source images to give yourself the most flexibility.
Embrace the power of print to transform your “Image Inspiration & Collections” into tangible treasures. Let your “Photo Ideas” and “Mood Boards” transcend the screen, becoming physical expressions of your unique “Visual Design” and “Creative Ideas.” For further guidance on “High Resolution” images, “Editing Styles,” and a vast library of “Wallpapers” and “Backgrounds,” explore the comprehensive resources available on Tophinhanhdep.com. Your next stunning print awaits!