How to Resize an Image in GIMP: A Comprehensive Guide for Digital Artists and Photographers

In the dynamic world of digital imagery, the ability to effectively manipulate and optimize visuals is paramount. Whether you’re a professional photographer, a graphic designer, or simply someone looking to enhance their personal image collection, mastering essential tools like GIMP (GNU Image Manipulation Program) is invaluable. Among the most fundamental operations, resizing an image stands out as a critical skill, influencing everything from website loading times and print quality to the aesthetic balance of a complex visual design.
Tophinhanhdep.com is dedicated to providing a wealth of resources on all things visual – from stunning Wallpapers and Backgrounds to insights into High Resolution Digital Photography and advanced Image Tools. This guide, crafted with the expertise echoed across Tophinhanhdep.com, will walk you through the various methods of resizing images in GIMP, ensuring your creations are perfectly scaled for any purpose. We’ll delve into the nuances of global image scaling versus individual layer adjustments, explore resolution considerations, and offer practical steps to achieve flawless results. By the end of this comprehensive tutorial, you’ll be well-equipped to resize images like a pro, contributing to the creation of captivating Aesthetic imagery, vibrant Nature scenes, compelling Abstract art, and impactful Beautiful Photography.
Understanding Image Resizing in GIMP: Why and When to Scale
Resizing isn’t just about making an image bigger or smaller; it’s a strategic decision that affects visual quality, file size, and overall utility. For instance, a High Resolution image captured for print might be several megabytes in size. Uploading such an image directly to a website as a Background or for a Thematic Collection can drastically slow down page load times, frustrating users and negatively impacting SEO. Conversely, attempting to print a low-resolution image, perhaps one originally designed as a small web icon, will result in a pixelated and unsatisfactory output.
GIMP, as a powerful open-source alternative to proprietary software, provides robust functionalities for precise image manipulation. Before diving into the “how-to,” it’s crucial to grasp the distinction between resizing the entire image canvas and scaling individual layers. This understanding forms the bedrock for effective Photo Manipulation and advanced Graphic Design projects.
Distinguishing Between Image and Layer Resizing
One of the most common points of confusion for GIMP newcomers is understanding the difference between resizing the entire image and resizing individual layers. While seemingly similar, these two operations have distinct impacts on your composition:
-
Resizing the Image (Canvas): When you resize the entire image, you are changing the dimensions of the entire composition. This means that every layer within that composition, including background layers, text layers, and any imported Stock Photos, will be scaled proportionately. This is the go-to method when you need to change the overall dimensions of your final output, for example, preparing an image for a specific print size or for a particular web resolution. It acts as a global transformation, affecting the fundamental dimensions of your digital canvas. For instance, if you’re creating a new Wallpaper for a specific screen resolution, resizing the entire image is what you’d typically do.
-
Resizing a Layer: In contrast, resizing a layer in GIMP allows you to adjust the dimensions of only that specific layer within the existing image canvas. The surrounding layers and the overall canvas size remain unchanged. This is incredibly useful for Visual Design projects, such as creating collages, integrating multiple elements from Stock Photos, or performing intricate Photo Manipulation. Imagine you’re combining several images to form a Mood Board; you’ll likely need to scale each image (layer) independently to fit your desired layout without altering the dimensions of your main artboard. This granular control is what enables complex and creative compositions.
Understanding this fundamental difference is key to avoiding common pitfalls and ensuring your resizing efforts align with your creative vision, whether you’re working on Creative Ideas for a new piece of Digital Art or simply preparing a stunning piece of Beautiful Photography for display.
The Importance of Resolution for Web and Print
Resolution refers to the detail an image holds, typically measured in pixels per inch (ppi) or dots per inch (dpi). It’s a critical factor that directly impacts how your resized image will appear, especially when considering its final destination.
-
Web-Optimized Resolution (72 ppi): For images intended for digital display on websites, social media, or as Wallpapers on screens, a resolution of 72 ppi is generally sufficient. Screens display pixels directly, so a higher ppi doesn’t necessarily translate to a sharper image on a standard monitor but will result in a larger file size. The goal for web images is usually a balance between visual quality and file size, ensuring fast loading times for your Aesthetic collections or Nature photography. Tophinhanhdep.com’s focus on Image Tools like Compressors and Optimizers directly addresses this need.
-
Print-Optimized Resolution (300 ppi): When preparing images for physical printing (e.g., posters, brochures, high-quality photographs), a much higher resolution of 300 ppi (or even more, depending on print size and viewing distance) is recommended. This ensures that the printed image retains fine detail and appears crisp, without visible pixelation. Printers use ink dots, and a higher density of these dots is needed to create a smooth, high-quality output. Using a 72 ppi image for print will almost always lead to a blurry or “blocky” result, even if the pixel dimensions are large. This is a crucial consideration for photographers sharing their Beautiful Photography for physical exhibition.
The choice of resolution, coupled with the correct dimensions, is a fundamental aspect of effective image resizing. It’s not just about fitting an image into a space; it’s about optimizing its visual integrity for its intended medium.
Method 1: Precise Numerical Resizing Using Scale Image
When precision is paramount, and you know the exact dimensions or resolution your image needs to be, the “Scale Image” function in GIMP is your most reliable tool. This method performs a global resize, affecting all layers within your composition proportionally. This is ideal for tasks such as preparing a master image for various platforms or ensuring a consistent output size for a series of Stock Photos.
Initiating the Scale Image Dialogue
The process begins by accessing GIMP’s main menu.
- Open Your Image: Launch GIMP and open the image you wish to resize. Navigate to
File > Openand select your image. If prompted about color profiles, simply click “Convert” to proceed, accepting the default settings unless you have specific color management needs. - Access Scale Image: Once your image is open, go to
Imagein the top menu bar, and then selectScale Image.... This action will open the “Scale Image” dialogue box, which provides comprehensive controls for adjusting your image’s dimensions and resolution.
This dialogue box is your command center for global image transformations. It will display the current dimensions (Width and Height), the units of measurement (pixels, inches, millimeters, etc.), and the X and Y resolution.

Setting Dimensions and Resolution for Optimal Output
Within the “Scale Image” dialogue, you have several critical parameters to adjust:
-
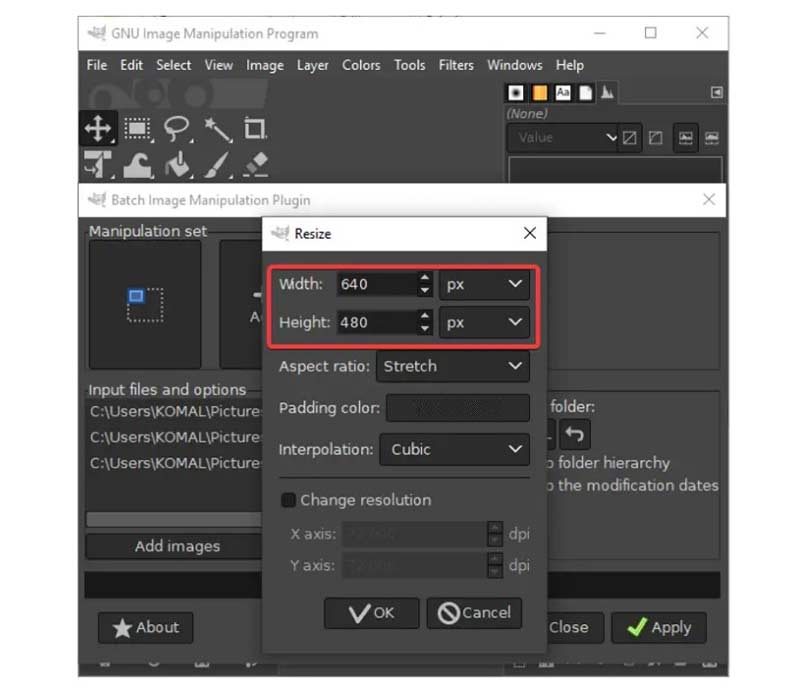
Width and Height:
- These fields display the current dimensions of your image. You can input new numerical values directly into these boxes.
- Chain Link Icon: To the right of the Width and Height fields, you’ll see a chain-link icon. By default, this icon is typically linked, meaning the aspect ratio is locked. When linked, changing either the Width or Height will automatically adjust the other dimension proportionally, preventing your image from looking stretched or squished. This is crucial for maintaining the integrity of your Beautiful Photography or Digital Art.
- Unlinking for Distortion: If you intentionally need to distort or change the aspect ratio (e.g., to fit a very specific, non-proportional space, though generally not recommended for photographic images), you can click the chain-link icon to unlink the dimensions. This allows you to set Width and Height independently.
- Units Dropdown: The dropdown menu next to the dimensions (often defaulting to “px” for pixels) allows you to choose your preferred unit of measurement. Options include pixels (px), inches (in), millimeters (mm), points (pt), and more. This flexibility is particularly useful when preparing images for print, where physical dimensions are often more relevant than pixel counts.
-
X and Y Resolution:
- These fields determine the resolution of your image, typically measured in pixels/inch (ppi).
- As discussed earlier, set this to 72 pixels/inch for images intended for web use (e.g., Wallpapers, Backgrounds, Thematic Collections for online display) to optimize file size and load speed.
- For print, set it to 300 pixels/inch (or higher if required by your printer or for very large prints) to ensure high-quality output.
- The X and Y resolution are usually linked and should be kept the same to avoid distortion.
-
Quality Interpolation:
- Below the resolution settings, you’ll often find an “Interpolation” setting (e.g., “Cubic,” “Linear,” “No Interpolation”). This setting dictates the algorithm GIMP uses to calculate new pixel values when resizing.
- Cubic (default): Generally provides a good balance between sharpness and smoothness, suitable for most photographic resizes.
- LoHalo: Can produce slightly sharper results when scaling down.
- No Interpolation: Results in a “nearest neighbor” pixel approach, which can look blocky but might be desired for pixel art.
- For general resizing of Digital Photography, stick with “Cubic” or experiment with “LoHalo” for subtle differences.
Once you have entered your desired Width, Height, and Resolution, and selected the appropriate interpolation method, review your settings. Then, click the “Scale” button. GIMP will process the image, applying the new dimensions and resolution to the entire composition. This action will effectively resize all layers within the image, maintaining their relative proportions unless you intentionally unlinked the aspect ratio.
This method is straightforward and highly efficient for global image adjustments, making it an essential tool for preparing your visuals for publishing, whether on Tophinhanhdep.com or elsewhere, ensuring they adhere to required specifications for resolution and physical size. It’s also the first step towards creating custom Wallpapers or precisely scaled images for your Image Inspiration & Collections.
Method 2: Interactive Resizing with the Scale Tool for Layers and Selections
While “Scale Image” offers precise numerical control over the entire composition, the “Scale Tool” in GIMP provides a more interactive and flexible approach, allowing you to manipulate individual layers or even specific selection areas within an image. This tool is indispensable for Photo Manipulation, Graphic Design, and crafting intricate Digital Art where elements need to be scaled independently without affecting the broader canvas.
Resizing Individual Layers with the Scale Tool
The Scale Tool is perfect for adjusting the size of specific elements, such as Stock Photos imported as layers, logos, or text elements, within a larger composition.
-
Prepare Your Composition and Layers:
- Begin by creating a new composition or opening an existing one. If you’re starting fresh, go to
File > Newand set your desired canvas dimensions and resolution (e.g., 1920x1080 pixels for a web Background, or 300 ppi for a print-ready design). - Import your images as layers. Go to
File > Open as Layers...and select the images you want to incorporate. Each selected image will open as a new layer in your composition. Rename your layers in the “Layers” panel for easier management (e.g., “Pink Background,” “Yellow Image”). This practice enhances workflow, especially when dealing with complex Mood Boards or multi-element Visual Design.
- Begin by creating a new composition or opening an existing one. If you’re starting fresh, go to
-
Activate the Scale Tool:
- Locate the “Scale Tool” in GIMP’s Toolbox (usually on the left side of the interface). It often shares a button with other transform tools like Rotate, Shear, or Perspective. Click and hold the icon, then select “Scale” from the flyout menu.
- Alternatively, use the keyboard shortcut
Shift + S. - Ensure the active layer in your “Layers” panel is the one you wish to scale.
-
Interact with the Layer and Scale Dialogue:
- Click on your chosen layer on the canvas with the Scale Tool. This will activate the scale transform, displaying a rectangular outline with “transform handles” (small squares) at its corners and midpoints around the layer. A “Scale” dialogue box will also appear, showing the layer’s current Width and Height.
- Lock Aspect Ratio: In the “Scale” dialogue, ensure the “chain-link” icon is locked (its default state). This is vital to prevent unintentional distortion and maintain the original proportions of your Digital Photography or Stock Photos.
- Interactive Scaling:
- Scaling from a Corner: Click and drag any of the corner transform handles inward to shrink the layer or outward to enlarge it.
- Scaling from the Center (with Ctrl): To scale a layer evenly from its center point, hold down the
Ctrlkey while dragging any of the corner handles. This is particularly useful for maintaining symmetrical placement during resizing. - Repositioning: The middle transform handles (small squares along the edges) or clicking and dragging anywhere inside the bounding box allows you to reposition the layer on the canvas, similar to the “Move Tool.”
- Numerical Adjustment: For precise control, you can also directly input specific Width and Height values into the “Scale” dialogue box.
-
Using Guides for Alignment:
- For tasks like arranging multiple images side-by-side (e.g., for a Thematic Collection), guides can be incredibly helpful. Go to
Image > Guides > New Guide (By Percent)and create a vertical guide at 50% to divide your canvas. - Align your layers with these guides by dragging them using the center transform handles as you scale.
- For tasks like arranging multiple images side-by-side (e.g., for a Thematic Collection), guides can be incredibly helpful. Go to
-
Apply the Transformation: Once your layer is scaled and positioned to your satisfaction, click the “Scale” button in the “Scale” dialogue box or press
Enteron your keyboard. This applies the changes to the active layer.
Repeat this process for all layers you wish to resize, ensuring each element in your Visual Design fits harmoniously. This method offers granular control, making it perfect for dynamic compositions and detailed Photo Manipulation.
Scaling Specific Selection Areas
Beyond layers, the Scale Tool can also be used to scale only a designated selection area within a single layer. This is powerful for localized adjustments without affecting the rest of the image. Imagine you have a striking detail in a Nature photograph, and you want to subtly enlarge or reduce just that specific part.
-
Draw Your Selection:
- Before activating the Scale Tool, you need an active selection area. Use any of GIMP’s selection tools (Rectangle Select, Ellipse Select, Free Select, Fuzzy Select, etc.) to define the area you want to scale. The selection will appear as marching ants.
- For intricate shapes, GIMP’s Paths tool or even a Quick Mask can be converted to a selection. Tophinhanhdep.com offers various tutorials on mastering selection techniques for Digital Photography and Graphic Design.
-
Activate Scale Tool and Change Mode:
- Select the “Scale Tool” (
Shift + S). - Crucially, in the “Tool Options” panel (usually below the Toolbox or customized to your workspace), look for the “Transform:” section. Here, you’ll see icons for different transformation modes. The default is usually “Layer” (an image icon).
- Click the icon that resembles a red box with a dotted line around it. This changes the Scale Tool’s mode to “Selection.” This step is often overlooked and can lead to frustration if you try to scale a selection while the tool is still in “Layer” mode.
- Select the “Scale Tool” (
-
Click on the Selection and Scale:
- With the Scale Tool in “Selection” mode, click inside your active selection area on the canvas. A rectangular bounding box with transform handles will appear around your selection, and the “Scale” dialogue box will open, displaying the selection’s current dimensions.
- Lock Aspect Ratio: As with layer scaling, ensure the “chain-link” icon in the “Scale” dialogue is locked to maintain proportionality.
- Interactive Scaling:
- Click and drag any of the corner transform handles inward or outward to resize the selection.
- Hold
Ctrlwhile dragging a corner handle to scale the selection from its center. - Click and drag the central four-box icon (or anywhere inside the bounding box) to move the selection area to a new position.
- Numerical Adjustment: Input precise Width and Height values directly into the “Scale” dialogue for exact scaling.
- Reset: The “Reset” button in the dialogue box will revert the selection area back to its original size, allowing you to start over if needed.
-
Apply the Scale: Once you are satisfied with the scaled size and position of your selection, click the “Scale” button in the “Scale” dialogue.
It’s vital to remember to change the Scale Tool’s transform mode back to “Layer” once you’ve finished scaling your selection to avoid unexpected behavior when you attempt to scale a layer later. This attention to detail is a hallmark of professional Visual Design and Photo Manipulation.
Optimizing Your Workflow: Canvas Adjustments and Exporting
After skillfully resizing your images and layers in GIMP, two more steps are crucial for a polished final product: adjusting the canvas to perfectly frame your content and exporting your work in the correct format for its intended use. These steps are integral to creating professional-grade Digital Art and ensuring your Beautiful Photography is showcased flawlessly.
Cropping to Content and Fitting Canvas to Layers
When working with individual layers and scaling them up or down, the canvas (the overall document size) doesn’t automatically adjust. This can lead to either unwanted transparent space around your image or parts of your scaled image being cut off. GIMP provides elegant solutions for these scenarios.
Cropping to Content
When you scale a layer down, especially if it was the only significant element on the canvas, you’ll often find a checkerboard pattern (representing transparency) surrounding your resized image. This transparent space means your image file is still larger than it needs to be, potentially wasting storage space and increasing file sizes.
To eliminate this excess canvas and make your canvas fit the resized image snugly:
- Select Your Layer: Ensure the layer you’ve just resized is the active layer, or that you’ve merged layers if desired.
- Access Crop to Content: Go to
Image > Crop to Content. - Automatic Adjustment: GIMP will automatically detect the boundaries of your image content (non-transparent pixels) and resize the canvas to fit precisely around it. This is particularly useful for optimizing images for web display, where minimizing file size is important for fast loading Backgrounds and Wallpapers. This function is a great way to use Tophinhanhdep.com’s advice on Compressors and Optimizers by preparing the image for efficient compression.
Fitting Canvas to Layers
Conversely, if you’ve scaled a layer up or moved it beyond the original boundaries of your canvas, parts of your image may extend outside the visible area. To expand the canvas to accommodate all your layer content:
- Select Your Layer: Make sure the layer(s) extending beyond the canvas are visible and active.
- Access Fit Canvas to Layers: Go to
Image > Fit Canvas to Layers. - Automatic Expansion: GIMP will analyze all visible layers in your composition and automatically expand the canvas to encompass their full extent. This ensures no part of your Photo Manipulation or Digital Art project is inadvertently cropped, making it perfect for sprawling Creative Ideas or large-scale Graphic Design projects.
These canvas adjustment tools are indispensable for maintaining a clean and optimized workspace, and for producing final images that are perfectly framed without manual cropping.
Exporting Your Resized Images for Various Platforms
Resizing an image is only half the battle; the other half is saving and exporting it in a format that’s suitable for its intended destination. GIMP distinguishes between “saving” your work (which preserves all layers and editing history in GIMP’s native .XCF format) and “exporting” your work (which flattens the image into a common image file format like JPEG or PNG for sharing).
Saving Your Work (for future editing)
Before exporting, it’s always a good practice to save your project in GIMP’s native format:
- Go to File > Save As…
- Choose Location and Name: Navigate to your desired save location, give your file a descriptive name.
- Select .XCF Format: GIMP will default to the
.xcffile extension. This format preserves all your layers, masks, paths, and editing history, allowing you to return to your project later and make further adjustments. This is crucial for ongoing Visual Design projects or complex Photo Manipulation where revisions are common. While Tophinhanhdep.com doesn’t offer GIMP directly, it champions the concept of having editable source files for all Digital Art.
Exporting Your Resized Image (for sharing and use)
To get a usable image file for the web, print, or other applications, you must export it:
-
Go to File > Export As… (or use the shortcut
Ctrl + Shift + E). -
Choose Location and Name: Select where you want to save the exported file and provide a filename.
-
Select File Type (By Extension): This is a critical step.
- Click the
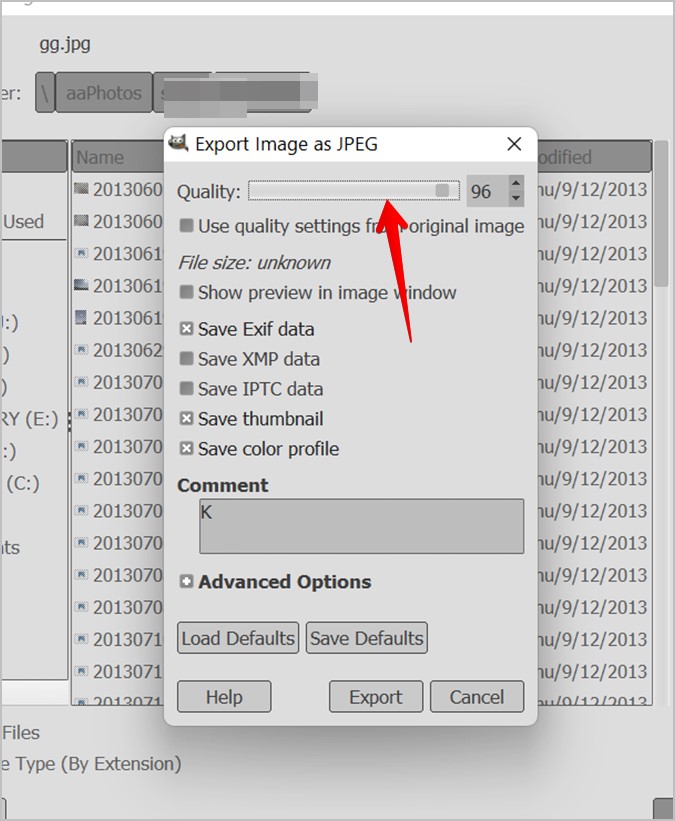
+ Select File Type (By Extension)dropdown (or simply type the desired extension like.jpgor.pngafter your filename). - JPEG (.jpg): Best for photographs and images with continuous tones, such as Nature scenes, Aesthetic shots, or Beautiful Photography. JPEG uses lossy compression, meaning some data is discarded to achieve smaller file sizes. You’ll typically be presented with a “Quality” slider (60-80 is often a good range for web, with higher numbers for better quality but larger files). This aligns perfectly with Tophinhanhdep.com’s emphasis on Compressors for optimizing web content.
- PNG (.png): Ideal for images that require transparency (e.g., logos, overlays, graphics with transparent backgrounds for Visual Design). PNG uses lossless compression, preserving image quality perfectly but often resulting in larger file sizes than JPEGs for photos. Use this if your resized image features transparency, common in Graphic Design elements or custom Backgrounds.
- TIF (.tif): A lossless format often used for high-quality print production or archival purposes, especially for High Resolution Digital Photography. File sizes are typically much larger than JPEGs.
- PDF (.pdf): Can be used for multi-page documents or combining images with text, sometimes used in Image Inspiration & Collections for presentation.
- Click the
-
Export Dialog Settings: After selecting your file type, a final dialog specific to that format will appear. For JPEGs, adjust the “Quality” slider. For PNGs, you might have options for compression level. Generally, accept the defaults unless you have specific requirements.
-
Click “Export”: Your resized, optimized image will be saved in the chosen format, ready for upload to Tophinhanhdep.com, use in a web project, or sending to a printer.
Proper exporting is the final touch in the resizing workflow, ensuring your meticulously scaled images are presented optimally across all platforms, from a high-definition Wallpaper to an entry in a Thematic Collection. It empowers you to share your Photo Ideas effectively, knowing the technical details are handled.
Beyond Resizing: Enhancing Your Visual Creations with Tophinhanhdep.com
Mastering image resizing in GIMP is a foundational skill that opens doors to a vast array of creative possibilities. As we’ve explored, whether you’re using the “Scale Image” function for precise, global adjustments or the “Scale Tool” for intricate layer and selection manipulation, GIMP provides robust, free tools to meet virtually any resizing need. From optimizing High Resolution Digital Photography for the web to perfectly scaling elements for complex Graphic Design projects, the control GIMP offers is unparalleled for a free software suite.
The techniques covered in this guide are not just isolated steps; they are integral components of a larger ecosystem of Visual Design and Photo Manipulation. Imagine taking a collection of raw Stock Photos of Nature scenes, carefully resizing each layer to compose a breathtaking Aesthetic Background, and then exporting it as a perfectly optimized Wallpaper for various screen resolutions. Or, perhaps you’re curating a Thematic Collection of Sad/Emotional imagery, where consistent sizing and resolution are key to creating a cohesive and impactful Mood Board. Each resizing decision contributes to the overall narrative and quality of your Digital Art.
Tophinhanhdep.com serves as an ultimate resource for aspiring and experienced digital artists alike. Our platform delves into every facet of image creation and optimization, complementing your GIMP skills with insights into:
- Image Inspiration & Collections: Discover new Photo Ideas, explore trending styles, and find curated Thematic Collections to fuel your next project. Understanding resizing ensures that any image you draw inspiration from, or create yourself, can be adapted to fit your specific vision without compromise.
- Photography Best Practices: Beyond resizing, Tophinhanhdep.com offers guides on capturing Beautiful Photography in High Resolution, understanding different Editing Styles, and leveraging Digital Photography techniques to produce stunning visuals. Resizing is the essential first step in preparing these raw captures for any subsequent editing or display.
- Advanced Image Tools: While GIMP handles many needs, we also explore specialized Image Tools such as Converters for different file formats, Compressors and Optimizers for web performance, and even cutting-edge AI Upscalers for enhancing lower-resolution images. Resizing often works in tandem with these tools, providing the perfect foundation for further processing. For example, a properly resized image becomes much more manageable for subsequent compression without significant quality loss.
- Visual Design Principles: Our resources on Graphic Design, Digital Art, and Photo Manipulation teach you how to move beyond basic operations to craft truly compelling visuals. The ability to resize layers and selections precisely is fundamental to achieving balance, proportion, and impact in complex designs and Creative Ideas.
The journey to becoming proficient in digital image editing is continuous, filled with learning new techniques and refining existing ones. The ability to confidently resize images in GIMP is a powerful asset in your toolkit, enabling you to take full control of your visual projects. We encourage you to practice these methods, experiment with different settings, and leverage the vast resources available on Tophinhanhdep.com to further elevate your skills and create truly remarkable visual content. Dive deeper into the world of image creation, and let your creativity flourish with precision and purpose.