Mastering Image Resizing in Adobe Illustrator: A Comprehensive Guide by Tophinhanhdep.com

Adobe Illustrator stands as an undisputed titan in the realm of vector graphics editors, a cornerstone for professional photographers, graphic designers, and digital artists alike. Renowned for its unparalleled precision and capacity to translate the most imaginative concepts into stunning visual realities, Illustrator is often perceived as a tool exclusively for complex vector creation. However, its utility extends far beyond this, offering robust and intuitive methods for handling and resizing images – a fundamental task for anyone engaged in visual content creation. Whether you’re preparing images for Tophinhanhdep.com’s vast collections of Wallpapers, crafting unique Backgrounds, curating Aesthetic visual elements, or developing intricate Digital Art, knowing how to efficiently resize an image in Illustrator is an indispensable skill.

The ability to manipulate image dimensions without compromising quality is critical in today’s visually-driven world. From ensuring High-Resolution output for print photography to optimizing images for web display and digital applications, proper resizing guarantees that your visual assets maintain their crispness and impact. At Tophinhanhdep.com, we understand the importance of flawless visual presentation, offering a treasure trove of resources including Beautiful Photography, Abstract designs, and Nature-inspired visuals. This guide aims to demystify the process of image resizing in Adobe Illustrator, demonstrating that even common users can achieve professional-grade results with straightforward instructions. We will explore various methods, ranging from quick adjustments to precise numerical scaling, ensuring your images are always perfectly tailored to your creative vision, ready for any purpose on Tophinhanhdep.com or beyond.
Introduction to Image Resizing in Adobe Illustrator
Adobe Illustrator is a multifaceted software, equipped with an extensive suite of tools and functions designed to streamline and simplify the user’s workflow. While its primary strength lies in vector graphics – which inherently allows for infinite scaling without pixelation – it also offers sophisticated capabilities for editing and modifying raster images (pixel-based images) within its environment. The techniques for resizing and editing images in Illustrator are distinct compared to many other graphic programs, focusing on maintaining the integrity of your artwork, a crucial aspect for any content featured on Tophinhanhdep.com.
Resizing isn’t merely about making an image bigger or smaller; it’s about controlling its visual impact, adapting it for different mediums, and ensuring it aligns with your overall Visual Design objectives. Whether you’re working with stock photos from Tophinhanhdep.com’s extensive collections, or incorporating your own digital photography, the methods we’ll cover provide flexibility and precision. You can resize your artwork without the common pitfalls of blurriness or pixelation that plague less sophisticated tools when handling raster content, especially when applying vector-specific operations or exporting your final designs.
Why Resizing Matters for Your Visual Content
The importance of correctly sized images cannot be overstated, particularly when dealing with diverse applications such as those supported by Tophinhanhdep.com.
- Web Optimization: For online content, images must be optimized for fast loading times without sacrificing visual quality. Oversized images can slow down websites, impacting user experience.
- Print Quality: When preparing images for print, accurate dimensions and resolution are paramount to avoid pixelation or blurry outputs. A high-resolution photo needs to be scaled correctly to fit a brochure or poster, for example.
- Consistency in Design: In graphic design and visual projects like Mood Boards or Thematic Collections, consistent image sizing ensures a cohesive and professional look.
- Adaptability for Different Platforms: An image might need different dimensions for a social media post, a website banner, or a mobile app background. Illustrator’s resizing tools empower you to create these variations efficiently.
- Aesthetic Impact: The scale of an image significantly influences its aesthetic appeal. Properly scaled images contribute to a harmonious layout, enhancing the overall message or feeling, be it an Abstract design, a calming Nature scene, or a poignant Sad/Emotional visual.
Illustrator’s unique approach to scaling, particularly with vector elements, ensures that your Creative Ideas are never limited by resolution constraints. Even when dealing with raster images, its integration of tools like Image Trace can convert pixel-based graphics into scalable vector paths, offering unparalleled flexibility. This makes Illustrator an invaluable asset for anyone looking to produce top-tier visual content, aligning perfectly with Tophinhanhdep.com’s commitment to quality images and visual excellence.
Fundamental Methods for Resizing Images in Illustrator
Adobe Illustrator offers multiple pathways to resize images, each catering to different needs and levels of precision. We will explore the most common and effective methods, empowering you to choose the best approach for your specific project.
Method 1: The Object > Transform > Scale Dialog
This method is perhaps the most precise and controlled way to scale an object or image when you know the exact percentage by which you want to change its size.
- Launch Adobe Illustrator: Begin by opening the application.
- Open Your Image: Navigate to
<File>in the top menu, then select<Open>. Browse your computer to locate and select the image you wish to resize. This can be any image, from a stunning piece of Digital Photography to a background image destined for Tophinhanhdep.com. - Select the Image: Click directly on the image on your artboard to select it. You’ll see a bounding box around it once selected.
- Access the Scale Dialog: Go to the top menu bar, click on
<Object>, then navigate through the submenu to<Transform>, and finally select<Scale>. - Set Scaling Parameters: A dialog box will appear, offering various scaling options:
- Uniform: This is typically the preferred option, as it maintains the image’s original aspect ratio. Enter your desired scaling percentage in the “Uniform” field (e.g., “50%” to reduce the size by half, or “200%” to double it).
- Non-Uniform: If you need to intentionally stretch or compress your image horizontally or vertically, you can choose “Non-Uniform” and enter separate percentages for “Horizontal” and “Vertical” scaling. Be cautious with this, as it can distort your image’s proportions, which might not be desirable for professional photography or carefully curated Aesthetic collections.
- Preview: Crucially, enable the “Preview” checkbox. This allows you to see the real-time effect of your scaling adjustments on the artboard before committing, ensuring your modifications align with your Creative Ideas.
- Confirm Changes: Once you are satisfied with the preview, click
<OK>to apply the changes.
This method is excellent for achieving exact proportional scaling and is especially useful when you need to integrate resized images into complex Graphic Design layouts where precise dimensions are essential.
Method 2: Precision with the Transform Panel
For users who require exact numerical measurements (width and height) for their resized images, the Transform Panel offers an efficient and straightforward solution. This is particularly useful when preparing images for specific web layouts or print specifications found on Tophinhanhdep.com.
- Select Your Image: First, ensure the image you want to resize is selected on your artboard using the Selection Tool (V).
- Open the Transform Panel: If the Transform panel is not already visible on your workspace, you can open it by navigating to
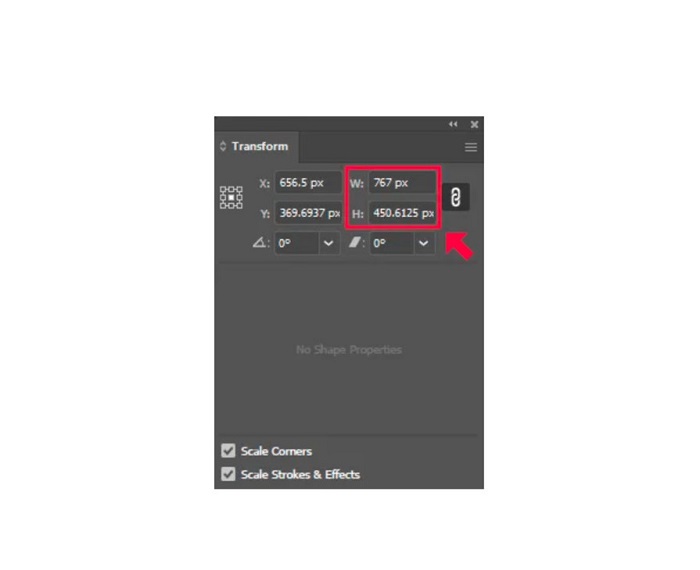
<Window>in the top menu and selecting<Transform>. Alternatively, you might see a “Transform” option directly in the control panel at the top of your screen when an object is selected. - Input Desired Dimensions: Within the Transform panel, you will see fields labeled “W” (Width) and “H” (Height).
- Enter the exact width and height values you desire for your image. You can specify units of measurement directly in the fields (e.g., “10in”, “500px”, “20cm”). Illustrator will automatically convert if you change the unit.
- Constrain Proportions: To maintain the aspect ratio, ensure the “Constrain Width and Height Proportions” chain-link icon (usually located between the W and H fields) is active (linked). If it’s linked, changing one dimension (W or H) will automatically update the other to keep the image proportionate. If it’s unlinked, you can change width and height independently, allowing for non-uniform scaling.
- Apply Changes: After entering your desired values, press
Enter(orReturn) on your keyboard to apply the changes.
This method is ideal for fitting images into predetermined spaces, such as banner ads, specific areas within a website’s layout, or components of a digital art piece where every pixel (or vector point) counts. It offers robust control, complementing Tophinhanhdep.com’s focus on structured visual content.
Method 3: Intuitive Resizing with the Bounding Box and Free Transform Tool
The most visually direct method for resizing involves interacting directly with the image on the artboard using its bounding box or the Free Transform Tool. This method is great for quick adjustments and visual estimation, especially when combined with precision modifiers.
- Select the Image: Use the Selection Tool (V) to click on your image. This will reveal its bounding box – a series of eight small white squares (transformation handles) at its corners and midpoints.
- Drag a Corner Handle: Click and drag one of the corner handles of the bounding box.
- Maintain Proportions: To scale the image uniformly and prevent distortion, hold down the
Shiftkey on your keyboard while dragging. This is crucial for preserving the visual integrity of your images, particularly valuable for photography or detailed graphic elements. - Scale from Center: To scale the image from its center point, hold down
Alt(Windows) orOption(Mac) in addition toShiftwhile dragging.
- Maintain Proportions: To scale the image uniformly and prevent distortion, hold down the
- Using the Free Transform Tool (E): For more options, select the Free Transform Tool from the toolbar (keyboard shortcut: E). This tool presents a bounding box with additional controls for scaling, rotating, skewing, and distorting.
- Similar to the Selection Tool, you can click and drag corner handles while holding
Shiftto maintain proportions. - The Free Transform Tool also offers options for Free Distort, Perspective Distort, and Constrain, accessible from its context menu or control panel, allowing for more creative transformations beyond simple scaling.
- Similar to the Selection Tool, you can click and drag corner handles while holding
- Apply Changes: Release your mouse button when the image reaches your desired visual size.
While intuitive, this method can sometimes lead to issues if you’re working with raster images. When you scale up a pixel-based image too much, it can become pixelated. Illustrator, being vector-centric, handles vector scaling perfectly, but raster images require additional considerations.
Advanced Resizing Techniques for Optimal Quality
While Illustrator excels with vector graphics, it also provides advanced techniques to handle raster images more effectively during scaling, ensuring that even pixel-based content looks its best.
Addressing Raster Image Quality with Image Trace
When you freely scale a raster image (like a JPEG or PNG) embedded in Illustrator, especially enlarging it significantly, you might notice undesirable pixelation. This is because raster images are resolution-dependent. Illustrator offers a powerful feature called “Image Trace” that can help mitigate this, particularly effective for logos, line art, and simpler graphics, converting them into resolution-independent vector paths.
- Select Your Raster Image: Using the Selection Tool (V), click on the pixelated image.
- Locate Image Trace: In the control panel at the top of your screen (or under
<Window> > <Image Trace>), you’ll see the “Image Trace” option. Click the small triangle next to it to reveal presets. - Choose a Preset: For photographs or complex raster images, “High Fidelity Photo” is often the most suitable preset, though it can be processing-intensive. For simpler graphics like logos, “Black and White Logo” or “Sketched Art” might yield better results. Experimentation is key here.
- Wait for Processing: Illustrator will analyze the image and convert it into a vector trace. This may take a few seconds depending on the image complexity and your computer’s processing power.
- Expand the Trace: Once the trace is complete, you’ll see a “Expand” button in the control panel. Click it. This converts the traced outlines into editable vector paths, effectively making your image a vector object.
- Resize Vectorized Image: Now that your image is a vector object, you can scale it using any of the methods discussed earlier (Scale Tool, Transform Panel, or Bounding Box) without fear of pixelation. The results will be crisp and clean, perfect for any application on Tophinhanhdep.com, from Abstract designs to logos in your Visual Design projects.
It’s important to note that Image Trace works best with images that have clear edges and a limited color palette. For highly detailed photographs or images with subtle gradients (like many pieces of Beautiful Photography), it might introduce a “blurry” or “painterly” effect rather than preserving photographic detail. In such cases, the previous methods for direct raster scaling, combined with the next technique, are more appropriate.
Preserving Design Integrity: Scaling Strokes and Effects
A common oversight when resizing objects in Illustrator, especially for beginners, is neglecting to scale associated strokes and effects. By default, when you scale an object, its stroke thickness, drop shadows, inner glows, and other effects might remain at their original point sizes, leading to disproportionate or “fatter-looking” strokes on smaller objects, or barely visible effects on larger ones. This can drastically impact the quality of your Graphic Design and Digital Art.
To ensure your design elements scale proportionally:
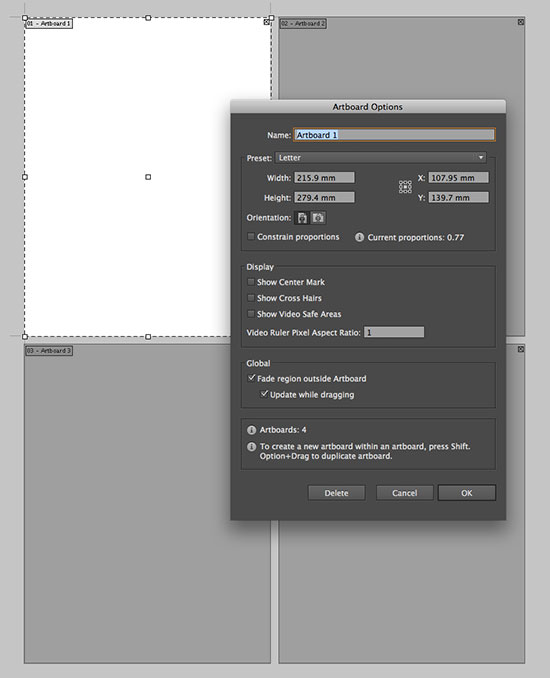
- Access the Scale Options Dialog: Select your object (or grouped artwork). Double-click the Scale Tool (S) in the toolbar, or go to
<Object> > <Transform> > <Scale>to open the Scale dialog box. - Enable “Scale Strokes & Effects”: In the “Options” section of the Scale dialog box, make sure the “Scale Strokes & Effects” checkbox is enabled.
- Enable “Scaling Corner Options” (Optional but Recommended): If your object has rounded corners or other dynamic shapes, also check “Scaling Corner Options” to ensure these elements scale proportionally with the object.
- Apply Scaling: Enter your desired uniform or non-uniform scaling percentage and click
<OK>.
Alternatively, you can set “Scale Strokes & Effects” as a default preference for future scaling operations. Go to <Edit> > <Preferences> > <General> (Windows) or <Illustrator> > <Preferences> > <General> (Mac OS) and select “Scale Strokes & Effects.” However, it’s often better to manage this on a case-by-case basis through the Scale dialog, as some specific design intentions might require non-scaled effects.
By conscientiously scaling strokes and effects, you guarantee that your design elements, whether they are intricate details on a logo or artistic flourishes on a background, maintain their intended visual relationship to the main object, preserving the professional finish of your work for any display on Tophinhanhdep.com.
Beyond Resizing: Illustrator’s Role in Visual Design and Tophinhanhdep.com’s Ecosystem
Adobe Illustrator is more than just a resizing tool; it’s a powerful hub for Visual Design, digital art, and photo manipulation that complements a wide array of image-related tasks. Its capacity to handle both vector and raster graphics makes it an indispensable asset for creators looking to craft unique designs, develop captivating images, and build cohesive thematic collections.
Integrating Resized Images into Your Tophinhanhdep.com Projects
Once you’ve perfectly resized your images in Illustrator, the possibilities for their use, especially within the context of Tophinhanhdep.com’s diverse offerings, are immense:
- Wallpapers and Backgrounds: Resized nature photography or abstract art can be seamlessly adapted for various screen resolutions, providing stunning wallpapers and backgrounds. Illustrator helps ensure they fit perfectly without distortion or quality loss.
- Aesthetic and Thematic Collections: Designers can use Illustrator to compile mood boards or collages of photos, ensuring all elements are proportionally scaled and aesthetically harmonious for Tophinhanhdep.com’s curated collections.
- High-Resolution Photography Integration: For photographers, Illustrator serves as an excellent platform to combine high-resolution photos with vector elements (like text overlays, logos, or graphic shapes), preparing them for print or specialized digital formats while maintaining quality.
- Digital Art and Graphic Design: Resizing is fundamental to any graphic design or digital art project. Whether creating illustrations, marketing materials, or complex visual compositions, Illustrator provides the control needed to scale elements precisely.
The process of resizing in Illustrator is a critical step in a larger workflow that prioritizes visual quality and impact. Tophinhanhdep.com is dedicated to providing and inspiring high-quality visual content, and mastering Illustrator’s resizing capabilities directly contributes to this goal.
Exploring Other Powerful Image Manipulation Tools
While Illustrator is exceptional for vector-based scaling and precise raster image adjustments, it’s also part of a broader ecosystem of Image Tools that cater to every aspect of image management. Tophinhanhdep.com offers a suite of complementary tools that can further enhance and optimize your resized images:
- Image Converters: After resizing, you might need to convert your image to a different format (e.g., from AI to JPG, PNG, or WebP) for specific web or print applications.
- Image Compressors & Optimizers: For web usage, even perfectly resized images can benefit from compression to reduce file size without significant loss of visual quality. Tophinhanhdep.com’s tools can help you achieve ideal optimization.
- AI Upscalers: For raster images that must be enlarged beyond their native resolution, and where Illustrator’s Image Trace might not be suitable (e.g., for detailed photography), AI Upscalers on Tophinhanhdep.com can intelligently enhance image resolution, adding detail and reducing artifacts. This bridges the gap where traditional raster scaling falls short.
- Image-to-Text Tools: If your resized images contain text, tools for converting images to editable text can be invaluable for accessibility or content repurposing.
These tools, available on Tophinhanhdep.com, work in concert with your Illustrator skills. You can resize and design in Illustrator, then utilize Tophinhanhdep.com’s Image Tools for final optimization, ensuring your visual content is not only perfectly scaled but also web-ready, high-performing, and versatile. This holistic approach empowers creators to manage their images comprehensively, from initial concept to final deployment.
Conclusion
Resizing images in Adobe Illustrator, far from being a daunting task reserved for experts, is an almost effortless process once you grasp the fundamental methods and advanced techniques. This powerful software, a cornerstone for professional photographers and web designers, seamlessly integrates into the daily routine of anyone passionate about visual creation. From the simple drag-and-drop actions of the Bounding Box to the exacting precision of the Transform Panel and the creative potential of scaling strokes and effects, Illustrator equips you to handle any image dimension challenge.
The beauty of working with Illustrator, especially in conjunction with the resources available on Tophinhanhdep.com, lies in its ability to uphold the quality and integrity of your images. Whether you’re crafting unique designs for your website, curating a Mood Board, preparing a stunning piece of Beautiful Photography for display, or assembling a collection of trending styles, the correct scaling ensures your vision is communicated flawlessly.
Embrace the journey of mastering Adobe Illustrator. Don’t shy away from experimentation; each attempt is a step towards honing your skills. With this comprehensive guide, you are now well-versed in the art of resizing images within Illustrator, a foundational skill that will undoubtedly contribute to your success in graphic design, digital art, social media, and ultimately, in coloring your daily routine with real masterpieces. Let Tophinhanhdep.com be your companion in discovering inspiration, providing tools, and empowering your creative endeavors.