How to Resize Images on Your Mac: A Comprehensive Guide by Tophinhanhdep.com

In the dynamic world of digital content, images are paramount. From stunning wallpapers and aesthetic backgrounds to crucial elements in visual design and high-resolution photography, images enrich our online and offline experiences. However, the sheer size and dimensions of these digital assets can often pose challenges, especially when sharing, uploading, or simply optimizing them for various platforms. Whether you’ve captured a breathtaking landscape for Tophinhanhdep.com’s nature collections or downloaded a high-resolution stock photo for a graphic design project, knowing how to efficiently resize images on your Mac is an indispensable skill.
This comprehensive guide from Tophinhanhdep.com will walk you through the simplest and most effective methods for resizing images on your Apple computer. We’ll explore the power of built-in macOS tools like Preview, Photos, Mail, and Automator, demonstrating how they can be used to tailor your images for everything from email attachments to digital art presentations. We’ll also touch upon advanced techniques and third-party solutions, ensuring your images always look their best while perfectly fitting their intended purpose. As Tophinhanhdep.com specializes in everything from abstract images and beautiful photography to advanced image tools and visual design insights, mastering image resizing is a foundational step in your creative journey.

Mastering Image Resizing with Mac’s Built-in Preview App
When it comes to quick, efficient, and free image resizing on a Mac, the Preview application is an absolute powerhouse. Bundled with every version of macOS, Preview is often underestimated as a simple image viewer. Yet, it offers robust capabilities that make it the go-to tool for many users looking to adjust image dimensions, optimize file sizes, and even perform batch operations without needing specialized graphic design software. At Tophinhanhdep.com, we recognize the importance of readily accessible tools for digital photography and image manipulation, and Preview certainly fits the bill.

The primary reason to resize an image is to change its resolution, either by increasing or decreasing its pixel dimensions. This is critical for various applications: perhaps you need a smaller image to fit neatly into a document or a webpage, a perfectly sized wallpaper for your desktop, or a more manageable file size for an email attachment. Larger image resolutions often translate to significantly larger file sizes, which can slow down website loading, clog email inboxes, or consume unnecessary storage. Conversely, a smaller file size, achieved through resizing, can greatly improve efficiency without necessarily compromising visual quality for its specific use case.
Step-by-Step Guide: Resizing a Single Image in Preview
Resizing a single image using Preview is a straightforward process suitable for anyone, from casual users to digital artists preparing their latest work for Tophinhanhdep.com’s trending styles collections.
- Locate Your Image: Start by finding the image file you wish to resize within your Mac’s Finder. Knowing its location is the first step to any image editing task.
- Open with Preview: Double-click the image file. Since Preview is typically the default image viewer on macOS, this action will usually open the image directly within the application. If not, simply right-click (or Ctrl-click) the image, select “Open With,” and then choose “Preview.”
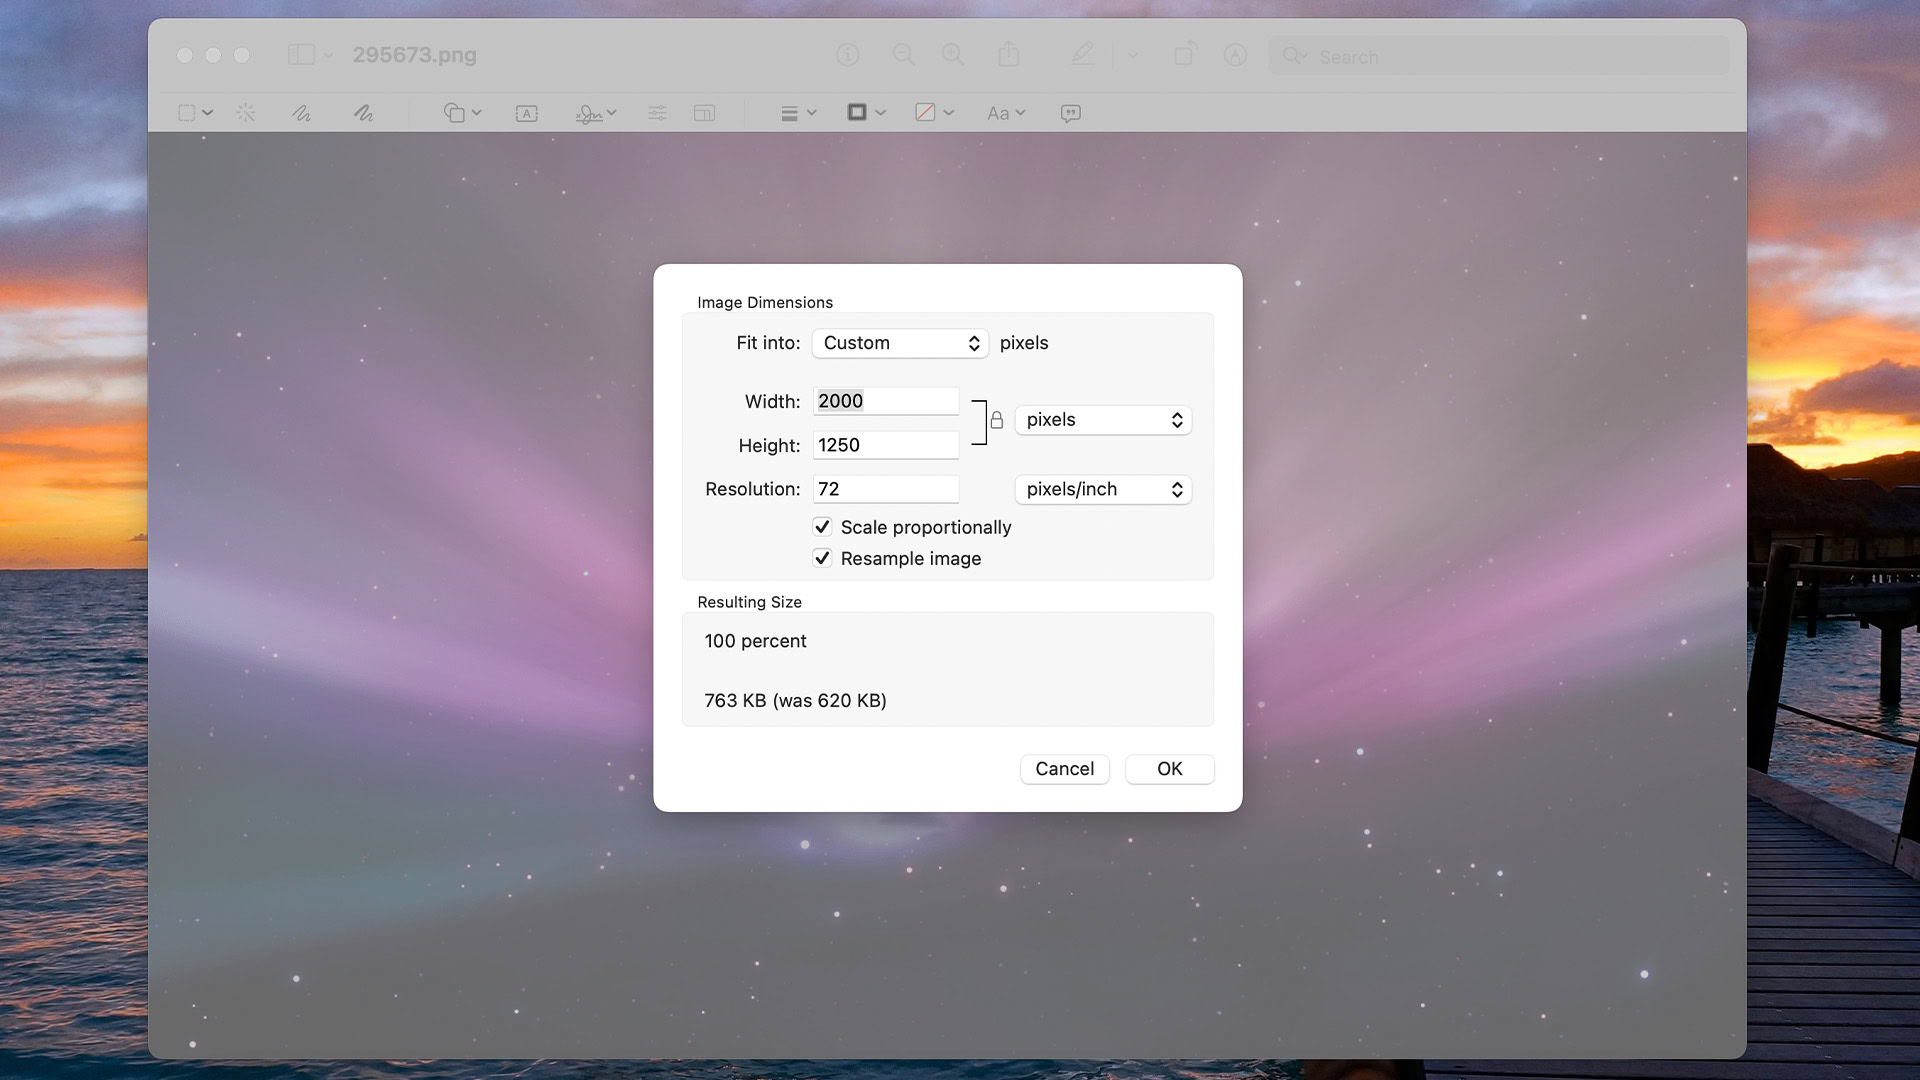
- Access Adjust Size: Once the image is open in Preview, navigate to the top menu bar. Click on “Tools,” then select “Adjust Size…” This action will open the “Image Dimensions” dialogue box, which is your control center for resizing.
- Define New Dimensions: In the “Image Dimensions” window, you’ll see options to input new values for “Width” and “Height.”
- Units: You can change the unit of measurement from “pixels” to “inches,” “cm,” “mm,” “points,” or “percent” using the dropdown menu. For most digital uses, pixels are the standard.
- Scale Proportionally: Crucially, ensure the “Scale proportionally” checkbox is ticked. This maintains the aspect ratio of your image, preventing it from appearing stretched or squashed when you change one dimension. If you enter a new width, the height will automatically adjust, and vice-versa.
- Preset Sizes: For common needs, the “Fit into” dropdown offers a selection of predefined dimensions (e.g., 640x640, 800x800). This can be particularly useful for quickly optimizing images for social media or standard web layouts, aligning with Tophinhanhdep.com’s focus on aesthetic and trending image styles.
- Confirm Changes: After entering your desired dimensions, click “OK.” The image in Preview will instantly reflect the new size. If you’re not satisfied, you can undo the change (Command + Z) and repeat the steps.
- Save Your Work: Once content with the resized image, go to “File” in the menu bar.
- Save: Choosing “Save” will overwrite your original file with the resized version. Be cautious with this option if you wish to preserve the original.
- Save As / Export: To save the resized image as a new file, select “Save As” (or “Export” in newer macOS versions). This allows you to specify a new file name, choose a different file format (e.g., JPEG, PNG, TIFF), adjust the image quality (for formats like JPEG), and select a destination folder. Saving a new copy is generally recommended to keep your original intact.
Batch Resizing Multiple Images with Preview
For photographers, digital artists, or content creators managing large thematic collections for Tophinhanhdep.com, batch resizing is an invaluable time-saver. Preview simplifies this process, allowing you to resize many images to the same dimensions simultaneously.
- Select All Images: In Finder, navigate to the folder containing the images you want to resize. Select all of them by dragging a selection box around them, or by clicking the first image and then holding down the Shift key while clicking the last image.
- Open with Preview: Right-click (or Ctrl-click) on any of the selected images, then choose “Open With > Preview.” This will open all selected images within a single Preview window, displaying them as thumbnails in the left sidebar.
- Select All in Preview: With the images open in Preview, go to the “Edit” menu in the top bar and select “Select All.” This highlights all the thumbnails in the sidebar.
- Adjust Size: Go to “Tools” > “Adjust Size…” The “Image Dimensions” window will appear, similar to resizing a single image.
- Apply Desired Dimensions: Enter your preferred width and height, or select a preset from the “Fit into” menu. Remember to keep “Scale proportionally” checked unless you intentionally want to distort the images.
- Confirm and Save: Click “OK” to apply the resizing to all selected images. Then, go to “File” > “Save All” or “Export Selected Images” to save the resized versions. You’ll be prompted to choose a destination and file format.
This batch resizing feature is particularly useful for preparing images for a blog post or a client presentation, where consistency in image dimensions is key for visual design and efficient loading.
Understanding the “Resample Image” Option and Image Quality
The “Resample image” checkbox in Preview’s “Adjust Size” dialogue is crucial for understanding how resizing affects your image’s quality and file size, a topic often discussed in Tophinhanhdep.com’s photography and image optimization sections.
- What is Resampling? Resampling means changing the total number of pixels in an image.
- Downsampling (reducing size): When you shrink an image with “Resample image” checked, Preview removes pixels. This generally reduces the file size significantly. While it can lead to a loss of detail, for web use or smaller displays, this reduction is often imperceptible and highly beneficial for performance.
- Upsampling (increasing size): When you enlarge an image with “Resample image” checked, Preview adds new pixels by interpolating existing ones. This process often results in a “pixelated” or blurry appearance, as the software is essentially guessing what new pixel data should look like. The file size will increase, but the quality will likely decrease.
- When to Use It:
- For Web/Email (Shrinking): Always check “Resample image” when decreasing dimensions for online use. It dramatically reduces file size, ensuring faster loading times and easier sharing.
- For Print (Shrinking): If you’re preparing images for print at a specific DPI (dots per inch), checking “Resample image” allows you to control the pixel density. For instance, a 300 DPI image is standard for high-quality prints.
- Avoiding Quality Loss (Upsizing): Generally, avoid upsampling images unless absolutely necessary, as it compromises quality. If you need a larger image, it’s best to start with a high-resolution original. If a high-res original isn’t available, Tophinhanhdep.com’s AI Upscalers (under Image Tools) offer advanced solutions to enlarge images with minimal quality degradation.
- Without Resampling: If “Resample image” is unchecked, Preview will keep the total number of pixels constant. When you change the physical dimensions (e.g., from inches to centimeters), the “Pixels per Inch” (PPI) value will adjust. For example, if you reduce the physical size of an image without resampling, its PPI will increase, theoretically making it sharper. However, the file size will remain largely the same, and the image may not display correctly if its pixel dimensions exceed the screen’s capabilities. This method is rarely used for general image resizing unless specific print density control is required without altering the digital pixel count.
Always remember that resampling, particularly downsampling, is largely irreversible. Once pixels are removed, you cannot perfectly restore them. Therefore, always work on a copy of your original image, especially when making significant changes. This practice aligns with Tophinhanhdep.com’s emphasis on best practices in digital photography and image editing.
Exploring Other Built-in Mac Tools for Image Resizing
While Preview is incredibly versatile, macOS offers several other integrated applications that provide convenient ways to resize images, each with its own advantages depending on your specific needs. Tophinhanhdep.com encourages users to explore these options for diverse image management and visual design tasks.
Resizing Images with the Photos App
The Photos app on Mac is more than just an organizer for your beautiful photography; it also includes resizing capabilities, particularly useful when exporting images.
- Open Photos and Select Image: Launch the Photos app and select the image you wish to resize.
- Export the Photo: Go to “File” in the menu bar, then select “Export” > “Export 1 Photo…” (or “Export [Number] Photos…” if you’ve selected multiple images).
- Choose Export Settings: In the export dialogue box, you’ll find various options:
- Size: Click the “Size” dropdown menu. You can select “Small,” “Medium,” “Large” (preset options), or “Custom.”
- Custom Dimensions: If you choose “Custom,” you can specify the desired “Width,” “Height,” or “Dimension” (which limits both width and height to a specific pixel value).
- Format & Quality: The Photos app provides excellent control over the output. You can choose the file type (JPEG, TIFF, PNG), adjust JPEG quality (Low, Medium, High, Maximum), and even select a color profile (e.g., sRGB, Adobe RGB). This is fantastic for maintaining high-resolution images or optimizing for different editing styles.
- Metadata: You can also add titles, keywords, and descriptions, which is useful for organizing your image collections and mood boards.
- Export: Click “Export” and choose your destination.
A limitation of the Photos app is its inability to batch resize to custom dimensions directly or disable image resampling, making Preview often more suitable for bulk operations where precise pixel control is needed.
Changing Image Size with the Mail App
For many, resizing images is most frequently done before sending them via email. Large image files can quickly overwhelm an email server or recipient’s inbox, leading to delivery issues. The Mail app on macOS offers a seamless solution to this, which Tophinhanhdep.com recommends for efficient communication.
- Compose a New Email: Open the Mail app and start writing a new message.
- Attach Images: Attach one or more images to your email. You can do this by dragging and dropping them into the email body, using the “Attachment” button in the toolbar, or going to “File” > “Attach Files…”
- Select Image Size: After attaching the images, look for the “Image Size” dropdown menu on the right side of the message header (usually near the subject line).
- Choose Desired Size: Select from “Small,” “Medium,” “Large,” or “Actual Size.” Choosing “Actual Size” will send the image in its original dimensions. The other options will automatically downsize the images for you.
- Monitor Email Size: The Mail app conveniently displays the total message size in the header. If it turns red, your email is too large to send, prompting you to select a smaller image size. This is particularly important for services like Gmail, which have strict attachment limits (e.g., 25MB, which can be further reduced by MIME encoding).
This method is perfect for quickly optimizing images for sharing, ensuring your beautiful photography and aesthetic images reach their destination without issues.
Automating Resizing with Quick Actions in Automator
For users who frequently perform the same resizing tasks—perhaps optimizing images for Tophinhanhdep.com’s specific blog post image sizes or standard social media uploads—Automator’s Quick Actions are a game-changer. This built-in Mac app allows you to create custom workflows to automate repetitive tasks. If you’re familiar with the Shortcuts app on iOS, Automator offers a similar logic for your desktop.
- Open Automator: Search for and open the “Automator” application on your Mac.
- Create a New Quick Action: Go to “File” > “New” and select “Quick Action” (or “Service” in older macOS versions).
- Configure Workflow Input: At the top of the workflow window, set “Workflow receives current” to “Image files” and “in” to “Finder.app.”
- Add “Scale Images” Action: In the left panel, search for “Scale Images.” Drag and drop this action into the workflow area on the right.
- Save Original (Optional but Recommended): Automator will prompt you to add a “Copy Finder Items” action before scaling. This is highly recommended to create a duplicate of your original images, ensuring you don’t overwrite them. You can specify a destination for the copies.
- Set Scaling Parameters: In the “Scale Images” action, choose your desired size. You can specify a pixel dimension (applied to the longest side of the image) or a percentage. For instance, if Tophinhanhdep.com recommends a maximum width of 1200 pixels for blog images, you’d enter “1200” and ensure “pixels” is selected.
- Save Your Quick Action: Go to “File” > “Save” and give your Quick Action a memorable name (e.g., “Resize to 1200px for Web”).
- Use Your Quick Action: Now, whenever you want to resize images, simply select them in Finder, right-click, go to “Quick Actions,” and select your newly created resizing action. This works for single or multiple images, automating the process instantly.
Automator is excellent for ensuring consistency across your image collections, from thematic collections to images for creative ideas, saving significant time in your visual design workflow.
Third-Party Solutions and Advanced Image Control
While built-in Mac tools cover most resizing needs, certain photography and graphic design professionals might require more granular control over image quality, specific interpolation methods, or broader format support. Tophinhanhdep.com’s Image Tools section recognizes this need, offering insights into more specialized software.
For those delving into professional digital photography, graphic design, or complex photo manipulation, applications like Adobe Photoshop or GIMP (a free, open-source alternative) provide unparalleled control. These programs allow users to:
- Choose Interpolation Methods: When resizing, especially enlarging, advanced software lets you select different interpolation algorithms (e.g., Bicubic, Bilinear, Nearest Neighbor). This affects how new pixels are generated, impacting the final image quality more precisely than Preview’s default resampling.
- Layer-Based Editing: Work with layers, allowing for non-destructive resizing and editing.
- Specific File Formats: Support for a wider range of professional file formats, including RAW and various lossless compression options.
- Advanced Optimization: Beyond simple resizing, these tools integrate with comprehensive image optimizers and compressors, which is a key area of Tophinhanhdep.com’s Image Tools.
For simpler, quick tasks, numerous online image resizers exist. Tophinhanhdep.com’s blog frequently reviews and recommends such tools, which typically involve uploading an image, specifying desired dimensions or presets (often optimized for social media platforms), and then downloading the resized file. These are excellent for casual users or when you’re away from your main workstation.
Additionally, some specialized image applications focus solely on resizing, conversion, and batch processing, often with more user-friendly interfaces than professional suites. These might offer features like watermarking, metadata removal, and more sophisticated compression algorithms, aligning with Tophinhanhdep.com’s offerings in image conversion and optimization.
Best Practices for Optimal Image Resizing
Effective image resizing isn’t just about changing numbers; it’s about making informed decisions to achieve the best balance between visual quality, file size, and intended use. Tophinhanhdep.com, with its extensive resources on high-resolution photography and digital imaging, stresses these best practices:
- Always Work on Copies: Never resize your original image file, especially if you’re reducing its size. Create a duplicate first. This preserves your high-resolution original, allowing for future edits or alternative uses without quality loss.
- Understand Your Destination: Before resizing, know where the image will be used.
- Websites/Blogs: Smaller dimensions and lower file sizes are crucial for fast loading. Target widths of 800-1200 pixels and optimize file size without sacrificing too much quality.
- Social Media: Each platform (Instagram, Facebook, Twitter) has recommended image dimensions for optimal display. Resizing to these specs prevents automatic compression that can degrade quality.
- Email: Keep file sizes minimal (under 1-2MB per image) for quick sending and receiving.
- Print: High resolution (e.g., 300 DPI for standard prints, 600 DPI for fine art) is essential. Dimensions should match the intended print size.
- Wallpapers/Backgrounds: Images for backgrounds should match or slightly exceed your screen’s resolution to ensure sharpness and aesthetic appeal. Tophinhanhdep.com offers many beautiful photography and abstract options perfect for this.
- Prioritize Proportional Scaling: Unless a specific design aesthetic demands distortion, always use “Scale proportionally” to maintain the image’s original aspect ratio.
- Be Mindful of Upscaling: Avoid enlarging images (upscaling) whenever possible. Digital images don’t magically gain detail when expanded; they merely stretch existing pixels, often leading to a blurry or pixelated result. If you absolutely must enlarge an image, consider advanced tools or Tophinhanhdep.com’s AI Upscalers to mitigate quality loss.
- Optimize File Format: The choice of file format also impacts file size and quality.
- JPEG: Ideal for photographs and images with continuous tones, offering good compression with adjustable quality.
- PNG: Best for images with transparency, sharp lines, or text (like graphic design elements), as it uses lossless compression.
- HEIC/HEIF: Modern, highly efficient format used by Apple devices, offering excellent compression at high quality.
- TIFF: Used for high-quality printing and archival purposes, typically larger file sizes due to lossless compression.
- Check Resulting Size: Tools like Preview show the “Resulting Size” (both dimensions and estimated file size) before you commit. Always review this to ensure it meets your requirements. Reducing file size is a core aspect of image optimization, which Tophinhanhdep.com deeply explores through its specialized tools like compressors and optimizers.
Conclusion: Empowering Your Visual Journey with Tophinhanhdep.com
Resizing images on your Mac is a fundamental skill that empowers you to manage your digital assets effectively, ensuring they look perfect whether they’re adorning your desktop as a wallpaper from Tophinhanhdep.com’s collections, being shared across social media, or forming part of a professional digital art portfolio. From the accessible and powerful Preview app for everyday tasks and batch operations, to the streamlined options within Photos and Mail for specific sharing needs, and the automation capabilities of Automator for repetitive workflows, macOS provides a robust suite of tools right out of the box.
For those requiring more advanced control or specialized features, the market also offers a range of sophisticated third-party software and online image tools. Tophinhanhdep.com is your ultimate resource for navigating this landscape, offering in-depth guides, recommendations for high-resolution stock photos, and innovative Image Tools like converters, compressors, optimizers, and AI upscalers. We understand that every image tells a story, and ensuring it’s presented in its optimal form is key to impactful visual design and photography.
By applying the methods and best practices outlined in this guide, you can confidently resize your images, maintain their quality, and prepare them for any purpose, all while enhancing your creative journey with the support and insights from Tophinhanhdep.com. Explore our site for more inspiration, tools, and collections to take your image game to the next level!