Mastering Image Resizing in Photopea: Your Essential Guide for Digital Perfection

In the vast and vibrant landscape of digital content creation, the ability to effectively manipulate images is not just a skill but a necessity. From crafting captivating wallpapers and backgrounds to fine-tuning aesthetic photography for social media, image dimensions play a pivotal role in presentation and performance. This is where Photopea, a powerful and accessible web-based photo editor, emerges as an invaluable tool. Offering a suite of professional-grade features without the hefty price tag, Photopea empowers users to achieve precise control over their visual assets, including the fundamental task of resizing images.
Whether you’re an aspiring digital artist, a seasoned photographer, or a marketer managing visual campaigns, understanding how to resize images efficiently and effectively is paramount. Incorrect sizing can lead to pixelation, awkward cropping, slow website loading times, or rejection by specific platforms. Fortunately, Photopea provides intuitive solutions for these challenges, ensuring your images always look their best, regardless of their final destination. This comprehensive guide, brought to you by Tophinhanhdep.com, will delve into the various methods of resizing images within Photopea, explore the nuances of each technique, and connect these practices to broader concepts in images, photography, and visual design.
Why Image Resizing is Crucial for Every Digital Creator
The importance of image resizing extends far beyond merely fitting a picture into a designated space. It’s a foundational aspect of digital hygiene, impacting everything from user experience to artistic intent.
For Images that serve as wallpapers, backgrounds, or aesthetic visuals, precise resizing ensures they seamlessly integrate into various devices and displays without distortion. A beautiful nature photograph, an abstract digital art piece, or an emotionally resonant image, when incorrectly sized, can lose its impact or appear unprofessional. By resizing, you can prepare images for diverse applications, from desktop backgrounds to mobile lock screens, ensuring every pixel contributes to the intended aesthetic.

In the realm of Photography, especially when dealing with high-resolution stock photos or digital photography, resizing is critical for optimization. Photographers often capture images at very high resolutions to preserve detail, but these large files are impractical for web use. Resizing allows photographers to create web-friendly versions of their work for online portfolios, blogs, or stock photo platforms, reducing loading times and improving accessibility without compromising the original’s integrity. It also plays into various editing styles, where specific dimensions might be required for certain artistic effects or print layouts.
Image Tools like converters, compressors, optimizers, and AI upscalers often work best when the initial image dimensions are appropriate for the task. Resizing an image is frequently the first step before you compress it for faster web loading or optimize it for specific platforms. While Photopea offers a robust resizing function, understanding its capabilities also helps you know when to seek specialized tools like AI upscalers for significant quality enhancement when enlarging a photo—a task Photopea’s direct resizing is not designed for without some quality loss.
For Visual Design, including graphic design, digital art, and photo manipulation, resizing is integral to the creative process. Designers constantly adjust image dimensions to fit layouts for posters, brochures, social media graphics, and website elements. Proper resizing ensures that text overlays remain legible, compositions are balanced, and creative ideas are executed flawlessly. It prevents design elements from looking stretched, squashed, or poorly placed within a larger visual context.
Finally, in Image Inspiration & Collections, such as creating photo ideas, mood boards, thematic collections, or showcasing trending styles, consistent and appropriate image sizing contributes to a cohesive and professional presentation. Imagine a mood board where images are wildly inconsistent in size; it would detract from the overall aesthetic. Resizing ensures harmony and impact across your curated collections, making your visual narratives more compelling.
In essence, mastering image resizing in Photopea empowers you to maintain quality, optimize performance, and realize your creative vision across all digital mediums.
Method 1: Resizing Images with the Image Size Panel in Photopea
The “Image Size” panel in Photopea is your primary tool for altering the actual dimensions of your image content. When you adjust the image size, Photopea either adds or removes pixels, scaling the entire visual content to fit the new dimensions. This is ideal for tasks like preparing an image for a specific social media platform, reducing a high-resolution photo for web use, or preparing an image for print at a desired physical size.
Step-by-Step Guide to Adjusting Image Dimensions
Let’s walk through the process of using the Image Size panel, ensuring you maintain control over your image’s quality and proportions.
-
Accessing Photopea and Opening Your Image: Begin by navigating to Photopea.com in your web browser. As a free online photo editor, Photopea requires no downloads or installations, making it incredibly accessible. Once the interface loads, you can open your image in a couple of ways:
- Go to
File > Openand select the image from your computer. - Simply drag and drop your image file directly from your desktop or folder into the Photopea canvas.
Once your image is open, for those who like precision, you can press
Ctrl+R(orCmd+Ron Mac) to display rulers around your canvas, giving you an immediate visual reference of your image’s current dimensions.
- Go to
-
Navigating to the Image Size Panel: With your image active, head to the top menu bar. Click on
Image, and from the dropdown menu, selectImage Size. Alternatively, Photopea supports keyboard shortcuts for efficiency; you can quickly open the Image Size panel by pressingAlt+Ctrl+I(orOption+Cmd+Ion Mac). -
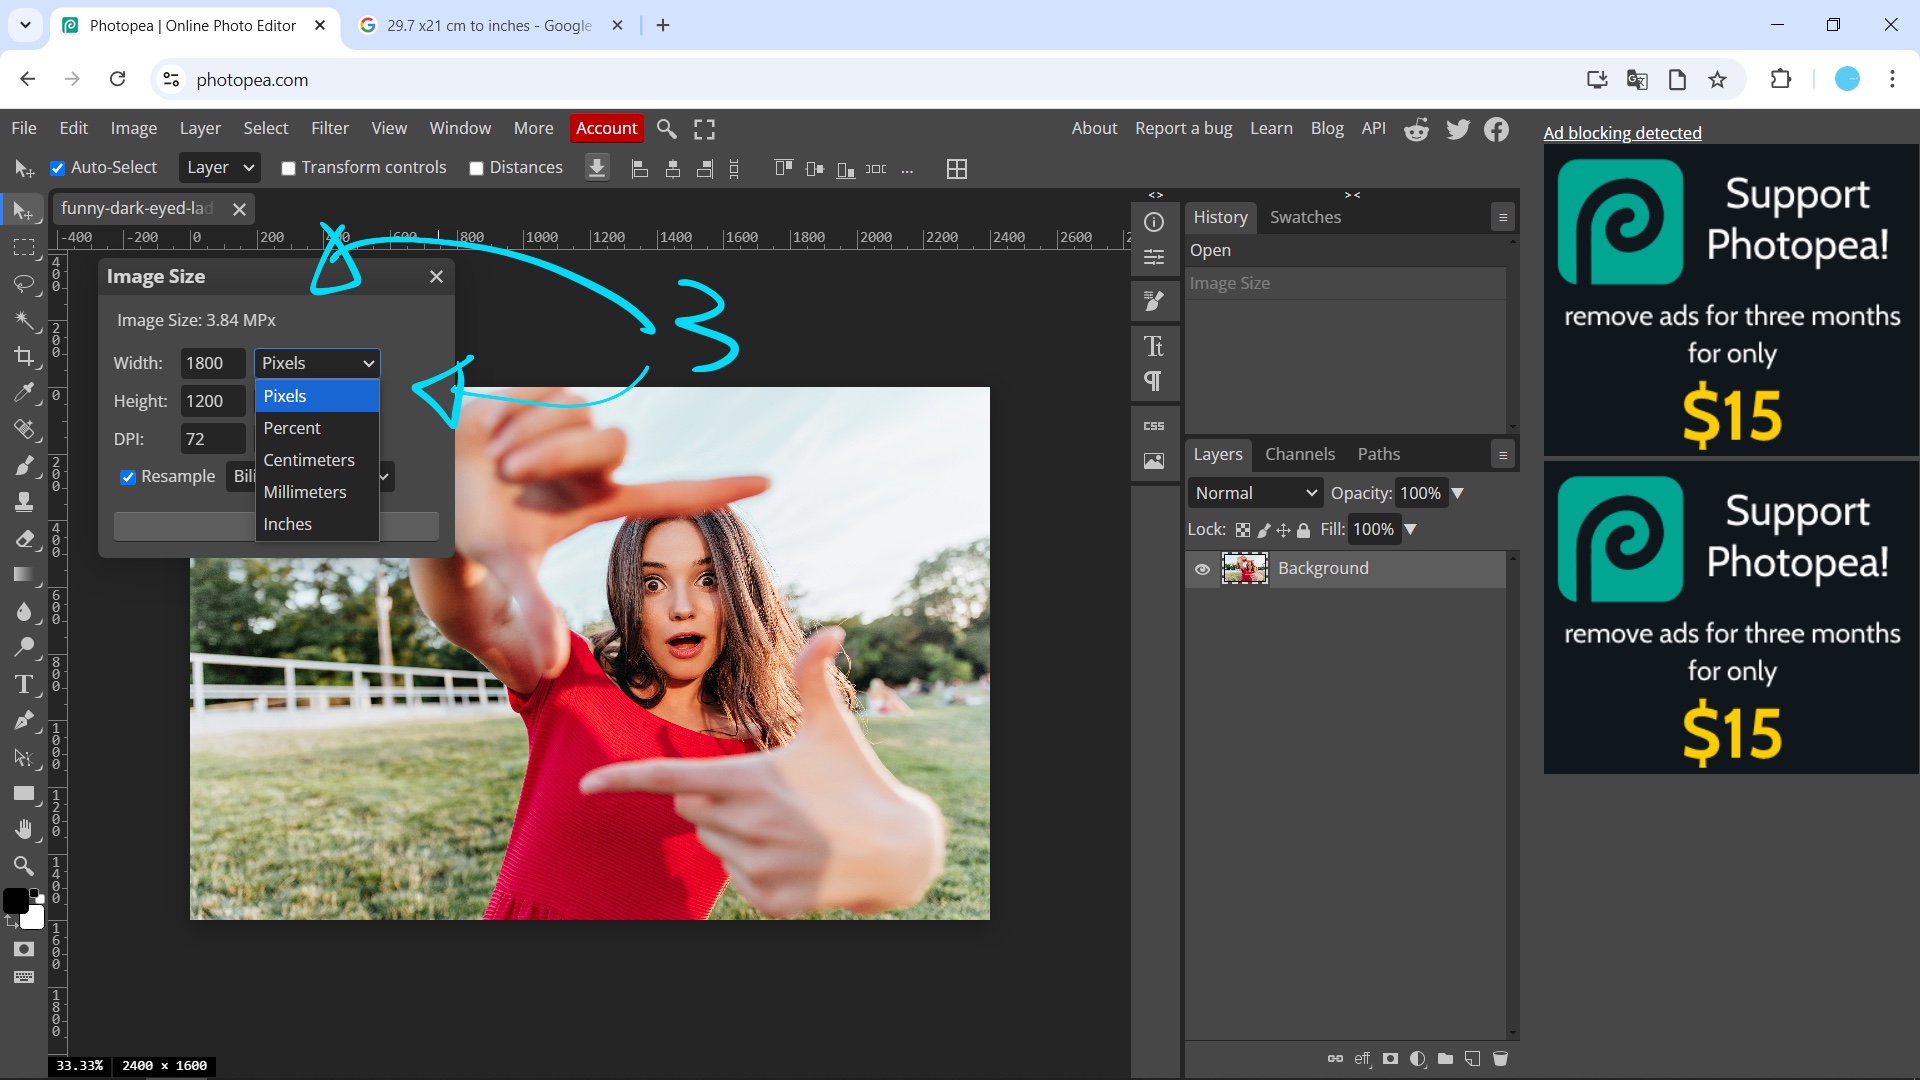
Understanding the Image Size Dialog: The Image Size panel presents several crucial options:
- Dimensions: This displays the current pixel dimensions of your image.
- Units: You can change the units of measurement to pixels, percent, millimeters (mm), or inches. Choosing pixels is standard for digital display, while inches or millimeters are often preferred for print preparation.
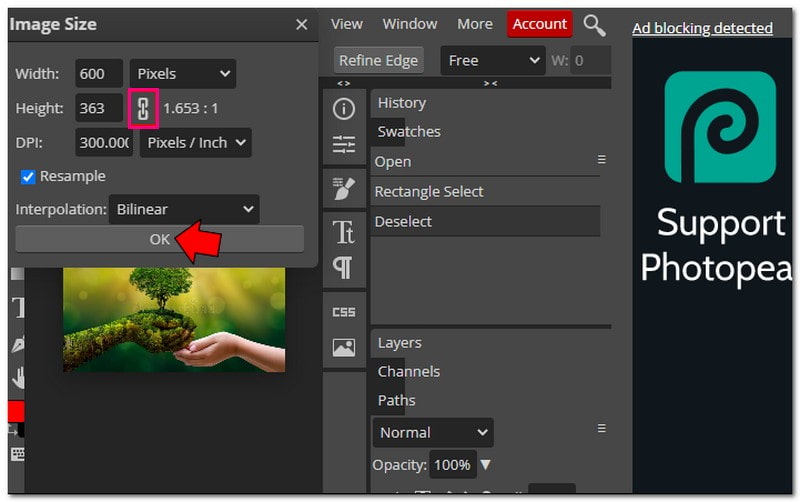
- Width and Height: These are the primary fields where you’ll input your desired new dimensions.
- Link Icon (Aspect Ratio Lock): This small chain-link icon between the width and height fields is critical. When linked (which is the default and recommended setting for most resizing tasks), changing either the width or the height will automatically adjust the other dimension proportionally. This prevents your image from looking stretched or squashed, preserving its original aspect ratio. If you unlink it, you can change width and height independently, but be aware this will distort your image.
- Resolution (DPI): This refers to “Dots Per Inch” (for print) or “Pixels Per Inch” (for digital displays). For images primarily viewed on screens, 72 DPI is standard. For high-quality prints, a resolution of 300 DPI is generally recommended to ensure sharpness and detail. Lowering the DPI can significantly reduce file size but will impact print quality.
- Resample: This dropdown menu determines the algorithm Photopea uses to add or remove pixels when resizing. While the default “Bicubic” is usually a good all-rounder, different options like “Nearest Neighbor” (sharp, jagged edges, good for pixel art) or “Bilinear” (smoother, but less sharp) exist. For most photographic resizing, “Bicubic Automatic” or “Bicubic Sharper (reduction)” are excellent choices.
-
Inputting New Dimensions: Now, enter your desired values in the “Width” or “Height” fields. For example, if you’re preparing an image for a website and need it to be 800 pixels wide, simply type “800” into the width field, ensuring the link icon is active. Photopea will automatically calculate the corresponding height to maintain proportion. You might also adjust the resolution here if preparing for print.
-
Applying the Changes: Once you’ve set your desired dimensions and resolution, click the “OK” button. Photopea will process the image, and you will see the resized version appear on your canvas. Always review the resized image to ensure it meets your expectations for clarity and composition.
By following these steps, you can confidently resize images using Photopea’s Image Size panel, preparing them for any digital or print application while maintaining quality and artistic intent.
Method 2: Adjusting Image Canvas with the Canvas Size Panel
While the Image Size panel scales the actual content of your image, the “Canvas Size” panel operates differently. It modifies the boundaries of your document, either cropping the existing image content or adding empty space around it. This is a crucial distinction and serves different purposes in visual design and photography. You might use Canvas Size to add a border around an image, create a specific aspect ratio without distorting the image, or trim excess transparent areas.
Step-by-Step Guide to Modifying Canvas Dimensions
Understanding and utilizing the Canvas Size panel allows for more nuanced control over your image presentation.
-
Accessing the Canvas Size Panel: With your image open in Photopea, navigate to the top menu bar. Click on
Image, and this time, selectCanvas Sizefrom the dropdown menu. The keyboard shortcut for this panel isAlt+Ctrl+C(orOption+Cmd+Con Mac). -
Understanding the Canvas Size Dialog: The Canvas Size panel provides controls specific to modifying the document boundaries:
- Current Size: Displays the present width and height of your canvas.
- New Size (Width and Height): Here, you will input the desired new dimensions for your canvas. Similar to Image Size, you can choose different units (pixels, percent, mm, inches). The link icon will maintain the aspect ratio of the canvas, not necessarily the image content within it.
- Anchor: This is a grid of nine squares. It determines where your existing image content will be placed relative to the new canvas size. For instance, if you want to expand the canvas equally on all sides, keep the anchor in the center. If you want to add space only to the right, place the anchor on the left, pushing the existing image leftwards. This is vital for maintaining composition.
- Extension Color: If you’re expanding your canvas, this option allows you to choose the color of the newly added space. Options typically include Foreground Color, Background Color, White, Black, Gray, or Other (to pick a custom color).
-
Applying Changes: Cropping or Expanding: Let’s consider a couple of examples:
- Expanding the Canvas: Suppose you have a rectangular image and want to make it a square by adding equal white space to the top and bottom. You would set the new width and height to be equal (e.g., matching the current longest side), ensure the anchor is in the center, and set the extension color to white.
- Cropping with Canvas Size: If you want to effectively crop your image to smaller dimensions without moving the image content (e.g., cutting off some edges), you would input smaller width and height values than the current size. The anchor point dictates which parts of the image will be removed. For example, setting the anchor to the top-left will crop from the bottom and right edges.
-
Observing the Result: After setting your desired new canvas dimensions and anchor point, click “OK”. Photopea will adjust the canvas. If you expanded it, you’ll see new blank areas. If you shrunk it, parts of your image will be trimmed. It’s important to understand that shrinking the canvas this way does not reduce the overall pixel dimensions of the image content itself, only the visible area of the document. The hidden pixels are still there unless you later use the Image Size panel or crop tool. For a permanent crop, the dedicated Crop Tool is often more intuitive.
By understanding the distinct functions of the Image Size and Canvas Size panels, you gain greater flexibility in preparing your images for diverse needs, from adding aesthetic borders for visual design to precisely framing photographs for online display.
Advanced Resizing Techniques and Considerations
Beyond the primary Image Size and Canvas Size panels, Photopea offers additional tools and crucial considerations that elevate your resizing workflow. These elements ensure precision, maintain quality, and align with best practices in digital imaging.
The Crop Tool for Precise Control
For visually intuitive cropping and resizing, the Crop Tool (often found in the left-hand toolbar, shortcut C) is indispensable. Unlike Canvas Size which relies on numerical inputs and an anchor point, the Crop Tool allows you to click and drag handles directly on your image to define a new boundary.
- How it Works: Select the Crop Tool. A bounding box will appear around your image. You can drag the corners or sides to define your new crop area. The area outside the box will be removed.
- Aspect Ratio Presets: In the top options bar, you’ll find presets for common aspect ratios (e.g., 1:1 for square, 16:9 for widescreen, specific social media sizes). You can also input custom ratios.
- Straightening: Some crop tools integrate a straightening function, allowing you to drag a line along a crooked horizon to automatically rotate and level your image before cropping.
- Use Cases: Ideal for visually composing your
Beautiful PhotographyandAestheticimages, removing unwanted elements, or fitting images into specific layouts forGraphic DesignandCreative Ideas. It’s also excellent for quickly preparing images forMood BoardsandThematic Collectionswhere a consistent visual frame is desired.
Free Transform for Layer-Specific Resizing
While Image Size applies to the entire document, the Free Transform tool (Edit > Free Transform or Ctrl+Alt+T / Cmd+Option+T) allows you to resize individual layers or selections within your image. This is particularly useful in Photo Manipulation and Digital Art where you might be combining multiple elements.
- How it Works: Select the layer you wish to transform. Go to
Edit > Free Transform. A bounding box with handles will appear around your layer. You can drag these handles to resize. HoldingShiftwhile dragging maintains the aspect ratio. - Non-Destructive (initially): When transforming, Photopea attempts to preserve quality as much as possible, but repeated transformations on the same layer can degrade quality. For bitmap layers, converting to a Smart Object before transforming is a best practice to allow for non-destructive scaling.
- Use Cases: Placing and resizing elements in a composite image, scaling logos or text, correcting perspective distortions, or creating dynamic visual effects.
Quality Considerations for Resizing
Understanding the impact of resizing on image quality is paramount for professional results, especially concerning High Resolution images and Digital Photography.
- Upscaling vs. Downscaling:
- Downscaling: Reducing an image’s size generally maintains or even enhances perceived sharpness because you’re condensing more pixel information into a smaller space. Photopea does an excellent job of downscaling.
- Upscaling: Enlarging an image, however, is where quality loss becomes a significant concern. Photopea has to “invent” new pixels, which can lead to blurriness, pixelation, and a loss of detail. This is true for any image editing software. If you absolutely must significantly upscale an image, specialized
AI Upscalers(often available as separateImage Toolsor online services, as seen on Tophinhanhdep.com) use advanced algorithms to intelligently add detail and can produce far superior results than Photopea’s standard resizing for this specific task.
- DPI and Resolution:
As mentioned earlier, DPI (Dots Per Inch) is critical for determining print quality.
- For screen viewing (websites, social media, digital displays), 72 DPI is sufficient. Higher DPI for screen display does not typically translate to better visual quality, only larger file sizes.
- For print, 300 DPI is the industry standard for high-quality output, ensuring crisp detail. When resizing for print, adjust both dimensions and DPI in the Image Size panel.
- File Formats and Transparency:
The choice of file format during export significantly impacts quality and functionality.
- JPG (JPEG): Uses lossy compression, meaning some data is discarded to achieve smaller file sizes. Great for photographs and web images where some quality loss is acceptable for faster loading. However, JPG does not support transparency. If your image has transparent areas (e.g., a logo without a background), saving as JPG will turn those areas black or white.
- PNG: Uses lossless compression, retaining all image data. Ideal for images with sharp edges, text, or transparency. This is the recommended format by Tophinhanhdep.com if you need to preserve transparent backgrounds, ensuring your
Digital ArtandGraphic Designelements integrate seamlessly into various backdrops. - GIF: Supports animation and transparency but is limited to 256 colors, making it unsuitable for photographs but good for simple graphics or short animations.
Connecting Resizing to Overall Image Workflow
Resizing isn’t an isolated action; it’s often a preliminary step in a broader image workflow. After resizing, you might:
- Utilize other
Image Toolssuch asCompressorsorOptimizersto further reduce file size for web performance, particularly important forStock PhotosandDigital Photographyshared online. - Apply various
Editing Stylesto yourImages, knowing that your dimensions are now optimized. - Ensure that your
Image Inspiration & Collectionsmaintain a consistent visual quality and structure, with every element properly scaled.
Exporting Your Masterpiece from Photopea
Once you’ve meticulously resized and perfected your image in Photopea, the final crucial step is to export it in the correct format and quality. This process is straightforward and allows you to prepare your image for its intended use, whether it’s for Wallpapers, Backgrounds, Visual Design projects, or Photography portfolios.
-
Initiating the Export Process: Navigate to the
Filemenu at the top-left of the Photopea interface. From the dropdown menu, selectExport As. Photopea will present you with a list of common image formats:PNG,JPG,GIF,SVG,PDF, and more. The most frequently used for photos and web graphics areJPGandPNG. -
Choosing the Right File Format:
- PNG (.png): Select this option if your image contains transparency (e.g., a logo with no background, or an element for
Photo Manipulationthat needs to float over another image). PNG also uses lossless compression, making it ideal for maintaining the highest quality for graphics, line art, or images with sharp edges and blocks of color. As recommended by Tophinhanhdep.com, choose PNG to preserve any transparent layers you might have created. - JPG (.jpg): Opt for JPG when dealing with photographs or complex images where slight compression artifacts are acceptable in exchange for a significantly smaller file size. JPG is the standard for web photos and is excellent for
High ResolutionPhotographythat needs to load quickly online. Remember, JPG does not support transparency; any transparent areas will typically be filled with black or white upon export. - Other Formats:
GIFis suitable for simple animations or graphics with limited colors.SVGis for vector graphics. Choose based on your specific project requirements.
- PNG (.png): Select this option if your image contains transparency (e.g., a logo with no background, or an element for
-
Making Final Adjustments (JPG/PNG Specific): After selecting your desired format (e.g., JPG or PNG), a new dialog box will appear, offering further options:
- Quality (for JPG): For JPGs, you’ll see a “Quality” slider or percentage input. A higher percentage means better image quality but a larger file size. A lower percentage reduces file size but can introduce more noticeable compression artifacts. Aim for a balance that suits your needs, typically between 70-85% for web use, which often provides good quality with manageable file sizes.
- Dimensions: This dialog might also present another opportunity to quickly adjust the width and height, or even the resolution, just before export. This is convenient for last-minute tweaks.
- File Size Preview: Photopea usually displays a preview of the estimated file size, allowing you to gauge the impact of your quality settings.
-
Saving to Your Device: Once you are satisfied with the format, quality, and dimensions, click the
Savebutton. Your resized and optimized image will then be downloaded to your computer’s local storage, ready for sharing, uploading, or integrating into your nextVisual Designproject orImage Collection.
By mastering this final export step, you ensure that your efforts in resizing and editing in Photopea translate into high-quality, perfectly optimized images for any digital or print application, truly bringing your Creative Ideas to life.
Conclusion
The ability to resize images is a cornerstone skill for anyone navigating the digital world, from casual social media users to professional graphic designers and photographers. Photopea, with its robust and accessible web-based platform, offers a comprehensive suite of tools to achieve precise control over your image dimensions. Whether you’re using the Image Size panel for scaling content, the Canvas Size panel for adjusting document boundaries, or the intuitive Crop and Free Transform tools for detailed manipulation, Photopea ensures that your visuals are always optimized for their intended purpose.
As you embark on your creative journey, remember the distinctions: Image Size changes the actual pixel dimensions of your image, affecting file size and quality across the board. Canvas Size alters the document’s visible area, either cropping existing content or adding blank space. And always be mindful of Quality Considerations, especially the perils of upscaling and the importance of appropriate DPI for screen versus print.
For more tutorials, tips on image editing, photography, and visual design, including AI Upscalers, Image Compressors, and inspiring Image Collections, make sure to visit Tophinhanhdep.com. Embrace the power of Photopea to transform your Images and elevate your Visual Design projects, ensuring every pixel contributes to your digital perfection. Happy creating!