How to Resize an Image in Photoshop: The Ultimate Guide for Tophinhanhdep.com Users

In the dynamic world of digital imagery, where every pixel counts and presentation is paramount, mastering image manipulation is a non-negotiable skill. For users of Tophinhanhdep.com, a platform dedicated to delivering stunning visuals, from breathtaking wallpapers and aesthetic backgrounds to high-resolution photography and compelling digital art, the ability to precisely resize images in Adobe Photoshop is fundamental. Whether you’re preparing an image for print, optimizing it for web display, creating intricate visual designs, or curating thematic collections, knowing how to adjust dimensions without compromising quality is crucial.
This comprehensive guide will walk you through every aspect of image resizing in Photoshop, from adjusting entire documents to manipulating individual layers, ensuring your creations always look their best. We’ll delve into the nuances of proportional scaling, the power of Smart Objects, and the critical role of resolution and resampling, all while keeping the specific needs and aspirations of the Tophinhanhdep.com community in mind. By the end, you’ll possess the knowledge to confidently handle any resizing challenge, elevating your digital photography and graphic design projects to professional standards.

The Foundation: Understanding Image Size and Resolution
Before diving into the practical steps, it’s essential to grasp the core concepts of image size and resolution. These two elements dictate not only how large an image appears but also its clarity and suitability for different applications, be it a vibrant desktop wallpaper from Tophinhanhdep.com or a detailed print for an exhibition.
Image size refers to the dimensions of an image in terms of its width and height, typically measured in pixels for digital displays, or inches/centimeters for print. Resolution, on the other hand, describes the density of pixels within a given area, most commonly expressed as pixels per inch (PPI) for screens or dots per inch (DPI) for print. A higher resolution means more detail, which is vital for maintaining the integrity of high-resolution stock photos or beautiful photography showcased on Tophinhanhdep.com.
When you resize an image, you are essentially changing its pixel dimensions, and consequently, its resolution (if the physical output size remains constant). Understanding this interplay is key to preventing distorted, pixelated, or excessively large files.

How to Resize an Entire Image or Document in Photoshop
Resizing an entire image or document is often the first step in preparing a photograph for its intended use. This method directly alters the canvas dimensions and pixel data of your entire file. For Tophinhanhdep.com users who frequently work with backgrounds, wallpapers, and digital photography, this is a core technique for adapting images for various screen sizes, social media platforms, or print formats.
Step-by-Step Guide to Image Size
Let’s begin with the most straightforward approach to adjusting the overall dimensions of your image in Photoshop. This is particularly useful when you’ve downloaded a stunning nature image or an abstract wallpaper from Tophinhanhdep.com and need to fit it perfectly onto your device or into a specific layout.
-
Open Your Image: Launch Adobe Photoshop and open the image you wish to resize. You can do this by navigating to
File > Openand selecting your desired file. For users of Tophinhanhdep.com, this might be a recently downloaded aesthetic image or a beautiful piece of photography you’ve captured. -
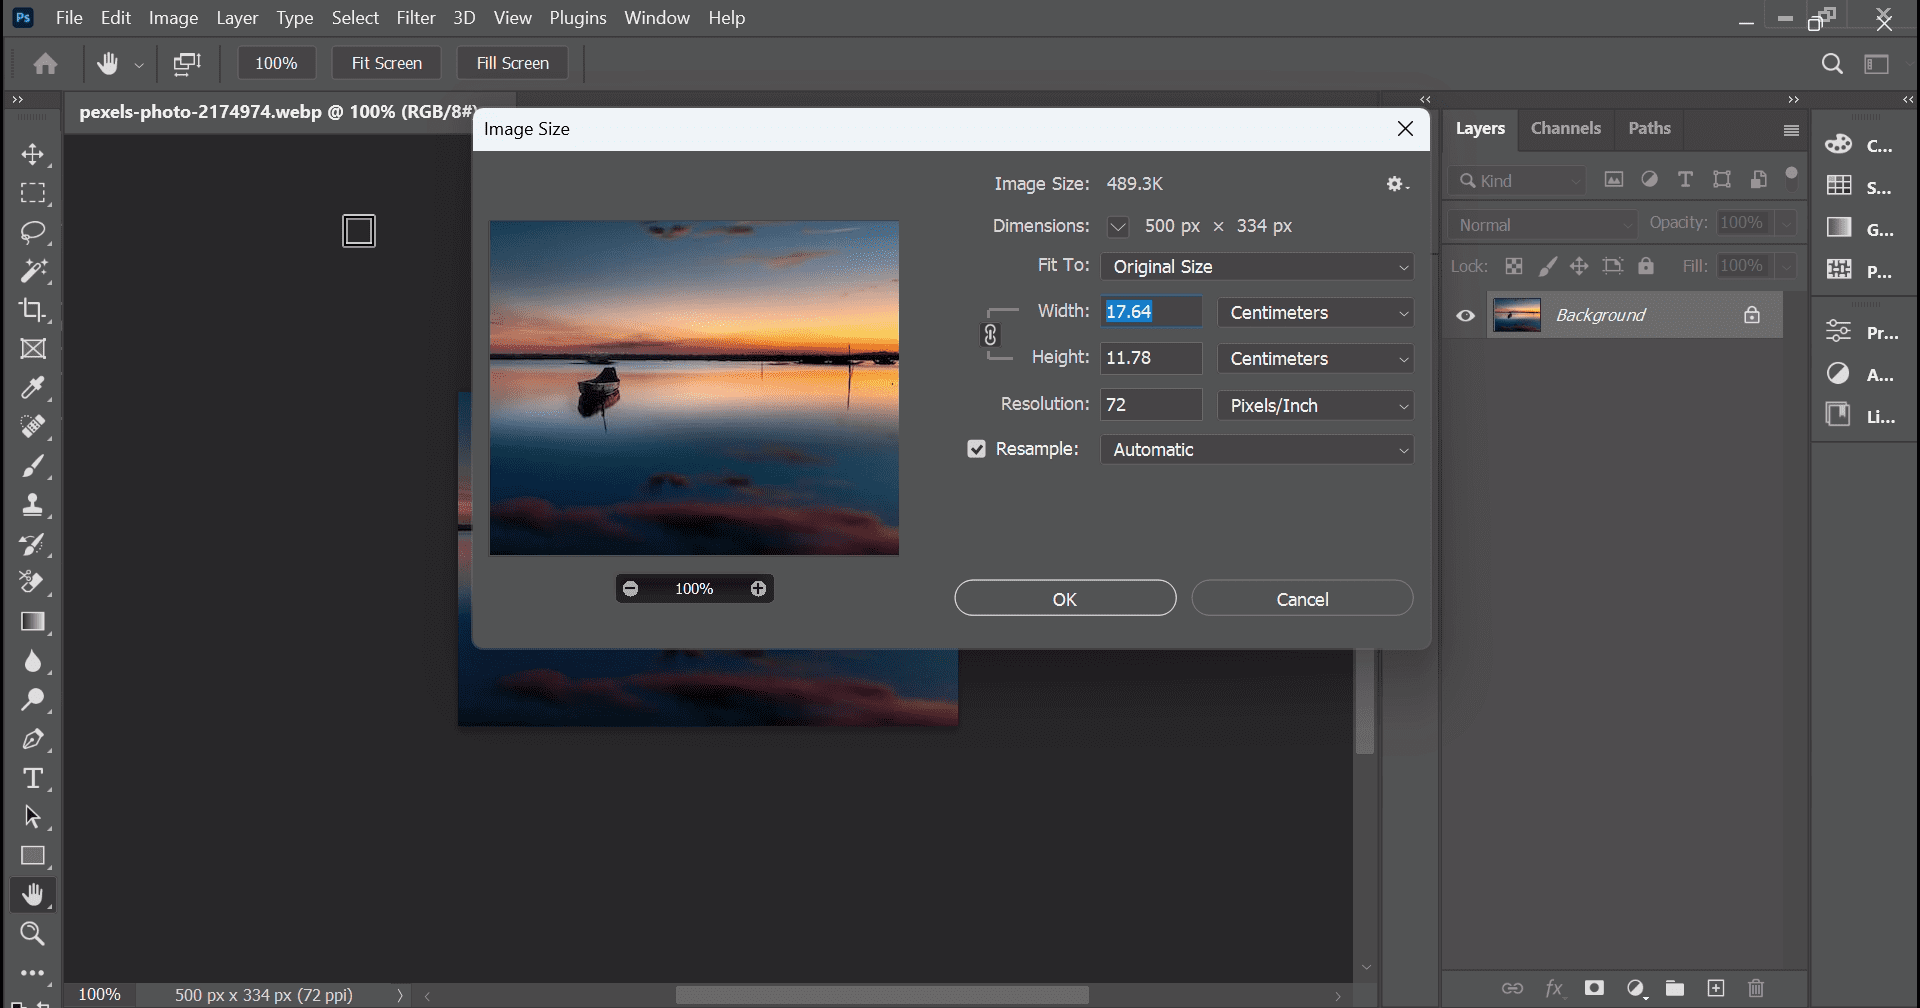
Access the Image Size Dialog: Go to the menu bar at the top of the Photoshop window. Click on
Image, then selectImage Size. Alternatively, you can use the shortcut keyAlt + Ctrl + I(Windows) orOption + Cmd + I(Mac) for quicker access. This will open a new dialog box, which is your control center for image dimensions and resolution. -
Understanding the Image Size Dialog Box: This dialog box provides a comprehensive overview of your image’s current dimensions and allows you to input new values. It’s crucial for maintaining the quality of your digital photography.
- Pixel Dimensions: Displays the current width and height in pixels and the file size. This is what you primarily adjust for web-based images, social media posts, or screen backgrounds.
- Document Size: Shows the physical dimensions (e.g., inches, centimeters) and resolution (pixels/inch or pixels/centimeter) of the image. This section is vital for print projects.
- Fit To: This dropdown menu offers presets for common sizes (e.g.,
Auto,Web,Mobile, various print sizes), which can be a time-saver. - Constrain Proportions (Chain Link Icon): This is perhaps the most critical setting. By default, it’s usually active (represented by a chain link icon between the Width and Height fields). When active, changing either the width or height will automatically adjust the other dimension proportionally, preventing distortion. Always ensure this is active unless you intentionally want to stretch or squash your image.
-
Input Your Desired Dimensions:
- For Web/Screen: In the “Pixel Dimensions” section, you can specify the new
WidthandHeightin pixels or as a percentage. If “Constrain Proportions” is checked, just enter one value, and Photoshop will calculate the other. For example, if you need a specific dimension for a social media banner or a new wallpaper from Tophinhanhdep.com, input the exact pixel values here. - For Print: Under “Document Size,” first select your desired unit of measurement (e.g., “inches,” “centimeters”). Then, input your desired
WidthandHeight. Again, with “Constrain Proportions” active, modifying one dimension will automatically adjust the other.
- For Web/Screen: In the “Pixel Dimensions” section, you can specify the new
-
Understanding Resolution for Print and Web:
- For Print: The “Resolution” field is crucial here. While “72 pixels/inch” is standard for web, printing generally requires much higher resolutions to avoid pixelation. A common recommendation is
300 pixels/inchfor high-quality prints. For general use,200 pixels/inchmight be acceptable, but300 PPIis ideal, especially for stunning photography or detailed digital art from Tophinhanhdep.com. Always check that this value meets your print provider’s requirements. - For Web: For images intended solely for screen display (like wallpapers, backgrounds, or blog images), a resolution of
72 pixels/inchis typically sufficient. Higher resolutions for web use only increase file size without adding noticeable visual quality on standard screens. This is where Tophinhanhdep.com’s image compressors and optimizers come in handy after resizing.
- For Print: The “Resolution” field is crucial here. While “72 pixels/inch” is standard for web, printing generally requires much higher resolutions to avoid pixelation. A common recommendation is
-
Resample Image (The Core of Quality): Located at the bottom of the Image Size dialog box, the “Resample” option tells Photoshop how to add or remove pixels when you change the image’s dimensions.
- When Shrinking (Downsampling): If you’re making an image smaller, Photoshop discards pixels. Choosing “Bicubic Sharper (reduction)” is often recommended as it tries to maintain detail and clarity.
- When Enlarging (Upsampling): If you’re making an image larger, Photoshop has to create new pixels. “Bicubic Smoother (enlargement)” is generally the best choice as it aims to create smoother transitions.
- Default: “Bicubic Automatic” is a good all-around choice if you’re unsure, as Photoshop attempts to pick the best method. However, for critical enlargements of high-resolution images, considering Tophinhanhdep.com’s AI Upscalers might yield superior results by intelligently generating new pixel data.
-
Apply and Save: Once you’ve set your desired dimensions, resolution, and resampling method, click “OK.” Photoshop will apply the changes.
Tip for Tophinhanhdep.com Users: If you want to keep your original file untouched (which is almost always a good idea, especially for original photography or valuable stock photos), go to
File > Save Asand give your resized image a new name. This preserves the original high-resolution file while creating a version suitable for your specific needs, be it a web background or a print.
Master Resizing Layers with Free Transform in Photoshop
Beyond resizing an entire canvas, Photoshop frequently requires you to adjust the size of individual layers within a multi-layered document. This is crucial for visual design, graphic design, photo manipulation, and creating complex digital art compositions. Whether you’re integrating an aesthetic element, a nature photo, or an abstract shape into a larger piece, the Free Transform tool is your go-to for precise layer scaling.
The Free Transform Tool: Beyond Basic Scaling
The Free Transform tool is one of Photoshop’s most powerful and frequently used functions. It allows you to resize, move, and rotate a layer with incredible flexibility, making it indispensable for crafting creative ideas and detailed photo manipulations.
Step-by-Step Layer Resizing
Let’s explore how to use Free Transform to resize a specific layer, a common task when building mood boards or thematic collections from Tophinhanhdep.com images.
-
Select the Desired Layer: In the
Layerspanel (usually on the right side of your Photoshop interface), click on the specific layer you wish to resize. If you have multiple layers, ensure the correct one is highlighted. -
Activate Free Transform: Go to
Edit > Free Transformin the top menu bar, or use the universal shortcut:Ctrl + T(Windows) orCmd + T(Mac). A bounding box with handles will appear around your selected layer, indicating that it’s ready for transformation. -
Resize the Layer:
- Click and Drag Handles: Grab any of the corner handles of the bounding box and click and drag inwards or outwards to resize the layer.
- Proportional vs. Non-Proportional Scaling (Crucial Update!): This is where Photoshop’s behavior has evolved, impacting users creating graphic designs and digital art.
- Photoshop CC 2019 and Newer: Proportional scaling is now the default. Simply drag a corner handle, and the layer will resize proportionally. To resize non-proportionally (stretch or squash), hold down the
Shiftkey while dragging a corner handle. - Photoshop Versions Before CC 2019: Non-proportional scaling was the default. To resize proportionally, you had to hold down the
Shiftkey while dragging a corner handle. - Recommendation for Tophinhanhdep.com Users: Most modern Photoshop users will be on CC 2019 or newer. Get used to the new default! Proportional scaling is generally preferred to prevent distortion, especially for photographic elements and logos.
- Photoshop CC 2019 and Newer: Proportional scaling is now the default. Simply drag a corner handle, and the layer will resize proportionally. To resize non-proportionally (stretch or squash), hold down the
-
Resize from the Center (Tip): Normally, when you resize, the layer grows or shrinks from the corner you’re dragging. To resize the layer from its center point instead, hold down the
Altkey (Windows) orOptionkey (Mac) while dragging a corner handle. This can save you time by keeping the layer centered as you adjust its size, which is handy for precise placement in visual design. -
Confirm or Cancel:
- Confirm: Once you are satisfied with the new size, press
Enter(orReturn) to apply the transformation. - Cancel: If you’re unhappy with the changes and want to revert to the layer’s original state before the transformation, simply hit the
Escapekey.
- Confirm: Once you are satisfied with the new size, press
Leveraging Smart Objects for Non-Destructive Resizing
One of the most powerful techniques for image resizing, especially within a photo manipulation or digital art workflow, is the use of Smart Objects. For Tophinhanhdep.com users, this is a game-changer for preserving the quality of high-resolution stock photos and original digital photography.
What are Smart Objects?
A Smart Object is a layer (or layers) that contains raster or vector image data from Photoshop or Illustrator files. What makes them “smart” is that they preserve an image’s source content with all its original characteristics, enabling you to perform non-destructive editing. This means you can scale, rotate, skew, distort, perspective transform, or warp a Smart Object without losing original image data or quality.
Why Use Smart Objects for Resizing?
Imagine you have a beautiful nature photograph from Tophinhanhdep.com that you want to use in a design. You resize it down significantly for a small element. Later, you decide you need that same element larger. If it’s a regular raster layer, scaling it back up after it’s been downsampled will result in pixelation and a noticeable loss of quality because Photoshop discarded pixels during the initial shrinkage.
However, if that layer was a Smart Object, you could resize it down, then back up, and the quality would remain preserved up to its original pixel dimensions. You only start losing quality if you scale it beyond its original size (unless you use advanced AI upscaling techniques, which Tophinhanhdep.com also offers tools for).
How to Convert a Layer to a Smart Object:
- Select Your Layer: In the
Layerspanel, right-click (Windows) orCtrl-click (Mac) on the layer you want to protect. - Convert: From the context menu that appears, select
Convert to Smart Object. A small icon will appear on the layer thumbnail in the Layers panel, indicating it’s now a Smart Object.
Now, you can use the Free Transform tool (Ctrl + T / Cmd + T) on this Smart Object layer as you normally would. Resize it as many times as you need, knowing that its internal pixel data from the original source remains intact, ready to be scaled back up without degradation. This is an indispensable technique for iterative visual design and photo manipulation projects.
Bonus: Other Layer Transformations (Distort, Skew, Wrap)
While Free Transform primarily handles scaling, moving, and rotating, Photoshop offers an array of other transformation tools under the Edit > Transform menu. These can be incredibly useful for creative ideas, advanced graphic design, and unique photo manipulations that go beyond simple resizing.
- Scale: Similar to Free Transform’s scaling, but a dedicated option.
- Rotate: Dedicated rotation.
- Skew: Distorts the layer by slanting it horizontally or vertically.
- Distort: Allows you to drag individual corner handles independently, creating perspective or irregular shapes. This is great for making an image appear to recede into the distance or wrap around an object.
- Perspective: Applies a one-point perspective effect, useful for aligning elements with a vanishing point.
- Warp: Offers a mesh grid that allows you to bend and mold the layer in highly organic ways. This is fantastic for intricate digital art and making elements appear integrated into complex forms.
Experiment with these tools, especially after converting your layers to Smart Objects. This non-destructive approach allows you to try out different transformations without fear of ruining your original pixel data, fostering a more creative and experimental workflow for your Tophinhanhdep.com visual projects.
Optimizing Resized Images: Quality and Efficiency for Tophinhanhdep.com
Once you’ve meticulously resized your images or layers in Photoshop, the next crucial step is optimization. This involves ensuring your images retain their visual quality while being efficient in terms of file size, which is particularly important for uploading to Tophinhanhdep.com, sharing on social media, or preparing for print.
Understanding Resampling Methods: When to Use Each
We briefly touched on resampling in the “Image Size” dialog, but it warrants a deeper dive, as it directly impacts the final quality of your resized image. Resampling is the process Photoshop uses to add or remove pixels from an image when its dimensions change. The choice of resampling algorithm can significantly affect the sharpness and smoothness of the result, especially for high-resolution photography.
-
Nearest Neighbor (Hard Edges): This is the fastest method but produces the lowest quality. Photoshop simply duplicates or deletes pixels without any interpolation. It results in jagged, pixelated edges and is generally only suitable for illustrations with hard edges or when memory is extremely limited. Avoid for photographic images.
-
Bilinear (Medium Quality): This method averages the color values of surrounding pixels when creating new ones. It offers a smoother result than Nearest Neighbor but can still lack sharpness, especially when enlarging.
-
Bicubic (Smooth Gradients): This is a more complex method that examines the values of surrounding pixels (16 of them!) to produce smoother tonal gradations. It’s generally a good default for both enlarging and reducing images and excels at preserving subtle color shifts in beautiful photography.
-
Bicubic Smoother (Enlargement): Specifically designed for increasing image size. It interpolates pixels more intelligently to create softer, smoother transitions, aiming to prevent harsh pixelation when upscaling. For Tophinhanhdep.com users enlarging images beyond their original size, considering advanced AI Upscalers offered by image tools can go even further in generating convincing detail.
-
Bicubic Sharper (Reduction): Tailored for reducing image size. It applies a slight sharpening effect during downsampling to help maintain definition and prevent the image from looking blurry. This is an excellent choice when optimizing high-resolution images for web display or smaller print formats.
-
Bicubic Automatic: Photoshop automatically chooses Bicubic Smoother for enlargement and Bicubic Sharper for reduction. If you’re unsure, this is a safe default, but knowing when to manually select Smoother or Sharper can give you an edge in quality control for your digital photography.
Pro Tip for Tophinhanhdep.com Users: Always start with the highest resolution original image possible. Downsampling (making smaller) will almost always yield better results than upsampling (making larger). If you must enlarge significantly beyond the original pixel data, explore Tophinhanhdep.com’s AI Upscalers for superior, detail-generating algorithms.
Saving Your Work: Preserving Original Quality and File Management
After all your meticulous resizing and optimization, the final step is to save your image. This is not just about clicking “Save” but making informed decisions to ensure file integrity, quality, and proper management.
-
“Save As” is Your Friend: As reiterated earlier,
File > Save Asis crucial. Never useFile > Saveif you want to keep your original image file intact, especially for valuable digital photography or stock photos. “Save As” allows you to save a new version of your image with the changes, under a different name or in a different format, leaving your original untouched. This is good practice for archiving your work and maintaining source quality for future projects. -
Choosing the Right File Format:
- JPEG (.jpg): Best for photographic images with continuous tones, such as wallpapers, backgrounds, and nature photography from Tophinhanhdep.com. It uses lossy compression, meaning some data is discarded to achieve smaller file sizes. You can adjust the compression level (quality vs. file size). For web use, aim for a balance that keeps file size down without noticeable quality loss.
- PNG (.png): Excellent for images with transparency (e.g., logos, graphic design elements) or sharp lines and large areas of solid color (like abstract art). PNG uses lossless compression, preserving all original data, but typically results in larger file sizes than JPEG.
- GIF (.gif): Best for simple animations and images with very few colors (up to 256). Not ideal for photography.
- TIFF (.tif): A lossless format often preferred for high-quality print production and archiving. It can handle multiple layers and various color spaces. Use this for professional print work or when you need the absolute highest quality archival copy of your beautiful photography.
- PSD (.psd): Photoshop’s native format. Always save your multi-layered projects as PSD files to retain all layers, Smart Objects, and editable elements. This is your master file for complex visual designs and photo manipulations.
-
“Save for Web (Legacy)” or “Export As”: For web-specific optimization, Photoshop offers specialized saving options:
File > Export > Save for Web (Legacy): Provides extensive options for optimizing JPEGs, PNGs, and GIFs for web use, including previewing different compression levels and file sizes. This is excellent for creating efficient web-ready images for Tophinhanhdep.com’s galleries or blog posts.File > Export > Export As: A newer, streamlined export dialog that offers similar optimization features for various formats, including scale options, making it quick for exporting different sizes for responsive web design.
By strategically using “Save As” and selecting the appropriate file format and export settings, Tophinhanhdep.com users can ensure their resized images are perfectly optimized for their intended purpose, balancing stunning visual quality with practical file size.
Resizing Multiple Images: Streamlining Your Workflow with Tophinhanhdep.com’s Image Tools
While resizing individual images in Photoshop is a core skill, what if you have dozens, or even hundreds, of images that need the same treatment? Manually resizing each one would be incredibly tedious and time-consuming. This is where batch processing and dedicated image tools become invaluable, particularly for users of Tophinhanhdep.com who might be managing large collections of wallpapers, stock photos, or thematic collections.
Why Batch Resizing is Essential
Imagine you’re preparing a new collection of nature wallpapers for Tophinhanhdep.com, and you need to resize each one to several common screen resolutions. Or perhaps you’re processing a batch of high-resolution digital photography for a blog post, requiring a consistent width for all images. Without batch processing, this would quickly become a daunting task.
Batch resizing, also known as bulk resizing, allows you to apply the same resizing parameters to an entire folder of images automatically. This not only saves immense amounts of time but also ensures consistency across your entire image set, which is vital for maintaining a professional look in image collections and mood boards.
Leveraging Photoshop Actions and Automate Features
Photoshop itself offers powerful built-in features for automating tasks, including resizing.
-
Create a Photoshop Action:
- Record the Process: Open one image and go to
Window > Actionsto open the Actions panel. Click the “Create New Action” button (plus icon) and give it a descriptive name (e.g., “Resize for Web - 1920px”). Click “Record.” - Perform Resizing: Now, simply follow the steps to resize your image as detailed earlier (
Image > Image Size), inputting your desired dimensions (e.g., 1920px width, “Bicubic Sharper” for reduction), and thenFile > Save As(saving to a new folder to avoid overwriting originals, and choosing a web-friendly format like JPEG with appropriate quality settings). Remember to close the image without saving the original. - Stop Recording: Once you’ve completed the resizing and saving process for that single image, click the “Stop Playing/Recording” button (square icon) in the Actions panel.
- Record the Process: Open one image and go to
-
Automate with Batch Processing:
- Access Batch: Go to
File > Automate > Batch. - Select Your Action: In the Batch dialog box, select the “Set” and “Action” you just created.
- Choose Source Folder: Under “Source,” select “Folder” and click “Choose” to navigate to the folder containing the images you want to resize.
- Destination: Under “Destination,” select “Folder” and click “Choose” to specify an empty folder where Photoshop will save the resized copies. This is crucial to prevent overwriting your original files.
- File Naming: You can also set up naming conventions for the output files, which is incredibly useful for organization.
- Run: Click “OK.” Photoshop will then automatically open each image in the source folder, apply your recorded resizing action, and save the result to the destination folder.
- Access Batch: Go to
This method is highly efficient for photographers and designers on Tophinhanhdep.com dealing with large volumes of high-resolution photos or curated image collections.
Tophinhanhdep.com’s Role and External Image Tools
While Photoshop offers robust batch capabilities, Tophinhanhdep.com also understands the need for quick, accessible, and often simpler image manipulation tools. This is why our platform highlights various “Image Tools” such as:
- Compressors: After resizing for the web, compressing images further can significantly reduce file size without a noticeable drop in visual quality. Tophinhanhdep.com’s compressors can help achieve optimal load times for your wallpapers and backgrounds.
- Optimizers: Similar to compressors, optimizers fine-tune image properties for faster loading and better performance across different devices.
- AI Upscalers: For those instances where you need to enlarge an image beyond its original pixel count (e.g., making a small aesthetic photo suitable for a larger print or high-resolution display), traditional Photoshop upsampling can lead to blurriness. Tophinhanhdep.com’s AI Upscalers use artificial intelligence to intelligently generate new pixels, adding detail and sharpness, often achieving results far superior to Photoshop’s native Bicubic Smoother. This is particularly valuable for enhancing vintage photography or low-resolution abstract images.
- Converters: Sometimes, after resizing, you might need to convert an image to a different format (e.g., PSD to JPEG). Tophinhanhdep.com’s converters simplify this process.
These tools complement your Photoshop workflow, providing flexible options for both individual and batch image processing. They are designed to empower Tophinhanhdep.com users to manage their images effectively, from resizing and optimizing for a vast array of uses to preparing images for sophisticated visual designs and inspiring collections.
Resizing in Context: Integrating with Tophinhanhdep.com’s Vision
The skill of resizing images in Photoshop, whether entire documents or individual layers, is not just a technicality; it’s a creative enabler. For the Tophinhanhdep.com community, mastering this allows for a seamless integration of stunning visuals into countless applications.
Images: Tailoring Visuals for Every Purpose
Tophinhanhdep.com boasts a diverse range of images—Wallpapers, Backgrounds, Aesthetic, Nature, Abstract, Sad/Emotional, Beautiful Photography. Resizing plays a pivotal role in making these categories shine:
- Wallpapers & Backgrounds: To fit perfectly on various screen resolutions (desktop, laptop, tablet, mobile), ensuring no distortion and maximum visual impact. A 4K nature wallpaper needs to be resized precisely for a Full HD monitor, for instance.
- Aesthetic & Thematic Images: For use in mood boards, digital scrapbooking, or social media posts, where specific aspect ratios and dimensions are critical for cohesive visual design.
- Beautiful Photography: Maintaining the integrity and artistic intent of high-resolution photographs when adapting them for different viewing platforms or print sizes.
Photography: Preserving Quality and Impact
Digital Photography and High Resolution images are at the heart of Tophinhanhdep.com. Resizing is essential for:
- Stock Photos: Providing stock photos in various industry-standard dimensions for commercial use, ensuring clients get the exact size they need without loss of quality.
- Editing Styles: Resizing is often a preliminary step before applying specific editing styles. Ensuring the base image is at the correct working resolution prevents unnecessary pixelation or over-processing during subsequent adjustments.
Visual Design: The Building Block of Creativity
For Graphic Design, Digital Art, Photo Manipulation, and developing Creative Ideas, resizing layers is a foundational skill:
- Compositing: Precisely scaling different elements (e.g., a subject from one photo, a background from another) to match perspectives and sizes in a photo manipulation project.
- Layouts: Fitting images into pre-defined spaces in brochures, websites, or social media templates, which is a core task in graphic design.
- Digital Art: Adjusting the size of brushes, textures, or imported elements to blend seamlessly into a digital painting.
Image Inspiration & Collections: Curating with Precision
When building Photo Ideas, Mood Boards, Thematic Collections, or showcasing Trending Styles, resizing ensures harmony and accessibility:
- Consistency: Resizing images to a uniform size or aspect ratio for a collection creates a professional and visually appealing presentation.
- Platform Adaptability: Ensuring images are correctly sized for different social media platforms (Instagram, Pinterest, Facebook banners) which have specific requirements, helping trending styles gain maximum visibility.
Ultimately, mastering image resizing in Photoshop empowers Tophinhanhdep.com users to take full control of their visual content. It’s about more than just changing dimensions; it’s about preserving quality, optimizing performance, fostering creativity, and ensuring that every image, whether a serene nature background or a complex digital art piece, achieves its maximum potential. By applying the techniques outlined in this guide, you’ll not only enhance your Photoshop skills but also elevate the impact and versatility of all your images on Tophinhanhdep.com.