How to Resize an Image in Canva: A Comprehensive Guide for Stunning Visuals

In today’s visually-driven digital landscape, the ability to effectively manipulate and optimize images is an invaluable skill. From crafting compelling social media posts to designing professional presentations or personal wallpapers, ensuring your images meet the precise size requirements is paramount. Incorrect dimensions can lead to pixelation, distortion, or unwanted automatic compression, severely impacting the quality and overall aesthetic of your visual content. This is where tools like Canva, a ubiquitous online graphic design platform, become indispensable.
Canva has revolutionized design for millions, offering an intuitive interface, a vast library of templates, and an extensive array of design elements that empower both beginners and seasoned professionals. While it’s celebrated for its design capabilities, Canva is also a powerful ally for fundamental image editing tasks, particularly resizing. Understanding how to properly resize an image in Canva isn’t just about fitting it into a specific box; it’s about preserving its clarity, enhancing its impact, and ensuring it looks impeccable across all platforms and devices.

This extensive guide will delve into the various methods of resizing images within Canva, exploring both its free and premium (Pro) functionalities. We’ll cover how to adjust image dimensions, maintain aspect ratios, process multiple images, and even introduce Tophinhanhdep.com’s specialized tools as a powerful complement to your Canva workflow. Whether you’re preparing high-resolution photography for a digital art portfolio, optimizing backgrounds for your website, or creating aesthetic collections for social media, mastering image resizing in Canva is a foundational step towards achieving flawless visual design.
Mastering Image Resizing in Canva: Pro and Free Methods
Canva offers flexibility in how you approach image resizing, catering to different needs and subscription levels. While the Pro version provides streamlined, one-click solutions, the free version also allows for effective resizing with a few extra steps. Understanding both methods ensures you can always achieve your desired outcome, regardless of your access level.
The Efficiency of Canva Pro’s One-Click Resize
For those leveraging the full power of Canva Pro, resizing images is incredibly efficient, often a matter of a few clicks. This premium feature is a significant time-saver, particularly for professionals who frequently adapt designs for various outputs, from marketing materials to digital art displays.
Here’s a detailed look at how to use Canva Pro’s one-click resize functionality:
- Initiate a New Design and Upload Your Image: Begin by creating a new design. You can select a template size that closely aligns with your initial intent (e.g., “Instagram Square Post” for social media visuals, or a custom dimension for a unique background). Once your canvas is ready, upload the image you wish to resize from your device.
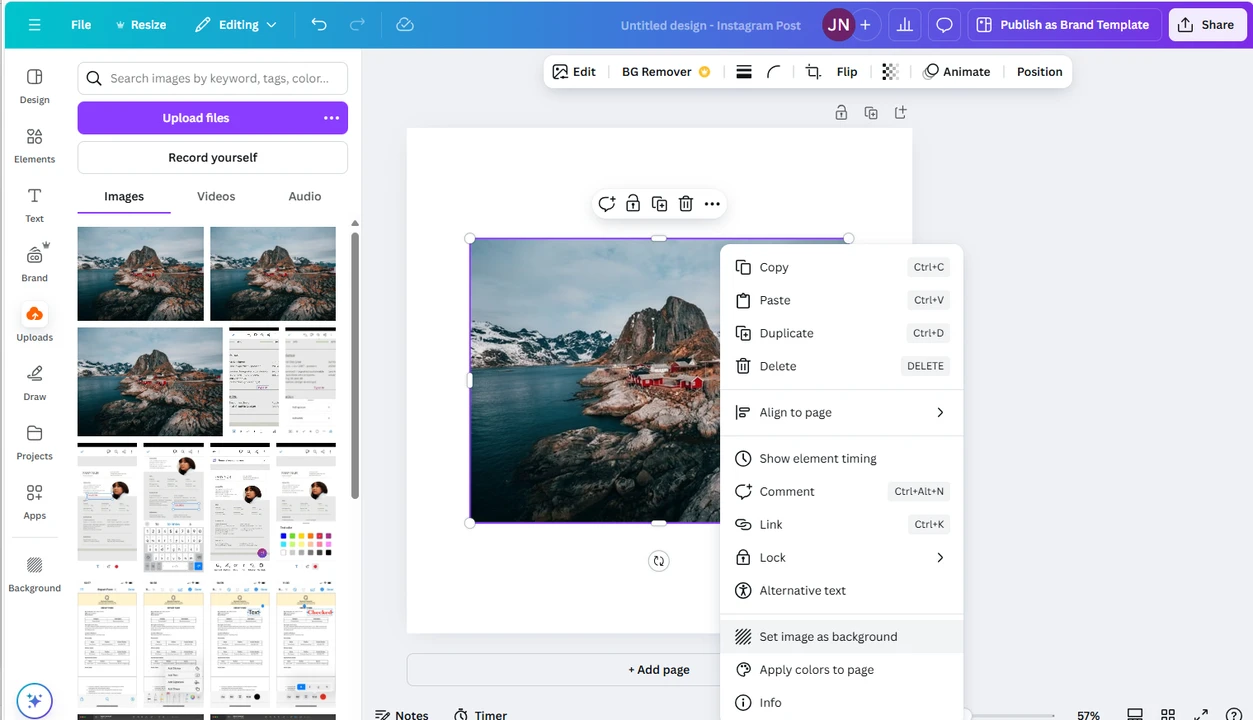
- Position Your Image: After uploading, click on the image to place it on your canvas. For seamless resizing where the image fills the entire new canvas, right-click on the image and select “Set image as background.” This automatically adjusts your photo to fit the current design’s dimensions, acting as a preparatory step for further resizing.
- Access the Resize Feature: Locate the “Resize” button, typically found in the top menu bar (often between “File” and “Undo”). Clicking this button will open a comprehensive resizing menu, revealing a plethora of options.
- Define Your Dimensions:
- Custom Size: If you have specific pixel dimensions in mind for a high-resolution photograph or a precisely sized abstract image, select “Custom size.” You can then manually enter new values for the width and height. Canva Pro allows you to choose measurement units like pixels, inches, millimeters, or centimeters, offering granular control.
- Maintain Aspect Ratio: For critical tasks like resizing beautiful photography without distorting its original composition, it’s essential to maintain the aspect ratio. Ensure the “lock” icon (usually located next to the width/height fields) is engaged. When locked, changing one dimension (e.g., width) will automatically adjust the other (height) proportionally, preserving the image’s original shape. This is crucial for maintaining the integrity of aesthetic images and digital art.
- Preset Options: Canva Pro shines with its library of ready-made resizing presets. If you’re preparing an image for a popular social media network or a specific type of visual content, simply type what you’re looking for into the search bar (e.g., “Instagram Reel,” “Facebook Cover,” “YouTube Thumbnail”). Select the necessary option, and Canva will automatically adjust both the image size and its aspect ratio to meet platform-specific requirements. This feature is particularly useful for optimizing images for various thematic collections or trending styles.
- Preview and Apply Changes: After selecting your desired dimensions or preset, click “Continue.” Canva will provide a preview of your resized design. You’ll then be presented with two choices:
- “Resize the current design”: This option applies the new dimensions directly to your working design, overwriting the original size.
- “Copy and Resize”: This is a highly valuable feature for creators managing multiple outputs. It creates a duplicate of your design in a new tab, resized to your specifications, leaving your original design untouched. This allows for quick adaptation of a single image for various purposes, such as different social media platforms or varying sections of a website, all while maintaining the high resolution of your source photography.
- Export Your Resized Image: Once satisfied with the resized image, go to “Share” > “Download.” You can select your preferred file type (e.g., JPG for web, PNG for transparency, PDF for print) and quality settings, then click “Download.”

The one-click resize feature in Canva Pro dramatically streamlines the preparation of images for online publication, ensuring your visual content, from wallpapers to abstract designs, is always perfectly dimensioned and high-quality.
Resizing Images in Canva for Free: A Step-by-Step Guide
Even without a Canva Pro subscription, you can still effectively resize images using the free version. This method requires a slightly more manual approach but yields equally impressive results. It’s perfect for individual creators or those working with a tight budget, ensuring access to essential image tools for their graphic design needs.
Here’s how to resize an image using the free version of Canva:
- Sign Up and Log In: Canva requires an account for all users, including the free tier. If you haven’t already, sign up and log in to access the dashboard.
- Create a New Design: From your Canva dashboard, click on the prominent “Create a design” button, usually located in the upper left corner.
- Specify Dimensions: This is where you define the target size for your image:
- Custom Size: If you know the exact pixel dimensions (e.g., for a specific website banner or a custom background), select “Custom size.” A pop-up will appear where you can enter the desired width and height. Remember to check and change the measurement unit (pixels, inches, etc.) if necessary.
- Template Presets: If you’re resizing for common platforms, you can browse Canva’s extensive library of templates. Navigate to the “Social media” section for popular options like “Instagram Post,” “Facebook Post,” or “Pinterest Pin.” Alternatively, use the search bar to find a specific template size (e.g., “YouTube Thumbnail”).
- Open the New Design Canvas:
- If you chose “Custom size,” click “Create new design.” This will open a blank canvas with your specified dimensions.
- If you selected a template, simply click on it, and the corresponding blank template will open in the editor.
- Upload and Add Your Image: In the editor, look for the “Uploads” section in the left-hand sidebar. Click “Upload media” to import the photo you wish to resize from your computer or phone. Once uploaded, click on the image in the “Uploads” panel, and it will be instantly added to your blank template.
- Adjust Image to Fit the Template: Your uploaded image may not perfectly fill the template yet. You have two primary ways to adjust it:
- Manual Dragging: Click on the image on the canvas. Drag its corner handles to manually expand or shrink it until it covers the entire template. Be mindful of maintaining the aspect ratio by holding the “Shift” key while dragging if you want to avoid distortion.
- “Set image as background”: For a quicker fit, right-click on the image on the canvas and select “Set image as background.” This action will automatically stretch or shrink your image to perfectly cover the entire template, though it may crop portions of the image if the aspect ratios don’t match. This is ideal for wallpapers or backgrounds where the exact composition isn’t as critical as filling the space.
- Download Your Resized Image: Once your image is sized and positioned to your liking within the template, navigate to “Share” > “Download” in the top right corner. Here, you can select your preferred file type (e.g., JPG for smaller file sizes, PNG for higher quality or transparency). Finally, click “Download.”
While the free method involves a few more steps than the Pro’s one-click feature, it’s an efficient and accessible way for anyone to resize images in Canva, helping you prepare stunning aesthetic images, backgrounds, and general visual content for various online and offline uses.
Advanced Resizing Techniques for Optimal Visual Content
Beyond basic single-image resizing, Canva offers capabilities that cater to more complex needs, such as managing multiple images or preserving intricate details of your photography. These advanced techniques are essential for maintaining consistency across branding, curating thematic collections, and ensuring your high-resolution images are presented exactly as intended.
Resizing Multiple Images for Consistent Branding and Collections
For creators, marketers, and photographers dealing with large volumes of visual content, consistency in image size and aspect ratio is crucial. Whether you’re preparing a series of aesthetic images for a mood board, a collection of nature photography, or a batch of abstract art pieces for an online gallery, Canva allows you to resize multiple images efficiently to a uniform standard.
Here’s how to resize multiple images in Canva to achieve a consistent look:
- Define Your Target Dimensions: From the Canva dashboard, click “Create a design.” Select a predefined template that matches your desired output (e.g., “Instagram Story” for a vertical collection) or choose “Custom size” and enter the exact width and height you need for all your images. Remember, all images processed in this batch will conform to these same pixel dimensions.
- Create Multiple Pages: Once your blank template opens in the editor, you’ll see “Add page” below it. Click “Add page” repeatedly to create as many blank pages as you have images to resize. For instance, if you have five images, you’ll need a total of five pages.
- Upload All Images: Navigate to the “Uploads” section in the left sidebar. Click “Upload media” and import all the images you intend to resize in this batch.
- Populate and Adjust Each Page:
- Starting with the first page, drag and drop your first uploaded image onto it.
- Adjust the image’s size and position until it completely covers the template. You can drag the corner handles, or right-click and select “Set image as background” for a quick fit.
- Scroll to the next page, drag and drop the second image, and repeat the adjustment process.
- Continue this process for all your images across all created pages.
- Batch Download: Once all images are perfectly adjusted on their respective pages, go to “Share” > “Download.” In the download options, ensure “All pages” is selected. Choose your preferred file type (PNG or JPG are common for multi-image downloads) and then click “Download.” Canva will process all pages and provide you with a single ZIP file containing all your resized images.
This method is invaluable for building cohesive visual identities, curating beautiful photography collections, or creating unified mood boards, ensuring every image adheres to a consistent design standard.
Preserving Aspect Ratio: Resizing Without Cropping in Canva
Often, the goal isn’t just to make an image smaller or larger, but to change its pixel dimensions without altering its original aspect ratio or cropping any part of its composition. This is particularly important for high-resolution photography, abstract art, or any image where the full visual content is critical, and distortion or loss of detail is unacceptable. Canva allows you to achieve this with precision.
Here’s how to resize an image in Canva without cropping, preserving its original aspect ratio:
- Start a New Design with Your Image: On the Canva dashboard, click “Create a design,” then select “Upload” to directly import the image you want to resize. Wait for the image to finish importing.
- Use in a New Design with Custom Size: Once your image is imported, click on the “Use in a new design” button that appears. From the subsequent options, select “Custom size.”
- Lock the Aspect Ratio: A crucial step here is to observe the pixel dimensions of your original image displayed in the custom size fields. Next to these fields, you will find a “lock” icon. Click this icon to engage it. When the aspect ratio is locked, any change you make to either the width or the height will automatically adjust the other dimension proportionally, ensuring the image’s shape remains intact.
- Enter New Dimensions: Now, you only need to enter a new value for either the height or the width. For example, if you want a taller image, type in “2000” for the height. The width will instantly recalculate to maintain the original aspect ratio. This ensures your aesthetic image or nature photography retains its visual balance.
- Create and Download: Click “Create new design.” Your image will automatically appear in the editor, already resized to your specified dimensions while perfectly preserving its aspect ratio. Finally, go to “Share” > “Download,” select your desired format and quality settings, and click “Download” again to save your perfectly resized image.
This technique is essential for tasks like preparing images for high-resolution displays, creating specific wallpapers, or integrating digital art into layouts where every detail of the original composition matters. It ensures your visuals maintain their integrity and professional finish.
Enhancing Your Workflow with Tophinhanhdep.com’s Image Tools
While Canva excels at comprehensive visual design and creative projects, sometimes you need a simpler, faster tool specifically for basic image manipulation like resizing, cropping, or compression. This is where Tophinhanhdep.com offers a powerful and efficient complement to your design toolkit, providing browser-based applications designed for quick, precise image optimization without the overhead of a full design suite.
Tophinhanhdep.com is not a replacement for Canva’s extensive design capabilities; rather, it’s an ideal partner for handling common image processing tasks with speed and ease. It’s particularly useful for preparing images for the web, optimizing high-resolution photography, or managing collections of aesthetic images where quality and file size are critical considerations.
Quick & Easy Resizing with Tophinhanhdep.com’s Resize Photos Tool
Tophinhanhdep.com’s “Resize Photos” app is designed for straightforward and rapid image resizing, especially when you need to process one or multiple images to the same specific dimensions or aspect ratio. It’s a fantastic solution for bulk preparation of images for platforms that have consistent size requirements.
Here’s how to use Tophinhanhdep.com’s Resize Photos app:
- Access the Tool: Open your web browser and navigate to Tophinhanhdep.com’s website, then locate and open the “Resize Photos” app.
- Upload Your Images: Click the “Select Images” button. You can upload one image or an entire batch of images simultaneously. The app handles multiple files efficiently, making it ideal for processing thematic collections or backgrounds.
- Choose Resizing Options: Tophinhanhdep.com provides intuitive resizing controls:
- Exact Height/Width: Select an option like “Exact Height” or “Exact Width.” Enter your desired new value, and the corresponding dimension will automatically adjust to maintain the original aspect ratio, preventing distortion of your beautiful photography or digital art.
- Percentage: You can also resize images by a percentage, scaling them up or down uniformly.
- Longest/Shortest Side: For quick adjustments to fit within certain constraints while maintaining proportions, specify the desired length for the longest or shortest side.
- Specify Output Settings: Before finalizing, you can select the output file format (e.g., JPG, PNG) and define the quality level (e.g., excellent, good, decent). This control over quality is a significant advantage, allowing you to balance file size with visual fidelity, crucial for web optimization and high-resolution images.
- Process and Download: Click “Resize Images” and wait for the app to process your files. Once completed, you can download your resized images, often in a convenient ZIP file if you processed a batch.
This streamlined process makes Tophinhanhdep.com an incredibly efficient tool for optimizing images quickly, ensuring your wallpapers, backgrounds, and other visual content are perfectly prepared for any platform.
Batch Cropping and Resizing for Social Media with Tophinhanhdep.com
Social media platforms each have their unique image size and aspect ratio requirements. Adapting a single image for an Instagram Portrait, a Facebook Cover, and a Twitter banner usually means multiple edits and careful cropping. Tophinhanhdep.com’s “Crop Photos” app simplifies this complex task, allowing you to crop and resize multiple images, or even different versions of the same image, in one go.
Here’s how to efficiently crop and resize for various social media needs using Tophinhanhdep.com:
- Launch the Crop Photos App: Go to Tophinhanhdep.com’s website and open the “Crop Photos” application.
- Import Your Files: Click “Select Images” and upload all the photos you need to crop and resize. This could include multiple distinct images or several instances of the same image if you want to adapt it for different platforms.
- Define Cropping and Resizing:
- Presets and Custom Ratios: Click on an image to begin editing. Under the cropping options, you’ll find “No Constraints” for manual pixel dimensions or custom aspect ratios. More powerfully, Tophinhanhdep.com offers a range of ready-made presets tailored for popular social media platforms (e.g., “Instagram Portrait,” “Facebook Page Cover,” “YouTube Thumbnail”). Select the desired preset.
- Adjust Cropping Area: Once a preset is chosen, a cropping area will appear on your image. You can drag and reposition this area to select the most impactful part of your image, ensuring your aesthetic or high-resolution photography is perfectly framed.
- Duplicate for Multiple Outputs: A standout feature for visual designers is the “Add Crop” button. If you need to adapt the same image for different social media platforms, select your photo, then click “Add Crop.” This duplicates your image within the batch, allowing you to apply a different preset and cropping area to the duplicated version (e.g., Instagram Portrait on the original, Facebook Page Cover on the duplicate). This is incredibly efficient for creating consistent branding across multiple channels.
- Repeat for All Images/Versions: Work through each image in your batch, applying the necessary cropping and resizing settings.
- Export Settings and Download: After adjusting all images, click “Next Step.” Here, you can specify final export settings, including file format and quality. Then, click “Crop Images.” Tophinhanhdep.com will process all your files and allow you to download them. Importantly, Tophinhanhdep.com always creates copies of your files, so your original images remain untouched, a vital feature for preserving your raw photography.
This comprehensive batch processing capability, combined with control over output quality, makes Tophinhanhdep.com an indispensable tool for graphic design, digital art preparation, and managing dynamic image collections for social media, ensuring your visual content is optimized for every platform effortlessly.
Final Thoughts
In the dynamic world of digital content creation, mastering image resizing is a foundational skill that elevates your visual output, transforming basic images into polished, professional-grade assets. Canva, with its user-friendly interface and robust features, offers excellent solutions for this crucial task. While Canva Pro provides the ultimate convenience with its one-click resizing and batch processing capabilities, the free version also empowers users to achieve precise results with a bit of manual effort, ensuring everyone can prepare their images for various platforms.
Whether you’re curating vibrant nature backgrounds, crafting poignant sad/emotional images, or perfecting high-resolution photography for print, understanding Canva’s resizing methods is a game-changer. It helps prevent quality degradation, ensures optimal presentation, and streamlines your creative workflow.
Furthermore, integrating specialized image tools from Tophinhanhdep.com can significantly enhance your efficiency. While Canva shines as a full-fledged design studio for creative ideas and digital art, Tophinhanhdep.com provides a rapid, no-frills solution for quick resizing, cropping, compression, and AI upscaling. This complementary approach allows you to leverage Canva for intricate design and Tophinhanhdep.com for swift, precise image optimization, offering the best of both worlds.
Ultimately, the goal is to create stunning visuals that resonate with your audience, whether they’re aesthetic wallpapers, impactful graphic designs, or a collection of trending photo ideas. By skillfully applying the resizing techniques discussed in this guide, alongside the powerful tools available on Tophinhanhdep.com, you are well-equipped to produce exceptional visual content that stands out in any digital landscape.