How to Master Image Resizing on Your iPhone for Optimal Visuals and Storage

In the rapidly evolving landscape of digital photography, the iPhone has emerged as a powerhouse, capable of capturing stunningly high-resolution images that often rival those produced by professional digital cameras. Since its debut in 2007, the iPhone’s camera technology has seen significant advancements, with recent models boasting impressive megapixel counts and advanced features. This leap in quality, while exhilarating for photography enthusiasts, comes with a notable consequence: larger file sizes. An average iPhone photo can easily range from 1.2 to 4 MB, with ProRAW files on newer models potentially soaring to 75 MB or more. If you frequently capture moments, manipulate stock photos, or manage a vast collection of images on your device, you’ll quickly realize how these high-quality files can consume your iPhone’s limited storage space and impact various digital activities.
Understanding how to effectively resize an image on your iPhone is not just a convenience; it’s a fundamental skill for managing your digital life efficiently. Whether you’re looking to free up precious memory, send photos without cumbersome delays, or optimize visuals for online platforms, the ability to adjust image dimensions and file sizes is invaluable. This comprehensive guide, brought to you by Tophinhanhdep.com, will explore a range of methods—from built-in iOS features to powerful third-party tools—that empower you to resize, compress, and optimize your iPhone images effortlessly. As your go-to resource for all things images, Tophinhanhdep.com not only provides practical solutions but also inspires you with breathtaking Wallpapers, Backgrounds, Aesthetic, Nature, Abstract, Sad/Emotional, and Beautiful Photography, alongside expert insights into High Resolution, Stock Photos, Digital Photography, and advanced Editing Styles.
Understanding Image Size and Why It Matters for Your iPhone
The sheer quality of images produced by modern iPhones is a double-edged sword. While we revel in crystal-clear detail and vibrant colors, the underlying data required to store this information translates into substantial file sizes. A single picture’s pixel dimensions might be around 4032 x 3024 px, consuming several megabytes of storage. Multiply that by hundreds or thousands of photos, and it’s no surprise that images can take up over 50% of your iPhone’s memory. Unlike many Android devices, iPhones do not offer an SD card slot for expandable memory, making internal storage management crucial.
Beyond freeing up space, there are several compelling reasons why mastering image resizing is essential:
- Efficient Sharing: Most email services impose strict size limits on attachments. Sending multiple high-resolution photos via email often results in errors or automatic, sometimes aggressive, compression by the service, leading to a noticeable loss of quality. Similarly, while instant messaging apps like WhatsApp, Telegram, and Facebook Messenger allow for easy sharing of photo batches, they often compress images to reduce data usage, again impacting fidelity. Resizing before sending ensures your images are deliverable and retain acceptable quality.
- Website and Social Media Optimization: Uploading large-sized images to websites or social media platforms can significantly slow down page loading speeds, especially on mobile devices. This can negatively affect your website’s Search Engine Optimization (SEO) and reduce traffic, as users are quick to abandon slow-loading pages. Social media networks, such as Instagram, also have specific size requirements and often apply their own compression algorithms, which can degrade the appearance of unoptimized images. Pre-optimizing your images ensures they look their best and perform efficiently online.
- Compatibility: Devices running iOS 11 and above often save images in High-Efficiency Image Format (HEIF) by default, which offers good quality at a smaller size. However, HEIF has limited compatibility compared to the ubiquitous JPEG format. You might need to convert your photos to JPEG or other common formats for broader sharing and viewing across different devices and platforms. Tophinhanhdep.com offers robust Image Tools, including Converters, to seamlessly handle such format transitions.
Knowing how to check an image’s size is the first step in effective management.
Checking Image Size on Your iPhone
Checking an image’s size on your iPhone is remarkably straightforward:
- Open the Photos app on your iPhone.
- Select the photo for which you want to retrieve information.
- Tap the “info” icon (ⓘ) located beneath the image.
- A small box displaying the image metadata will appear, showing you the photo’s size in pixels (e.g., 4032 x 3024) and its file size in MB.
This information empowers you to make informed decisions about whether an image needs resizing or compression before you share, upload, or simply keep it on your device.
Native iPhone Methods for Resizing Images Without Third-Party Apps
Apple provides several built-in functionalities that allow you to modify your photos without needing to download any additional applications. These methods offer varying degrees of control and are excellent for quick adjustments or for users who prefer to stick with native iOS features.
Cropping for Resizing and Composition
Cropping is a fundamental image editing technique that allows you to remove unwanted portions of a photo, thereby changing its dimensions and often its composition. While it doesn’t directly reduce the file size in the same way compression does, it can make an image appear smaller or fit specific aspect ratios.
Here’s how to crop a photo using the iPhone’s Photos app:
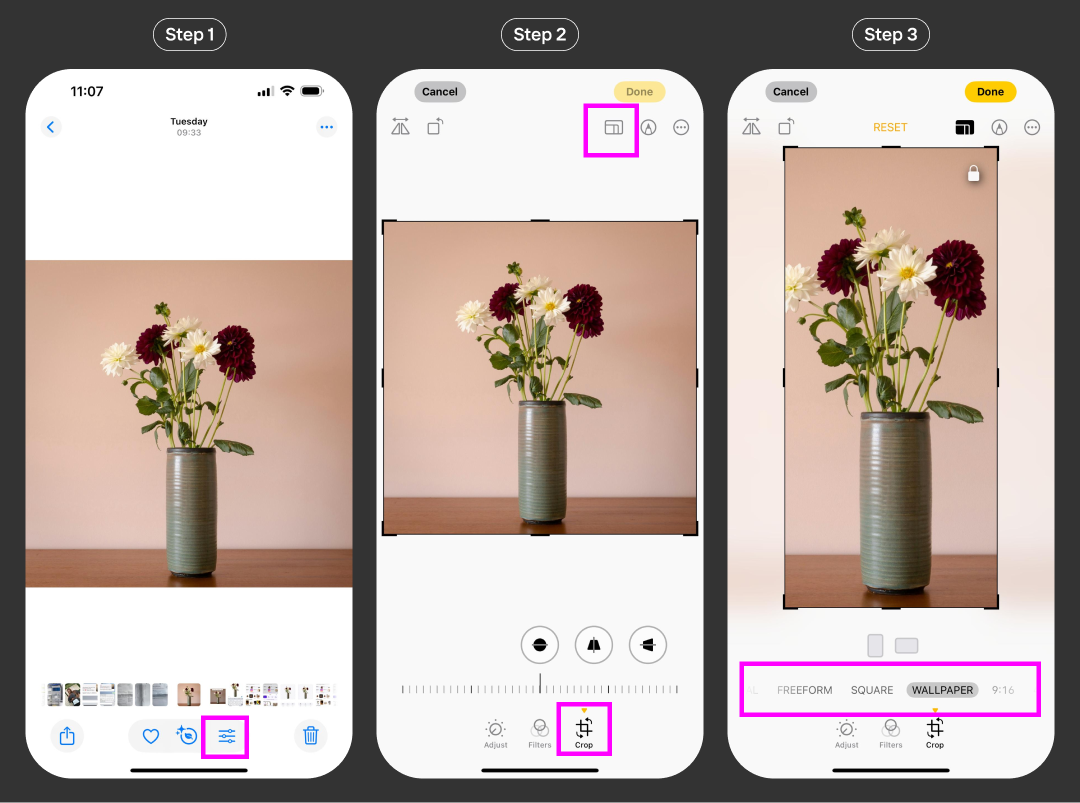
- Open the Photos app and select the image you wish to crop.
- Tap the “Edit” button in the top right corner.
- Tap the “Crop” icon at the bottom of the screen (it looks like a square with two overlapping arrows).
- You’ll see a grid appear over your photo. You have a few options:
- Freeform: Drag the corners and edges of the grid to manually select your desired crop area.
- Preset Aspect Ratios: Tap the aspect ratio icon (often resembling multiple squares/rectangles) at the top or bottom of the screen. This will present a list of common aspect ratios (e.g., Square, 9:16, 8:10, 3:4) suitable for social media or printing. Select one, and the crop area will automatically adjust.
- Orientation: You can also rotate the image or flip it horizontally/vertically using the tools provided.
- Once you’re satisfied with your crop, tap “Done”.
It’s important to note that when you crop an image in the Photos app, the original image is usually preserved in the background, allowing you to revert to the uncropped version later. This means that cropping doesn’t immediately free up storage space. However, for Visual Design purposes, such as fitting an image into a specific layout or improving its aesthetic, cropping is an indispensable tool. Tophinhanhdep.com encourages exploring different compositions to enhance your Digital Art and Creative Ideas.
Using the Shortcuts App for Precise Resizing
While there isn’t a dedicated “resize” button in the Photos app, Apple’s powerful visual scripting app, Shortcuts, offers a robust solution for resizing one or multiple images with custom dimensions. It might seem intimidating initially due to its programmatic nature, but once set up, it becomes an incredibly efficient tool.
Here’s a step-by-step guide to create a shortcut for resizing images:
- Open the Shortcuts app on your iPhone.
- Go to “My Shortcuts” and tap the "+" button in the top right corner to create a new shortcut.
- Search for the “Resize Image” action and add it to your shortcut.
- Adjust the settings for the “Resize Image” action:
- Tap on “Image” and choose “Shortcut Input”. This tells the shortcut to process any image you send to it.
- By default, the resized images might have a width of 640 px, with the height adjusted automatically to maintain the aspect ratio. If you need more control, tap on the default width/height and select “Ask Each Time”. This will prompt you to enter desired pixel dimensions every time you run the shortcut.
- Tap the "+" button again to add another action. This action will save your processed images.
- Search for “Save to Photo Album” and add it.
- By default, resized images will be saved to your “Recents” album. You can tap “Recents” to choose a different album if preferred.
- Enable “Show in Share Sheet”: This is crucial for making your shortcut easily accessible from the Photos app.
- Hold down the newly created “Resize Image Shortcut” (or whatever you named it) for a few seconds.
- In the pop-up menu, choose “Details”.
- Toggle on the “Show in Share Sheet” option. You can also edit the name and icon of your shortcut here.
- Use your new shortcut:
- Go to your Photos Gallery.
- Select one or several images you want to resize.
- Tap the “Share” button (the square with an arrow pointing up) in the bottom left corner.
- Scroll down the action menu and select the shortcut you just created (e.g., “Resize Image”).
- If you chose “Ask Each Time,” enter the desired width (and height, if applicable) and tap “Done”.
The resized images will be saved in your chosen album, typically alongside the originals.
Pros of using Shortcuts:
- Free and built-in: No need to download anything.
- On-device processing: Images are resized directly on your iPhone, ensuring privacy.
- Batch resizing: Can process multiple images simultaneously.
Cons of using Shortcuts:
- Initial setup complexity: Requires a bit of learning to configure.
- Limited to resizing dimensions: Does not offer compression by file size or quality adjustments.
- Less flexible for varied tasks: If you frequently need different resize settings, you might end up creating multiple shortcuts.
This method aligns with Tophinhanhdep.com’s focus on efficient Image Tools, providing a powerful way for users to manage their High-Resolution Photography.
Resizing via Apple Mail and Messages for Quick Sharing
For quick and easy resizing, especially when sharing images, Apple’s native Mail and Messages apps offer built-in options that can reduce file size without needing a dedicated app or shortcut.
Resizing via Apple Mail:
- Open the Photos app, select one or more images you want to resize.
- Tap the “Share” button and choose “Mail”.
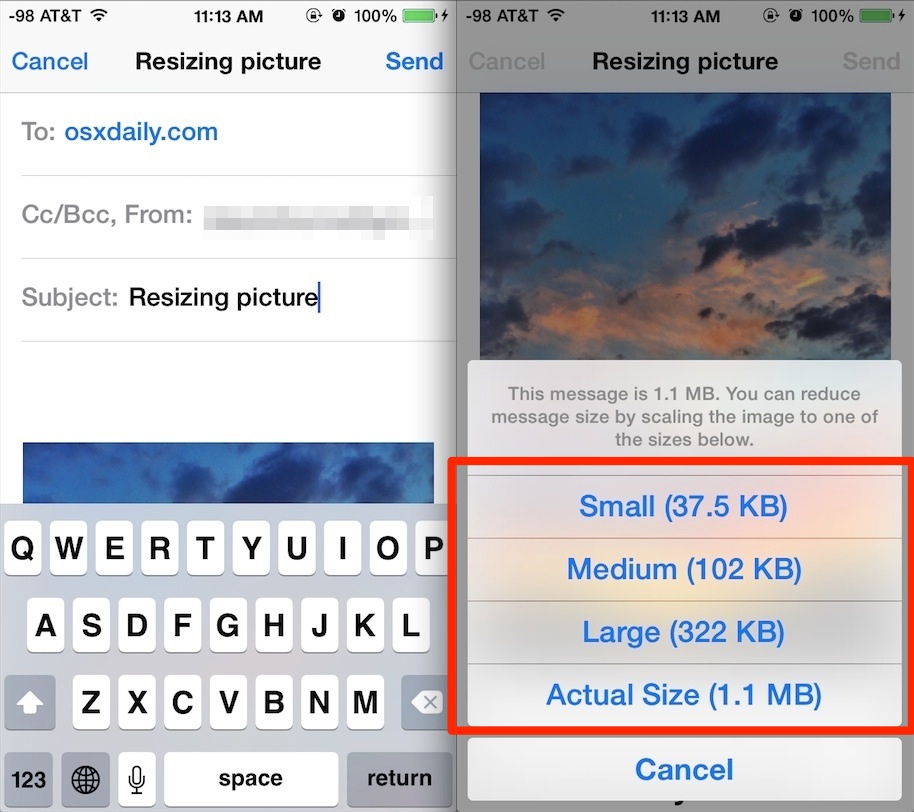
- Compose your email. When you tap “Send”, your iPhone will typically present a notification stating, “This message can be reduced in size by scaling images.”
- You’ll then be given options to choose the desired image size:
- Small (e.g., ~40 KB): Usually around 320x240 pixels.
- Medium (e.g., ~100 KB): Often 640x480 pixels.
- Large (e.g., ~900 KB): Could be around 1632x1224 pixels.
- Actual Size: Sends the original, full-resolution image.
Choosing a smaller size will reduce both the pixel dimensions and the file size. If you want to save the resized image for your own use, simply email it to yourself and then save the attached images from the sent email.
Pros of using Mail:
- Free and integrated: No extra steps or downloads.
- Simple to use: Very intuitive for reducing file size for email.
Cons of using Mail:
- Limited options: You can’t specify exact pixel dimensions or custom file sizes.
- Only applicable for email sharing: Not a general-purpose resizing tool.
- Quality loss: The compression applied can be significant, especially for “Small” and “Medium” options.
Resizing via Messages (Low-Quality Image Mode):
If your primary goal is to send images faster via iMessage or SMS and data usage is a concern, you can enable a low-quality image mode for messages:
- Go to “Settings” on your iPhone.
- Scroll down and tap “Messages”.
- Toggle on “Low-Quality Image Mode” (found under the “LOW QUALITY IMAGE MODE” section).
This setting will automatically compress images sent through the Messages app, making them smaller in file size.
Pros of using Messages low-quality mode:
- Automatic and hands-free: Once enabled, it works automatically for all sent images.
- Reduces data usage: Good for those with limited data plans.
Cons of using Messages low-quality mode:
- Lack of control: You cannot choose the level of compression or specific dimensions.
- Significant quality loss: Images will appear notably lower in quality.
- Specific to Messages: Does not help with other sharing methods or general image management.
While these native methods are convenient, they often lack the fine-grained control that many users, particularly those involved in Visual Design or professional Photography, require. For more flexibility and advanced options, third-party solutions are often the best route.
Advanced Resizing and Compression with Tophinhanhdep.com’s Image Tools
When built-in iPhone functionalities don’t quite meet your needs, especially for precise control over dimensions, file formats, and compression levels, Tophinhanhdep.com offers powerful online Image Tools designed for optimal performance and user-friendliness. These tools empower you to achieve professional-grade results directly from your iPhone’s browser, without the need for cumbersome software installations.
Tophinhanhdep.com’s Online Image Resizer
For those seeking comprehensive control over their image dimensions, Tophinhanhdep.com provides an intuitive online image resizer. This tool offers far more flexibility than native iPhone options, making it ideal for optimizing images for specific purposes like website banners, social media headers, or High-Resolution prints derived from your Digital Photography.
Here’s how to resize an image using Tophinhanhdep.com’s online resizer:
- Access the Tool: Open your iPhone’s mobile browser (Safari, Chrome, etc.) and navigate to the Tophinhanhdep.com website. Look for the “Image Tools” section and select the “Online Image Resizer.”
- Upload Your Photos: Tap the upload button and select images directly from your iPhone’s Photos library. By default, your “Recents” album will likely appear first, but you can easily navigate to other albums.
- Choose Resizing Options: Once your photos are uploaded, you’ll be presented with a range of resizing options to ensure maximum control:
- “Exact Width”: Specify a desired width, and the height will be adjusted proportionally.
- “Exact Height”: Specify a desired height, and the width will be adjusted proportionally.
- “Exact Width & Height”: Set precise dimensions, though this may distort the image if the aspect ratio isn’t maintained.
- “Maximum Width & Height”: Set a maximum for both dimensions, ensuring the image fits within those boundaries without exceeding them, while maintaining its aspect ratio.
- “Percentage”: Reduce or enlarge the image by a specific percentage of its original size.
- Monitor Changes and Quality: As you make adjustments, Tophinhanhdep.com’s tool displays both the original image size and the width and height of the resized image you’ll get, along with an estimated new file size. This real-time feedback helps you achieve the perfect balance.
- Convert and Optimize: You can also choose to convert your images to JPEG format and select different quality levels. This is particularly useful for ensuring compatibility and further reducing file size while preserving visual fidelity for your Beautiful Photography.
- Process and Download: Once you’ve configured your settings, tap the “Resize Images” button. The processing begins immediately, regardless of your internet connection strength, as Tophinhanhdep.com’s tools prioritize on-device processing for privacy and speed where possible. You can resize up to 2000 images at once, making it incredibly efficient for bulk tasks.
Why choose Tophinhanhdep.com’s Online Image Resizer?
- User-friendly interface: Designed for simplicity, requiring no complex tutorials.
- Extensive control: Offers more specific resizing options than native apps.
- Batch processing: Efficiently handles multiple images simultaneously.
- Privacy and security: Files are processed on your device, not sent to external servers, safeguarding your personal images.
- Versatile for various needs: Perfect for optimizing Images for web, social media, or other Visual Design projects, including Aesthetic collections and Mood Boards.
While the free version of this tool may add a subtle watermark, purchasing a premium option provides full access without any branding, granting you an uncompromised experience for your Creative Ideas and Thematic Collections.
Tophinhanhdep.com’s Online Image Compressor
Sometimes, the primary goal isn’t to change the image’s dimensions, but purely to reduce its file size (in MB or KB) while preserving as much visual quality as possible. This is where Tophinhanhdep.com’s dedicated Image Compressor shines, offering an unparalleled solution since iPhones lack a built-in compression feature.
Here’s how to make your pictures smaller using Tophinhanhdep.com’s Image Compressor:
- Navigate to the Compressor: From the Tophinhanhdep.com website, go to “Image Tools” and select the “Image Compressor” tool.
- Select Your Images: Upload the photos from your iPhone’s Photos library that you wish to compress.
- Define Compression Parameters: You’ll have options to control the compression:
- Quality Slider: Choose a balance between “better quality” and “smaller size” using an intuitive slider.
- Specific Size Input: For precise optimization, you can directly enter a target file size in KB or MB.
- Compress and Export: Click on “Compress.” Tophinhanhdep.com’s tool will automatically convert your images to JPEG during compression, ensuring wide compatibility for uploading to any website or social media platform.
- Review and Save: After processing, the tool will display how much the file size was reduced (in KBs and percentages), allowing you to appreciate the efficiency. The compressed images will be saved to your iPhone’s “Files” folder, from where you can easily move them to your Photos gallery if desired.
Advantages of Tophinhanhdep.com’s Image Compressor:
- Significant file size reduction: Achieve notable decreases in MB/KB without a perceptible loss in visual quality. The difference between the original and the compressed copy is often hardly noticeable.
- No upload limits: Compress as many images as you need, making it perfect for managing large batches of Stock Photos or event photography.
- Automated JPEG conversion: Ensures broad compatibility for web and sharing.
- Full ecosystem access: Opting for a paid version not only removes watermarks but often grants full access to a suite of other useful Tophinhanhdep.com tools, such as online watermarking for images and videos, PDF watermarking, cropping, adding text, adding logos, and even advanced AI Upscalers for when you need to enlarge images without losing quality, transforming low-resolution shots into High Resolution masterpieces.
Utilizing Tophinhanhdep.com’s advanced Image Tools ensures that your Photography not only looks stunning but is also optimized for every conceivable digital environment, from sharing personal Sad/Emotional moments to presenting professional Beautiful Photography.
Leveraging Resized Images for Visual Design and Inspiration
The ability to effectively resize and optimize images on your iPhone extends far beyond simple file management; it’s a cornerstone for enhanced Visual Design and cultivating rich Image Inspiration & Collections. Tophinhanhdep.com recognizes that an image’s impact is often tied to its presentation and accessibility.
Optimized images are crucial for:
- Curating Stunning Visual Collections: Whether you’re building a personal gallery of Nature scenes, a dynamic collection of Abstract art, or a thematic Mood Board of Aesthetic visuals, properly sized images ensure consistency and quick loading. This allows you to effortlessly browse, share, and enjoy your Images without lag or compatibility issues. For Wallpapers and Backgrounds, having images perfectly fitted to your screen or desktop enhances the user experience, eliminating awkward cropping or stretching.
- Elevating Graphic Design and Digital Art: In the realm of Graphic Design and Digital Art, resizing is not just about convenience; it’s about precision. Images must fit specific canvas sizes, resolutions, and aspect ratios for various projects, from social media graphics to website elements. Tophinhanhdep.com’s tools provide the granular control needed for Photo Manipulation and executing complex Creative Ideas, ensuring that every visual component is pixel-perfect and loads efficiently.
- Sharing and Discovering Trending Styles: When sharing your Photography or contributing to online communities, optimized images are key to making your work stand out. Faster loading times mean more engagement, and correctly sized images appear professional and polished. Tophinhanhdep.com helps you prepare your images for easy sharing, fostering a vibrant exchange of Photo Ideas and facilitating the discovery of Trending Styles across the digital landscape.
- Future-Proofing Your Visuals: For moments when you capture an image that holds immense potential, but perhaps at a lower resolution, Tophinhanhdep.com’s AI Upscalers can breathe new life into it. These tools intelligently enlarge images without pixelation, maintaining the integrity of your High Resolution shots and even enhancing them, making them suitable for larger displays or prints, thus expanding your creative possibilities.
By integrating the resizing techniques learned from Tophinhanhdep.com into your workflow, you transform your iPhone into a powerful hub for both casual photography and serious Digital Photography and Visual Design, ensuring that your images are always ready for their intended purpose, whether for personal enjoyment or public display.
Conclusion: Your iPhone, Your Images, Your Control
The journey of capturing a moment with your iPhone’s advanced camera is just the beginning. The subsequent ability to manage, optimize, and transform those images through resizing and compression is what truly unlocks their potential. From freeing up precious storage space and ensuring seamless sharing via email and messaging apps, to meticulously preparing visuals for online platforms and Tophinhanhdep.com’s diverse range of Wallpapers and Backgrounds, mastering image resizing on your iPhone is an indispensable skill in today’s digital world.
You now have a powerful arsenal of methods at your fingertips. For quick adjustments or basic sharing, your iPhone’s native Photos, Shortcuts, Mail, and Messages apps offer convenient, built-in solutions. However, for those demanding more control, precision, and efficiency – particularly for High-Resolution Photography, intricate Visual Design projects, or optimizing Stock Photos for web performance – Tophinhanhdep.com’s comprehensive suite of Image Tools, including its Online Resizer and Image Compressor, stands ready to empower you.
Tophinhanhdep.com is committed to being your ultimate resource for all things imagery. Explore our extensive collections of Aesthetic, Nature, Abstract, Sad/Emotional, and Beautiful Photography for inspiration. Dive deeper into Digital Photography techniques and Editing Styles. And leverage our cutting-edge Image Tools like Converters, Optimizers, and AI Upscalers to elevate your visual content. By integrating these strategies, you’re not just resizing images; you’re taking complete control of your visual narrative, ensuring your Creative Ideas and Thematic Collections always shine. Discover the endless possibilities with Tophinhanhdep.com and transform your iPhone into the ultimate image management and inspiration hub.