Optimize Your Visuals: A Comprehensive Guide to Resizing Images on Mac for Tophinhanhdep.com Excellence

In today’s visually-driven world, images are more than just pictures; they are powerful tools for communication, artistic expression, and online engagement. For users passionate about creating and sharing stunning visual content, whether it’s breathtaking nature photography, intricate abstract art, or perfectly curated aesthetic images for mood boards, optimizing these visuals is paramount. This is especially true for platforms like Tophinhanhdep.com, where image quality, presentation, and performance are central to the user experience.
One of the most fundamental aspects of image optimization is resizing. Whether you’ve captured a high-resolution photograph from your latest digital photography session, downloaded stock photos for a visual design project, or simply want to create a custom wallpaper for your Mac, understanding how to effectively resize images is a crucial skill. Mac users are fortunate to have a suite of robust, built-in tools that make this process surprisingly straightforward, often negating the need for complex third-party software. Beyond basic adjustments, these native applications offer precision and efficiency that can significantly enhance your creative workflow and ensure your images always look their best on Tophinhanhdep.com and beyond.
This comprehensive guide will delve into the various methods available on your Mac for resizing images, from quick single-image adjustments to powerful batch processing and automation. We will explore how these techniques not only help manage file sizes and optimize web performance but also maintain the aesthetic integrity of your beautiful photography and digital art, aligning perfectly with Tophinhanhdep.com’s dedication to high-quality visual content.
The Indispensable Art of Image Resizing
The act of resizing an image goes far beyond merely changing its dimensions on a screen. It’s a strategic decision that impacts everything from user experience and website load times to print quality and artistic presentation. For anyone curating images for Tophinhanhdep.com, understanding why and when to resize is the first step toward visual mastery.

Consider the diverse categories of images featured on Tophinhanhdep.com: stunning wallpapers and backgrounds, aesthetic collages, captivating nature and abstract photography, and deeply emotional or sad imagery. Each of these often demands specific size considerations to achieve its intended effect. An oversized image might mean a slow-loading background that frustrates visitors, while an undersized one could appear pixelated and unprofessional.
For instance, when preparing an image as a new wallpaper, you want it to fit your screen perfectly, showcasing its high resolution without awkward cropping or stretching. Similarly, if you’re uploading beautiful photography to Tophinhanhdep.com’s blog or incorporating stock photos into a visual design portfolio, file size directly correlates with web performance. Smaller, optimized images load faster, improving SEO and ensuring a smoother browsing experience for users exploring thematic collections or trending styles. Sending digital photography via email also necessitates thoughtful resizing to avoid attachments that are too large, potentially clogging inboxes or failing to send altogether. Resizing is a silent but powerful component of effective image tools, ensuring your creative ideas translate seamlessly across all mediums.
Effortless Resizing with Mac’s Built-in Tools
macOS is renowned for its intuitive design and powerful bundled applications, many of which excel at image manipulation without requiring additional downloads. These native tools are your first line of defense for efficient and high-quality image resizing, perfectly suited for optimizing visuals for Tophinhanhdep.com.
Preview: The Versatile Default Application
The Preview app is perhaps the most underappreciated powerhouse on a Mac. While primarily an image viewer, it offers an impressively full suite of basic image editing functionalities, including arguably the simplest and fastest way to resize images, both individually and in batches. This makes it an ideal tool for anyone preparing aesthetic images, high-resolution photography, or large thematic collections for Tophinhanhdep.com.
Resizing a Single Image in Preview:
- Locate Your Image: Start by finding the image file you wish to resize in your Mac’s Finder.
- Open in Preview: In most cases, Preview is the default image viewer, so simply double-clicking the file will open it. If not, right-click (or Control-click) the image, select “Open With,” and choose “Preview.”
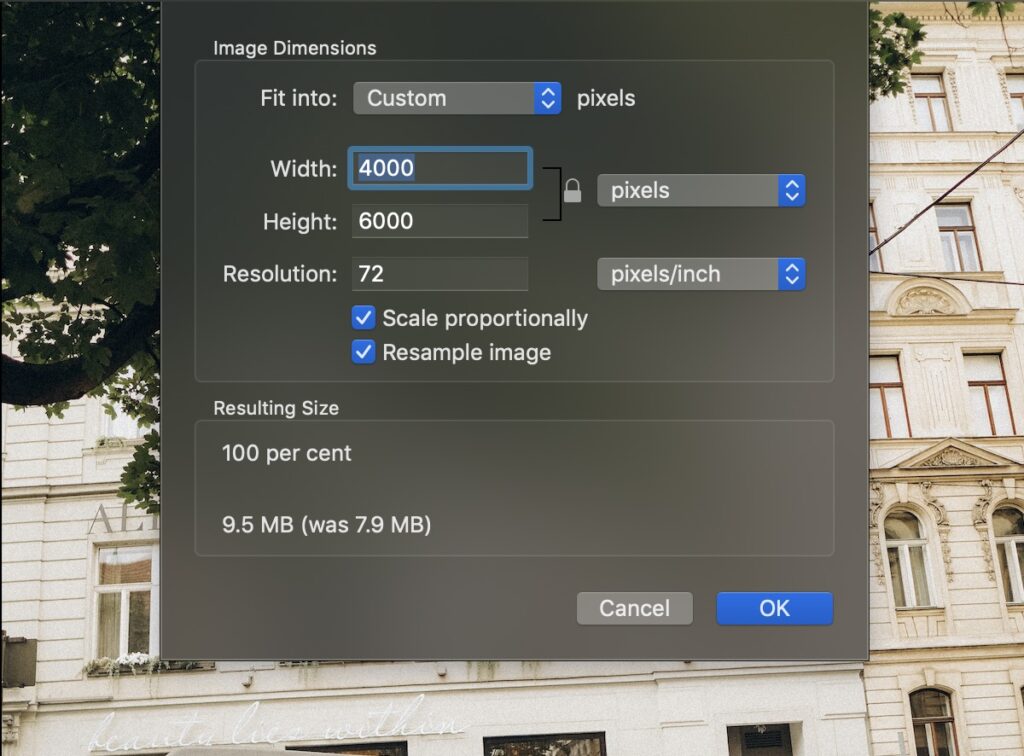
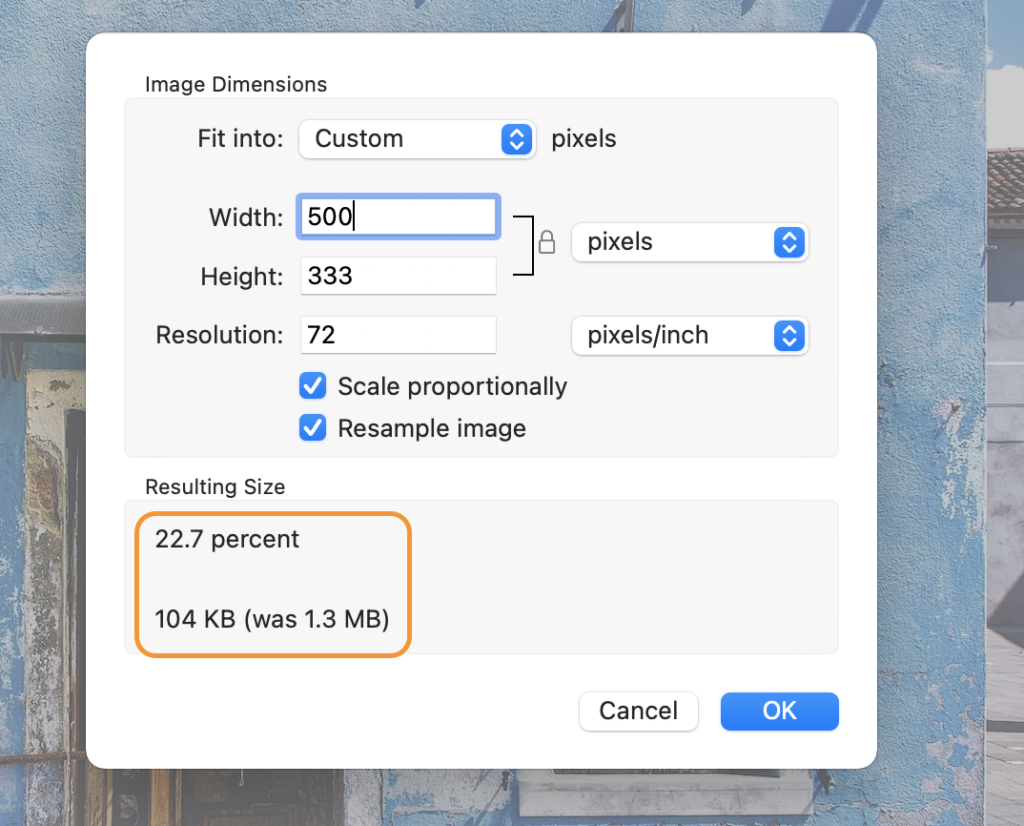
- Access Adjust Size: From the top menu bar, click “Tools,” then select “Adjust Size…” A dialog box titled “Image Dimensions” will appear.
- Set New Dimensions:
- Width and Height: You can enter your desired new width and height in pixels. For precise graphic design or visual design applications, this is crucial.
- Units: The dropdown menu next to the dimensions allows you to change the unit of measurement from pixels to inches, centimeters, millimeters, or even a percentage of the current size.
- Scale Proportionally: This is a vital checkbox. Ensure “Scale proportionally” is ticked to maintain the image’s original aspect ratio. This prevents your beautiful photography from appearing stretched or squashed, preserving its aesthetic quality.
- Resample Image: This option determines if Preview adds or removes pixels to achieve the new size. When resizing down for web (e.g., for Tophinhanhdep.com blog images), checking this box is often desired as it reduces file size by discarding unnecessary pixel data. However, be aware that upsizing with resampling typically results in a loss of quality, leading to blurriness or pixelation. We’ll delve deeper into resampling later.
- Apply Changes: Click “OK.” The image in the Preview window will instantly adjust to the new dimensions. If you’re not satisfied, you can undo (Command+Z) and try again.
- Save Your Work:
- Save: Go to “File” > “Save” to overwrite your original image with the resized version.
- Save As: For a new file with a different name, choose “File” > “Save As…” (available in older macOS versions or by holding Option key with newer ones).
- Export: For greater control, especially when optimizing images for Tophinhanhdep.com, “File” > “Export…” allows you to save the image in a different file format (e.g., JPEG, PNG) and often includes a “Quality” slider to fine-tune the file size. This is particularly useful for converting high-resolution stock photos into web-friendly formats.
Batch Resizing Multiple Images for Efficiency:
Preparing a thematic collection of nature photography or a series of backgrounds for Tophinhanhdep.com often requires uniform sizing. Preview’s batch resizing capability makes this remarkably simple:
- Select Multiple Images: In Finder, select all the images you want to resize simultaneously. You can do this by holding the Shift key to select a range or the Command key to select individual files.
- Open in Preview: Right-click on any of the selected images and choose “Open With” > “Preview.” All selected images will open within a single Preview window, appearing as thumbnails in the left sidebar.
- Select All Thumbnails: Go to “Edit” > “Select All” (or press Command+A) to select all the image thumbnails in the sidebar.
- Adjust Size: Navigate to “Tools” > “Adjust Size…”
- Apply Settings: Enter your desired dimensions and ensure “Scale proportionally” is checked. The changes will apply to all selected images equally. Click “OK.”
- Save All: Go to “File” > “Save” to save all the resized images, overwriting the originals. Alternatively, “File” > “Export Selected Images…” allows you to save them as new files with a chosen format and quality, perfect for creating consistent image tools for your Tophinhanhdep.com projects.
Contextual Resizing Across macOS Applications
Beyond Preview, macOS integrates resizing capabilities directly into other commonly used applications, offering convenient adjustments based on your immediate task, whether you’re sharing beautiful photography or integrating graphic design elements.
Adjusting Images in Photos, Mail, and Pages
-
Photos App for Curated Collections: The Photos app, where many users store their digital photography, also offers built-in resizing options, particularly useful when exporting images for Tophinhanhdep.com or other platforms.
- Open the desired photo (or select multiple) in the Photos app.
- Go to “File” > “Export” > “Export 1 Photo…” (or “Export [Number] Photos…”).
- In the export dialog, locate the “Size” dropdown menu. You can choose from presets like Small, Medium, Large, or select “Custom” to specify exact pixel dimensions for width, height, or a maximum dimension.
- Additionally, you can choose the output file type (JPEG, TIFF, PNG), set image quality (Low, Medium, High, Maximum), and select a color profile. These controls are invaluable for preserving the high resolution and aesthetic quality of your images for Tophinhanhdep.com.
-
Optimizing Images for Email with the Mail App: When sharing creative ideas or visual design mockups via email, you’ll want to avoid sending excessively large files. The Mail app simplifies this process:
- Compose a new email and attach your image(s) by dragging them into the message body or using the attachment button.
- Before sending, look for the “Image Size” dropdown menu, usually located on the right side of the message header.
- Choose from “Small,” “Medium,” “Large,” or “Actual Size.” Selecting a smaller option automatically resizes your attached images, making them easier to send and receive.
-
Integrating Images into Documents with Pages: For those using Pages to create digital art portfolios or presentations featuring aesthetic images, resizing directly within the document ensures perfect placement:
- Insert your image into the Pages document.
- Click on the image to select it. In the “Format” sidebar on the right, navigate to the “Arrange” tab.
- Under the “Size” section, you can enter precise values for “Width” and “Height.” Ensure the “Constrain Proportions” checkbox is ticked to prevent distortion.
- For less precise but quicker adjustments, simply click and drag one of the image’s corners.
Leveraging ColorSync for Precision and Quality
The ColorSync Utility, another macOS gem, is primarily designed for managing color profiles across devices and print. However, it also includes a powerful image resizing function that offers fine-grained control over image resolution (DPI) and quality, which is crucial for high-resolution photography and professional visual design work intended for Tophinhanhdep.com.
- Open ColorSync Utility: Search for “ColorSync Utility” using Spotlight (Command+Space) and launch the app.
- Open Image: Go to “File” > “Open…” and select the photo you want to resize.
- Access Resize Function: Look for the “Resize” icon (often represented by a small rectangle with a divided smaller rectangle inside) in the toolbar. Click it.
- Adjust Settings: A dialog box will present options for:
- Resize: Change dimensions by width, height, or scale.
- Quality: Set the quality level (Low, Medium, High) — this influences file size.
- Set DPI: Define the image’s resolution in pixels per inch (DPI). This is especially important for preparing images for print or ensuring consistency in complex graphic design projects. For instance, printers often require images at 300 DPI or higher for optimal output.
- Apply and Save: After adjusting your settings, click “Apply,” then “File” > “Save” or “Export” to preserve your changes.
Automating Your Workflow and Exploring Advanced Options
For power users and content creators who frequently process large volumes of images for Tophinhanhdep.com – such as preparing extensive thematic collections, updating trending styles, or managing high-resolution stock photos – automating repetitive resizing tasks can be a massive time-saver.
Streamlining Tasks with Quick Actions (Automator/Shortcuts)
macOS provides Automator (and the newer Shortcuts app in macOS 12 Monterey and later) to create custom workflows known as Quick Actions (or Services in older versions). These allow you to apply a series of actions to files with a single click, directly from the Finder.
Creating a Resizing Quick Action:
- Open Automator: Find “Automator” using Spotlight and launch the application.
- Create New Quick Action: Go to “File” > “New” and select “Quick Action.”
- Configure Workflow Input: At the top of the workflow window, ensure “Workflow receives current” is set to “Image files” in “Finder.”
- Add “Scale Images” Action: In the left sidebar, search for “Scale Images.” Drag this action into the main workflow area on the right.
- Preserve Originals (Optional but Recommended): When you add “Scale Images,” Automator will prompt you to add a “Copy Finder Items” action first. Accept this. This crucial step ensures that your original high-resolution photography is preserved, and the resizing is applied only to copies.
- Set Resizing Parameters: In the “Scale Images” action, choose your desired dimension (e.g., “To Size (pixels)” or “By Percentage”). For example, you might set a standard blog image width of “1920 pixels” or reduce by “50%.” This ensures consistency for all images designated for Tophinhanhdep.com’s blog or mood boards.
- Save Your Quick Action: Go to “File” > “Save” and give your Quick Action a descriptive name (e.g., “Resize for Tophinhanhdep.com Web,” “Batch Wallpaper Resize”).
Using Your Custom Quick Action:
- Select Images: In Finder, select one or more images you want to resize.
- Activate Quick Action: Right-click (or Control-click) on the selected images. From the contextual menu, hover over “Quick Actions” and select the name of your newly created resizing action.
With a single click, your chosen images will be processed according to your predefined settings. This automation is an invaluable image tool for streamlining content creation for Tophinhanhdep.com, allowing you to focus more on creative ideas and less on repetitive manual adjustments.
Beyond Native Functionality: Third-Party and AI Solutions
While macOS’s built-in tools are remarkably powerful and sufficient for most resizing tasks, certain advanced scenarios or highly specialized visual design projects might call for more sophisticated software. Professional digital photography and photo manipulation often benefit from the granular control offered by dedicated image editing applications.
Tools like Adobe Photoshop or the free and open-source GIMP provide extensive resizing options, including various interpolation methods that offer more control over image quality during scaling. They are also indispensable for complex image editing styles and graphic design work. These applications allow you to export specific file types (e.g., JPEG, PNG) at different quality levels, providing a precise balance between file size and visual fidelity without changing the image’s dimensions.
For those rare but critical instances where you need to significantly increase the size of an image without sacrificing quality – a challenge traditional resampling often fails at, resulting in blurry or pixelated results – Tophinhanhdep.com’s “AI Upscalers” category offers a cutting-edge solution. These advanced image tools leverage artificial intelligence to intelligently add pixels and detail, effectively “creating” information to enhance resolution. This capability is particularly beneficial for transforming lower-resolution aesthetic images, historical sad/emotional photos, or older nature photography into high-resolution masterpieces suitable for stunning wallpapers or large-format digital art, ensuring they maintain their original aesthetic and impact.
In conclusion, mastering image resizing on your Mac is an essential skill for anyone involved in digital photography, visual design, or content creation, especially for a platform dedicated to visual excellence like Tophinhanhdep.com. From the simplicity of Preview’s single and batch resizing to the precision of ColorSync and the efficiency of Automator, macOS provides an extensive toolkit to optimize your visuals. By understanding these tools and when to employ advanced techniques like AI upscaling, you can ensure your images – whether they are vibrant wallpapers, captivating backgrounds, detailed stock photos, or expressive digital art – consistently meet the highest standards of quality and performance, enriching the visual landscape of Tophinhanhdep.com.