Mastering Image Resizing in Paint: A Comprehensive Guide for Tophinhanhdep.com Users

In the vast and vibrant world of digital imagery, where stunning wallpapers, aesthetic backgrounds, and high-resolution photography captivate audiences, the ability to manipulate images is a fundamental skill. Whether you’re a seasoned photographer, a budding graphic designer, or simply someone looking to optimize family photos for sharing, understanding basic image editing is crucial. While professional software like Adobe Photoshop offers unparalleled capabilities, for many common tasks, a simpler, readily available tool suffices: Microsoft Paint.
Paint, often overlooked in favor of its more advanced counterparts, is a powerful entry-level program found on every Windows operating system. It provides an intuitive interface for essential image adjustments, particularly resizing and cropping. These seemingly simple actions are foundational to preparing any image for its intended purpose, from fitting a captivating nature shot as a desktop background to ensuring a precise element for a digital art project. For the users of Tophinhanhdep.com, a platform dedicated to diverse image collections, photography resources, and visual design tools, mastering Paint’s resizing functions can significantly enhance their workflow, ensuring that every image shared or utilized meets optimal specifications for performance, aesthetics, and creative intent.
This comprehensive guide will walk you through the essential steps of resizing and cropping images using Paint, offering practical advice and connecting these techniques to the broader spectrum of image management and visual design principles championed by Tophinhanhdep.com. We’ll explore how these basic skills contribute to creating impactful thematic collections, streamlining photo manipulation, and preparing images for everything from mood boards to trending styles, while also pointing to more advanced tools on Tophinhanhdep.com for when Paint’s capabilities reach their limit.
The Essentials of Image Resizing in Paint
Before diving into the specifics, it’s vital to understand the “why” behind image resizing. Digital photographs, especially those captured by modern cameras or smartphones, often boast high resolutions and large file sizes. While excellent for printing, these original dimensions can be cumbersome for online use. Large image files slow down website loading times, consume excessive bandwidth, and may exceed upload limits for social media or online forms. Conversely, an image that’s too small might appear pixelated or blurry when enlarged. Paint offers a straightforward solution to adjust these dimensions, making your images suitable for any context.
To begin, ensure you’re working with a copy of your original image. This safeguards your high-quality master file, allowing you to experiment with resizing without permanent alteration. To do this, simply right-click your image, select “Copy,” and then right-click an empty space on your desktop or in a folder and choose “Paste.” You’ll now have a duplicate to work with.
To access Paint, navigate to your Windows Start menu, select “All Programs,” then “Accessories,” and finally, “Paint.” Once the application is open, click on the “File” tab (or the Paint icon in older versions) in the upper-left corner, select “Open,” and browse to locate your copied image.
Enlarging or Shrinking an Image While Preserving Aspect Ratio
One of the most frequent needs is to change an image’s overall size – making it larger or smaller – without distorting its proportions. Preserving the aspect ratio is critical for maintaining the visual integrity of your photographs, whether they are beautiful landscape shots, intricate abstract art, or professional stock photos destined for a graphic design project. Without it, your carefully composed images can appear stretched or squashed, severely detracting from their aesthetic quality.
Here’s a step-by-step guide to resizing an image in Paint, focusing on maintaining its aspect ratio:
- Open Your Image in Paint: As described above, launch Paint and open the image you wish to resize. Look near the bottom of the Paint window to see the current pixel dimensions of your image. This provides a baseline for your adjustments.
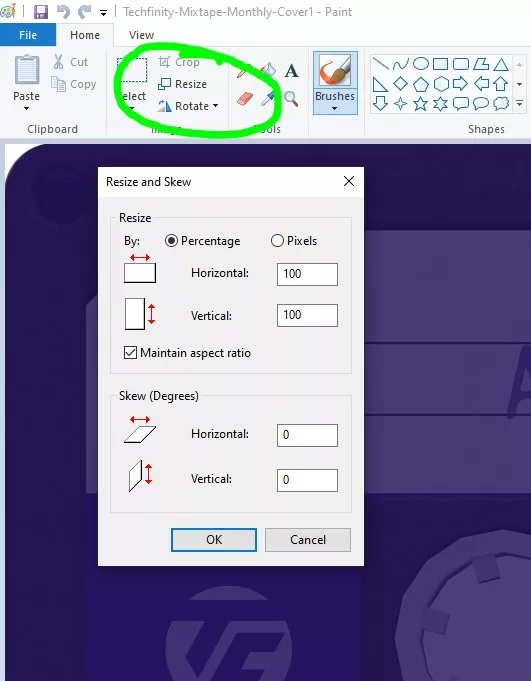
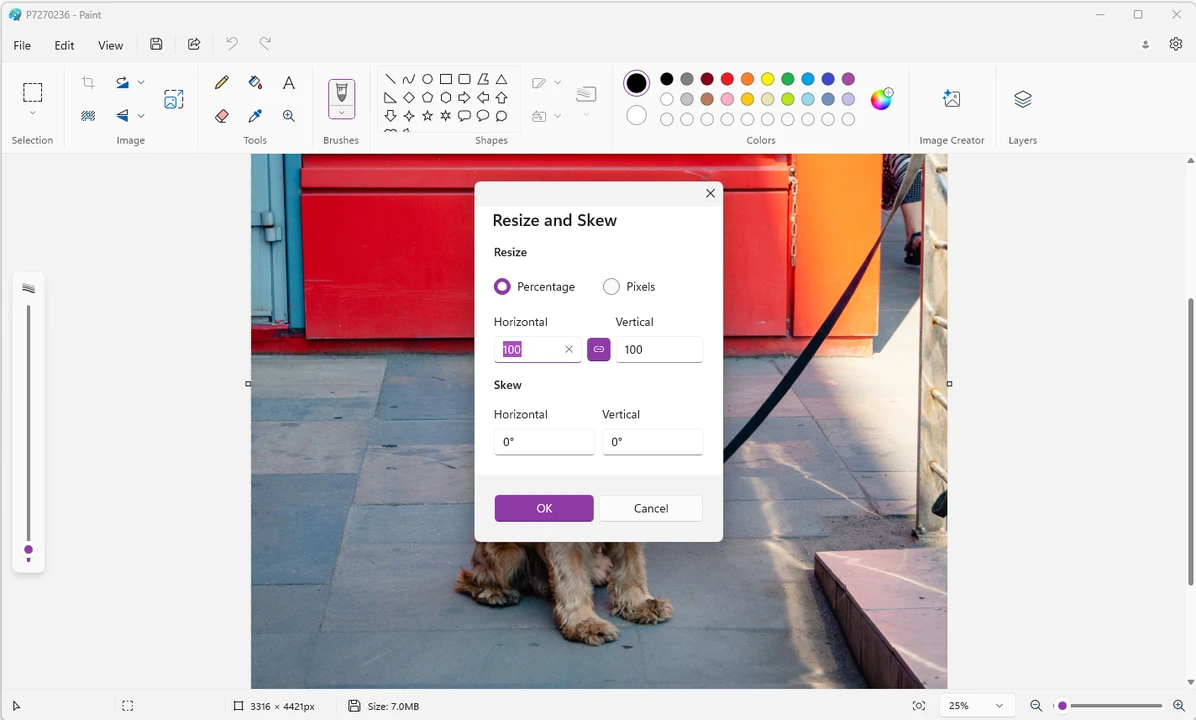
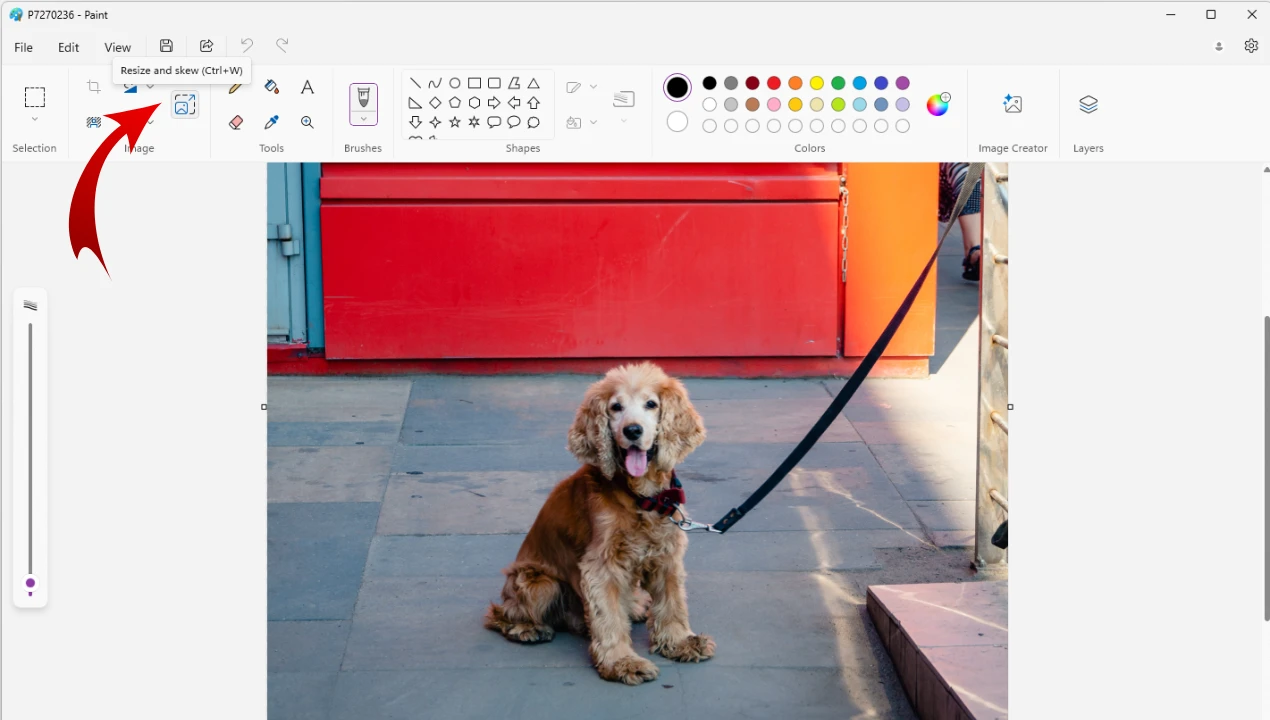
- Access the Resize Tool: On the “Home” tab of the Paint ribbon, locate the “Image” section. Within this section, click on the “Resize” button. This action will open the “Resize and Skew” dialog box.
- Choose Your Measurement Unit: Inside the “Resize and Skew” dialog box, you’ll see two options under the “Resize” section: “Percentage” and “Pixels.”
- Percentage: This is ideal if you want to scale your image relative to its current size. For example, entering “50” will reduce the image to half its current dimensions, while “200” will double its size. This method is intuitive for quick adjustments for things like profile pictures or smaller web graphics.
- Pixels: If you have a specific dimension in mind, such as “825 px” for a top banner, “580 px” for a middle section, or “235 px” for a grey highlight box (as might be required for various sections on Tophinhanhdep.com or other web layouts), choosing “Pixels” allows for precise control.
- Crucially, Maintain Aspect Ratio: Before entering any values, ensure there is a checkmark in the box labeled “Maintain aspect ratio.” This is the golden rule for non-distorted resizing. When this box is checked, you only need to enter either a horizontal or a vertical value; Paint will automatically calculate the corresponding value to preserve the image’s original proportions. Failing to select this option will result in a distorted image, which is detrimental to any visual content, especially professional photography or carefully curated aesthetic images.
- Input Your Desired Dimensions:
- If you chose “Percentage,” enter your desired percentage (e.g., 75 for a 75% reduction) into either the “Horizontal” or “Vertical” field. The other field will update automatically.
- If you chose “Pixels,” enter your target pixel width into the “Horizontal” field or height into the “Vertical” field. The linked dimension will adjust accordingly. Remember the examples for web sections: 825px, 580px, 235px.
- Apply Changes: Once your values are entered, click “OK.” Paint will immediately apply the resizing to your image.
- Save Your Resized Image: After resizing, click on the “File” tab (or Paint icon) again, and select “Save as.” Choose “JPEG” as the file type for most photographic images, as it offers a good balance between quality and smaller file size, making it ideal for web uploads on Tophinhanhdep.com. Enter a short, descriptive name for your new file (avoiding spaces, often using hyphens or underscores, e.g., “nature-wallpaper-resized.jpg”), and click “Save.” Your image is now optimized and ready to upload or use!
This process is invaluable for preparing beautiful photography for online portfolios, adjusting abstract art for social media banners, or creating perfectly sized nature backgrounds for various devices. It empowers Tophinhanhdep.com users to ensure their images are always presented at their best, regardless of their original dimensions.
Mastering Image Cropping for Precision and Composition
While resizing adjusts the overall dimensions of an image, cropping is about changing its frame and focus. Cropping allows you to remove unwanted peripheral elements, highlight a specific subject, or adjust the image’s composition to fit a particular aesthetic or layout. For instance, you might crop a vast landscape to emphasize a specific tree, or remove a distracting background element from a portrait. Unlike resizing, which can sometimes reduce image quality if drastically enlarged, cropping generally retains the quality of the selected area while reducing the image’s overall file size by eliminating unused pixels.
Here’s how to effectively crop an image using Paint:
- Open Your Image in Paint: Just as with resizing, begin by opening your desired image in the Paint application.
- Select the “Select” Tool: On the “Home” tab, within the “Image” section, click on the “Select” dropdown menu. You’ll typically have two main options:
- Rectangular selection: This is the most common choice, allowing you to drag a perfect rectangle or square over the area you wish to keep.
- Free-form selection: For more irregular shapes, this option lets you draw a custom outline around the part of the image you want to preserve. This can be useful for unique digital art compositions or creative ideas that require non-standard frames.
- Define Your Crop Area: Once you’ve chosen your selection tool, click and drag your mouse over the image. A dotted line will appear, indicating the area that will remain after cropping. Everything outside this dotted line will be discarded.
- Tip for precision: If you’re trying to remove a border or fine-tune an edge, start your selection precisely in one corner of your desired area and drag diagonally to the opposite corner. If you make a mistake, simply click anywhere outside the dotted line to deselect and start over.
- Execute the Crop: After you’re satisfied with your selection, click the “Crop” button, which is usually located next to the “Select” tool in the “Image” section of the Home tab. Paint will instantly remove all areas outside your selection, leaving only the focused portion.
- Save Your Cropped Image: Go to “File” > “Save as.” Choose a suitable format (JPEG for photos) and save your newly cropped image with a distinct name.
Cropping is an indispensable technique for Tophinhanhdep.com users, especially for those working with various image types. It allows for the precise framing of beautiful photography, enhancing the visual impact of nature and abstract images by focusing on their strongest elements. In visual design and photo manipulation, cropping is key to fitting images into specific layouts, creating compelling narratives, or developing mood boards with perfectly curated visuals.
Why Image Resizing Matters for Tophinhanhdep.com’s Visual Content
The careful management of image dimensions and file sizes is more than just a technical formality; it’s a cornerstone of effective digital communication and user experience. For Tophinhanhdep.com, a platform thriving on high-quality visual content—from inspirational photo ideas to trending styles—the implications of proper image resizing are profound:
- Optimized Website Performance: Large, unoptimized images are notorious for slowing down web pages. On Tophinhanhdep.com, where users explore extensive collections of wallpapers, backgrounds, and aesthetic images, fast loading times are paramount. Properly resized images ensure that galleries load quickly, enhancing user satisfaction and encouraging longer visits. This also contributes positively to Search Engine Optimization (SEO), as search engines favor faster websites.
- Consistent Visual Aesthetics: Imagine browsing a thematic collection of sad/emotional images or an abstract art gallery on Tophinhanhdep.com, only to find images with inconsistent sizes, stretched proportions, or varying quality. It would significantly detract from the overall experience. Resizing and cropping ensure visual harmony, presenting a cohesive and professional look across all image collections and digital art projects.
- Seamless Platform Compatibility: Different digital environments impose different image specifications. Social media platforms have preferred aspect ratios for posts and stories, website banners demand specific pixel dimensions, and even email attachments benefit from smaller file sizes. Mastering resizing in Paint allows Tophinhanhdep.com users to tailor their high-resolution photography or stock photos for any platform, preventing images from being automatically compressed (and potentially degraded) or awkwardly cropped by external systems.
- Efficient Storage and Bandwidth Utilization: For both users and the Tophinhanhdep.com platform, optimized images lead to more efficient use of storage space and reduced bandwidth consumption. This is particularly relevant for individuals managing large personal photo collections or for the platform hosting vast libraries of images, including digital photography and creative ideas.
- Empowering Creative Freedom: The ability to easily adjust an image’s size and composition expands creative possibilities. A stunning nature photo can be transformed into a perfectly sized header, a piece of abstract art can be adapted for a mobile background, or elements from beautiful photography can be precisely integrated into a complex graphic design. Resizing gives creators the power to adapt any image for any purpose, realizing their creative visions without technical limitations.
In essence, whether you’re uploading a new wallpaper, showcasing a digital art piece, or contributing to a thematic collection, proper image resizing in Paint is the initial step towards ensuring your visual content is impactful, accessible, and professional, perfectly aligning with Tophinhanhdep.com’s mission to celebrate and facilitate visual creativity.
Beyond Basic Resizing: Advanced Tools and Techniques
While Microsoft Paint is an excellent starting point for basic image resizing and cropping, it does have its limitations. For instance, Paint does not offer advanced compression algorithms, true image upscaling without quality loss, or the ability to process multiple images simultaneously (batch processing). These features become essential when dealing with large volumes of high-resolution photography, intricate visual design projects, or when aiming for absolute perfection in image optimization. This is where Tophinhanhdep.com’s specialized Image Tools come into play, offering a suite of solutions that complement and extend the foundational skills learned in Paint.
Optimizing Images for Various Platforms and Purposes
Once you’ve mastered the basics of resizing and cropping in Paint, Tophinhanhdep.com provides the next level of tools to further refine your images for specific needs:
- Image Converters: Often, after resizing, you might need to change an image’s format. For example, converting a PNG (which supports transparency but can have a larger file size) to a JPEG for a web background where transparency isn’t needed can significantly reduce file size without re-resizing. Tophinhanhdep.com’s converters offer seamless format transitions, ensuring compatibility and efficiency for all your images, including those prepared for aesthetic or thematic collections.
- Image Compressors and Optimizers: While Paint’s “Save as JPEG” option provides some compression, Tophinhanhdep.com offers dedicated Compressors and Optimizers that use more sophisticated algorithms to reduce file size even further, often with minimal perceptible loss in visual quality. This is crucial for high-resolution photography and stock photos intended for web use, where every kilobyte counts for faster loading. These tools allow you to find the perfect balance between file size and image fidelity, a critical consideration for maintaining the impact of your beautiful photography or digital art.
- AI Upscalers: One of the main warnings when resizing in Paint is that “Enlarging an image will reduce its quality.” This is because Paint simply stretches the existing pixels, leading to a blurry or pixelated result. Tophinhanhdep.com’s AI Upscalers directly address this limitation. Utilizing artificial intelligence, these tools can intelligently add detail and resolution to smaller images, making them appear sharper and more vibrant when enlarged. This technology is a game-changer for digital photography, allowing users to transform smaller images into stunning wallpapers or high-resolution backgrounds without the traditional drawbacks, opening new avenues for creative ideas and photo manipulation.
- Batch Resizing and Processing: For users with dozens or even hundreds of pictures to resize – perhaps a large collection of stock photos, a series of images for a mood board, or an entire folder of nature photography – manually resizing each one in Paint would be incredibly tedious. Tophinhanhdep.com offers tools that facilitate batch processing, allowing you to resize, convert, or compress multiple images simultaneously. This dramatically streamlines the workflow, saving valuable time and effort, and is particularly beneficial for managing extensive image inspiration libraries or preparing vast thematic collections.
Leveraging Tophinhanhdep.com’s Ecosystem for Enhanced Visual Projects
Paint serves as an accessible entry point into image manipulation, providing fundamental skills that are indispensable for any digital creative. However, Tophinhanhdep.com envisions a complete ecosystem for visual content creators. By combining the basic proficiency gained from Paint with Tophinhanhdep.com’s advanced Image Tools, users can elevate their projects to new heights.
From refining graphic design elements and executing complex photo manipulation techniques to curating engaging image inspiration for mood boards and adapting content to trending styles, Tophinhanhdep.com empowers its community. The platform offers not only the tools to optimize images but also a wealth of visual design resources, high-quality images (wallpapers, backgrounds, aesthetic, nature, abstract, sad/emotional, beautiful photography), and ideas to spark creativity. This integrated approach ensures that whether you’re creating digital art or managing a collection of beautiful photography, you have all the resources needed to produce professional, impactful, and visually stunning content.
In conclusion, mastering image resizing and cropping in Microsoft Paint is an invaluable skill that forms the bedrock of digital image manipulation. It enables basic optimization, aesthetic consistency, and practical application of images across various platforms. As you advance, Tophinhanhdep.com stands ready with a suite of sophisticated Image Tools, including converters, compressors, optimizers, and AI upscalers, to tackle more complex challenges and unlock limitless creative possibilities. Embrace these tools and techniques to ensure your visual content always leaves a lasting impression.