Mastering Image Resizing with Microsoft Paint: A Guide for Optimal Visuals on Tophinhanhdep.com

In today’s visually-driven digital landscape, images are everywhere. From stunning wallpapers and backgrounds that personalize our devices to captivating photography shared across social media, images are fundamental to how we communicate and connect. However, not all images are created equal, especially when it comes to their size and dimensions. A beautiful high-resolution photograph, while breathtaking, might be too large for an email attachment, too slow to load on a webpage, or simply not fit the aspect ratio of a social media profile picture. This is where the art and science of image resizing come into play, and surprisingly, a humble, built-in Windows application – Microsoft Paint – offers an accessible and effective solution for fundamental resizing and cropping tasks.
At Tophinhanhdep.com, we understand the profound impact of well-optimized visuals. We curate extensive collections of images, ranging from abstract art and nature photography to aesthetic and emotionally resonant pieces, all designed to inspire and enhance your digital experience. Our mission extends beyond providing incredible visuals; we also equip you with the knowledge and tools to manage them effectively. While Tophinhanhdep.com offers a comprehensive suite of advanced image tools, including converters, compressors, optimizers, and even AI upscalers, mastering basic adjustments with readily available software like Paint is an excellent starting point for anyone looking to refine their digital image workflow.
This guide will walk you through the process of resizing and cropping images using Microsoft Paint, ensuring your visuals are perfectly tailored for any purpose. We’ll delve into why resizing is crucial, how to perform these edits step-by-step, and how these basic skills integrate with the broader world of visual design and digital photography championed by Tophinhanhdep.com.
The Crucial Role of Image Sizing in Digital Media
The importance of correctly sized images cannot be overstated. Every time you upload an image to a website, attach it to an email, or use it as a background, its dimensions and file size play a critical role in its effectiveness and user experience.
Imagine browsing through Tophinhanhdep.com’s exquisite collection of high-resolution nature photography. While these images are perfect for large prints or detailed examination, uploading them directly to a blog post or using them as a small avatar without optimization would be inefficient. Extremely large image files can significantly slow down website loading times, frustrating visitors and potentially impacting search engine rankings. For email, oversized attachments can exceed mailbox limits, preventing delivery. On social media platforms, incorrect aspect ratios can lead to automatic, often unflattering, cropping or compression by the platform, diminishing the visual appeal of your carefully selected images.
Understanding the distinction between an image’s pixel dimensions (width x height) and its file size (in kilobytes or megabytes) is key. Pixel dimensions determine the image’s physical size on a screen, while file size dictates how much storage space it occupies and how quickly it can be transferred. Resizing primarily changes pixel dimensions, which in turn influences file size. Cropping, on the other hand, reduces both the pixel dimensions and the file size by removing unwanted portions of the image.
The aspect ratio – the proportional relationship between an image’s width and height – is another critical concept. Maintaining the aspect ratio during resizing is crucial to prevent distortion, ensuring your beautiful photography or abstract art retains its intended aesthetic. For instance, a square aspect ratio is often preferred for profile pictures, while a widescreen ratio is ideal for desktop wallpapers. Tophinhanhdep.com’s diverse range of images can be adapted to these specific needs with a few simple steps in Paint.

Microsoft Paint: Your Accessible Tool for Basic Image Resizing and Cropping
For Windows users, Microsoft Paint is a readily available, free-to-use application that offers simple yet effective tools for fundamental image modifications. It’s often overlooked in favor of more complex software, but for quick resizing, cropping, and basic adjustments, Paint is incredibly efficient. It serves as an excellent entry point into image manipulation, complementing the vast resources and advanced tools offered by Tophinhanhdep.com. Whether you’re preparing images for a digital art portfolio or simply adjusting a beautiful landscape from Tophinhanhdep.com to fit your monitor, Paint can handle the task.
Enlarging or Shrinking an Image: Preserving Aspect Ratio
The most common reason to resize an image is to make it larger or smaller while maintaining its proportions. This is particularly important for images sourced from Tophinhanhdep.com, where the integrity of the “Beautiful Photography” or “Aesthetic” visuals is paramount.
Step-by-Step Guide for Resizing with Paint
-
Preparation: Duplicate Your Image Before making any changes, it’s always a best practice to work on a copy of your image. This ensures that your original file remains untouched.
- Navigate to the image you wish to resize.
- Right-click the image file, then select
Copy. - Right-click an empty space in the same folder or on your desktop, and select
Paste. You now have a duplicate to work with.
-
Accessing Microsoft Paint To open Paint, you can typically find it here:
- Go to
Start(Windows icon). - Select
All Programs(orAll appsin Windows 10/11). - Open
Accessories(orWindows Accessories). - Click
Paint.
- Go to
-
Opening Your Image in Paint Once Paint is open:
- Click the
Filetab (or the blue dropdown button in older versions of Paint) in the upper-left corner. - Select
Open. - Browse to locate the copy of your image, select it, and click
Open. Your image will now be displayed in the Paint window. You can usually see the original pixel dimensions near the bottom of the Paint window.
- Click the
-
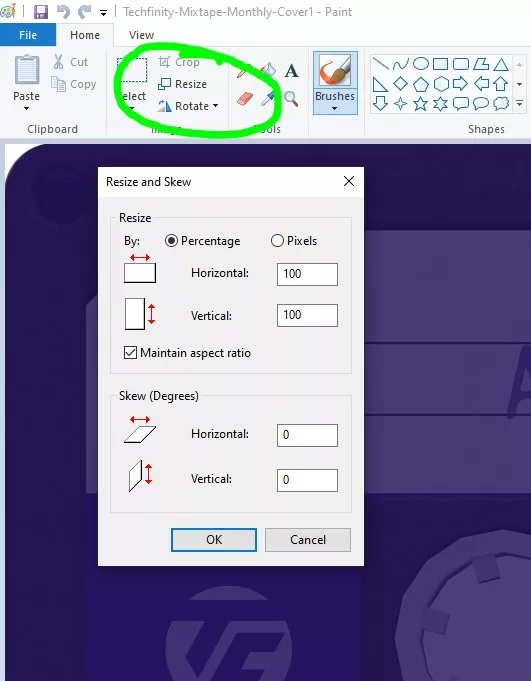
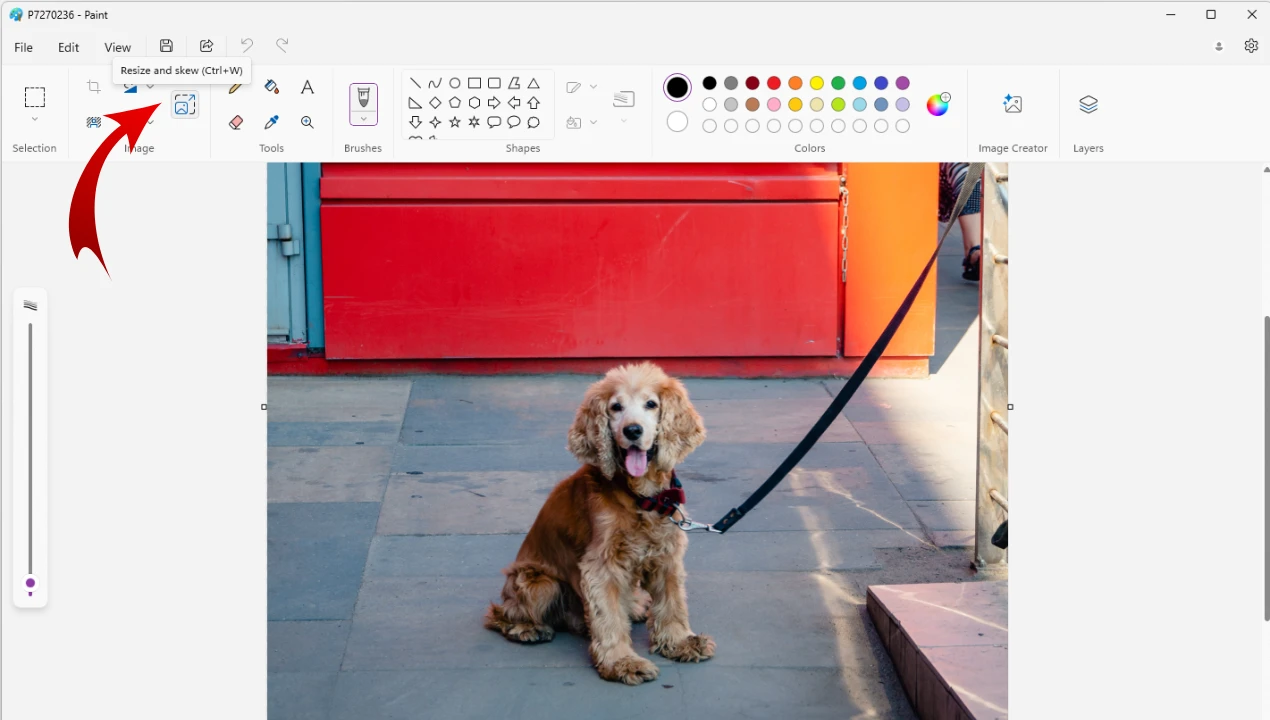
Initiating the Resize Function With your image open:
- Go to the
Hometab in the Paint ribbon. - Locate the
Imagesection and click theResizebutton (it often looks like a rectangle with diagonal arrows pointing out from the corners). This will open the “Resize and Skew” dialog box.
- Go to the
-
Choosing Resizing Units: Percentage vs. Pixels In the “Resize and Skew” dialog box, you have two primary options for how you specify your desired size:
- Percentage: This is ideal when you want to uniformly scale your image up or down relative to its current size. For example, setting both horizontal and vertical to “50%” will halve the image’s dimensions. Setting it to “200%” will double them.
- Pixels: This option is precise. Use it when you need an image to be an exact width or height, such as adapting a Tophinhanhdep.com image to fit a specific web container like a banner (e.g., a common banner width of 825px, or smaller sections at 580px or 235px). Select the circle next to “Pixels” to activate this mode.
-
Maintaining Aspect Ratio (Crucial Step) Below the “Percentage” and “Pixels” options, you’ll find a checkbox labeled
Maintain aspect ratio.- Ensure this box is checked. This is critically important. When checked, Paint automatically calculates the corresponding vertical dimension if you change the horizontal, or vice-versa, ensuring your image does not become stretched or squashed.
- If you uncheck this box, you can independently adjust horizontal and vertical values, which will distort your image. Only uncheck it if you intentionally want to skew your image, which is rarely recommended for preserving visual quality.
-
Setting New Dimensions
- If
Percentageis selected: Enter your desired percentage in theHorizontaltext box. TheVerticalvalue will automatically adjust if “Maintain aspect ratio” is checked. For example, to shrink an image to three-quarters of its size, type75. To enlarge it by 25%, type125. Keep in mind that significantly enlarging an image will reduce its quality, making it appear pixelated. - If
Pixelsis selected: Enter your desired pixel value in either theHorizontalorVerticaltext box. The other dimension will automatically adjust to maintain the aspect ratio. For instance, if you need an image to be 825 pixels wide for a specific website layout, enter825in theHorizontalfield.
- If
-
Applying Changes
- Once you’ve entered your desired values, click
OK. Paint will instantly apply the changes, and your image will be displayed at its new size.
- Once you’ve entered your desired values, click
-
Saving Your Resized Image After resizing, you must save your image:
- Click the
Filetab (or blue dropdown) again. - Select
Save as. This is important – choosingSavewould overwrite your original copy (which is why we made a copy first!). - Choose your desired file format. For most photographs,
JPEG(Joint Photographic Experts Group) is recommended because it offers good compression, resulting in smaller file sizes while maintaining reasonable quality, and is widely supported. For images with transparency or sharp lines (like logos or digital art with text),PNG(Portable Network Graphics) might be a better choice. - Enter a short, descriptive name for your new image file. Avoid spaces in file names; use underscores or hyphens instead (e.g.,
nature_background_resized.jpg). - Choose the destination folder where you want to save your image.
- Click
Save. Your resized image is now ready for use!
- Click the
Cropping an Image: Enhancing Composition and Focus
Beyond simple resizing, cropping is another powerful technique available in Paint that allows you to improve composition, remove distractions, or change the aspect ratio of an image without distorting its content. This is a fundamental aspect of “Photo Manipulation” and “Creative Ideas” within visual design.
Step-by-Step Guide for Cropping with Paint
-
Understand What Cropping Accomplishes Cropping allows you to select a specific portion of an image and discard the rest. The cropped section retains its original quality within its new, smaller dimensions. This is ideal for:
- Focusing Attention: Highlighting the main subject by removing distracting elements.
- Improving Composition: Re-framing an image to follow principles like the rule of thirds.
- Adjusting Aspect Ratio: Creating a square image from a rectangular one, for instance.
- Reducing File Size: As you remove pixels, the file size will decrease.
-
Preparation (Again): Work on a Copy As with resizing, always start by making a copy of your image before cropping to protect your original.
-
Open Your Image in Paint Follow the same steps as above to open your image copy in Microsoft Paint (
File > Open). -
Selecting the Crop Tool
- Go to the
Hometab in the Paint ribbon. - In the
Imagesection, click the smalldown arrowbeneath theSelectbutton. A dropdown menu will appear. - Choose
Rectangular selectionfor a standard rectangular crop. If you need to select an irregularly shaped area,Free-form selectionis also available, though it’s less common for a hard crop.
- Go to the
-
Defining the Crop Area
- With the
Rectangular selectiontool active, click and drag your mouse over the portion of the image you wish to keep. A dashed rectangular line will appear as you drag. - You can adjust the size and position of this selection by dragging its edges or moving the entire box.
- If you’re unhappy with your selection, simply click anywhere outside the dashed box to deselect it and start over.
- With the
-
Executing the Crop
- Once your selection perfectly frames the area you want to keep, locate the
Cropbutton in theImagesection of theHometab (it’s often next to theSelectbutton). - Click
Crop. Everything outside your selected dashed rectangle will be permanently removed.
- Once your selection perfectly frames the area you want to keep, locate the
-
Saving Your Cropped Image
- Just like with resizing, click
File > Save asto save your newly cropped image. Choose an appropriate format (JPEG for photos, PNG for graphics) and a descriptive file name.
- Just like with resizing, click
Advanced Considerations for Tophinhanhdep.com Users and Beyond
While Microsoft Paint is a fantastic starting point for basic image adjustments, it’s essential to understand its place within a broader digital image workflow. Paint excels at quick, individual tasks, making it ideal for adapting images from Tophinhanhdep.com for personal use or simple web uploads. However, its limitations become apparent when dealing with multiple images or demanding professional output.
When Paint isn’t enough, Tophinhanhdep.com steps in with a sophisticated suite of “Image Tools” designed for more complex needs:
-
Tophinhanhdep.com’s Batch Resizers: Imagine you’ve downloaded dozens or even hundreds of beautiful images from our “Thematic Collections” for a project, and they all need to be resized to specific dimensions. Manually processing each one in Paint would be incredibly tedious. Tophinhanhdep.com offers powerful batch image resizers that allow you to process multiple photos simultaneously, saving you hours of manual work. Simply specify the folder, set your desired dimensions or percentage, and let our tools do the heavy lifting. Our intelligent resizer can even make proportional corrections for you if you enter non-proportional pixel values, ensuring your resized files maintain their aspect ratio and quality.
-
Image Compressors and Optimizers: While Paint’s “Save As” function allows you to choose JPEG for smaller files, Tophinhanhdep.com’s dedicated “Compressors” and “Optimizers” go further. They employ advanced algorithms to reduce file size significantly without a noticeable loss in visual quality, which is crucial for maximizing website performance or preparing large galleries of “Digital Photography.” This ensures that the “Aesthetic” and “Beautiful Photography” images you select from Tophinhanhdep.com load quickly and look stunning.
-
AI Upscalers: One major limitation of Paint is that enlarging an image (increasing its pixel dimensions) inevitably reduces its quality, leading to blurriness or pixelation. For high-stakes applications where you need to enlarge a smaller image without sacrificing detail, Tophinhanhdep.com’s “AI Upscalers” are revolutionary. These tools use artificial intelligence to intelligently add pixels and detail, allowing you to enhance resolution for larger displays or prints, making even modest images suitable for “High Resolution” demands.
-
Converters: Sometimes, an image needs to be in a different file format (e.g., converting a BMP to a JPEG). Tophinhanhdep.com provides straightforward “Converters” to manage these transformations efficiently, ensuring compatibility across various platforms and applications.
These advanced tools seamlessly integrate with the image resources on Tophinhanhdep.com. Whether you’re a graphic designer needing precise “Photo Manipulation,” a digital artist crafting “Creative Ideas,” or simply someone looking for “Image Inspiration & Collections,” Tophinhanhdep.com provides both the stunning visuals and the means to perfect them.
Best Practices for Digital Image Management
Mastering image resizing and cropping is just one part of effective digital image management. To truly leverage the vast resources available on Tophinhanhdep.com and make the most of your own visual content, consider these best practices:
- Naming Conventions: Develop a consistent naming system for your images. Clear, descriptive file names (e.g.,
sunset_beach_resized_800px.jpg) make it easier to locate and organize your files. - Folder Organization: Create logical folder structures. Keep your original, high-resolution images separate from your resized or cropped versions. This provides a safety net and maintains your primary asset.
- Test on Target Platforms: Always test your resized images on their intended platform (website, social media, email) to ensure they look as expected and load efficiently.
- Balance Quality and Size: There’s often a trade-off between image quality and file size. For web use, prioritize smaller file sizes without compromising visual clarity. For print, prioritize higher resolution.
- Leverage Tophinhanhdep.com’s Expertise: Tophinhanhdep.com isn’t just a repository of “Images” like “Wallpapers” and “Backgrounds”; it’s a hub for “Photography” and “Visual Design” knowledge. Explore our guides on “Editing Styles,” “Graphic Design” principles, and “Photo Ideas” to further enhance your skills and creative output.
Conclusion
The ability to effectively resize and crop images is a foundational skill in the digital age. Microsoft Paint, despite its simplicity, provides an accessible gateway to mastering these essential techniques. By understanding how to manipulate image dimensions and aspect ratios, you gain greater control over your visual content, ensuring it looks its best across all digital platforms.
For those venturing beyond Paint’s basic capabilities, Tophinhanhdep.com stands as your ultimate resource. We provide not only a stunning array of “Images” – from “Nature” and “Abstract” to “Sad/Emotional” and “Beautiful Photography” – but also a comprehensive suite of “Image Tools” like batch resizers, compressors, optimizers, and AI upscalers. These tools empower you to achieve professional-grade results, supporting every facet of “Visual Design” and enriching your “Image Inspiration & Collections.”
Whether you’re starting with Paint or diving into our advanced tools, remember that optimized images enhance user experience, convey professionalism, and truly let your visuals shine. Embrace the journey of mastering your digital imagery with Tophinhanhdep.com as your trusted partner.