Mastering Image Resizing in Photoshop: A Comprehensive Guide for Digital Artists and Photographers

In the dynamic world of digital imaging, mastering the art of resizing images is not just a technical skill—it’s a foundational pillar for achieving visual excellence across all platforms. Whether you’re a professional photographer curating a portfolio of high-resolution images, a graphic designer crafting compelling digital art, or an enthusiast optimizing beautiful photography for web galleries and aesthetic backgrounds, understanding how to effectively resize images in Adobe Photoshop is indispensable.
Tophinhanhdep.com is dedicated to providing inspiration and practical tools for all your visual needs, from stunning wallpapers and abstract designs to critical image tools like converters and optimizers. This comprehensive guide will delve deep into Photoshop’s robust resizing capabilities, ensuring your images always look their best, no matter the final destination. We’ll explore everything from altering entire image dimensions to manipulating individual layers, emphasizing techniques that preserve quality and streamline your workflow.
The Core Mechanics: Resizing the Entire Image in Photoshop
Resizing an entire image in Photoshop involves adjusting its overall dimensions, typically measured in pixels for digital screens or physical units like inches for print. This fundamental operation is crucial for adapting your images to various contexts without compromising their visual integrity.
Accessing the Image Size Dialog Box
The primary command for resizing your entire image in Photoshop is the “Image Size” dialog box. This intuitive interface provides all the necessary controls to precisely adjust your image’s dimensions and resolution.
To begin:
- Open Your Image in Photoshop: Launch Adobe Photoshop and navigate to
File > Open. Select the image you wish to resize and click “Open.” Alternatively, you can right-click the image file on your computer, choose “Open with,” and then select “Adobe Photoshop.” - Create a Backup (Highly Recommended): Before making any significant changes, it’s always wise to preserve your original file. Go to
File > Save As, and save a copy of your image with a new name, perhaps adding “-resized” to the filename (e.g.,NaturePhoto-resized.jpg). This ensures you can always revert to the untouched original if needed, preventing accidental overwriting. - Access the Image Size Dialog Box: Once your image is open and a backup is secured, go to the top menu bar, click on
Image, and then selectImage Size. For a quicker route, you can use the keyboard shortcutAlt+Ctrl+I(Windows) orOption+Cmd+I(macOS).

This action will open the Image Size dialog box, displaying your image’s current dimensions, resolution, and estimated file size.
Understanding Dimensions, Resolution, and Proportions
Within the Image Size dialog box, you’ll encounter several critical parameters that dictate how your image will be scaled. Understanding each of these is key to achieving your desired outcome without unexpected distortions or loss of detail.
- Pixel Dimensions: This section displays your image’s width and height in pixels. These are the absolute measurements of your digital image. You can input new values here directly. Photoshop also allows you to specify these dimensions as a percentage of the original size, which is useful for relative scaling (e.g., 50% to halve the size, 200% to double it).
- Document Size: This area shows the physical dimensions of your image, typically in units like inches, centimeters, or millimeters. These measurements are directly tied to the image’s resolution and are most relevant when preparing an image for print. You can select your preferred unit of measurement from the dropdown menu next to the Width and Height fields.
- Resolution: Measured in “pixels/inch” (PPI), resolution defines the density of pixels within a given physical dimension. For example, an image with 300 PPI will have 300 pixels packed into every inch of its physical print size. This setting is paramount for print quality:
- For Web/Screen: A resolution of 72 to 96 PPI is typically sufficient, as monitors display images based on pixel count, not physical dimensions. Higher PPI for web images only increases file size without visible improvement.
- For Print: A resolution of 200 to 300 PPI is generally recommended for high-quality printing. Lower resolutions can result in pixelation or a “blurry” appearance when printed. Tophinhanhdep.com’s high-resolution photography collections often aim for these print-ready specifications.
- Constrain Proportions: This crucial checkbox (represented by a chain-link icon in newer Photoshop versions) ensures that when you change either the width or the height, the other dimension automatically adjusts to maintain the original aspect ratio.
- Keeping Proportions (Checked/Linked): This is almost always what you want to prevent your image from appearing stretched or squashed. If you change the width, the height will update proportionally, and vice versa. This preserves the visual integrity of your beautiful photography and aesthetic compositions.
- Unlinking Proportions (Unchecked/Unlinked): If you uncheck this box, you can input independent values for width and height. This can lead to severe distortion if the new aspect ratio doesn’t match the original. For instance, resizing a 200x200 pixel image to 100x250 pixels without constraining proportions would stretch it vertically, making a koala bear look unusually tall, as an example provided by Tophinhanhdep.com’s resources. This is usually undesirable unless you’re aiming for a specific creative effect that involves intentional distortion.
- Resample Image: This checkbox, when active, tells Photoshop to add or remove pixels from your image when resizing. This process is called “resampling.”
- Downsampling (shrinking): When you make an image smaller, Photoshop discards pixels. The “Bicubic Sharper” option is generally best for reducing image size, as it helps maintain edge definition.
- Upsampling (enlarging): When you make an image larger, Photoshop must create new pixels based on existing ones. This is where quality can be lost. “Bicubic Smoother” is recommended for enlarging, as it attempts to smooth out the transition between existing and new pixels. For more significant enlargements beyond the original pixel data, Tophinhanhdep.com’s AI Upscalers can offer superior results compared to traditional Photoshop resampling.
- Bicubic Automatic: If you’re unsure, “Bicubic Automatic” lets Photoshop decide the best resampling method based on whether you’re enlarging or shrinking.
After setting your desired dimensions, resolution, and resampling options, click “OK” to apply the changes. Remember to then go to File > Save As to save your resized image under a new name, ensuring your original remains untouched.
Precision Resizing for Diverse Applications: Web, Print, and Beyond
The goal of resizing isn’t merely to change numbers; it’s to prepare your image for a specific purpose, whether it’s loading quickly on a website or looking crisp in a printed art book.
Optimizing Images for Web and Digital Displays
For images intended for websites, social media, or digital presentations, the key is to achieve a balance between visual quality and file size. Smaller file sizes ensure faster loading times, which is crucial for user experience and SEO.

Here’s how to resize for web optimization:
- Open Your Image and Create a Backup.
- Access the Image Size Dialog Box (
Image > Image SizeorAlt+Ctrl+I/Option+Cmd+I). - Set Pixel Dimensions:
- Ensure
Constrain Proportionsis checked. - In the “Pixel Dimensions” section, input your desired
WidthorHeightinpixels. Common web widths might be 800px, 1200px, or 1920px, depending on where the image will be displayed (e.g., a blog post image vs. a full-width banner for aesthetic wallpapers on Tophinhanhdep.com). You can also usePercentto scale down an image to, say, 50% or 75% of its original size.
- Ensure
- Set Resolution to 72 PPI: For web images, a resolution of 72 pixels/inch is standard. Anything higher won’t be visibly better on a screen but will unnecessarily increase file size.
- Choose Resampling Method: If you are making the image smaller (which is common for web optimization), select
Bicubic SharperforResample Image. If you are slightly enlarging a web image,Bicubic Smoothermight be used, but generally, it’s best to start with sufficiently large originals for web. - Click “OK.”
- Save Your Web-Optimized Image: Go to
File > Save As. Choose a web-friendly format like JPEG (for photos with continuous tones) or PNG (for images with transparency or sharp lines, like logos). Tophinhanhdep.com’s “Image Tools” also include compressors and optimizers that can further reduce the file size of your JPEGs and PNGs without significant quality loss, enhancing performance for backgrounds and digital art.
Preparing High-Resolution Images for Professional Printing
When an image is destined for print, quality is paramount. This requires meticulous attention to resolution and physical dimensions to ensure sharp, vibrant results. Tophinhanhdep.com’s dedication to high-resolution photography underscores the importance of these details.
Here’s how to resize for print:
- Open Your Image and Create a Backup.
- Access the Image Size Dialog Box (
Image > Image Size). - Set Document Size (Physical Dimensions):
- Ensure
Constrain Proportionsis checked. - Change the unit of measurement to
inches(orcm/mm) from the dropdown menus under “Document Size.” - Input the precise
WidthandHeightyou desire for the final print.
- Ensure
- Set Resolution to 200-300 PPI: For most professional prints, aim for at least 200 pixels/inch, with 300 PPI being ideal for photographic quality. This ensures that the image has enough detail to look sharp when printed.
- Choose Resampling Method: If you are shrinking the image for print, select
Bicubic Sharper. If you are slightly enlarging it,Bicubic Smootheris the better choice to minimize pixelation. Remember, significant upsampling can still lead to a soft or blurry print, so starting with a high-resolution original is always best for print projects. - Consider Cropping for Aspect Ratio Mismatches: If your original image’s aspect ratio differs from your desired print size (e.g., a square photo for a rectangular print), simply resizing will either leave white space or distort the image. In such cases, you will need to
cropthe image after resizing to fit the desired print dimensions, carefully composing the frame to keep important elements. - Click “OK.”
- Save Your Print-Ready Image: Use
File > Save As. TIFF or high-quality JPEG are common formats for print, but always consult with your printer for their preferred file type and settings.
Dynamic Layer Resizing and Non-Destructive Workflows
Beyond adjusting the entire canvas, Photoshop excels at manipulating individual elements within your image. This is where layer resizing comes into play, enabling intricate photo manipulation, digital art, and composite images.
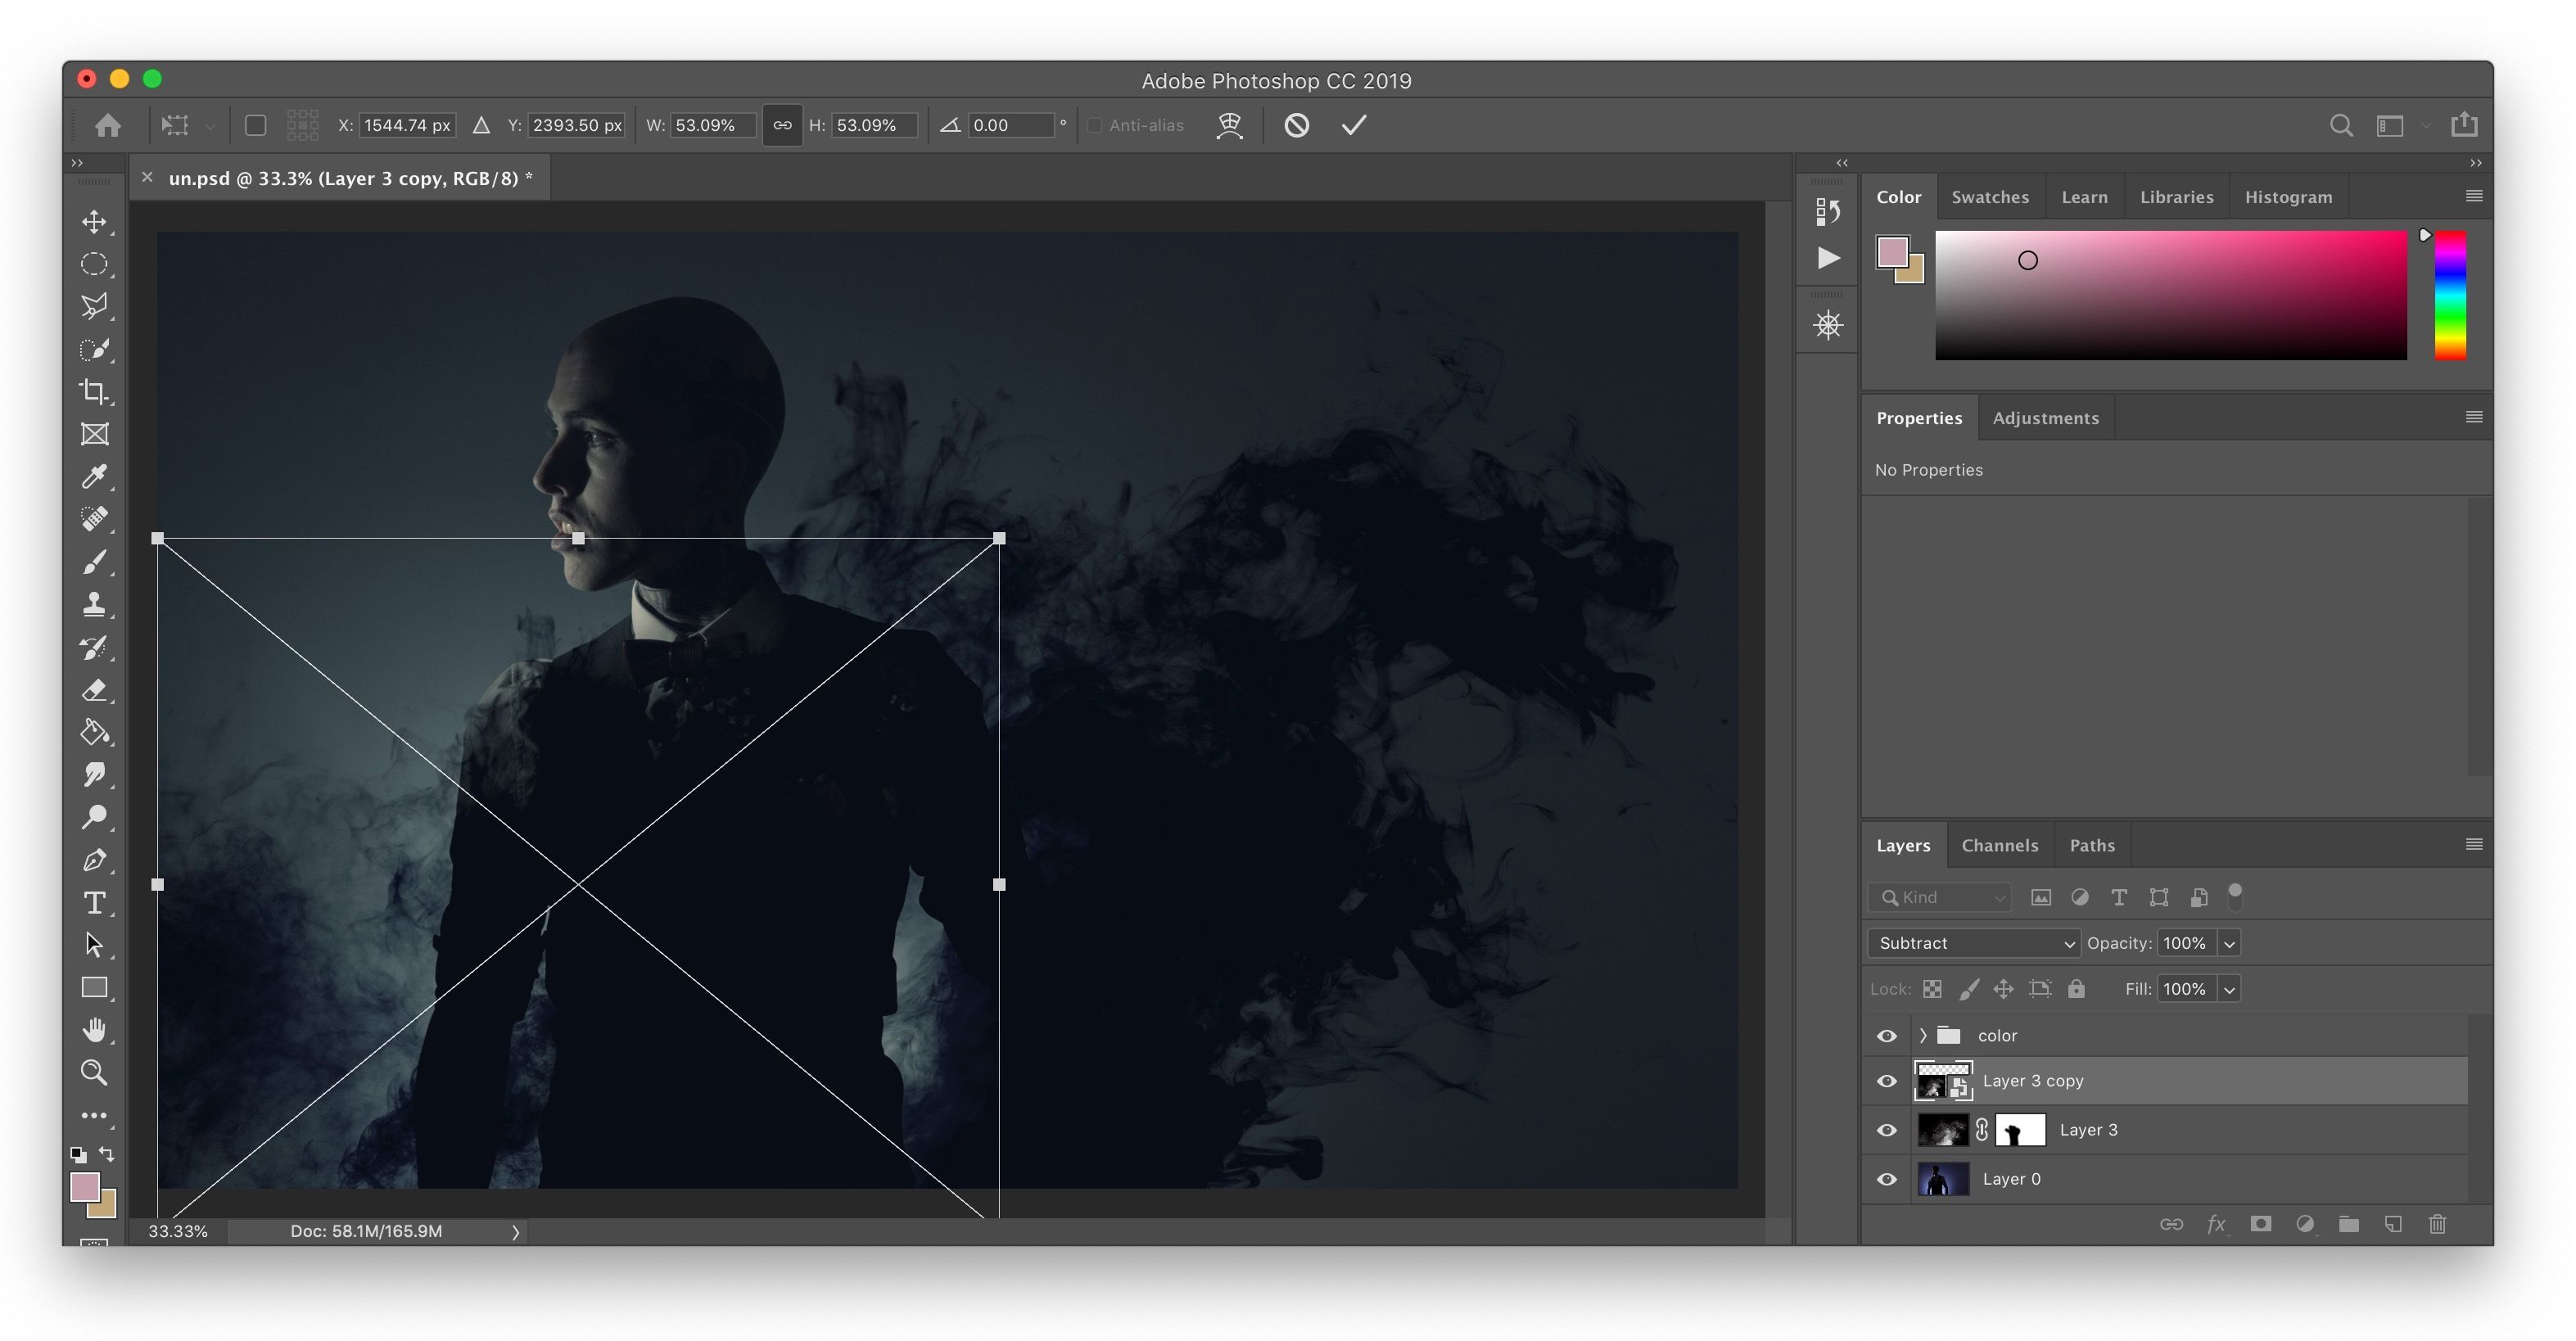
Utilizing the Free Transform Tool for Layer Manipulation
When you need to resize a specific object, element, or image that exists on its own layer, the Free Transform tool is your go-to command. It offers unparalleled flexibility for scaling, rotating, and repositioning.
Steps to resize a layer:
- Select the Layer: In the Layers panel, click on the specific layer you wish to resize. If you have multiple layers, ensure the correct one is active.
- Activate Free Transform: Go to
Edit > Free Transform, or use the universal shortcutCmd+T(macOS) orCtrl+T(Windows). A bounding box with handles will appear around your selected layer. - Resize the Layer:
- Proportional Resizing: Since Photoshop CC 2019, simply grabbing any of the corner handles and dragging will resize the layer proportionally by default. This is a crucial update that saves time, as most users desire proportional scaling.
- Non-Proportional Resizing (since CC 2019): To resize non-proportionally, hold down the
Shiftkey while dragging a corner handle. - Proportional Resizing (older Photoshop versions): In older versions (pre-CC 2019), you would hold
Shiftwhile dragging a corner handle to maintain proportions. If you’re using an older version, remember this “gotcha” to avoid distortion. - Resizing from the Center: To resize the layer from its center point (instead of from the handle you’re dragging), hold down the
Option(macOS) orAlt(Windows) key while dragging any handle. This can be a handy trick for precise positioning, reducing the need to reposition the layer after resizing.
- Rotate the Layer: While the Free Transform box is active, move your mouse pointer slightly outside one of the corner handles. The cursor will change to a curved double-arrow icon, indicating you can now click and drag to rotate the layer.
- Confirm or Cancel:
- When you are satisfied with the new size and position, press
Enter(or click the checkmark in the Options bar) to commit the transformation. - If you’re unhappy with the changes and want to discard them, press the
Escapekey (or click the cancel icon in the Options bar).
- When you are satisfied with the new size and position, press
The Free Transform tool also allows for other complex transformations, which you can access via Edit > Transform. These include Scale, Skew, Distort, Perspective, and Warp—powerful tools for advanced photo manipulation and creative visual design. Experimenting with these options can unlock new possibilities for your digital art projects.
Embracing Smart Objects for Uncompromised Quality
While the Free Transform tool is incredibly versatile, resizing layers, especially repeatedly, can lead to a significant loss of pixel quality. This is where Smart Objects become an essential component of a non-destructive workflow.
What is a Smart Object? A Smart Object is a container that holds image data from raster or vector images. When you convert a layer to a Smart Object, Photoshop embeds the original pixel data within that object. This means any transformations (scaling, rotating, skewing, distorting) you apply to the Smart Object do not directly modify the original pixel data.
Why use Smart Objects for resizing? Imagine you resize a regular pixel layer down to a small thumbnail, and then later decide you need it larger again. When you scale it back up, Photoshop has to “guess” at the missing pixel information, resulting in a blurry, pixelated mess. However, if you convert the layer to a Smart Object before the initial resizing, Photoshop retains access to the original, high-resolution pixel data. You can then:
- Scale Down and Up Infinitely (within original dimensions): You can shrink the Smart Object layer to a tiny size and then scale it back up to its original embedded pixel dimensions without any loss of quality. Photoshop always refers to the high-quality source data within the Smart Object.
- Preserve Original Quality: Even if you scale it larger than its original embedded dimensions (which will still result in some loss of quality for any image), the Smart Object ensures you’re always starting from the best possible source, rather than a degraded version. This is critical for maintaining the integrity of your high-resolution and beautiful photography elements in complex compositions.
How to Convert to a Smart Object:
- In the Layers panel, right-click (or Control-click on macOS) on the layer you want to protect.
- From the context menu, select
Convert to Smart Object. A small icon will appear on the layer thumbnail in the Layers panel, indicating it is now a Smart Object. - Now, you can apply Free Transform (
Cmd+T/Ctrl+T) to resize this Smart Object layer as many times as you like, confident that its internal pixel quality remains preserved up to its original resolution.
Embracing Smart Objects is a cornerstone of professional photo manipulation and digital art workflows, allowing for endless creative revisions without irreversible quality degradation.
Elevating Your Workflow: Batch Processing and Complementary Tools
For anyone managing a large volume of images—whether it’s preparing a collection of aesthetic backgrounds for upload or optimizing stock photos—manual resizing quickly becomes inefficient. Photoshop offers robust automation, and Tophinhanhdep.com provides a suite of online tools to further enhance your productivity.
Streamlining Resizing with Photoshop Actions
If you have dozens or even hundreds of pictures that require the same resizing operations, performing the steps manually for each file would be incredibly tedious. Photoshop’s “Actions” feature allows you to record a series of steps and then apply them automatically to multiple files, transforming a repetitive task into a swift, automated process.
Creating a Resizing Action:
- Open a Sample Image: Open one image that represents the typical characteristics of the batch you want to resize.
- Open the Actions Panel: Go to
Window > Actions. - Create a New Set (Optional but Recommended): Click the folder icon at the bottom of the Actions panel to create a new “Set” (e.g., “Tophinhanhdep Resizing”). This keeps your actions organized.
- Create a New Action: Click the “New Action” icon (the square with a plus sign) at the bottom of the Actions panel. Give your action a name (e.g., “Web 1200px Wide”), and optionally assign a Function Key for quick access. Click “Record.”
- Perform the Resizing Steps: Now, Photoshop will record every step you take.
- Go to
Image > Image Size. - Set your desired dimensions (e.g.,
Width: 1200 pixels,Resolution: 72 PPI, withConstrain Proportionschecked andBicubic Sharperselected for resampling). - Click “OK.”
- Crucially, now go to
File > Save As. Choose your desired format (e.g., JPEG with a specific quality setting). Important: Do NOT click “Save” if it would overwrite your original. Instead, choose “Save As” and save to a different folder or with a different name. If you always save to a new location, the batch process will handle it. - Go to
File > Close(without saving changes to the original if prompted, unless that’s part of your desired workflow).
- Go to
- Stop Recording: Click the “Stop” button (the square icon) at the bottom of the Actions panel. Your action is now saved.
Batch Processing with Your Action:
- Prepare Your Images: Place all the images you want to resize into a single source folder.
- Create a Destination Folder: Create an empty folder where Photoshop will save the resized copies.
- Access Batch Command: Go to
File > Automate > Batch. - Configure Batch Options:
- Play:
Set:Select the action set you created (e.g., “Tophinhanhdep Resizing”).Action:Select the specific resizing action you recorded (e.g., “Web 1200px Wide”).
- Source:
Folder:Select the folder containing your original images.Include All Subfolders:Check this if your images are organized in subfolders within the source.
- Destination:
Folder:Select the empty folder you created for the resized images.Override Action "Save As" Commands:This is often useful. If your action included aSave Asstep, checking this allows the Batch process to manage the naming and saving to the specified destination folder, preventing unwanted overwrites or multiple dialog boxes.File Naming:This powerful option allows you to automatically rename files. You can add prefixes, suffixes, sequential numbers, or change extensions (e.g.,Document Name + 3 Digit Serial Number + Extension).
- Play:
- Click “OK”: Photoshop will now automatically open each image in the source folder, apply your resizing action, save the result to the destination folder with your chosen naming convention, and then close the original, repeating this for every image. This dramatically streamlines preparing vast collections of images for specific purposes, from generating aesthetic social media content to compiling thematic collections for Tophinhanhdep.com.
Enhancing Productivity with Tophinhanhdep.com’s Image Tools
While Photoshop is a powerhouse, complementary online tools can further optimize and diversify your image workflow. Tophinhanhdep.com offers a suite of “Image Tools” designed to handle various aspects of image processing, perfectly complementing your Photoshop resizing efforts.
- Image Converters: After resizing your images in Photoshop, you might need them in a different format. Tophinhanhdep.com’s converters allow you to easily change file types (e.g., JPEG to WebP for superior web performance, PNG for transparency needs, or even converting obscure formats). This is invaluable for ensuring your aesthetic backgrounds and beautiful photography are delivered in the most efficient format.
- Image Compressors & Optimizers: Resizing an image reduces its pixel dimensions, but further compression can significantly shrink its file size without noticeable visual quality degradation, especially for web use. Tophinhanhdep.com’s compressors analyze your images and apply advanced algorithms to reduce bytes, ensuring your wallpapers and online images load lightning-fast. This is a critical step after Photoshop resizing for web optimization.
- AI Upscalers: Sometimes, you encounter an image that is simply too small for your needs, and traditional Photoshop upsampling (even with “Bicubic Smoother”) can introduce blurriness and artifacts. Tophinhanhdep.com’s AI Upscalers leverage artificial intelligence to intelligently reconstruct missing pixel data, allowing you to enlarge images by 2x, 4x, or even more with surprisingly crisp and detailed results. This is a game-changer for working with low-resolution stock photos or for rescuing smaller images for larger digital art projects or high-resolution displays.
- Image-to-Text: While not directly related to resizing, Tophinhanhdep.com also offers Image-to-Text tools, which can be useful in broader visual design workflows, allowing you to extract textual information from images, such as captions from photography.
Integrating these Tophinhanhdep.com tools into your workflow ensures that you not only resize images effectively but also optimize them for performance, adapt them for various platforms, and even enhance their resolution beyond what traditional software can achieve.
Conclusion: The Art of Precision in Digital Imaging
Resizing an image in Photoshop is far more than a simple numerical adjustment; it’s a critical skill that impacts everything from the load time of a website adorned with aesthetic backgrounds to the print quality of a cherished piece of high-resolution photography. By mastering the Image Size dialog box, understanding the nuances of resolution and resampling, and leveraging the power of Smart Objects and the Free Transform tool, you gain precise control over your visual creations.
For those managing large volumes of images, Photoshop Actions provide an indispensable pathway to automation, transforming hours of manual work into a few clicks. Furthermore, Tophinhanhdep.com’s suite of image tools—including converters, compressors, optimizers, and AI upscalers—offers powerful supplementary capabilities that extend your reach beyond Photoshop, enabling you to refine, enhance, and adapt your images for any digital or print requirement.
Ultimately, whether you’re working on digital art, enhancing stock photos, preparing a stunning wallpaper, or curating a collection of beautiful photography, thoughtful and precise resizing ensures that your images always convey the intended impact with clarity and quality. Continue to explore Tophinhanhdep.com for more insights, tools, and inspiration to elevate your visual design and digital photography journey.