How to Resize an Image with Paint: A Comprehensive Guide for Digital Creators

In today’s visually-driven digital landscape, images are everywhere—from stunning wallpapers and evocative backgrounds to professional stock photos and personal aesthetic collections. Whether you’re a burgeoning digital artist, a seasoned photographer, or simply looking to optimize your family photos for sharing, understanding how to manage image dimensions is a fundamental skill. Resizing an image is not merely about making it bigger or smaller; it’s about optimizing its visual integrity, ensuring efficient loading, and meeting the specific requirements of various platforms, from social media to print publications.
While a plethora of sophisticated image editing software exists, Microsoft Paint remains an incredibly accessible and straightforward tool for basic image manipulation on Windows platforms. Often overlooked, this built-in utility can capably handle fundamental resizing and cropping tasks, making it an excellent starting point for anyone dipping their toes into image optimization. This comprehensive guide will walk you through the process of resizing images using Paint, exploring its practical applications, limitations, and how these basic techniques lay the groundwork for more advanced visual design and photography practices within the broader digital ecosystem. We’ll delve into why correct dimensions truly matter, how Paint can be your go-to for quick adjustments, and when to consider leveraging more powerful tools for your high-resolution photography, creative projects, and curated image collections.
The Fundamental Importance of Image Resizing in Digital Media
In an era dominated by visual content, every image, from a serene nature background to an intricate abstract artwork, plays a crucial role in conveying a message or setting a mood. The dimensions and file size of these images significantly impact their effectiveness, user experience, and overall presentation. Understanding the “why” behind resizing is as important as knowing the “how.”
Why Correct Dimensions Matter for Quality and Performance
The resolution and physical dimensions of an image are critical factors that influence both its visual quality and its performance in a digital environment. Using images of incorrect sizes can lead to a host of problems that detract from the intended visual experience and can even hinder the reach of your content.
Firstly, visual integrity is paramount. A high-resolution photograph, rich in detail, can lose its crispness and clarity if improperly enlarged in a basic editor like Paint, resulting in pixelation—a common issue where individual pixels become visible, making the image appear blocky and unprofessional. Conversely, even when shrinking an image, maintaining its native aspect ratio is crucial to prevent distortion, where subjects appear stretched or squashed. For high-resolution photography, this means ensuring that scaling down for web use doesn’t inadvertently degrade the artistic composition or fine details captured. This attention to detail extends to all forms of imagery, from delicate aesthetic shots to robust stock photos.
Secondly, load times and bandwidth are significant considerations, especially for web-based content. Larger image file sizes, often a direct consequence of higher resolutions and dimensions, translate to slower loading times for websites and applications. In today’s fast-paced digital world, users expect instantaneous access; even a few seconds delay can lead to increased bounce rates, negatively impacting user engagement and search engine rankings. Resizing an image to the appropriate dimensions, often coupled with effective compression and optimization, drastically reduces its file size, ensuring a snappier experience for viewers. This is a core tenet for efficient digital photography and content delivery.
Finally, platform requirements vary widely across the digital landscape. Social media platforms, e-commerce sites, content management systems, and online portfolios each have specific guidelines for image dimensions to ensure optimal display. For instance, a full-width banner image for a website section might require specific pixel dimensions (e.g., 825px for a top banner, 580px for a middle section, or 235px for a highlight box, as seen in some CMS guidelines). Uploading an image that is too large will often result in automatic, and potentially poor-quality, resizing by the platform, while an image that is too small might appear blurry or pixelated when stretched to fit. Adhering to these specifications is essential for maintaining brand consistency, professionalism, and creative ideas across all digital touchpoints.
Resizing in the Context of Diverse Image Categories
The need for precise image resizing is universal but manifests differently depending on the type and purpose of the image. Each category of visual content benefits uniquely from thoughtful dimension adjustments, enhancing its impact and usability.
For wallpapers and backgrounds, the primary goal is often a perfect fit to a specific screen resolution without stretching or cropping essential elements. Whether it’s a serene nature scene or an intricate abstract pattern, a correctly sized background image ensures that the visual experience is seamless and immersive. Misaligned dimensions can lead to unsightly borders, awkward stretching, or vital parts of the image being cut off, diminishing the overall aesthetic.
Aesthetic and nature photography thrives on visual harmony and the preservation of intricate details. When these images are prepared for online galleries, mood boards, or thematic collections, resizing them appropriately allows for consistent presentation while managing file sizes for web delivery. The ability to reduce a high-resolution landscape photo to a web-friendly size without sacrificing its majestic appeal is a testament to effective resizing.
Images that convey sad/emotional themes or are part of beautiful photography collections require particular care during resizing. The emotional resonance of a photograph can be easily disrupted by a blurry detail or a distorted face. Professional photographers, when showcasing their work, often resize their high-resolution originals to web-optimized versions that retain emotional depth and clarity, while also preparing larger files for potential print sales or extensive digital art displays.
In visual design, including graphic design and digital art, resizing is an integral part of the creative process. Designers constantly manipulate image elements to fit layouts, create composite images, and prepare assets for various media. The ability to precisely adjust dimensions ensures that every component, from a small icon to a large banner, integrates flawlessly into the overall composition, supporting creative ideas and effective photo manipulation. This meticulous approach extends to curating image inspiration and collections, where consistent sizing can transform a disparate group of photos into a cohesive visual narrative.
Mastering Image Resizing with Microsoft Paint
Microsoft Paint, a staple of Windows operating systems, offers a user-friendly interface for basic image editing tasks, including resizing and cropping. While it may not boast the advanced features of professional software, its accessibility makes it an excellent tool for quick adjustments without needing to download or purchase specialized programs. For anyone working with images, particularly for web uploads or simple personal use, Paint can be surprisingly efficient.
Step-by-Step Guide to Enlarging or Shrinking Images
Resizing an image in Paint involves a few straightforward steps. It’s crucial to understand that Paint is a raster-based editor, meaning when you enlarge an image, it interpolates new pixels, which can lead to a reduction in quality (pixelation). Shrinking, however, generally preserves quality more effectively.
-
Prepare Your Image (Crucial First Step): Before making any changes, always create a copy of your original image. This safeguards your high-resolution, untouched file in case you’re not happy with the resized version or need the original for other purposes. To do this, right-click the image file, select “Copy,” then right-click an empty area on your desktop or in a folder and select “Paste.” You’ll now have a duplicate to work on.
-
Open Paint: Navigate to and launch the Paint application on your Windows computer. In most Windows versions, you can find it by typing “Paint” into the Start menu search bar or by going to “Start > All Programs > Accessories > Paint” (the path may vary slightly by Windows version).
-
Open the Image in Paint: Once Paint is open, click the “File” tab (or the Paint button in older versions, usually a blue icon in the top-left corner), then select “Open.” Browse your computer to locate the copy of the image you wish to resize, select it, and click “Open.” The image will appear in the Paint workspace. Near the bottom of the Paint window, you might notice the image’s current pixel dimensions displayed, giving you a reference point.
-
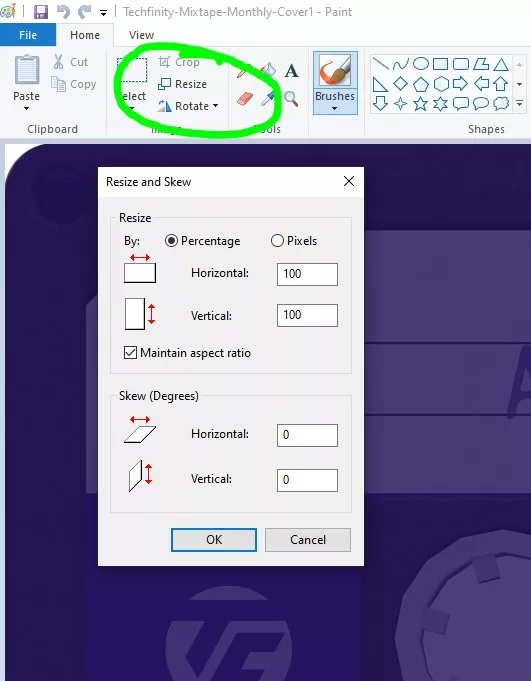
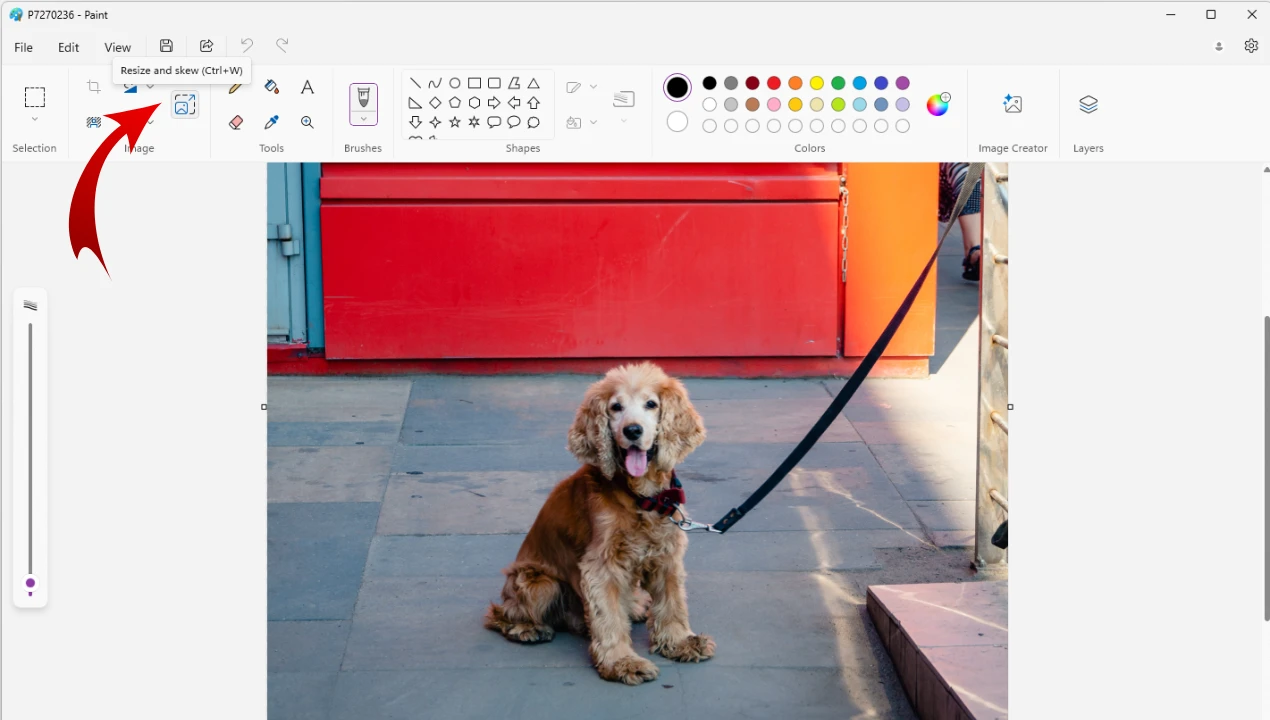
Initiate the Resize Function: On the “Home” tab of the Paint ribbon, locate the “Image” section. Here, you’ll find the “Resize” icon, which typically looks like a small square or a rectangle with arrows. Click this icon to open the “Resize and Skew” dialog box.
-
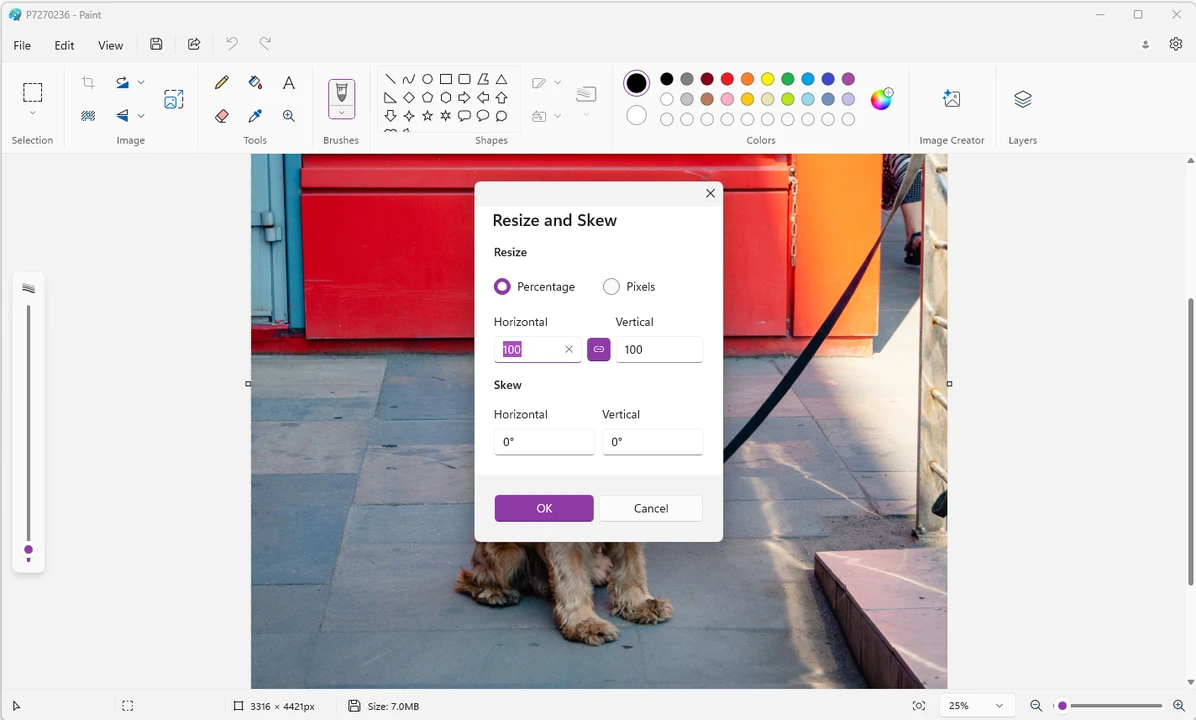
Choose Your Resizing Units: Within the “Resize and Skew” dialog box, you have two primary options for specifying new dimensions:
- Percentage: This is often the easiest method for quick adjustments. If you want to make an image half its size, you’d enter “50” in the percentage fields. To enlarge it slightly, you might enter “120.”
- Pixels: If you have an exact target dimension in mind (e.g., 1920x1080 for a desktop wallpaper or specific sizes for online registrations), select “Pixels” and enter the precise width and/or height.
-
Maintain Aspect Ratio (Highly Recommended): Beneath the percentage and pixel options, you’ll see a checkbox labeled “Maintain aspect ratio.” It is highly recommended to ensure this box is checked. When checked, changing either the “Horizontal” or “Vertical” value will automatically adjust the other dimension proportionally, preventing your image from becoming stretched or squashed. If you uncheck this box, you’ll be able to enter independent values for width and height, but this almost always leads to image distortion unless you are very precise and know the exact new proportional values.
-
Input New Dimensions: Based on your chosen unit (percentage or pixels) and with “Maintain aspect ratio” checked, enter your desired value into either the “Horizontal” or “Vertical” text box. The other field will automatically update. If you need a specific pixel width, enter it into the “Horizontal” box; if a specific pixel height, use the “Vertical” box. For instance, to reduce a large photo to 75% of its original size, you would type “75” into the “Horizontal” percentage box.
-
Apply Changes: Once you’ve entered the new dimensions, click “OK.” Paint will immediately apply the changes to your image.
-
Save the Resized Image: To save your resized image, click the “File” tab again (or the Paint button), then select “Save as.” You’ll be prompted to choose a file format. For most photos and web use, “JPEG” is recommended due to its good balance of image quality and smaller file size, making it ideal for sharing and uploading. Enter a short, descriptive name for your new file (preferably with no spaces, using hyphens or underscores instead for web compatibility), choose your desired save location, and click “Save.” Your image is now ready for use.
Precision Cropping for Enhanced Visual Composition
Beyond simple resizing, cropping is another essential image manipulation technique available in Paint. Cropping allows you to remove unwanted outer portions of an image, focusing on a specific subject, adjusting the composition, or fitting the image into a particular aspect ratio without distorting its content. It’s an excellent way to refine a high-resolution photograph or adapt a digital art piece for various layouts.
-
Open Your Image in Paint: Similar to resizing, start by opening your copied image in Microsoft Paint.
-
Select the Cropping Tool: On the “Home” tab, within the “Image” section, click the small arrow beneath the “Select” button. This will reveal a dropdown menu.
-
Choose Your Selection Method: You’ll typically want to choose “Rectangular selection” for most cropping tasks. This allows you to drag a perfect rectangle over the area you want to keep. If you need to make an irregular selection, “Free-form selection” is also available, though less common for standard cropping.
-
Drag and Select the Desired Area: With the selection tool active, click and drag your mouse over the part of the image you wish to retain. As you drag, a rectangular dotted line will appear, outlining your selection. Everything inside this dotted line will be kept, and everything outside will be removed. If you make a mistake, simply click anywhere outside the selected area to deselect and start over. For example, if you’re removing an unwanted border from a photograph, you would drag from the top-left corner diagonally to the bottom-right, just inside the border.
-
Perform the Crop: Once your selection is precisely how you want it, click the “Crop” button in the “Image” section of the Home tab (it’s usually located to the right of the “Select” button). Paint will instantly remove all content outside your selection, leaving only the area you highlighted.
-
Save Your Cropped Image: Go to “File > Save as” and choose your preferred format (JPEG for photos, PNG for transparency). Give your new cropped image a descriptive filename and save it. This method helps reduce file size and refine the visual composition without altering the quality of the remaining portion.
Understanding Aspect Ratios and Image Quality Considerations
A critical concept in both resizing and cropping is the aspect ratio, which defines the proportional relationship between an image’s width and height. Common aspect ratios include 16:9 (widescreen), 4:3 (traditional display), and 1:1 (square, popular for social media). Maintaining the aspect ratio ensures your image doesn’t look stretched or compressed. Paint’s “Maintain aspect ratio” checkbox is your best friend for preserving this during resizing. When cropping, you might intentionally change the aspect ratio to fit a specific frame (e.g., cropping a panoramic shot to a square for an avatar).
Regarding image quality, Paint’s capabilities have inherent limitations. While reducing an image’s size generally maintains or improves perceived quality (as there are fewer pixels to display, making individual imperfections less noticeable), enlarging an image in Paint almost invariably reduces its quality. Since Paint operates with raster graphics (pixel-based images), stretching it beyond its original pixel count forces the software to guess what new pixels should look like, leading to blurriness and pixelation. This is a significant difference from vector graphics (which scale without loss) or advanced “AI Upscalers” that use complex algorithms to intelligently add detail when enlarging.
Choosing the correct file format also impacts quality and file size. JPEG (Joint Photographic Experts Group) is widely used for photographs because it employs “lossy” compression, meaning it sacrifices some data to achieve significantly smaller file sizes. This makes it ideal for web images, wallpapers, and backgrounds where rapid loading is crucial. PNG (Portable Network Graphics) uses “lossless” compression and supports transparency, making it suitable for logos, graphics, and digital art where sharp edges and transparent backgrounds are needed. BMP (Bitmap) offers uncompressed, high-quality images but results in very large file sizes, making it impractical for web use. Understanding these nuances helps optimize your visual content for its intended use, balancing quality with performance.
Beyond Basic Resizing: Advanced Tools and Techniques for Modern Photography and Design
While Microsoft Paint is a fantastic entry-level tool for quick image resizing and cropping, the demands of contemporary digital photography, visual design, and online content often necessitate more advanced capabilities. From handling high-resolution images to implementing complex editing styles, understanding when to graduate from Paint to more sophisticated tools is key for any aspiring or professional digital creator.
When to Opt for Professional Software and Online Tools
Paint’s simplicity is its strength, but also its limitation. For tasks beyond basic “shrink or crop,” other tools offer greater control, better quality, and expanded functionality.
-
Batch Resizing: One of Paint’s most significant drawbacks is its inability to process multiple images simultaneously. If you have dozens or hundreds of pictures to resize—perhaps a collection of nature photography from a recent trip, or numerous stock photos for a website update—opening and saving each one individually in Paint would be incredibly tedious. This is where batch image resizers come into play. Online platforms like Media.io’s Online UniConverter or dedicated desktop software (like the one mentioned by Ivertech) allow you to specify dimensions or percentages and apply them to an entire folder of images in a single operation. These tools are often equipped with intelligent features that maintain aspect ratios even when target pixels aren’t perfectly proportional, preventing distortion and saving countless hours. They are indispensable for managing large image collections, creating thematic collections, or preparing assets for content management systems.
-
Advanced Editing and Photo Manipulation: For serious digital photography, intricate photo manipulation, or developing unique editing styles, professional software like Adobe Photoshop is the industry standard. These programs offer granular control over color, exposure, layers, filters, and complex selections, far exceeding Paint’s capabilities. They are essential for transforming raw high-resolution images into polished digital art, creating sophisticated graphic design layouts, and realizing elaborate creative ideas that require precise adjustments and non-destructive editing workflows.
-
Quality Enlargement (AI Upscalers): As discussed, enlarging images in Paint drastically reduces quality. When you need to increase the size of an image without introducing pixelation, AI Upscalers are revolutionary. These advanced “Image Tools” use artificial intelligence algorithms to intelligently add new pixels, synthesizing detail and texture to create larger versions of images that retain, or even appear to enhance, original quality. This is particularly valuable for small aesthetic images, low-resolution vintage photos, or when repurposing images for larger display formats where high resolution is paramount.
-
Compression and Optimization: While Paint saves images in common formats, it lacks advanced control over compression levels. Dedicated compressors and optimizers (often part of a broader suite of “Image Tools”) allow you to fine-tune the balance between file size and visual quality. This is crucial for web performance, ensuring images load quickly without appearing overly degraded. These tools can perform various optimizations, such as removing metadata, applying smarter encoding, and converting to next-gen formats like WebP, leading to significantly smaller files than what Paint can achieve, especially beneficial for dynamic visual design projects and extensive image collections.
Integrating Resizing into Your Creative Workflow
Resizing isn’t just a technical task; it’s an integral part of the creative workflow for anyone involved in visual content creation. For graphic designers, artists, and photographers, it’s a fundamental step that ensures their work translates effectively across different mediums and platforms.
In digital art and graphic design, resizing elements is a constant activity. Whether it’s fitting a logo onto a banner, creating composite images from various sources, or designing user interface (UI) elements, precise dimension control is paramount. The ability to seamlessly integrate and scale visual assets ensures coherence and professional polish. Understanding resizing capabilities helps designers anticipate how their creative ideas will appear on different screens and print sizes, making photo manipulation and layout design more efficient.
For visual storytelling, adapting photography—be it evocative sad/emotional imagery or breathtaking nature scenes—for various platforms requires careful consideration of resizing. A powerful image meant for a large print might need to be strategically cropped and scaled for a social media post, ensuring its core message or emotional impact is preserved despite the smaller canvas.
Even in photo management, proper resizing practices streamline workflow. Maintaining high-resolution originals for archival purposes while creating appropriately sized derivatives for web galleries, client presentations, or mood boards is a strategic approach. This systematic management of image assets, particularly for stock photos and extensive digital photography portfolios, enhances efficiency and ensures that the right image is always available at the right size. Resizing, therefore, acts as a bridge between the artistic vision and its practical application across the digital landscape.
Optimizing Your Visual Content for Web and Print
The ultimate goal of resizing and optimizing images, whether for a beautiful photography portfolio or a functional e-commerce site, is to ensure your visual content looks its best and performs efficiently wherever it is displayed. This dual objective requires an understanding of the distinct requirements of web and print media, and how various image tools and visual design principles come into play.
Practical Applications Across Digital Platforms and Visual Design Projects
Creating web-ready images is a cornerstone of modern digital presence. For websites, blogs, and social media, the mantra is “fast and fabulous.” This means images should have optimal dimensions (not excessively large), be saved in efficient formats (like JPEG for photos, PNG for graphics with transparency, or newer formats like WebP), and be appropriately compressed. For example, a hero image for a website (like a stunning nature wallpaper or an abstract background) needs to fill a large area but load quickly. This often involves reducing a high-resolution original down to a web-friendly width (e.g., 1920px) and a carefully chosen quality setting during compression, ensuring visual appeal without bogging down page load times. For profile pictures or smaller elements, even smaller dimensions (e.g., 200x200px or 500x500px) are ideal, tailored to specific platform guidelines.
Conversely, print-ready images demand a different approach. While web images thrive on lower resolutions (typically 72-150 DPI), print requires significantly higher detail, usually 300 DPI (dots per inch) or more, to avoid pixelation when viewed up close. A beautiful photograph intended for a physical album or a large poster must have sufficient pixel dimensions to achieve this high DPI at the desired print size. Attempting to print a low-resolution, web-optimized image will result in a blurry, pixelated output. Graphic designers preparing brochures, magazines, or digital art for print must ensure their source images meet these stringent resolution requirements, often working with much larger file sizes initially and using tools capable of precise color management and lossless compression if applicable.
Beyond technical specifications, proper resizing and optimization are pivotal for image inspiration and collections. When curating mood boards, creating thematic collections, or aligning with trending styles, consistency in presentation is key. Resizing images to a uniform grid or specific display sizes ensures that your collection appears cohesive and professional, whether it’s a series of aesthetic travel photos or a portfolio of sad/emotional imagery. This attention to detail in visual design enhances the overall impact of your curated content, transforming disparate photo ideas into a harmonious and compelling visual narrative.
Finally, integrating resizing into broader creative ideas and digital art workflows empowers artists and designers to experiment more freely. Knowing how to adapt a digital painting for various outputs—from a small web thumbnail to a large canvas print—provides creative flexibility. It ensures that the integrity of the artwork is maintained across different scales and mediums, allowing the artist’s vision to be effectively communicated without technical impediments. Whether creating intricate photo manipulations or designing abstract patterns, the mastery of image dimensions is a foundational skill that unlocks greater creative potential.
In conclusion, while Microsoft Paint serves as an accessible entry point for fundamental image resizing and cropping, its role is often an introduction to a much broader and more sophisticated world of image optimization. From ensuring fast-loading web pages with compressed images to preparing high-resolution photography for stunning print outputs, the principles of correct sizing, aspect ratio management, and quality control are universally critical. As your needs evolve from simple adjustments to complex visual design projects, embracing advanced image tools, AI upscalers, and a comprehensive understanding of digital asset management will empower you to create, curate, and share compelling visual content that captivates and performs across all digital and physical canvases.