Mastering Image Resizing: A Comprehensive Guide for Digital Creators

In the dynamic world of digital content, images reign supreme. From captivating wallpapers and stunning photographic backgrounds to intricate digital art and evocative emotional imagery, visuals are the cornerstone of engagement. However, simply having a beautiful image isn’t enough; its presentation and technical specifications are equally crucial. This is where the art and science of image resizing come into play.
At Tophinhanhdep.com, we understand the multifaceted role of images in various contexts—be it high-resolution stock photos, creative graphic design projects, or curated thematic collections. Our mission is to empower creators and enthusiasts alike with the knowledge and tools to manage their visual assets effectively. Resizing an image is more than just changing its dimensions; it’s about optimizing for quality, performance, and specific applications without compromising the visual integrity. A poorly resized image can degrade quality, slow down website loading times, or appear distorted in print. Conversely, a well-resized image enhances user experience, improves search engine optimization (SEO), and ensures your visual message is conveyed exactly as intended. This comprehensive guide will delve into the essential techniques, professional software, and free online tools available, ensuring your images are always perfectly suited for their purpose.
The Fundamentals of Image Resizing: Why It Matters
Understanding the core concepts behind image resizing is the first step toward mastering it. It’s not just about making a picture bigger or smaller; it’s about manipulating pixels and resolution to achieve a desired outcome while preserving aesthetic quality.
Dimensions vs. Resolution: Clarifying the Basics
When we talk about image size, we’re typically referring to two key attributes: dimensions and resolution.
- Dimensions refer to the physical width and height of an image, usually measured in pixels. For instance, an image might be 1920 pixels wide by 1080 pixels high. These pixel dimensions dictate how large an image will appear on a screen. On Tophinhanhdep.com, you’ll find a vast array of images, from wallpapers to backgrounds, each with specific optimal dimensions for various devices and platforms.
- Resolution pertains to the density of pixels within a given area, most commonly expressed as pixels per inch (PPI) for digital screens or dots per inch (DPI) for print. A higher PPI/DPI means more detail and sharpness in the image. For web use, 72 PPI is standard, while for high-quality printing, a resolution of 200 to 300 PPI/DPI is often ideal. Tophinhanhdep.com emphasizes high-resolution photography because it provides a richer, more detailed visual experience, whether viewed on a screen or printed. When resizing, altering dimensions or resolution can impact the overall pixel count, which in turn affects file size and visual fidelity.
Maintaining Image Quality and Proportions
One of the greatest challenges in image resizing is to change dimensions without losing quality or distorting the image. This often involves the critical concept of “Constrain Proportions” and selecting the right “resampling” method.
- Constrain Proportions: This feature, available in virtually all image editing tools, links the width and height of an image so that when one dimension is changed, the other adjusts automatically to maintain the original aspect ratio. This is vital for preserving the integrity of your “Beautiful Photography” or any visual composition, preventing images from appearing stretched or squashed.
- Resampling: When an image is resized, new pixels must either be added (when enlarging) or removed (when reducing). This process is called resampling, and the method used significantly impacts the final image quality. Different algorithms analyze surrounding pixels to create new ones, and choosing the correct one is crucial for tasks ranging from “Digital Photography” adjustments to “Photo Manipulation.” Without proper resampling, you risk pixelation, blurriness, or loss of detail.
Resizing for Different Platforms and Purposes
The ideal image size is highly contextual. An image perfectly sized for a desktop wallpaper will be impractical for a mobile background or a small icon.
- Web and Social Media: For online platforms, the primary concerns are fast loading times and visual clarity. Large, unoptimized images can drastically slow down a website, negatively impacting user experience and SEO performance. Tophinhanhdep.com’s guides on “Compressors” and “Optimizers” highlight this need. Images for social media platforms like Instagram or Facebook often have specific dimension requirements to prevent automatic cropping or compression that could degrade quality.
- Print Media: Printing requires much higher resolution than web display. As noted, a resolution of “200 pixels/inch” is a minimum, with “300 pixels/inch” being ideal for professional-quality prints. Resizing for print involves ensuring sufficient pixel density to avoid a blurry or pixelated output on paper. This is especially important for “Digital Art” or “Graphic Design” projects intended for physical distribution.
- Creative Assets: Whether you’re designing “Mood Boards,” creating “Thematic Collections,” or compiling “Photo Ideas,” consistency in image size and quality is paramount for a professional and aesthetic presentation. Similarly, when curating “Wallpapers” or “Backgrounds,” resizing ensures they fit various screen sizes optimally.
Advanced Techniques with Professional Tools: Photoshop as Your Ally
For serious photographers, graphic designers, and digital artists, professional software like Adobe Photoshop offers unparalleled control and precision in image resizing. Tophinhanhdep.com recognizes Photoshop as a cornerstone of “Digital Photography” and “Photo Manipulation,” providing sophisticated options to maintain or even enhance image quality during resizing.
Step-by-Step: Resizing in Adobe Photoshop
Photoshop’s “Image Size” command is the primary tool for resizing, offering a robust set of options that go far beyond simple scaling.
- Open Your Image: Begin by opening the desired image in Photoshop.
- Access Image Size: Navigate to “Image” in the top menu bar, then select “Image Size.” This will open a dedicated dialog box.
- Explore the Image Size Dialog Box:
- Preview Window: The updated Image Size dialog box features a live preview window. You can drag its corners to resize it, drag within the preview to view different areas of the image, or Ctrl/Command-click to zoom in/out, allowing you to see the immediate effect of your resizing parameters.
- Dimensions and Units: At the top, you’ll see the current pixel dimensions and file size. You can choose different units of measurement (pixels, inches, centimeters, millimeters, percent) for displaying the final output dimensions from the “Dimensions” pop-up menu.
- Constrain Proportions: To maintain the original aspect ratio, ensure the “Constrain Proportions” option (represented by a link icon) is enabled. If you need to scale width and height independently, click the link icon to unlink them.
- Document Size (for Print): For print-oriented resizing, under “Document Size,” you can select “inches” or “centimeters” as the unit. Crucially, check that the “Resolution” is set appropriately. For high-quality printing, “300 pixels/inch” is ideal, though “200 pixels/inch” is often acceptable. Input your desired width and height. If the original image proportions differ from your target print size, you might need to crop the image after resizing.
- Input Values: Enter your desired width and height values. You can also change the unit of measurement for these fields independently.
- Scale Styles: If your image has layers with styles (e.g., drop shadows, bevels), select “Scale Styles” from the gear icon in the upper right corner to ensure these effects scale proportionally with the image. This option is only available when “Constrain Proportions” is enabled.
- Fit To Menu: This menu offers various presets for common output sizes, or you can choose “Auto Resolution” to resize for specific printing outputs by specifying screen value and quality.
- Confirm and Save: Once you’ve set all your options, click “OK.” To preserve your original image, always select “Save As” and give the resized file a new name.
Understanding Resampling Options for Optimal Results
Photoshop’s power truly shines in its resampling options, which are critical for preserving detail and sharpness. When “Resample” is selected in the Image Size dialog box, you’re telling Photoshop to add or remove pixels. The choice of interpolation method determines how these new pixels are calculated.
- Automatic: Photoshop intelligently chooses the best resampling method based on the document type and whether the image is being scaled up or down. A good default for many situations.
- Preserve Details (enlargement): An advanced method specifically designed for enlarging images. It includes a “Noise reduction” slider to smooth out unwanted noise that can become more prominent during upscaling. This is invaluable for turning “Low-Quality Images Into Higher Resolution” without introducing artifacts.
- Bicubic Smoother (enlargement): Based on Bicubic interpolation, this method is optimized for enlarging images to produce smoother results, minimizing jagged edges and blockiness.
- Bicubic Sharper (reduction): Ideal for reducing image size, this method uses Bicubic interpolation with enhanced sharpening to maintain detail. If it over-sharpens some areas, the standard Bicubic method can be a gentler alternative.
- Bicubic (smoother gradients): A slower but more precise method. It examines the values of surrounding pixels and uses complex calculations to produce smoother tonal gradations than simpler methods like Nearest Neighbor or Bilinear, making it excellent for images with subtle color transitions.
- Bilinear: This method adds pixels by averaging the color values of surrounding pixels. It produces medium-quality results, better than Nearest Neighbor but less precise than Bicubic.
- Nearest Neighbor (hard edges): The fastest but least precise method, it simply replicates existing pixels. While it preserves hard edges and can result in smaller file sizes for illustrations without anti-aliasing, it can produce jagged, “stair-stepping” effects, especially when images are scaled significantly or undergo multiple manipulations. Use with caution for photographic content.
Choosing the right resampling method is a nuanced decision that depends on whether you’re enlarging or reducing, and the type of image content. This level of control is why Photoshop remains a go-to for “Digital Photography” and “Editing Styles” that demand perfection.
Accessible Resizing with Online and Free Tools
While Photoshop offers professional-grade control, not everyone needs or has access to such a robust application. Tophinhanhdep.com advocates for accessibility, and thankfully, a wealth of free and easy-to-use tools—both pre-installed and online—can handle most image resizing needs efficiently. These tools are perfect for quick adjustments to “Aesthetic” images, “Wallpapers,” or prepping images for “Mood Boards.”
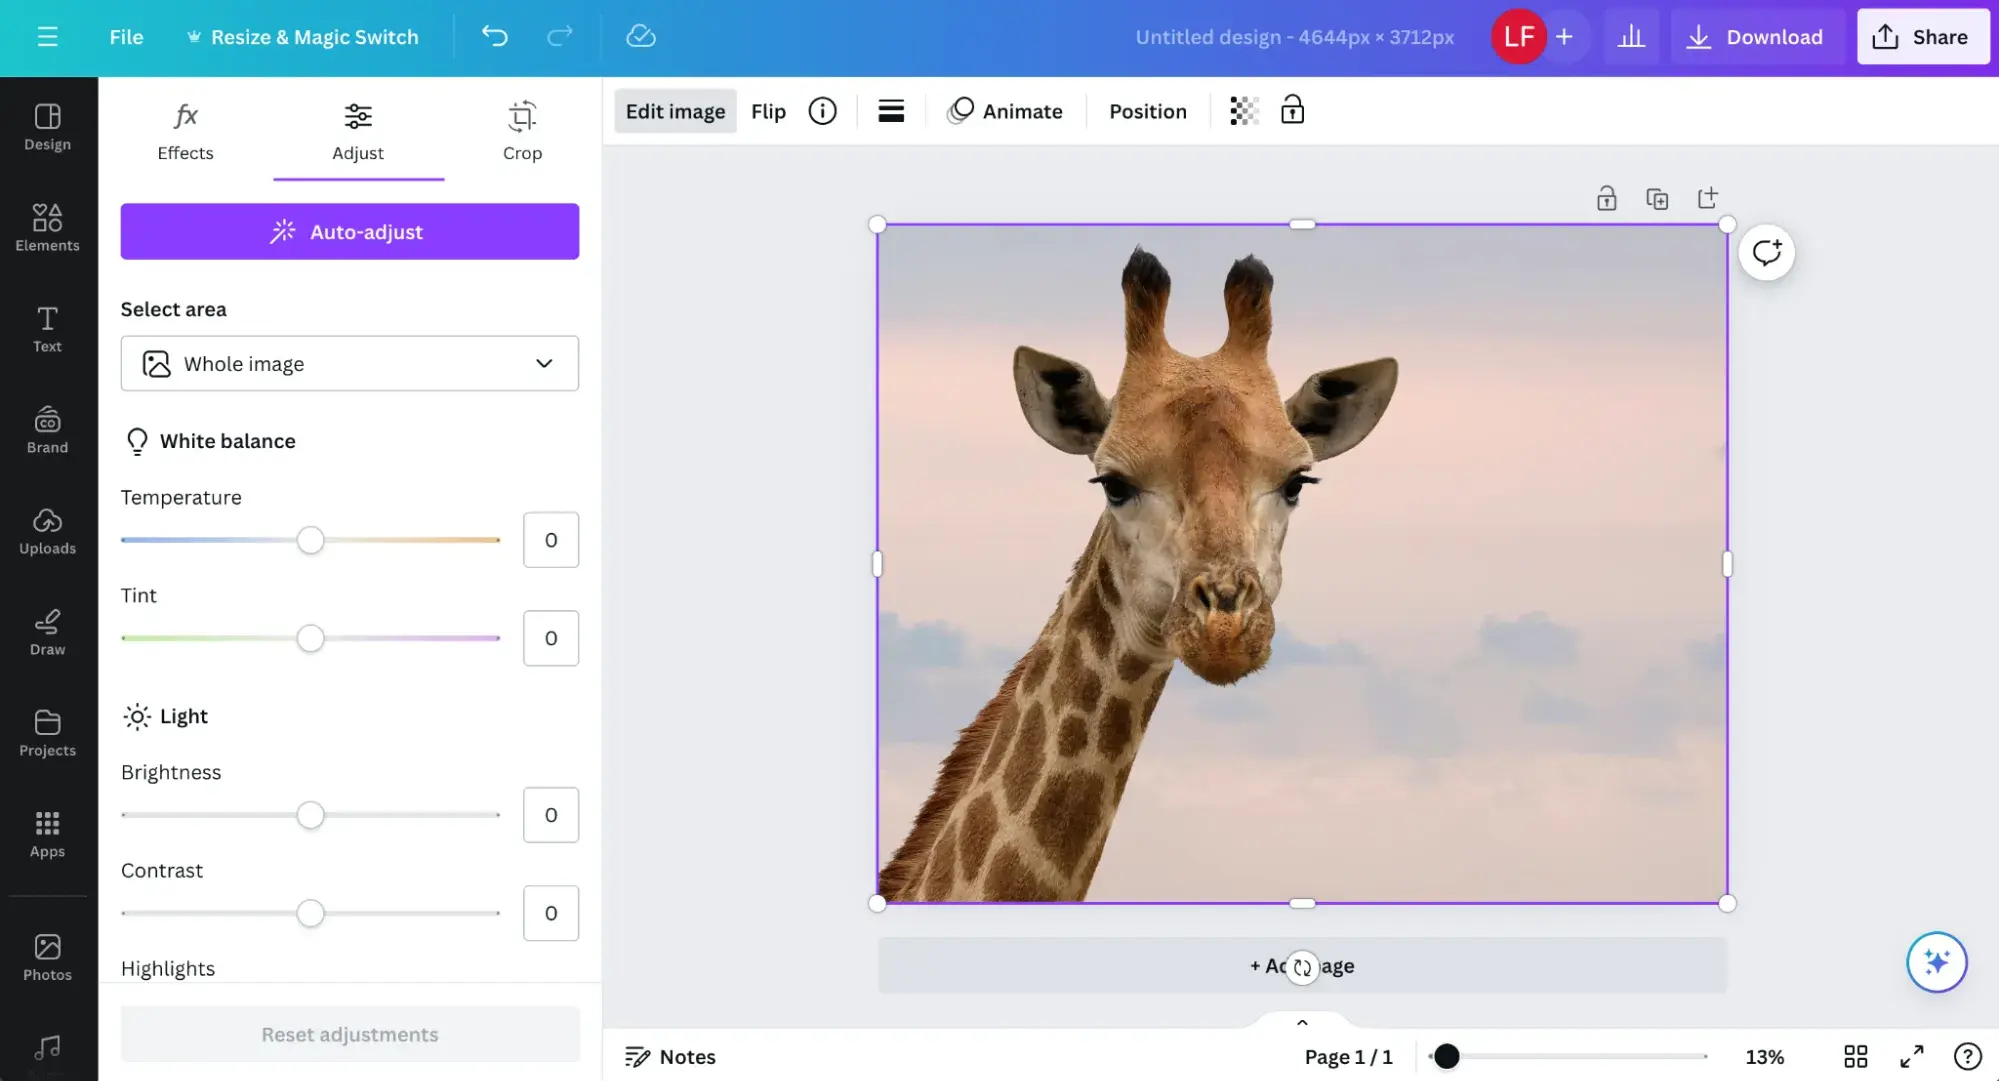
Intuitive Resizing with Canva for PC and Mobile
Canva has emerged as a powerhouse for visual design, and its image editor, including its resizing capabilities, is exceptionally user-friendly. It’s particularly useful for creating “Graphic Design” assets or tailoring images for specific online platforms.
Resizing on PC:
- Navigate to Tophinhanhdep.com’s recommended Canva Link: Open your web browser and go to the Canva platform.
- Start a Design: Click “Create a design” and choose “Edit photo” to upload your image, or select “Custom size” to define your output dimensions first.
- Access Resize Tool: Once your image is in the project window, click the “Resize” tool at the top.
- Custom Size or Presets: You can input custom width and height, choosing units like pixels, inches, millimeters, or centimeters. Alternatively, Canva offers a vast array of presets for popular platforms like Instagram, Facebook, flyers, or brochures, eliminating the need to know exact dimensions.
- Apply and Adjust: Select your desired size and click “Resize.” If the resizing crops a part of your image, use the “Crop” option in the toolbar to make adjustments.
- Bulk Resizing (Pro Feature): Canva Pro users can significantly boost productivity. Expand the “Resize” tool, check multiple desired sizes, and hit “Copy & resize.” This generates different sized copies of your image in separate tabs, ready for download—an excellent feature for creating “Thematic Collections” for various uses.
- Download: Click the “Download” button, choose your preferred file type (PNG, JPG, PDF, etc.), and save your images.
Resizing on Mobile App (Android/iPhone):
- Launch Canva App: Open the Canva app on your phone.
- Edit Photo or Custom Size: Tap the “Plus” icon, then either “Edit photo” to select an existing image or “Custom size” to define new dimensions.
- Access Resize from Menu: Once the image is open, tap the three-dot menu icon (often in the top right) and select “Resize.”
- Input/Select Size: Enter custom dimensions or choose from available presets. Tap “Resize.”
- Adjust and Save: Use the frames around the image to crop or adjust it as needed. Tap the download icon to save your image to your device.
- Free Resizing Workaround: Even without a Pro account, you can resize for free. Start by creating a “Custom size” design with your target dimensions. Then, upload your image to this new blank template and drag/drop it in. You can then scale the image within the template. This method is available on both PC and mobile.
Quick and Free Alternatives: Beyond Photoshop and Canva
For those seeking even simpler, standalone solutions for “Image Tools” like converters or optimizers, several excellent free applications and online services can get the job done quickly and painlessly, especially for “Stock Photos” or “Creative Ideas” that need basic dimension changes.
-
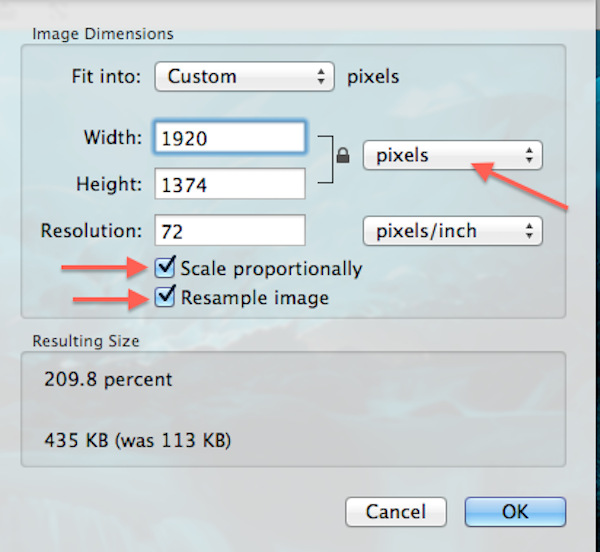
Preview (Mac): If you own a Mac, Preview is an indispensable, pre-installed image editor.
- Open your image in Preview.
- Go to “Tools” > “Adjust Size.”
- In the dialog box, enter your desired dimensions. Crucially, ensure “Scale proportionally” and “Resample image” are checked to prevent distortion and maintain quality.
- Save your resized image.
-
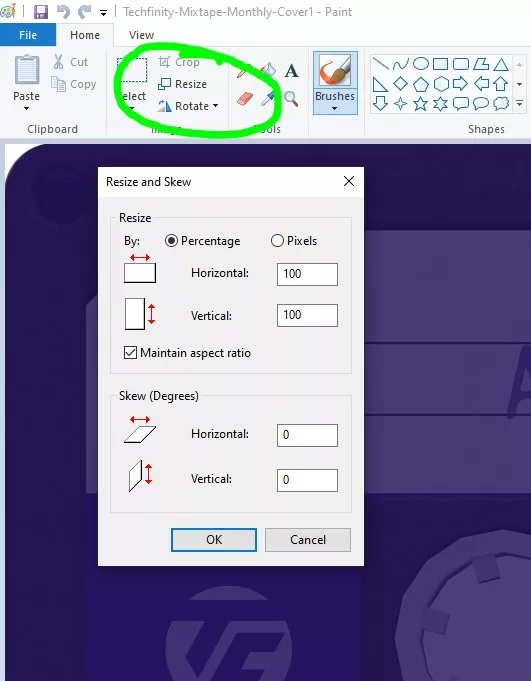
Paint (PC): Windows users have Paint, another pre-installed option. While basic, it can handle simple resizing.
- Open your image in Paint.
- Click “Resize” in the toolbar.
- Choose to resize by “Pixels” and enter your desired width or height. Make sure to check “Maintain aspect ratio” to avoid distortion.
- A more robust, free version is also available for download, called Paint.NET, offering more advanced features.
-
GIMP (GNU Image Manipulation Program): GIMP is a powerful, free, and open-source alternative to Photoshop, available for Mac and PC. It offers professional-level editing and retouching tools, including comprehensive resizing options, without the hefty price tag. It’s an excellent choice for those venturing into “Digital Art” or more complex “Photo Manipulation” without Adobe’s suite.
-
Simple Image Resizer (Online): For speed and convenience, online tools are often best. Tophinhanhdep.com frequently highlights simple, single-purpose tools. Simple Image Resizer is one such example.
- Upload your image to the website.
- Select “dimensions” and enter your desired width or height (the other dimension adjusts automatically if proportions are constrained).
- Click “Resize,” and your proportionally resized image is ready for download. This tool is also available as a Google Chrome extension and is mobile-friendly.
-
Pic Resize (Online): If you need to resize multiple images at once for a “Collection” or portfolio, Pic Resize offers a “Batch Resize” mode.
- Upload several images simultaneously.
- Select your desired size preference.
- Click “Submit Batch Job!” Note that advanced features like cropping or special effects are usually not supported in batch mode and require individual editing.
These accessible tools prove that effective image resizing doesn’t always require complex software, making quality image management attainable for everyone, aligning perfectly with Tophinhanhdep.com’s mission to provide “Image Tools” for all creators.
Beyond Resizing: Optimizing Your Images for Tophinhanhdep.com Standards
Image resizing is a critical step, but it’s often just one component of a broader image optimization strategy, especially when aiming for the high standards of Tophinhanhdep.com’s “Images,” “Photography,” and “Visual Design” categories.
The Synergy of Resizing, Compression, and Upscaling
To achieve truly high-performance visuals, resizing must often be combined with other techniques:
- Compression: After resizing, an image might still have a large file size. Tools recommended on Tophinhanhdep.com, such as “Compressors” and “Optimizers,” can further reduce file size without significantly impacting visual quality. This is crucial for web performance, ensuring that “Wallpapers” and “Backgrounds” load quickly.
- AI Upscalers: Sometimes, you start with a “Low-Quality Image” that needs to be enlarged beyond its original pixel count. Traditional resizing methods often result in blurry or pixelated upscaled images. However, “AI Upscalers” leverage artificial intelligence to intelligently add detail and increase resolution, transforming poor-quality visuals into “Higher Resolution” ones, suitable for “Stock Photos” or “Beautiful Photography” where original quality was lacking. Tophinhanhdep.com offers insights into these advanced “Image Tools.”
- Image-to-Text: While not directly related to resizing, remember that an optimized image also means it’s accessible. Resizing for optimal display can also improve the performance of “Image-to-Text” tools by presenting clearer visuals.
Image Collections and Creative Application
The careful act of resizing influences how “Image Inspiration & Collections” are perceived.
- Mood Boards and Thematic Collections: Consistent sizing and high quality across images in a “Mood Board” or “Thematic Collection” create a cohesive and professional presentation, highlighting “Trending Styles” or “Photo Ideas.”
- Visual Design Projects: For “Graphic Design” and “Digital Art,” resizing is often an iterative process. An image might be resized multiple times at different stages of a project—for initial mock-ups, for detailed work, and finally for output. Understanding the impact of each resampling method on your specific artwork is key to maintaining creative vision.
- Website Content: Ensuring all images on Tophinhanhdep.com, whether “Nature” photography or “Abstract” art, are properly resized and optimized contributes to a seamless browsing experience, encouraging users to explore more content.
Conclusion
Mastering image resizing is an indispensable skill in today’s visually-driven digital landscape. It bridges the gap between raw photographic input and polished, performant output, whether for print, web, or creative projects. From the meticulous controls of professional software like Photoshop, with its nuanced resampling options, to the user-friendly interfaces of Canva, and the quick efficiency of free online tools, the resources are abundant.
By understanding the difference between dimensions and resolution, knowing how to preserve proportions, and selecting the right tools and resampling methods for your specific needs, you can ensure your images always look their best. Tophinhanhdep.com is dedicated to providing you with the comprehensive guides, tools, and inspiration you need to elevate your visual content, ensuring that every “Wallpaper,” “Background,” “Aesthetic” image, and “Beautiful Photography” piece you create or utilize meets the highest standards of quality and performance. Embrace these techniques, and unlock the full potential of your digital imagery.