How to Resize Images in Canva: A Comprehensive Guide for Stunning Visuals on Tophinhanhdep.com

In today’s visually-driven world, images are the cornerstone of effective communication, whether you’re crafting a captivating social media post, designing a professional presentation, or building an engaging website. As a premier destination for high-quality visuals and powerful image tools, Tophinhanhdep.com understands the critical role that properly sized images play in achieving aesthetic appeal and optimal performance. One of the most common tasks in digital design is resizing images, and Canva, with its intuitive interface, has become an indispensable tool for millions. However, knowing how to efficiently resize an image in Canva, especially considering its Pro features versus its free options, can be a game-changer for your workflow.

This comprehensive guide, brought to you by Tophinhanhdep.com, will walk you through every method of resizing images in Canva, from the swift one-click solutions for Pro users to the clever workarounds available for free accounts. We’ll also explore how Tophinhanhdep.com’s own suite of image tools can complement your Canva experience, providing advanced functionalities like AI upscaling, compression, and precise cropping, ensuring your visuals consistently meet the highest standards of “High Resolution” and “Beautiful Photography.”
Understanding Why Image Resizing is Crucial for Your Visuals
Before diving into the “how-to,” it’s essential to grasp the “why.” Image resizing isn’t just about making a picture fit a space; it’s about optimizing your visual content for various applications, ensuring quality, and enhancing user experience. At Tophinhanhdep.com, we advocate for thoughtful image preparation, recognizing its impact on your overall “Visual Design” strategy.
Maintaining Image Quality and Avoiding Compression
One of the primary reasons to meticulously resize your images is to preserve their quality. When an image is uploaded to a platform without meeting its specific size requirements, the platform’s algorithms often automatically compress or resize it. This automated process, while convenient, frequently leads to a degradation in image quality – blurriness, pixelation, or a loss of detail. For creators who value “Beautiful Photography,” “Nature,” or “Abstract” images, this quality loss is unacceptable. By proactively resizing your images to the recommended dimensions using tools like Canva or Tophinhanhdep.com’s specialized apps, you maintain control over the final output, ensuring your “High Resolution” photos remain crisp and vibrant. This careful preparation is a hallmark of excellent “Digital Photography” and professional “Editing Styles.”
Optimizing for Diverse Platforms and Purposes
The digital landscape is a mosaic of different platforms, each with its own set of optimal image dimensions. An image perfectly suited for an Instagram square post (1080x1080 pixels) will look distorted or be cropped awkwardly as a Facebook cover photo (820x312 pixels) or a website banner. From “Wallpapers” and “Backgrounds” to marketing materials and presentations, every visual asset has a context that dictates its ideal size. Effectively resizing your images ensures they display correctly, capture attention, and convey your message as intended across all mediums. This alignment with platform specifications is a core principle of effective “Graphic Design” and “Photo Manipulation,” allowing your “Creative Ideas” to shine without technical impediments. Tophinhanhdep.com offers “Thematic Collections” and “Trending Styles” that can provide inspiration, but proper sizing is key to their successful implementation.
Enhancing User Experience and Load Times
Beyond aesthetics, image size directly impacts website performance and user experience. Large, unoptimized images can significantly slow down page load times, leading to higher bounce rates and a frustrating experience for your audience. For websites featuring extensive “Stock Photos” or “Digital Photography,” this is a critical concern. Resizing images to appropriate dimensions, often coupled with compression, reduces file sizes without compromising visual integrity. This optimization ensures that your visuals load quickly, providing a seamless browsing experience. Tophinhanhdep.com’s commitment to “Image Tools” like compressors and optimizers directly addresses this need, helping you deliver visually rich content without sacrificing speed or efficiency.
Mastering Image Resizing in Canva: Pro and Free Methods
Canva offers both straightforward and more involved methods for resizing images, catering to users with different needs and budgets. Understanding these approaches is key to leveraging Canva’s full potential for your “Visual Design” projects.
Method 1: The One-Click Resize with Canva Pro (The Tophinhanhdep.com Recommended Workflow)
For those serious about design efficiency and speed, Canva Pro’s one-click resize feature is an invaluable asset. Tophinhanhdep.com highly recommends this functionality for professionals and businesses who frequently create diverse visual content.
How to Use One-Click Resize:
- Access the Feature: Once logged into your Canva Pro account and with your design open, locate the “Resize” button in the top menu bar (typically between “File” and “Undo”).
- Custom Dimensions: Click “Resize.” A dropdown menu will appear. If you have precise dimensions in mind, select “Custom size.” You can then input the desired width and height, choosing your preferred unit of measurement: pixels, inches, millimeters, or centimeters. For instance, if you’re adapting an existing “Aesthetic” image for a poster, you can set it as the background and then input your custom poster dimensions.
- Preset Sizes for Platforms: Canva Pro excels at offering ready-made presets tailored for popular platforms. Simply type “Instagram post,” “Facebook cover,” or “YouTube thumbnail” into the search bar within the resize menu. Select the relevant option, and Canva will automatically adjust your canvas to the ideal dimensions for that platform. This eliminates the guesswork and ensures your “Sad/Emotional” or “Beautiful Photography” finds its perfect fit.
- Batch Resizing with “Copy & Resize”: This is where Canva Pro truly shines for bulk operations. If you need the same image in multiple sizes (e.g., for different social media platforms or various sections of a website), you can select several preset sizes (or custom sizes) from the resize menu. Check the boxes next to all the desired dimensions, then click “Copy & resize.” Canva will then create separate copies of your design, each perfectly resized, opening them in new tabs. This feature is a massive time-saver for managing “Thematic Collections” or adapting visuals for various “Image Inspiration & Collections.”
The one-click resize is a testament to Canva Pro’s power in streamlining the “Graphic Design” process. It’s far more efficient than traditional desktop software like Photoshop for simple resizing tasks, making it an essential tool for maintaining consistent “Editing Styles” across all your visual assets.
Method 2: Manual Resizing with Canva Free (Creative Solutions for Every Tophinhanhdep.com User)
While the one-click resize is a Pro exclusive, Canva’s free version still offers effective ways to resize your images, albeit with a few more steps. Tophinhanhdep.com believes that every user should have access to powerful tools, and these free methods empower you to achieve great results.
Direct Manual Resize (Simple Adjustments):
- Upload Your Image: In your Canva design, click the “Uploads” tab (or “Photos” tab if you’re using a stock image) and drag your chosen image onto the canvas.
- Drag Handles: Once the image is on the canvas, click on it. A bounding box with circular “handles” at the corners and sides will appear.
- Resize Proportionally: To resize the image while maintaining its original aspect ratio (preventing distortion), click and drag one of the corner handles. As you drag, you’ll see a size indicator near your cursor showing the current dimensions.
- Resize Vertically or Horizontally: To adjust only the width or height, drag one of the side handles. Be mindful that this will change the image’s aspect ratio and can distort its appearance.
This manual drag-and-drop method is intuitive and perfect for informal adjustments or when exact pixel dimensions aren’t critical.
Free Workaround for Precise Resizing: For precise dimensions in the free version, you need a clever workaround:
- Start a New Design with Target Dimensions: From the Canva dashboard, click “Create a design.”
- Custom Size: Select “Custom size.” Enter your desired width and height (e.g., 1920x1080 pixels for a “Wallpaper”). You can change the unit (pixels, inches, etc.) if needed. Click “Create new design.”
- Preset Template: Alternatively, browse the “Social media” section or use the search bar to find a template with the desired dimensions (e.g., “Instagram Post”). Click on it to open a blank canvas with those specific dimensions.
- Upload and Position Your Image: In the new blank design, go to the “Uploads” section on the left-hand sidebar. Upload the image you wish to resize.
- Fit to Canvas: Once uploaded, click on your image to add it to the blank template. Now, carefully drag the corner handles to adjust the image size until it perfectly covers the entire template, ensuring no blank areas remain.
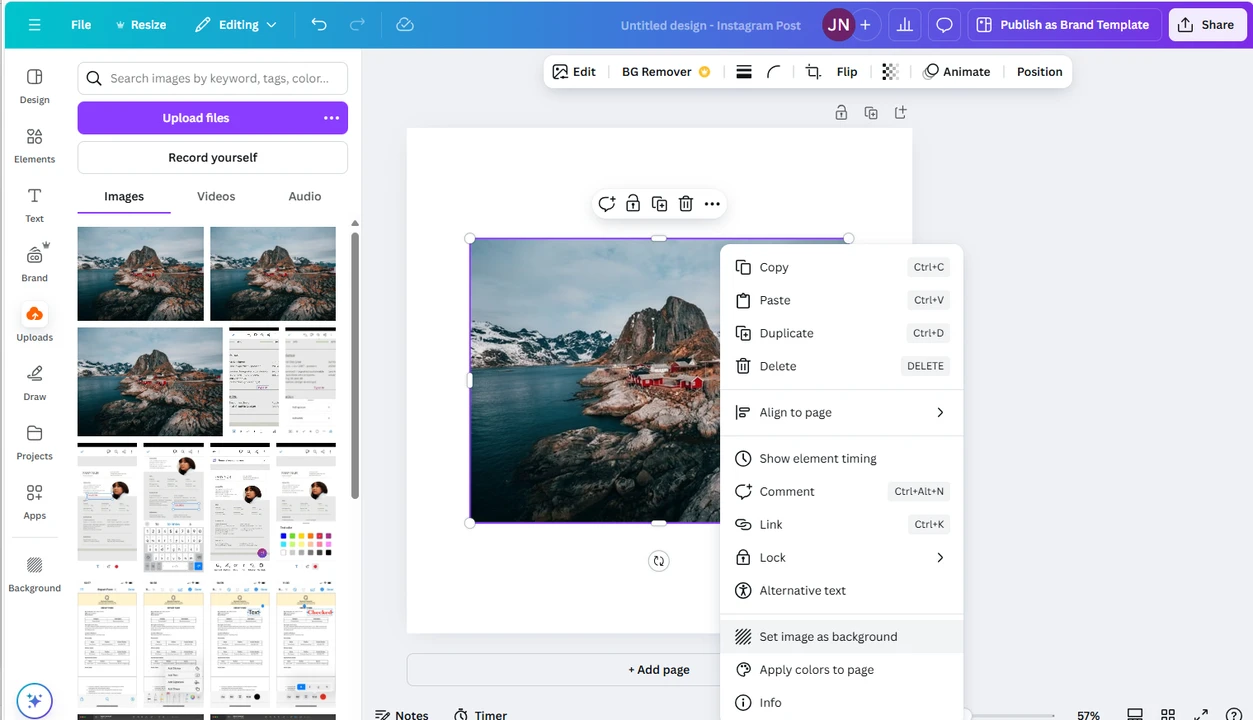
- Set as Background (Optional): For a quick fit, right-click on the image and select “Set image as background.” This will instantly stretch or shrink the image to cover the entire canvas. Be cautious, as this may crop parts of your image or stretch it disproportionately if the aspect ratios don’t match.
- Download Your Resized Image: When satisfied, click “Share” in the top right corner, then “Download.” You can choose the file type (e.g., PNG or JPG) and then click “Download” again. Your image is now resized to your specified dimensions!
How to Resize Multiple Images in Canva Free (Workaround): If you need to resize several images to the same dimensions using the free method:
- Follow steps 1-2 above to create a blank template with your target size.
- Once the blank template opens, click “Add page” (usually below your current page). Create as many additional pages as you have images to resize.
- Navigate to “Uploads” and import all your images.
- Drag the first image onto the first page, adjust its size to fit the template.
- Scroll to the second page, drag the second image, and adjust it. Repeat for all images.
- Finally, go to “Share” > “Download.” Select “All pages” and choose your desired file type (PNG or JPG). Canva will download a ZIP file containing all your individually resized images.
Resizing Without Cropping: Preserving Your Vision
Sometimes, the goal isn’t just to change dimensions but to do so without altering the image’s composition. Preserving the original aspect ratio is crucial for “Beautiful Photography” or when working with detailed “Digital Art” that shouldn’t be cut.
In Canva Pro: This is straightforward using the “Resize” feature. After clicking “Resize” and selecting “Custom size,” you’ll see the current width and height fields. Between these fields, there’s usually a “lock” icon. Click this icon to lock the aspect ratio. Now, when you change either the width or the height, the other dimension will automatically adjust proportionally, ensuring no cropping or distortion. Click “Copy & resize” or “Resize the current design” to apply.
In Canva Free: Achieving this without cropping requires more manual effort with the workaround:
- Create a new design using the “Custom size” option.
- Calculate the new dimensions that maintain the original aspect ratio. For example, if your original image is 2000x1500 pixels (a 4:3 aspect ratio) and you want a new width of 1000 pixels, the new height must be 750 pixels to maintain the 4:3 ratio.
- Upload your image to this new canvas and carefully drag its corners to fit the canvas precisely. Since the canvas itself already has the correct aspect ratio, your image will fit without cropping if you scale it proportionally.
- Download the image.
This method emphasizes precision and is essential for preserving the artistic integrity of your “Images” and “Photography” collections.
Beyond Canva: Elevating Your Images with Tophinhanhdep.com’s Image Tools
While Canva is a fantastic design platform, Tophinhanhdep.com offers a specialized suite of “Image Tools” that can complement your workflow, providing advanced functionalities for specific image manipulations. These tools are perfect for ensuring your “Stock Photos,” “Wallpapers,” and “Backgrounds” are always in top condition.
Tophinhanhdep.com’s Resize and Crop Tools for Precision and Efficiency
Tophinhanhdep.com’s online applications provide a streamlined, browser-based solution for precise resizing and cropping, often with fewer steps than Canva’s free methods, and with some benefits even over Canva Pro for specific tasks.
Using Tophinhanhdep.com’s Resize Photos App: Our dedicated “Resize Photos” tool is designed for speed and simplicity.
- Upload: Visit Tophinhanhdep.com and open the “Resize Photos” app. Click “Select Images” to upload one or multiple photos.
- Choose Resizing Options: You can choose to resize by an exact height or width (the other dimension adjusts automatically to maintain aspect ratio), by a specific percentage, or by setting custom pixel dimensions.
- Batch Processing: A key advantage is the ability to apply the same resizing rules to multiple images simultaneously. If you upload several images, they will all be resized to the same specified dimensions.
- Quality Control: Unlike Canva’s free version, Tophinhanhdep.com often provides options to select the output quality (e.g., excellent, good, decent), giving you more control over the file size versus visual fidelity, a crucial aspect of “Image Optimizers” and “Image Compressors.”
- Download: Click “Resize Images” and then download your processed files.
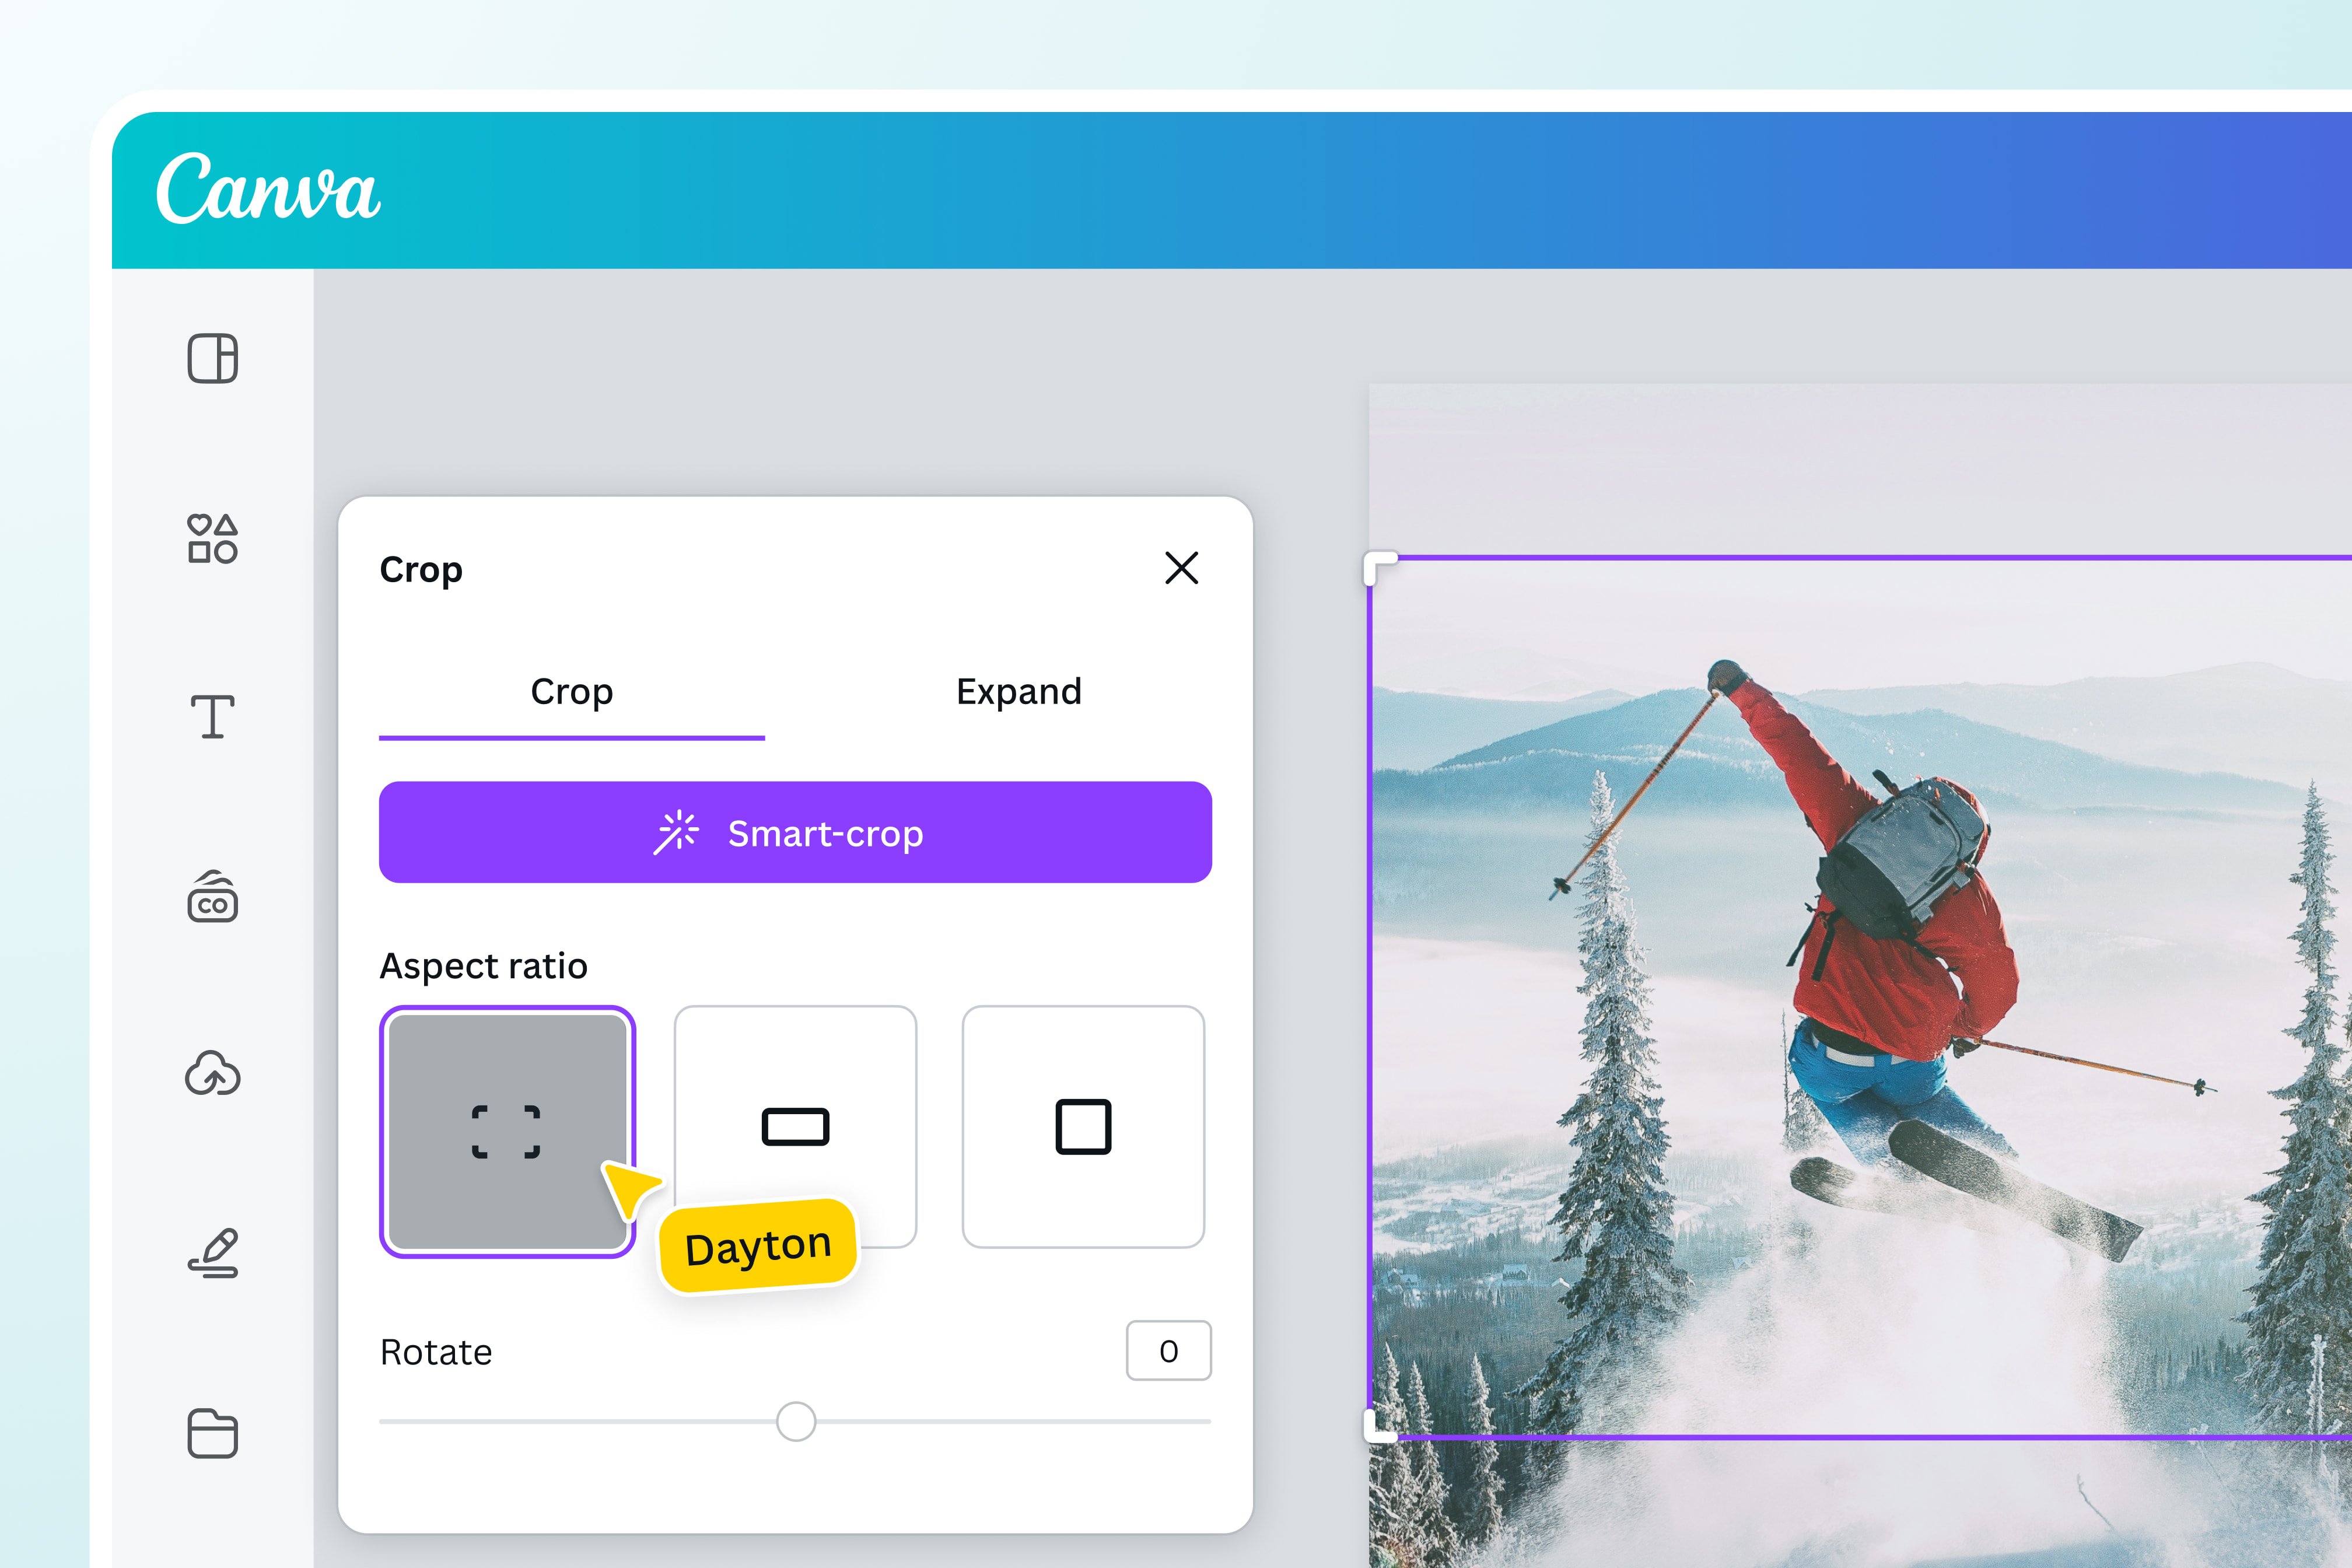
Using Tophinhanhdep.com’s Crop Photos App: For situations where precise cropping is needed, especially for social media, Tophinhanhdep.com’s “Crop Photos” app is highly efficient.
- Import: Open the “Crop Photos” app on Tophinhanhdep.com and import your images.
- Preset Ratios: Select from a variety of ready-made presets for popular social media platforms (e.g., Instagram Portrait, Facebook Page Cover, YouTube Thumbnail). This aligns perfectly with the need for platform-specific “Visual Design.”
- Adjust Crop Area: Drag and adjust the cropping area on your image to frame your subject perfectly within the chosen aspect ratio.
- Multiple Crops from One Image: A powerful feature is the ability to duplicate an image within the app and apply different crop presets to each copy. For example, you can crop one image for Instagram Portrait and then duplicate it to crop the same image for a Facebook Page Cover, all in one session. This creates multiple resized and cropped versions from a single original, ideal for “Image Inspiration & Collections” adapted for various uses.
- Batch Cropping: Adjust the cropping area for each image in your batch, then proceed.
- Export Settings & Download: Specify export settings and click “Crop Images.” Your resized and cropped copies will be available for download, with Tophinhanhdep.com ensuring the originals remain untouched.
These tools simplify tasks that can be cumbersome in Canva’s free version, offering a faster and more direct path to perfectly optimized images for “Graphic Design” and “Digital Photography” applications.
Enhancing and Optimizing Images with Tophinhanhdep.com’s Advanced Features
Tophinhanhdep.com extends beyond basic resizing and cropping to offer a suite of advanced “Image Tools” that further enhance your visual content, aligning with our commitment to “High Resolution” and professional “Editing Styles.”
AI Upscalers: If you have a small, low-resolution image that needs to be larger without losing quality – perhaps an older “Beautiful Photography” piece or a detail from a “Nature” shot – Tophinhanhdep.com’s “AI Upscalers” are invaluable. Our AI technology can enlarge images by 2x, 4x, 6x, or even 8x, intelligently adding detail and sharpening features that would otherwise appear pixelated with traditional resizing methods. This is essential for transforming existing images into stunning “Wallpapers” or “Backgrounds” without quality degradation.
Image Compressors: For web optimization, reducing file size is critical. Tophinhanhdep.com’s “Image Compressors” allow you to shrink your images by 50-80% while retaining impressive visual quality. This is particularly useful for optimizing large “Stock Photos” or “Digital Photography” for fast website loading, ensuring a smooth user experience as championed by “Image Optimizers.”
Image Converters: Beyond manipulation, Tophinhanhdep.com also provides “Converters” to switch between image formats (e.g., JPG to PNG, PNG to JPG). This flexibility is important for ensuring compatibility across different platforms and design software, completing a comprehensive suite of “Image Tools.”
By integrating Tophinhanhdep.com’s specialized tools with Canva, you create a powerful workflow. Canva for creative design and layout, and Tophinhanhdep.com for precise, high-quality image manipulation like upscaling, compression, and batch resizing/cropping. This synergy allows you to achieve truly outstanding results in your “Photo Manipulation” and “Creative Ideas.”
Tophinhanhdep.com: Your Hub for Visual Inspiration and Design Excellence
Beyond tools and tutorials, Tophinhanhdep.com serves as a vibrant hub for “Image Inspiration & Collections,” fueling your creative journey. Our platform is dedicated to providing everything you need to create visually compelling content.
A World of Images for Every Creative Project
Tophinhanhdep.com curates an extensive library of images spanning diverse categories. Whether you’re seeking a serene “Nature” landscape for a blog post, a thought-provoking “Abstract” design for “Digital Art,” an emotionally resonant “Sad/Emotional” image for a reflective piece, or breathtaking “Beautiful Photography” for a presentation, our collections are meticulously organized. These serve as perfect starting points for your Canva designs or as enriching “Wallpapers” and “Backgrounds” for your devices. The quality and variety of these images ensure you always have access to inspiring visuals that align with your “Graphic Design” and “Creative Ideas.”
Inspiring Your Next Design with Photo Ideas and Mood Boards
We understand that creativity sometimes needs a spark. Tophinhanhdep.com’s “Image Inspiration & Collections” are designed to provide just that. Explore our “Photo Ideas” for fresh perspectives, delve into “Mood Boards” to define your project’s aesthetic, and stay updated with “Thematic Collections” and “Trending Styles” to keep your designs current and engaging. This wealth of visual content can directly inform your choices when working in Canva, guiding your selection of elements, color palettes, and overall composition. By combining the vast resources of Tophinhanhdep.com with Canva’s user-friendly design interface, you’re equipped to push the boundaries of your “Digital Art” and create truly impactful visuals.
Conclusion
Mastering image resizing in Canva is an essential skill for anyone involved in digital design. Whether you opt for the efficiency of Canva Pro’s one-click resize, leverage the creative workarounds in Canva Free, or employ the specialized precision of Tophinhanhdep.com’s powerful “Image Tools,” the goal remains the same: to produce optimized, high-quality visuals that effectively communicate your message.
Canva empowers you to design, while Tophinhanhdep.com supports you with a rich repository of “Images” and advanced “Image Tools” for tasks like “Converters,” “Compressors,” “Optimizers,” and “AI Upscalers.” By integrating these platforms, you create a seamless and robust workflow that ensures your “High Resolution” “Photography” is always perfectly prepared, beautifully presented, and highly effective. Embrace these techniques and tools to elevate your “Visual Design” and bring your “Creative Ideas” to life with stunning clarity and impact.