Mastering Image Resizing in GIMP: A Comprehensive Guide for Tophinhanhdep.com Users

The digital world thrives on visual content, and for a platform like Tophinhanhdep.com, where images are at the heart of everything – from stunning wallpapers and aesthetic backgrounds to high-resolution photography and creative digital art – mastering image manipulation is paramount. One of the most fundamental yet critical skills in any image editor is resizing. Whether you’re preparing a breathtaking nature shot for a new desktop wallpaper, optimizing a stock photo for a web project, or integrating elements into a complex graphic design, knowing how to accurately and efficiently resize images in GIMP is invaluable.
GIMP, the GNU Image Manipulation Program, is a robust, free, and open-source software that stands as a powerful alternative to many commercial image editors. It offers a wealth of tools and features that cater to both beginners and seasoned professionals. Don’t let its comprehensive nature intimidate you; simple tasks like resizing are remarkably straightforward once you understand the core principles and available methods.
The necessity of resizing images stems from various practical considerations. For users on Tophinhanhdep.com, this could mean reducing the file size of a beautiful photograph to ensure fast loading times when used as a website background, preparing images to fit specific dimensions for a mood board, or scaling down high-resolution digital art for social media sharing without compromising quality. Conversely, you might need to scale up a smaller element to fit a larger composition, or adjust the print size of a digital artwork for a physical exhibition. This guide will walk you through the various methods of resizing in GIMP, distinguishing between scaling an entire image and manipulating individual layers, and providing practical tips for Tophinhanhdep.com users to achieve perfect results every time.
Understanding Image and Layer Resizing: The Crucial Distinction
Before diving into the “how-to,” it’s vital to grasp the difference between resizing an entire image and resizing an individual layer within GIMP. This distinction is often a source of confusion but is critical for effective photo manipulation and visual design, especially when working on detailed projects for Tophinhanhdep.com.
When you resize an entire image (often referred to as scaling the canvas or the entire composition), you are changing the dimensions of the entire workspace, and by extension, all the layers contained within that workspace will be scaled proportionally. This method is ideal when your final output needs to be a specific overall size, such as preparing a large wallpaper image to fit a smaller screen resolution, or downsizing a collection of stock photos to a uniform web-friendly size. It affects the fundamental “physical” dimensions of your digital file.
On the other hand, when you resize an individual layer, you are only modifying the dimensions of that specific layer without altering the overall canvas size or the scale of other layers. This is indispensable for graphic design, digital art, and photo manipulation tasks where you need to combine multiple images, overlay textures, or arrange various elements within a single composition. For example, if you’re creating a thematic collection on Tophinhanhdep.com and wish to blend several images, you’ll need to scale each image layer independently to fit your creative vision. GIMP empowers you with precise control over each element, allowing for complex visual ideas to come to life.
This guide will cover both scenarios, ensuring you have the knowledge to tackle any resizing challenge for your projects on Tophinhanhdep.com.
Method 1: Resizing the Entire Image (Canvas and All Layers)
The simplest and most direct way to change the overall dimensions of your image in GIMP is by using the “Scale Image” function. This method is particularly useful when you have a completed composition or a single image that needs to be adjusted to a specific output size, whether for web optimization or print.
Initial Setup: Creating a New Composition
If you’re starting a new project on Tophinhanhdep.com, the first step is to establish your canvas size. This pre-emptive setting can save you resizing headaches later.
- Open GIMP and go to
File > New. This will bring up the “Create a New Image” dialogue box. - Define Dimensions and Resolution: Here, you can set the
WidthandHeightof your composition. For web applications, such as images destined for Tophinhanhdep.com wallpapers or backgrounds, a common width might be 1920 pixels with a height of 1080 pixels (Full HD). You can change the units (pixels, inches, millimeters, etc.) using the dropdown menu next to the dimension fields. - Advanced Options for Resolution: Click on “Advanced Options” to access more settings. The
XandY resolutionare crucial for output quality.- For images intended for print, a resolution of 300 pixels per inch (PPI) is generally recommended to ensure sharp details.
- For images primarily for the web (which is often the case for Tophinhanhdep.com users), 72 pixels per inch (PPI) is usually sufficient, as higher resolutions won’t be visibly different on screen but will result in larger file sizes and slower load times.
- Color Space and Other Settings: Typically, leave the
Color Spaceat its default, setPrecisionto 32-bit floating point, andGammato “Perceptual gamma (sRGB).” The other default settings are usually fine. - Click
OKto create your new composition.
If you already have an image open, GIMP will use its current dimensions and resolution as a starting point.
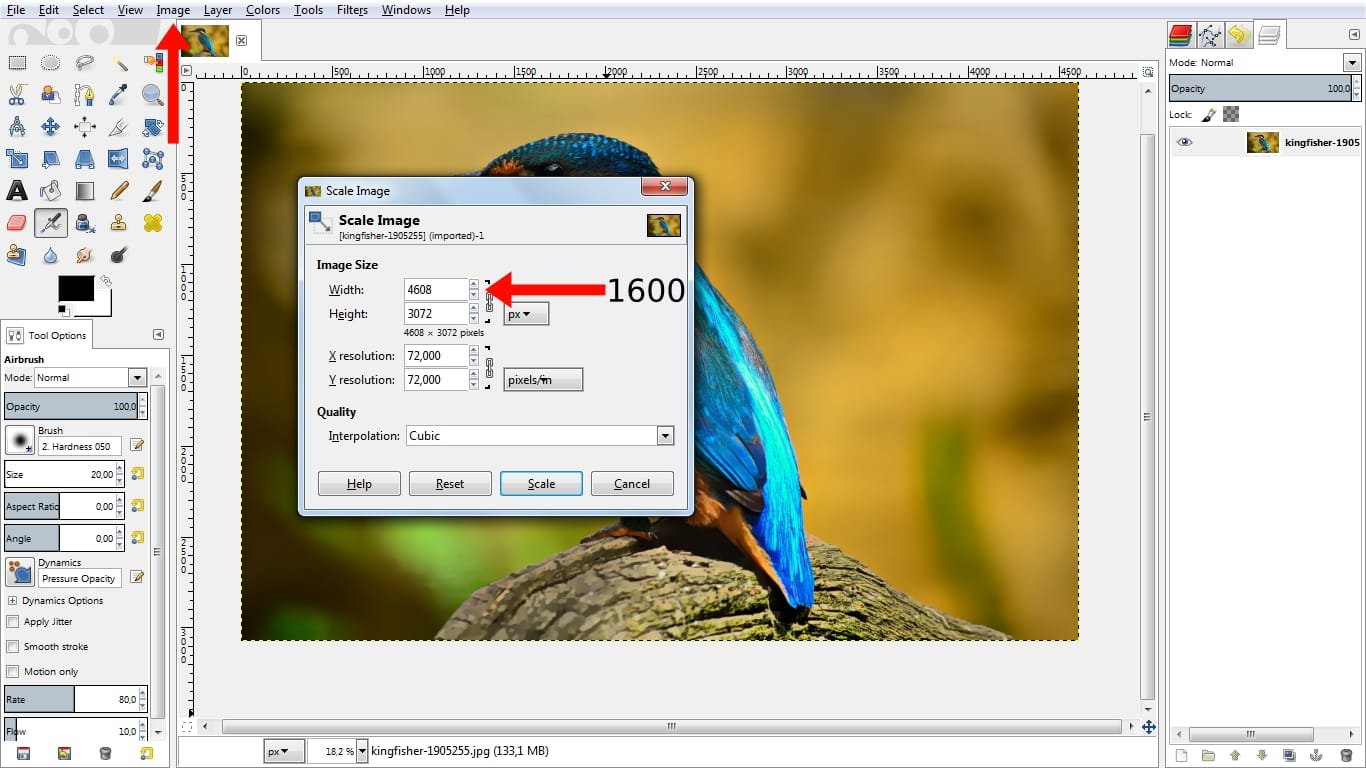
Executing the “Scale Image” Command
Once your image or composition is open, you can proceed to scale it globally.
- Navigate to
Image > Scale Image. This will open the “Scale Image” dialogue box, presenting the current dimensions, resolution, and interpolation method. - Adjust Width and Height: Input your desired
WidthandHeightvalues.- Lock Aspect Ratio (Chain Icon): Crucially, ensure the “chain icon” between the Width and Height fields is linked. This locks the aspect ratio, meaning that when you change one dimension, the other will automatically adjust proportionally, preventing your image from becoming stretched or squished. For Tophinhanhdep.com, maintaining the aspect ratio is essential for presenting high-quality, aesthetic, and beautiful photography correctly.
- Unlinking for Distortion: If you intentionally want to distort the image (e.g., for a unique visual design effect), you can click the chain icon to unlink the dimensions and adjust them independently.
- Set Resolution (if needed): Verify or adjust the
XandY resolutionfields based on your output needs (e.g., 72 PPI for web, 300 PPI for print, as discussed above). - Interpolation: The
Interpolationsetting determines the algorithm GIMP uses to calculate the new pixels when resizing. “Cubic” is a good general-purpose option that provides a balance between speed and quality for most scaling operations. For advanced users or specific scenarios, “LoHalo” or “NoHalo” might offer better results for scaling down, while “Lanczos” can be excellent for scaling up. - Click
Scaleto apply the changes to your entire image. The canvas and all its layers will now be resized according to your specifications. This is particularly useful when optimizing high-resolution stock photos from Tophinhanhdep.com for faster web display.
Method 2: Resizing Individual Layers Using the Scale Tool
For tasks involving visual design, photo manipulation, or creating complex digital art where you need to adjust elements independently, the GIMP “Scale Tool” is your go-to. This allows for granular control over each component of your multi-layered compositions, perfect for crafting unique creative ideas for Tophinhanhdep.com.
Importing and Organizing Layers
To effectively use the Scale Tool, you’ll often be working with multiple layers.
- Open Images as Layers: If you’re combining several images, go to
File > Open as Layers. Navigate to your desired image files, select them, and clickOpen. Each selected image will be imported as a new layer into your current composition. - Create New Layers: Alternatively, click the “New Layer” icon in the Layers panel (usually bottom right) to add blank layers for text, shapes, or other elements.
- Rename for Clarity: Especially in complex projects, rename your layers by double-clicking their names in the Layers panel. Descriptive names like “Background,” “Main Subject,” “Text Overlay,” or “Abstract Element” will significantly streamline your workflow.
Activating and Customizing the Scale Tool
The Scale Tool allows for both manual, interactive resizing and precise numerical adjustments for individual layers.
- Access the Scale Tool:
- Locate the
Toolbox(typically on the left side of your screen). The Scale Tool icon looks like a square with an arrow pointing out from a corner. In GIMP 2.10.18 and later, tools are often grouped; you might find it under the “Transform Tools” group. - Alternatively, use the keyboard shortcut
Shift + S. - Or go to
Tools > Transform Tools > Scale.
- Locate the
- Select the Target Layer: In the Layers panel, click on the layer you wish to resize to make it the active layer. The Scale Tool only operates on the active layer or a selected area within it.
- Activate Scaling Handles: Click anywhere within the boundaries of your active layer on the canvas. A rectangular outline with “transform handles” (small squares) at the corners and midpoints will appear around the layer. A “Scale” dialogue box will also pop up, showing the layer’s current dimensions and offering various options.
- Tool Options: Transform Mode (Important!): By default, the Scale Tool is usually set to transform the active layer. However, if you’ve used it for selections before, it might be in “Selection” mode. In the “Tool Options” panel (often below the Toolbox or to the right of your image window), ensure the
Transform:mode is set to “Layer” (it looks like a solid red box). This guarantees you’re resizing the entire layer content, not just a selection within it.
Interactive Scaling with Transform Handles
This method provides intuitive, visual control over your layer’s size, perfect for fine-tuning the placement of abstract elements or aesthetic image components on Tophinhanhdep.com.
- Zoom Out to See Handles: If your layer is very large, you might not see the transform handles. Hold
Ctrland use your mouse wheel to zoom out until you can see them around the edges. - Maintain Aspect Ratio (Chain Icon): In the Scale tool dialogue box, make sure the “chain-link icon” next to the
WidthandHeightfields is locked. This is crucial for preserving the original proportions of your layer, preventing unwanted distortion in your digital art or photography. - Click and Drag Handles:
- Scaling from a Corner: Click and drag any of the corner handles inward to shrink the layer or outward to enlarge it.
- Scaling from the Center: To scale the layer uniformly from its center point, hold down the
Ctrlkey while clicking and dragging any corner handle. This is excellent for keeping an element centrally aligned while adjusting its size. - Non-Proportional Scaling (Distortion): If you wish to intentionally stretch or squish your layer (e.g., for specific visual design effects or creative ideas), click the chain icon in the dialogue box to unlock the aspect ratio. Then, drag a side handle (not a corner) to resize horizontally or vertically, or drag a corner handle without holding
Ctrl(if the chain is unlocked) to distort freely.
- Repositioning the Layer: The middle transform handles (often appearing as four small boxes in the center of the bounding rectangle) act like a temporary “Move Tool.” Click and drag these handles to reposition your layer anywhere on the canvas while you’re still in Scale Tool mode. This is useful for aligning elements, perhaps using guides (more on this below) to create a balanced composition.
- Using Guides for Precision: For precise alignment, you can create guides. Go to
Image > Guides > New Guide (By Percent)orNew Guide (by Pixels). For instance, a “Vertical” guide at “50%” position will create a line down the center of your canvas, helping you perfectly center or arrange elements side-by-side, as often seen in professional graphic design or thematic collections on Tophinhanhdep.com. - Comparing Sizes (Opacity Trick): If you’re trying to match the size of models or objects across different layers, a useful trick is to temporarily move one layer over the other, reduce its opacity in the Layers panel, and then scale it until the sizes match. Once satisfied, reset the opacity and move the layer back to its desired position. This technique is invaluable when striving for visual consistency in your high-resolution photography edits.
- Apply Changes: Once your layer is resized and positioned to your liking, click the
Scalebutton in the Scale dialogue box to apply the transformation. Alternatively, you can press theEnterkey on your keyboard.
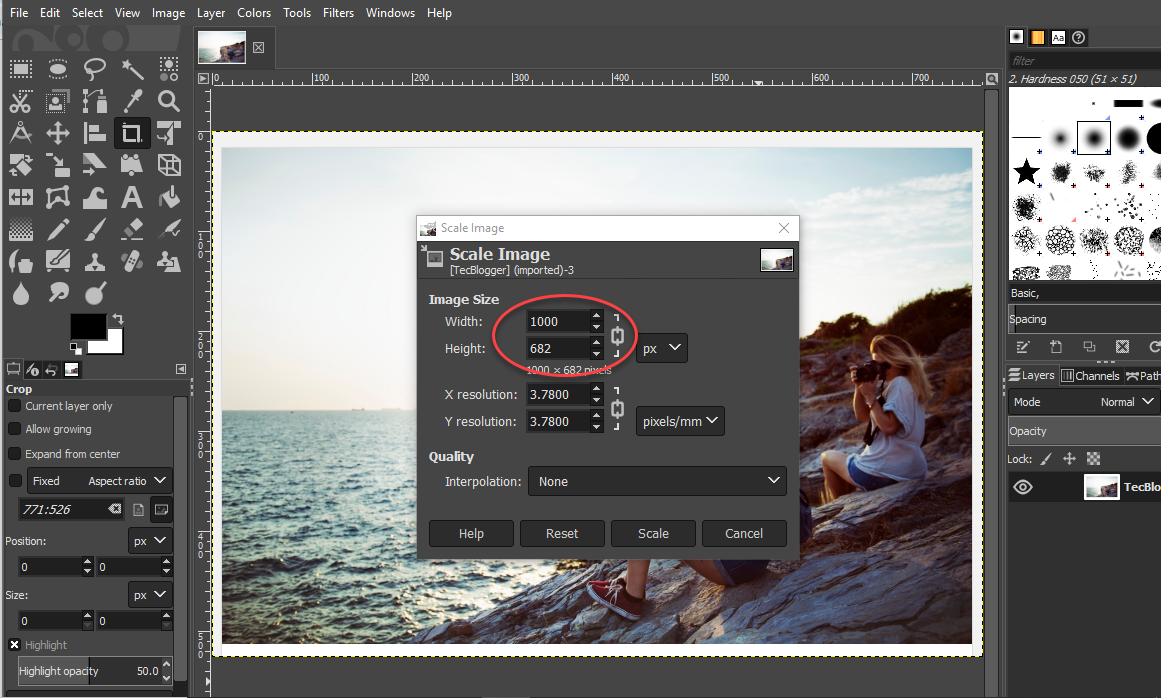
Precise Resizing with Numerical Inputs
For situations requiring exact dimensions, the Scale Tool also allows you to input numerical values.
- With the Scale Tool active and your layer selected, the “Scale” dialogue box will display the current
WidthandHeight. - Input New Values: Directly type your desired numerical values into the
WidthandHeightfields. Remember to ensure the “chain-link icon” is locked if you want to maintain the aspect ratio. - Change Units: Use the dropdown menu next to the
WidthandHeightfields to change the units of measurement (e.g., from pixels to inches or percent). This is particularly handy when preparing images for specific print sizes or fitting a layer into a design with predefined physical dimensions. - Click
Scaleto apply.
Important Note: When using the Scale Tool on individual layers, the canvas size itself does not automatically adjust. This means if you scale a layer down, you’ll see transparent “checkerboard” areas around it. If you scale a layer up beyond the canvas boundaries, parts of the layer will be “hidden” outside the viewable area. The next section addresses how to manage your canvas after resizing layers.
Optimizing Canvas and Print Size After Resizing
After resizing images or layers, particularly when working on visual design or preparing beautiful photography for display on Tophinhanhdep.com, you often need to adjust the canvas to match your new content or specify print output.
Adjusting the Canvas to Your Resized Content
Since the Scale Tool only affects the layer and not the canvas, you’ll need additional steps to manage the canvas size.
- Cropping to Content (Shrinking Canvas):
- If you’ve scaled a layer down and now have excess transparent space around it, you’ll want to shrink the canvas to fit the actual content.
- Go to
Image > Crop to Content. GIMP will automatically detect the boundaries of your image content (excluding transparent areas) and crop the canvas accordingly. This is ideal for cleaning up compositions and reducing unnecessary file size.
- Fitting Canvas to Layers (Expanding Canvas):
- If you’ve scaled a layer up and it now extends beyond the original canvas, or if you’ve simply added larger elements, parts of your image might be cut off.
- Go to
Image > Fit Canvas to Layers. GIMP will automatically expand the canvas to encompass all visible layers, ensuring nothing is lost. This is useful for ensuring all elements of your graphic design or digital art are fully displayed.
Setting the Perfect Print Size
For Tophinhanhdep.com users who produce high-resolution photography or digital art for printing, correctly setting the print size is paramount.
- Go to
Image > Print Size. - Define Physical Dimensions: In this dialogue box, you can set the
WidthandHeightof your image in physical units like inches or millimeters. - Understanding Resolution Impact: It’s important to understand that changing the print size here does not alter the number of pixels in your image. Instead, it changes the
resolution(pixels per inch/mm).- If you reduce the print size, the pixels become more concentrated, increasing the PPI and potentially resulting in a sharper print.
- If you increase the print size significantly without adding more pixels (e.g., through an AI upscaler or by recreating elements), the existing pixels will spread out. This will decrease the PPI, and the image quality may decline, appearing pixelated or blurry when printed.
- Optimal Print Resolution: As a rule of thumb, for high-quality prints, aim for at least 240-300 PPI at your desired print size. If your image’s pixel dimensions don’t allow for this, increasing the print size might lead to a softer image.
By understanding these canvas and print size adjustments, Tophinhanhdep.com creators can ensure their images are perfectly prepared for any output medium.
Saving and Exporting Your Resized Images for Tophinhanhdep.com
Resizing is only half the battle; knowing how to properly save and export your work ensures that your efforts translate into usable files for Tophinhanhdep.com or other platforms. The process differs slightly depending on whether you want to preserve your GIMP project for future editing or create a final image file.
Saving Your Project for Future Edits
When you’re working on a multi-layered project, such as a complex graphic design or a photo manipulation piece, you’ll want to save it in GIMP’s native format to retain all layer information, masks, paths, and other editable elements.
- Go to
File > SaveorFile > Save As. - Choose Location and Name: Select a location on your computer and give your file a meaningful name.
- GIMP’s Native Format (XCF): GIMP will default to saving your project in its
.xcf(eXperimental Computing Facility) format. This format is crucial if you intend to return to the project later for further editing or adjustments. - Compatibility (PSD): If you anticipate needing to open your layered file in other image editing applications like Adobe Photoshop or Affinity Photo, GIMP offers the option to save as a
.psd(Photoshop Document) file. This ensures better compatibility, though some GIMP-specific features might not transfer perfectly.
Exporting Your Resized Image for Distribution
To get a final, flattened image file that can be uploaded to Tophinhanhdep.com, shared online, or sent for print, you need to export your work. Exporting flattens all layers into a single image.
- Go to
File > Export As(or use the shortcutCtrl + Shift + E). - Choose Location and Name: Select where to save your file and give it a descriptive name.
- Select File Type (Format): This is a critical step, especially for Tophinhanhdep.com users dealing with various image types:
- Click the
+ Select File Type (By Extension)dropdown (or simply type the desired extension like.jpgor.pnginto the name field). - JPEG (.jpg or .jpeg): Ideal for photographs, wallpapers, and backgrounds (e.g., nature, aesthetic, beautiful photography) where file size needs to be minimized for web performance. JPEG uses lossy compression, meaning some data is discarded to reduce file size.
- PNG (.png): Essential for images that contain transparency (e.g., logos, graphic design elements with cut-outs, digital art overlays). PNG uses lossless compression, preserving all image data and transparency.
- TIFF (.tif or .tiff): Often preferred for high-quality prints or professional archives, as it supports lossless compression and various color depths.
- Other formats like GIF, BMP, and PDF are also available for specific uses.
- Click the
- Export Settings (Format-Specific): After selecting your file type and clicking
Export, a new dialogue box will appear with format-specific options:- JPEG Quality: For JPEGs, you’ll see a “Quality” slider (0-100). A setting between 60-80% typically offers a good balance between image quality and file size, making it suitable for fast-loading images on Tophinhanhdep.com. Higher quality means larger files.
- PNG Compression: PNGs offer compression levels (0-9). Higher compression reduces file size but takes longer to export; it doesn’t affect image quality.
- Click
Exportto generate your final image file.
By following these saving and exporting guidelines, you ensure that your resized images are perfectly optimized and ready for publishing on Tophinhanhdep.com, whether they’re aesthetic backgrounds, high-resolution stock photos, or elements of a new thematic collection.
Conclusion: Empowering Your Visual Creations on Tophinhanhdep.com
Mastering image resizing in GIMP is a foundational skill that unlocks a world of creative possibilities for Tophinhanhdep.com users. From preparing captivating wallpapers and optimizing stunning photography for web display to meticulously crafting detailed graphic designs and digital art, the ability to control image and layer dimensions is indispensable. GIMP’s intuitive interface, coupled with its powerful Scale Image and Scale Tool functionalities, makes this seemingly complex task accessible to everyone.
We’ve explored the critical distinction between resizing an entire image and manipulating individual layers, armed you with the step-by-step processes for both numerical and manual scaling, guided you through essential canvas adjustments like “Crop to Content” and “Fit Canvas to Layers,” and provided best practices for setting print sizes. Finally, understanding how to properly save your projects and export your final images in the correct formats and quality settings ensures your creations are ready for seamless integration into Tophinhanhdep.com’s diverse content categories, from “Image Inspiration & Collections” to “Visual Design” and beyond.
Whether you’re a budding photographer looking to showcase your high-resolution captures, a digital artist creating intricate visual narratives, or simply enhancing your personal collection of aesthetic backgrounds, GIMP provides the tools, and this guide provides the knowledge. Embrace the power of precise image resizing, and continue to enrich Tophinhanhdep.com with your beautifully optimized visual creations. The journey to becoming a GIMP master begins with these fundamental steps, empowering you to bring your creative ideas to life with confidence and precision.