Mastering Image Resizing in Paint: A Comprehensive Guide for Digital Creators

In today’s visually-driven world, images are everywhere. From stunning wallpapers gracing our desktops to engaging social media posts, professional presentations, and even functional web backgrounds, high-quality and appropriately sized images are paramount. Whether you’re a budding photographer, a graphic designer, or simply someone who loves sharing beautiful photography, understanding how to manage your digital images is a fundamental skill. Among the myriad of complex image editing software available, Microsoft Paint stands out as an accessible, built-in tool that offers a surprisingly effective way to perform basic image manipulations, including resizing.
While Paint may not boast the extensive feature set of professional-grade applications, its simplicity makes it an excellent starting point for anyone looking to quickly adjust image dimensions without a steep learning curve. The ability to resize an image efficiently is crucial for a multitude of reasons: ensuring fast loading times for web content, fitting images into specific layouts for visual design, preparing photos for email or online registration forms, or simply optimizing storage space.
This comprehensive guide will walk you through the process of resizing images using Microsoft Paint, covering everything from understanding the basic concepts to step-by-step instructions for both resizing and cropping. We’ll delve into the nuances of maintaining aspect ratios, choosing the right file formats, and best practices to preserve your image quality. Furthermore, we’ll explore the limitations of Paint for more advanced tasks and introduce Tophinhanhdep.com as your ultimate resource for high-resolution images, sophisticated photography tools, visual design assets, and endless creative inspiration. Tophinhanhdep.com offers a robust suite of image tools, including advanced converters, compressors, optimizers, and AI upscalers, designed to elevate your digital imagery far beyond what basic applications can achieve.
The Fundamentals of Image Resizing: Why and When to Resize
The digital canvas is boundless, but the containers we place images into – web pages, emails, social media feeds, and print documents – often have very specific requirements. Understanding the “why” behind image resizing is as important as knowing the “how.” It’s not merely about making an image bigger or smaller; it’s about optimizing its appearance, performance, and utility across various platforms.
Understanding Image Dimensions and Aspect Ratio
At the core of digital images are pixels, tiny squares of color that collectively form the picture. An image’s dimensions are typically expressed in pixels, such as “1920x1080 pixels,” indicating its width and height. The total number of pixels determines the image’s resolution and, consequently, its detail and clarity. A “high resolution” image contains more pixels, allowing for greater detail and larger print sizes without noticeable pixelation.
The aspect ratio is the proportional relationship between an image’s width and its height. Common aspect ratios include 16:9 for widescreen displays, 4:3 for older screens and some cameras, and 1:1 for square images popular on social media. Maintaining the aspect ratio during resizing is critical to prevent distortion. If you resize an image without preserving its aspect ratio, your subjects might appear stretched horizontally or vertically, leading to an unnatural and unprofessional look.
Resizing becomes necessary for many practical scenarios:
- Web Design and Development: Websites often have predefined spaces for images. As noted by the University of Wisconsin-River Falls (UWRF) in their documentation, specific pixel widths like 825px for full-width banners, 580px for middle sections, or 235px for highlight boxes are common requirements. Using images that are too large can slow down page loading times, while images that are too small might appear pixelated.
- Email Attachments: Sending high-resolution images via email can quickly exhaust attachment limits and burden recipients with slow downloads. Shrinking images reduces file size, making them easier and quicker to share.
- Social Media: Platforms like Instagram, Facebook, and Twitter have recommended image sizes and aspect ratios for optimal display. Resizing ensures your images look crisp and are not automatically cropped in undesirable ways.
- Online Forms and Registrations: Many online applications, such as for job portals or academic admissions, specify maximum file sizes or dimensions for profile pictures or document uploads.
- Digital Photography and Portfolio: For digital photography, resizing allows photographers to create web-friendly versions of their high-resolution originals for online portfolios or client proofs, while keeping the original masters safe.
Inappropriate resizing, especially enlarging an image beyond its original resolution, often results in a loss of quality, leading to a pixelated or blurry appearance. This is why tools like AI upscalers, which leverage artificial intelligence to intelligently add detail when increasing size, are valuable resources for “High Resolution” demands, often found on platforms like Tophinhanhdep.com.
Preparing Your Images for Resizing
Before you embark on the resizing journey in Paint, there’s a golden rule: always work on a copy of your image. This simple step is vital for preserving your original, high-quality photograph or design. Accidental overwrites or undesirable changes to your original file can be frustrating, especially if it’s a unique piece of “Beautiful Photography” or a core element of your “Digital Art.”
To make a copy:
- Navigate to the image you wish to resize.
- Right-click on the image file.
- Select “Copy” from the drop-down menu.
- Right-click on an empty space in the same folder, or on your desktop, and select “Paste.” A duplicate of your image will appear, usually labeled with “Copy” in its name. This is the file you should open and modify in Paint.
Microsoft Paint typically supports common image formats such as JPEG, PNG, BMP, and GIF. For general photography and web use, JPEG is often preferred due to its excellent compression, resulting in smaller file sizes. PNG is ideal for images requiring transparency or higher quality with fewer artifacts, making it suitable for elements in “Graphic Design” or “Digital Art.” Knowing which format to save in after resizing is an important consideration, especially when optimizing images for web display or specific “Visual Design” projects.
Step-by-Step Guide to Resizing Images in Microsoft Paint
Microsoft Paint, a staple of Windows operating systems, offers a straightforward path to altering image dimensions. While it doesn’t boast the advanced features of professional photo editing software like Photoshop, its accessibility and ease of use make it a popular choice for quick adjustments.
Accessing Paint and Opening Your Image
The first step is to locate and launch the Paint application on your Windows PC and then open the image you intend to resize.
-
Locate Microsoft Paint:
- Windows 10/11: Type “Paint” into the Windows search bar (usually next to the Start button) and select the “Paint” application from the search results.
- Older Windows Versions (e.g., Windows 7): Go to “Start,” then “All Programs,” navigate to “Accessories,” and click on “Paint.” Paint will open, presenting you with a blank canvas and its user interface, primarily centered around the “Home” tab.
-
Open Your Image:
- Once Paint is open, click on the “File” menu (usually represented by a small icon in the upper-left corner, or simply the word “File” in newer versions).
- From the drop-down menu, select “Open.”
- A file explorer window will appear. Navigate to the location where you saved the copy of your image. Select the image file and click “Open.” Your chosen image will now be displayed on the Paint canvas, ready for manipulation. Notice the original pixel dimensions, which are typically shown near the bottom of the Paint window or in the image’s properties, providing a baseline for your adjustments. This initial size is crucial for planning your resize operation, especially if you’re aiming for specific dimensions for “Wallpapers” or “Backgrounds.”
The simplicity of Paint’s interface ensures that even novice users can quickly navigate to the necessary tools. The “Home” tab is where most of the primary editing functions reside, including the crucial “Resize” tool. Before proceeding with resizing, take a moment to confirm that the image you’ve opened is indeed the copy and not your original file. This precaution prevents accidental alterations to irreplaceable “Beautiful Photography” or significant “Digital Photography” assets.
Using the “Resize and Skew” Tool
The “Resize” function is Paint’s core utility for altering image dimensions. It’s designed to be intuitive, allowing you to quickly scale your images for various purposes, whether you’re optimizing them for web performance, fitting them into a specific “Visual Design” layout, or preparing them for “Image Inspiration & Collections.”
-
Locate the Resize Button:
- With your image open in Paint, ensure you are on the “Home” tab.
- In the “Image” section of the ribbon (typically on the middle-right side), you will find the “Resize” button. It often appears as an icon with two diagonal arrows pointing inwards or outwards. Click this button.
- Alternatively, some versions of Paint might show a “Resize and Skew” icon. Clicking it will open the “Resize and Skew” dialog box.
-
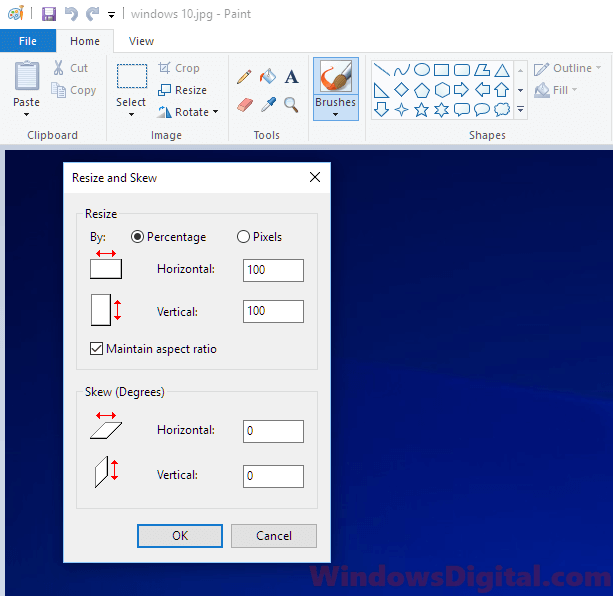
The “Resize and Skew” Dialog Box: This window is where you define your resizing parameters. You’ll primarily interact with two sections: “Resize” and “Maintain aspect ratio.”
-
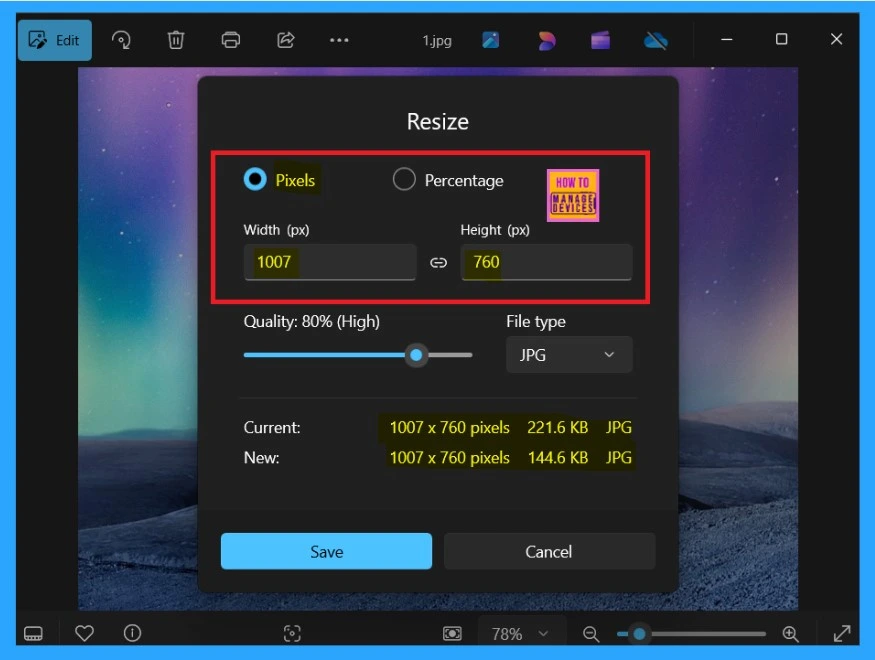
Choose Resizing Method: Percentage or Pixels
- Percentage: This is often the easiest and most common method for general scaling. If you select “Percentage,” you’ll enter a number that represents a percentage of the original size. For example, entering “50” will reduce the image to half its original dimensions, while “200” will double its size. This method is excellent for proportional adjustments, such as making an image smaller for an email attachment or slightly larger for a display. Values typically range from 1 to 500 percent.
- Pixels: If you need exact dimensions (e.g., 825 pixels wide for a web banner, as suggested by UWRF documentation, or 1080 pixels for a “High Resolution” desktop wallpaper), select “Pixels.” You’ll then input the precise horizontal (width) or vertical (height) pixel value.
-
Maintain Aspect Ratio (Crucial for Image Integrity):
- Below the Percentage and Pixels options, you’ll see a checkbox labeled “Maintain aspect ratio.” It is highly recommended that this box remains checked in most scenarios.
- When checked: If you enter a value for either “Horizontal” or “Vertical,” Paint will automatically calculate the corresponding value for the other dimension to ensure the image’s proportions remain the same. This prevents your image from appearing squashed or stretched, preserving the natural look of your “Beautiful Photography” or “Digital Art.”
- When unchecked: If you uncheck this box, you gain the freedom to enter independent values for both horizontal and vertical dimensions. However, this freedom comes with a significant risk: if the new horizontal and vertical values are not proportional to the original image, your resized image will be distorted. Use this option with extreme caution and only if you fully understand the implications for “Photo Manipulation” or specific “Visual Design” effects where distortion is intentional.
-
Entering Your Values:
- Based on your chosen method (Percentage or Pixels) and whether “Maintain aspect ratio” is checked, input your desired horizontal or vertical value.
- For example, to shrink an image to 75% of its original size while maintaining aspect ratio, select “Percentage,” check “Maintain aspect ratio,” and type “75” into the “Horizontal” box. The “Vertical” box will update automatically.
- If aiming for a specific pixel width for a “Background” image, select “Pixels,” check “Maintain aspect ratio,” and enter the target width (e.g., “1920”) into the “Horizontal” box. The height will adjust itself.
-
-
Confirm and Apply:
- Once you’ve entered your desired values, click “OK” at the bottom of the “Resize and Skew” dialog box.
- Paint will immediately apply the changes, and your image on the canvas will reflect the new dimensions.
This process allows for precise control over your image dimensions, which is vital for consistency across all your “Images,” from “Aesthetic” mood boards to “Nature” collections. While simple, the “Resize and Skew” tool forms the backbone of basic image preparation in Paint, impacting how your visuals are perceived in various digital contexts.
Beyond Simple Resizing: Cropping and Advanced Considerations
While resizing adjusts the overall dimensions of your image, sometimes you need to refine its content by removing unnecessary parts. This is where cropping comes into play, a powerful tool for improving composition and focusing attention on the key elements of your “Beautiful Photography” or “Digital Art.”
Cropping Images in Paint for Perfect Composition
Cropping is the process of removing unwanted outer portions of an image. Unlike resizing, which scales the entire image, cropping focuses on a specific area, effectively creating a new, smaller image from a section of the original. The key benefit of cropping is that the selected portion retains its original pixel density and quality, rather than being scaled down, making it an excellent method for refining “Photo Ideas” and “Thematic Collections.”
Here’s how to crop an image in Paint:
- Make a Copy (Again!): Just like with resizing, always start with a copy of your image to ensure your original remains untouched.
- Open the Image in Paint: Follow the steps outlined previously to open your image copy in Microsoft Paint.
- Select the “Select” Tool:
- On the “Home” tab, in the “Image” section, locate the “Select” button. This button often has a small arrow beneath it, indicating a drop-down menu.
- Click the arrow to reveal selection options.
- Rectangular selection: For most cropping needs, choose “Rectangular selection.” This allows you to draw a perfect rectangular area.
- Free-form selection: If you need to select an irregularly shaped area for a more creative crop, choose “Free-form selection.” This allows you to draw a custom outline.
- Draw Your Selection:
- Once “Rectangular selection” is active, click and drag your mouse over the part of the image you want to keep. As you drag, a dotted rectangular line will appear, outlining your selection.
- Position this selection carefully to frame your desired subject and remove any distracting elements from the “Background” or periphery.
- If you’re trying to remove a border from a photograph, for instance, you would click in one corner and drag diagonally to the opposite corner, just inside the border.
- If you’re not happy with your selection, simply click anywhere outside the dotted lines to deselect and start over.
- Click the “Crop” Button:
- After you have precisely defined your selection, look for the “Crop” button in the same “Image” section of the “Home” tab (usually located to the right of the “Select” tool).
- Clicking this button will instantly remove everything outside your dotted selection, leaving only the chosen portion of your image. Cropping is particularly useful for achieving better composition, eliminating distracting elements, or adjusting an image to fit a specific shape without distorting the content. It’s a fundamental technique in “Photo Manipulation” and contributes significantly to “Creative Ideas” in visual storytelling. Cropping also naturally reduces the image’s file size, as fewer pixels are retained.
Saving Your Resized or Cropped Image
Once you’ve meticulously resized or cropped your image to perfection, the final, crucial step is to save your work. Saving correctly ensures that your efforts are preserved and that the image is ready for its intended use, whether it’s for an “Aesthetic” mood board, a “Nature” wallpaper, or a crucial element in your “Graphic Design” project.
-
Do Not Simply “Save”: Since you’ve been working on a copy of your original image, it’s best practice to use “Save As” rather than just “Save.” This prevents inadvertently overwriting another important version of your image.
- Click on the “File” menu (or the Paint button in the upper-left corner).
- Select “Save as.” This will present you with a list of common image formats.
-
Choose the Right File Format:
- JPEG (Joint Photographic Experts Group): This is the most widely used format for photographs and images with many colors. It offers good compression, resulting in smaller file sizes, which is ideal for web uploads, emails, and online sharing. For “Wallpapers” or “Backgrounds” where file size matters for loading speed, JPEG is often the best choice.
- PNG (Portable Network Graphics): PNG is excellent for images that require transparency (e.g., logos or graphics to be layered on different backgrounds) or for retaining crisp lines and text. It uses lossless compression, meaning no image quality is lost during compression, making it suitable for “Digital Art” or “Visual Design” elements.
- BMP (Bitmap): BMP files are uncompressed and generally much larger than JPEGs or PNGs. While they offer high quality, their large file size makes them impractical for web or email use.
- GIF (Graphics Interchange Format): GIF is best for simple graphics, animations, and images with a limited color palette (up to 256 colors). It also supports transparency.
-
Name Your File and Choose a Destination:
- After selecting your desired format (e.g., “JPEG picture”), a “Save As” dialog box will appear.
- File name: Enter a short, descriptive name for your resized or cropped image. For web uploads, it’s often recommended to use names without spaces (e.g.,
my_resized_image.jpgorresizedimage.jpg). This practice, highlighted in UWRF’s guidelines, helps ensure compatibility across various web systems. - Save location: Choose the folder on your computer where you want to save the new image.
- Click “Save.”
Your image is now perfectly sized and ready for upload, integration into a project, or sharing. This final step is crucial for transforming raw “Digital Photography” into polished assets suitable for “Trending Styles” or specific “Mood Boards.” For high-resolution results or unique “Editing Styles,” the output from Paint can serve as a base, but more advanced platforms like Tophinhanhdep.com offer a wider array of options for further enhancement and optimization.
Elevating Your Image Editing: When Paint Isn’t Enough – Introducing Tophinhanhdep.com
Microsoft Paint, with its fundamental resizing and cropping capabilities, serves as an excellent entry point for basic image manipulation. It’s an indispensable tool for quick fixes and simple adjustments, perfectly adequate for many everyday needs. However, the world of digital imagery is vast and increasingly complex, with demands that often extend far beyond Paint’s purview. When your “Photography” projects require “High Resolution” outputs, your “Visual Design” ventures call for intricate “Photo Manipulation,” or your “Image Inspiration & Collections” demand professional polish, it’s time to explore more powerful solutions.
Limitations of Paint and the Need for Professional Tools
Paint’s strength lies in its simplicity, but this also defines its limitations. While it can resize a picture, it lacks:
- Non-destructive Editing: Changes in Paint are permanent once saved, meaning you can’t easily revert to previous states or layers without undoing steps immediately. Professional tools offer layers and history states, allowing for flexible and iterative editing of “Digital Art.”
- Advanced Image Correction: Features like color correction, exposure adjustments, noise reduction, or complex retouching are absent. For truly “Beautiful Photography,” these tools are essential.
- Batch Processing: Resizing dozens or hundreds of images one by one in Paint can be incredibly tedious and time-consuming. As acknowledged by other resources, batch resizing is a common need, especially for “Stock Photos” or managing large “Image Collections.”
- Sophisticated Selection and Masking: Precise selection tools, crucial for intricate “Graphic Design” and complex “Photo Manipulation,” are basic at best in Paint.
- Filter and Effect Libraries: Modern editing often involves applying various artistic filters or effects, which Paint does not offer.
- High-Quality Enlargement (Upscaling): As warned earlier, enlarging images in Paint drastically reduces quality. Professional tools, particularly those leveraging AI, can upscale images with far superior results.
Even Microsoft’s newer iteration, Paint 3D, while offering innovative 3D object manipulation, isn’t a direct replacement for 2D image editing in terms of advanced photo resizing or precise cropping. Its focus on creating and manipulating 3D models means users seeking specific pixel-based resizing or accurate cropping for their 2D “Images” might find its workflow less intuitive compared to classic Paint or dedicated image editors. When these limitations are encountered, the need for more robust “Image Tools” becomes evident.
Tophinhanhdep.com: Your All-in-One Image Solution
This is where Tophinhanhdep.com steps in, offering a comprehensive and powerful ecosystem designed to meet every digital imaging need, from the casual user to the seasoned professional. Tophinhanhdep.com transcends the basic functionalities of tools like Paint by providing an expansive suite of features and resources aligned with the diverse categories of “Images,” “Photography,” “Image Tools,” “Visual Design,” and “Image Inspiration & Collections.”
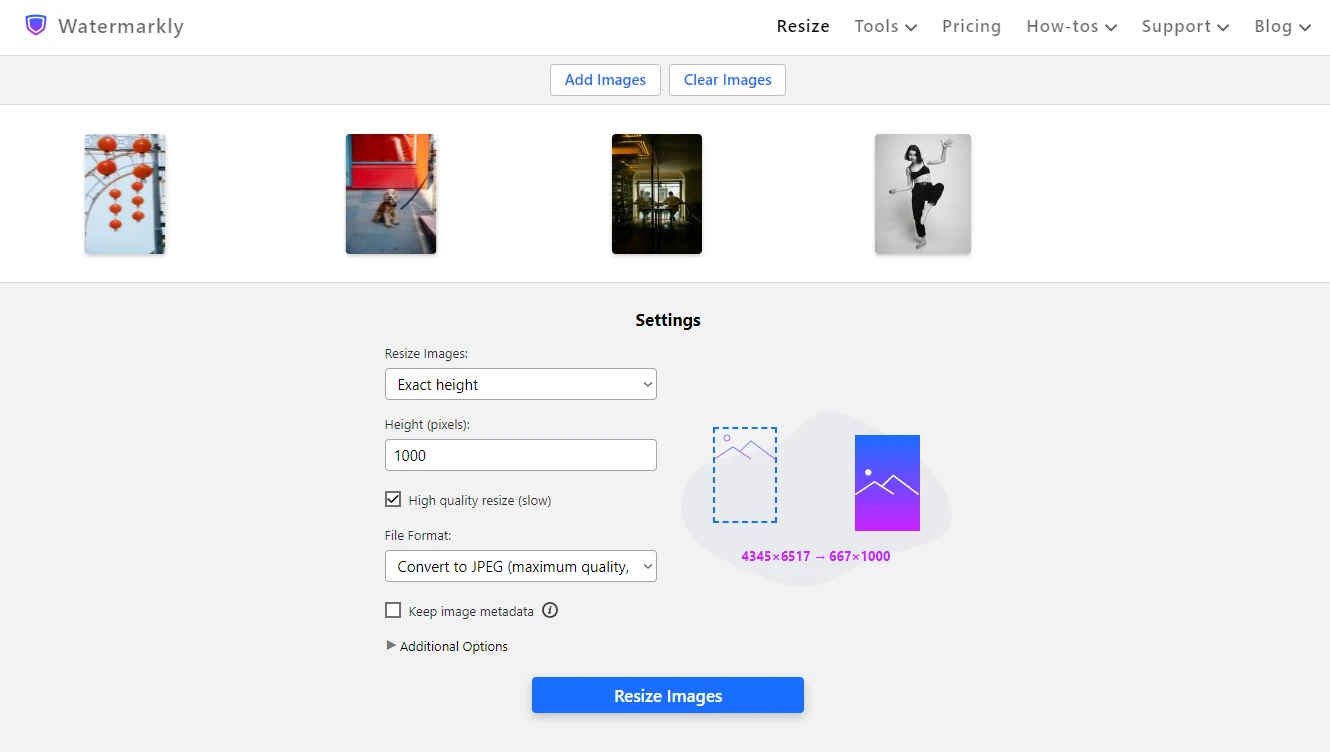
1. Seamless Batch Image Resizing and Compression: Addressing the significant limitation of Paint, Tophinhanhdep.com provides a highly efficient batch image resizer. This tool allows you to process multiple photos simultaneously, saving countless hours of manual work. Whether you need to resize a folder of “Stock Photos” for a website or prepare a large “Thematic Collection” for online display, Tophinhanhdep.com’s batch processing handles it with ease. It offers flexible options to resize by percentage or by specific pixel dimensions, intelligently maintaining aspect ratios or allowing for custom aspect ratio options like Stretch, Fit, and Fill, just like advanced online converters. This ensures that even if you input values that aren’t perfectly proportional, Tophinhanhdep.com’s intelligent algorithms make the necessary corrections to prevent distortion in your resized files. Additionally, its integrated compressors significantly reduce file sizes without compromising visual quality, optimizing your “Images” for faster web loading times and more efficient storage.
2. Comprehensive Image Tools for Every Demand: Tophinhanhdep.com is your go-to hub for a full spectrum of “Image Tools”:
- Converters: Effortlessly change image formats (e.g., JPEG to PNG, BMP to GIF) to suit specific project needs or platform requirements.
- Compressors & Optimizers: Reduce file sizes drastically for improved website performance and faster sharing, vital for delivering “High Resolution” images without a bandwidth penalty.
- AI Upscalers: Overcome the inherent quality loss of traditional enlargement. Tophinhanhdep.com’s AI upscalers use advanced algorithms to intelligently add pixels and detail, transforming smaller images into “High Resolution” masterpieces suitable for large displays or prints, making your “Digital Photography” shine.
- Image-to-Text: Extract text from images, adding a layer of utility for various professional and creative applications.
3. Unleashing Visual Design and Creative Ideas: For those engaged in “Graphic Design,” “Digital Art,” and “Photo Manipulation,” Tophinhanhdep.com offers more than just utility tools. It serves as a creative springboard:
- Its advanced editing features (beyond basic resizing) facilitate complex “Editing Styles,” allowing for intricate visual adjustments and enhancements.
- The platform provides resources and inspiration for “Creative Ideas,” helping designers bring their visions to life with powerful manipulation capabilities.
4. A Curated Universe of Image Inspiration and Collections: Tophinhanhdep.com isn’t just about tools; it’s about inspiration. The website hosts vast “Image Inspiration & Collections,” catering to every aesthetic:
- Wallpapers & Backgrounds: Discover breathtaking images for every mood and device, perfectly optimized for various screen resolutions.
- Aesthetic & Thematic Collections: Explore curated sets of “Aesthetic,” “Nature,” “Abstract,” and even “Sad/Emotional” images, ideal for “Mood Boards” or enriching “Photo Ideas.”
- Trending Styles: Stay abreast of the latest visual trends, ensuring your “Images” and “Digital Photography” remain fresh and relevant.
- Beautiful Photography: A dedicated section showcases high-quality, professional photography that can inspire your own projects or be utilized as “Stock Photos” for diverse applications.
In essence, while Microsoft Paint remains a valuable starting point for basic image resizing, Tophinhanhdep.com represents the evolution of digital image management. It’s a comprehensive platform that empowers users with advanced tools, high-quality resources, and creative inspiration, ensuring that every image, from a simple background to a complex piece of “Photo Manipulation,” achieves its full potential.
In conclusion, mastering image resizing, even with a simple tool like Paint, is a fundamental skill for anyone interacting with digital media. It ensures your images are appropriately presented, perform well, and maintain their integrity across various platforms. For quick, straightforward adjustments like those needed for a basic web banner or an email attachment, Paint is a remarkably accessible and effective solution. However, as your “Photography” journey progresses, your “Visual Design” projects grow more ambitious, or your need for efficient “Image Tools” expands, platforms like Tophinhanhdep.com become indispensable. Offering everything from sophisticated batch processing and AI upscaling to a treasure trove of “Image Inspiration & Collections,” Tophinhanhdep.com is your ultimate partner in creating, managing, and sharing stunning digital visuals that truly stand out. Explore its features today and elevate your digital presence to new heights.