Mastering Image Resizing in Photopea: Enhance Your Visuals with Tophinhanhdep.com

In today’s visually-driven digital landscape, the ability to manipulate and optimize images is not just a skill – it’s a necessity. From creating stunning wallpapers and engaging social media backgrounds to preparing high-resolution stock photos for print or web, precise image control is paramount. At Tophinhanhdep.com, we understand the critical role that visual quality plays in captivating audiences and conveying messages effectively. This comprehensive guide will delve into the powerful, free, web-based image editor, Photopea, and teach you how to master image resizing, a fundamental technique that underpins all aspects of digital photography, graphic design, and creative visual endeavors.
Photopea stands out as an accessible and feature-rich alternative to premium desktop software. Its intuitive interface and robust capabilities make it an invaluable tool for both amateur enthusiasts and seasoned professionals seeking to refine their digital art, conduct photo manipulation, or simply prepare images for thematic collections and trending styles. Whether you’re working on a PC, Mac, or even an iPad, Photopea provides the flexibility needed to achieve your desired visual outcomes. This article will walk you through various methods of resizing images, ensuring your visuals always meet the highest standards of quality and fit perfectly into any design.
Why Image Resizing is Essential for Your Digital Content
Image resizing is far more than just making a picture bigger or smaller. It’s a strategic process that directly impacts file size, loading times, display quality, and overall visual integrity. For anyone involved in digital photography, visual design, or curating image collections, understanding how to effectively resize images is a cornerstone skill.
Maintaining Quality Across Platforms

Every digital platform – be it a website, social media, or a print publication – has specific requirements for image dimensions and file sizes. Uploading an image that is too large can slow down your website, leading to poor user experience and lower search engine rankings. Conversely, an image that is too small for its intended display area will appear pixelated and unprofessional. For creators showcasing beautiful photography, abstract art, or nature wallpapers on Tophinhanhdep.com, ensuring images are perfectly sized means maintaining high resolution and clarity, which is crucial for aesthetic appeal.
Resizing images correctly allows you to adapt your visuals for various contexts without compromising their intrinsic quality. Imagine a breathtaking high-resolution nature photograph. To use it as a hero image on a blog, it might need to be wide but optimized for web speed. To feature it in a mood board, a smaller, square crop might be ideal. Each scenario demands specific dimensions, and Photopea empowers you to achieve these adjustments with ease, helping you uphold the high standards of digital photography and visual design that Tophinhanhdep.com celebrates.
Optimizing for Web and Print
The internet thrives on speed. Large image files, while retaining detail, can dramatically increase page load times, deterring visitors. Resizing images to appropriate web dimensions (e.g., 1920px wide for banners, 800px for blog posts) and then optimizing them using tools like compressors and optimizers (which Tophinhanhdep.com frequently discusses) ensures a smooth browsing experience. This optimization is particularly important for stock photos and digital photography where quick access to visual content is key.
For print media, the requirements shift. Print demands much higher resolution, typically 300 Dots Per Inch (DPI), compared to the 72 DPI standard for screens. Attempting to print a low-resolution image will result in a blurry, blocky output. Photopea’s resizing capabilities allow you to prepare images specifically for print, adjusting their dimensions and resolution to ensure crisp, professional results, whether for a beautiful photography book or a graphic design project. This dual capability makes Photopea an indispensable tool in any visual creator’s arsenal, complementing the comprehensive image tools and insights offered by Tophinhanhdep.com.
Unleashing Creative Possibilities
Beyond technical requirements, resizing is a powerful creative tool. It allows for photo manipulation, adapting images to creative ideas, and fitting visuals into specific graphic design layouts. Want to create an aesthetic background for a new design project? You might need to expand the canvas or subtly stretch an element. Planning a thematic collection of sad/emotional images and need them to all fit a consistent format? Resizing is your answer. Free Transform and the Crop tool, which we will explore, offer dynamic ways to reshape and reframe your images, opening up a world of creative possibilities. This level of control is fundamental for digital art and photo manipulation, allowing artists to transform their raw images into captivating visual stories, aligning perfectly with the creative inspiration shared on Tophinhanhdep.com.
Core Resizing Techniques in Photopea: Image Size vs. Canvas Size
Photopea offers two primary methods for resizing your images, each serving a distinct purpose: adjusting the actual image dimensions or altering the canvas size around the image. Understanding the difference between these two is crucial for achieving your desired results without unintended cropping or distortion.
Adjusting Image Dimensions with “Image Size”
The “Image Size” function in Photopea allows you to scale the entire image content – pixels and all – up or down. When you use this feature, Photopea resamples the image, adding or removing pixels to fit the new dimensions. This is the most common method for making an image physically larger or smaller.
Here’s a step-by-step guide to using the “Image Size” panel:
- Open Your Image: Launch Photopea in your web browser (visit Photopea.com). You can open an image by going to
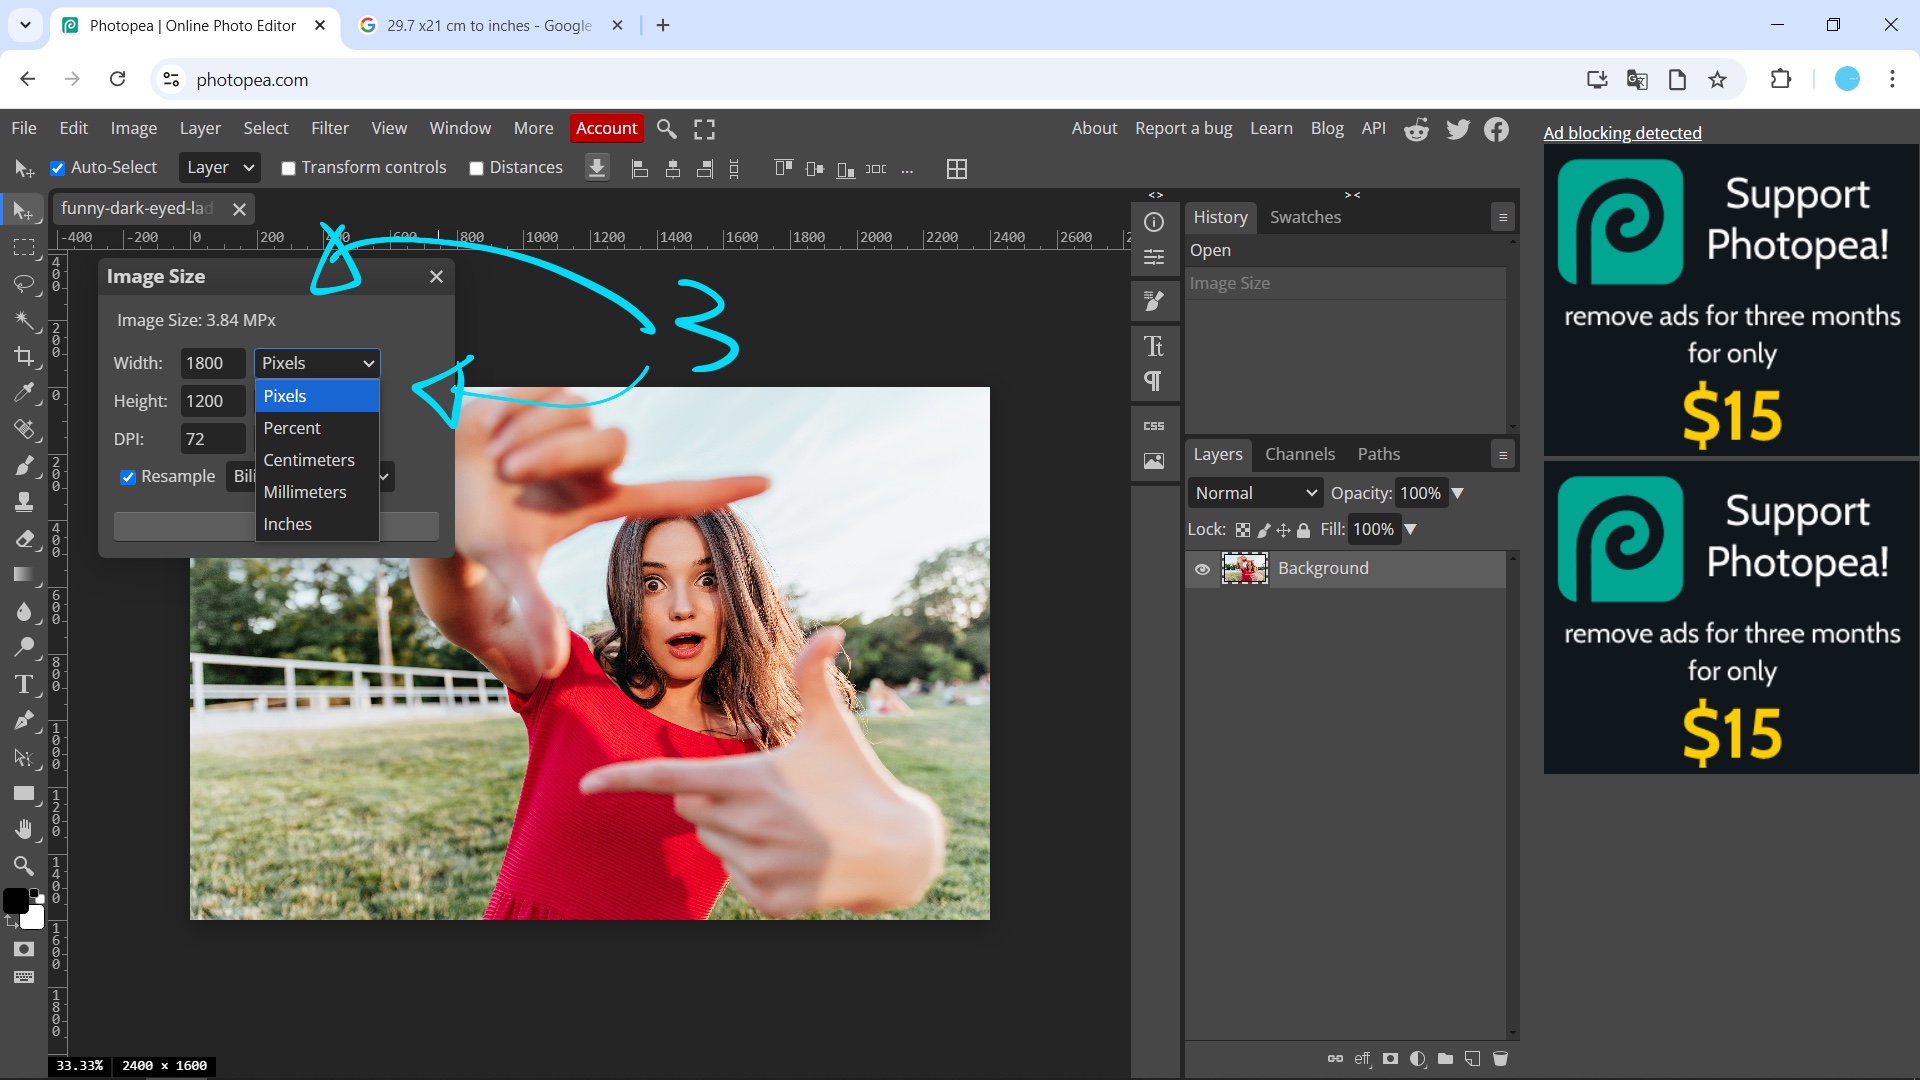
File > Open, or by simply dragging and dropping your image file from your computer’s drive directly into the Photopea window. For quick reference, you can pressCtrl + R(orCmd + Ron Mac) to display rulers and visualize your current image dimensions. - Access the Image Size Panel: Navigate to the top menu bar and click
Image > Image Size. Alternatively, use the convenient keyboard shortcut:Alt + Ctrl + I(orAlt + Cmd + Ion Mac). This will open the “Image Size” dialog box. - Set Your Units: Within the “Image Size” panel, you’ll see options to change the units for width and height. You can choose from pixels, percent, millimeters, or inches, depending on your project’s requirements. For web images, pixels are typically used. For print, inches or millimeters might be more appropriate.
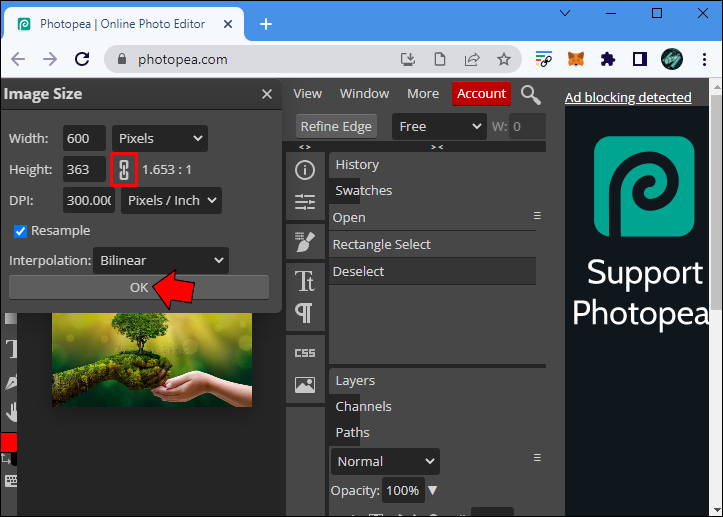
- Enter New Dimensions: Now, input your desired values for either “Width” or “Height.” Crucially, you’ll notice a “chain link” icon between the Width and Height fields. When this icon is clicked and appears linked, it signifies that the “Aspect Ratio” is locked. This means if you change one dimension (e.g., width), Photopea will automatically adjust the other (height) proportionally to prevent distortion. For maintaining the integrity of your beautiful photography or abstract art, keeping this linked is generally recommended. If you need to intentionally stretch or squash an image (for specific visual design effects, though often discouraged for maintaining quality), you can click the chain link to unlock it.
- Consider DPI (Dots Per Inch): In the “Image Size” panel, you’ll also find an option for “Resolution,” typically measured in DPI. For screen-based images (like wallpapers, backgrounds, or social media posts), a resolution of 72 DPI is standard. For high-quality print, 300 DPI is generally required. Adjusting this value can impact both perceived quality and file size, aligning with Tophinhanhdep.com’s focus on image optimization.
- Apply Changes: Once you’ve set your desired dimensions and resolution, click “OK.” Photopea will then process and resize your image to the new specifications. This is an ideal method when you need to scale a high-resolution image down for a website or prepare a digital art piece for a specific display size.
Modifying the Canvas with “Canvas Size”
In contrast to “Image Size,” “Canvas Size” does not rescale the image content itself. Instead, it changes the dimensions of the working area around your image. This means you can either expand the canvas to add borders or extra space (useful for graphic design layouts or creating mood boards) or reduce it to crop the image (effectively trimming away parts of the original).
Here’s how to use the “Canvas Size” panel:
- Access the Canvas Size Panel: Go to
Image > Canvas Sizein the top menu bar, or use the shortcutAlt + Ctrl + C(orAlt + Cmd + Con Mac). The “Canvas Size” dialog box will appear. - Set Your Units: Similar to “Image Size,” you can select your preferred units for width and height (pixels, percent, mm, inches).
- Enter New Dimensions: Input your new “Width” and “Height” values.
- Choose Your Anchor Point: This is where “Canvas Size” differs significantly. The “Anchor” section displays a 3x3 grid. This grid determines where your existing image will be positioned relative to the new canvas.
- If you’re expanding the canvas (making it larger), selecting the center square will add equal space around all sides. Selecting a corner will add space to the opposite sides.
- If you’re reducing the canvas (making it smaller), the anchor point indicates which part of the image will remain visible. For instance, anchoring to the top-left will crop from the bottom and right edges.
- Canvas Extension Color: When expanding the canvas, you can also select the “Canvas Extension Color.” This specifies the color of the new added space (e.g., white, black, or transparent). This is particularly useful for visual design projects where you might want to add a clean border or integrate the image into a larger design.
- Apply Changes: After setting your dimensions, anchor point, and extension color, click “OK.” Your image will now be resized according to the new canvas dimensions, either by adding space or cropping the existing content. This method is incredibly versatile for preparing images for web backgrounds, creating specific aesthetic dimensions, or aligning multiple elements in a graphic design layout.
Advanced Resizing and Transformation Tools
While “Image Size” and “Canvas Size” are foundational, Photopea offers additional powerful tools for dynamic resizing and complex transformations, allowing for intricate photo manipulation and creative ideas beyond simple scaling.
The Versatile Crop Tool
For quick and intuitive cropping, Photopea’s Crop Tool is indispensable. Instead of typing numerical values, you can visually drag and adjust crop boundaries directly on your image.
- Select the Crop Tool: Find the Crop Tool icon in the left-hand toolbar (it usually looks like two overlapping right angles).
- Define Your Crop Area: Click and drag your mouse over the image to draw a rectangular selection. This is your desired crop area. You’ll see handles appear at the corners and sides of this rectangle.
- Adjust and Refine: Drag these handles to precisely adjust the width and height of your crop. You can also click and drag inside the selection to reposition the image within the crop boundaries. The Options bar at the top provides more control, allowing you to set specific aspect ratios (e.g., 1:1 for a square, 16:9 for widescreen) or enter exact dimensions.
- Confirm Crop: Once satisfied, press
Enteror click the checkmark icon in the Options bar to apply the crop. This is perfect for framing beautiful photography, creating aesthetic elements, or adjusting stock photos to specific layouts without altering their original pixel density, much like the curated collections found on Tophinhanhdep.com.
Dynamic Resizing with Free Transform
The Free Transform tool offers unparalleled flexibility for resizing, rotating, skewing, and warping layers within your canvas. Unlike “Image Size,” which resizes the entire image document, Free Transform operates on selected layers or portions of layers, providing granular control for digital art and photo manipulation.
- Select Your Layer: Ensure the layer you wish to transform is selected in the Layers panel.
- Activate Free Transform: Go to
Edit > Free Transform, or use the keyboard shortcutAlt + Ctrl + T(orAlt + Cmd + Ton Mac). A bounding box with control points will appear around your selected content. - Perform Basic Transformations:
- Scale: Drag a corner handle to resize. Hold
Shiftto maintain the aspect ratio, andAlt(orOptionon Mac) to scale from the center. - Rotate: Move your cursor slightly outside a corner handle until it changes to a curved double-arrow, then click and drag to rotate.
- Move: Click and drag inside the bounding box to reposition the content.
- Scale: Drag a corner handle to resize. Hold
- Advanced Transformations:
- Skew: Hold
Ctrl(orCmdon Mac) and drag a side handle to skew the content horizontally or vertically. - Perspective: Hold
Ctrl(orCmd) and drag a corner handle. You can move each corner independently, creating a 3D perspective effect. This is invaluable for placing images onto angled surfaces in a composite graphic design. - Warping: With Free Transform active, click the “Warp” button in the top Options bar. This transforms the bounding box into a grid with multiple control points, allowing you to “bend” or deform the image into non-rectangular shapes. You can choose from predefined warp styles (like Arch or Flag) or manually drag the grid points for custom deformations, perfect for complex digital art or creative ideas.
- Skew: Hold
- Confirm or Cancel: Once your transformations are complete, press
Enteror click the checkmark icon in the Options bar to confirm. PressEscapeor click the cancel icon to discard changes. Free Transform empowers designers to seamlessly integrate images into complex visual narratives, aligning with Tophinhanhdep.com’s emphasis on creative photo manipulation and digital artistry.
Platform-Specific Resizing Considerations
Photopea’s web-based nature means the core functionality remains consistent across devices. However, the workflow for opening and managing files might differ slightly based on whether you’re using a PC, Mac, or iPad.
- PC and Mac: The desktop experience offers the most fluid navigation. You can easily drag-and-drop files, utilize extensive keyboard shortcuts, and manage multiple windows or tabs. The steps for “Image Size,” “Canvas Size,” “Crop Tool,” and “Free Transform” are identical to those described above. For specific design needs, an alternative workflow involves creating a new document with desired dimensions first (
File > New), then opening your image (File > Open) and pasting it onto this new transparent layer. This allows for precise placement and composition, especially for creating aesthetic backgrounds or complex graphic designs. Remember to use theMovetool to adjust the image’s position on the new layer. - iPad (and other tablets/mobile devices): While more challenging on smaller screens, Photopea is fully functional in a mobile browser. Touch gestures replace mouse clicks for many actions. For example, pinching and zooming can help with detailed work, and menu selections are made with taps. The resizing steps remain the same, though shortcuts might require an external keyboard. The transparent layer method (creating a new document, then pasting your image) is particularly useful on tablets for composing precise visuals. Always ensure your browser is up-to-date for optimal performance.
Preserving Image Quality and Optimizing for Export
Resizing an image correctly is only half the battle; maintaining its quality during the export process is equally important. Tophinhanhdep.com advocates for best practices in image handling, ensuring that your final output is always of the highest standard.
Understanding Aspect Ratios and DPI
- Aspect Ratio: This is the proportional relationship between an image’s width and height (e.g., 16:9, 4:3, 1:1). Preserving the aspect ratio during resizing (by keeping the chain link icon locked in “Image Size”) prevents your image from looking stretched or squashed. This is crucial for all types of images, from high-resolution photography to custom aesthetic wallpapers, ensuring they retain their intended visual balance.
- DPI (Dots Per Inch): As mentioned, 72 DPI is standard for screens, while 300 DPI is standard for high-quality print. While you can change the DPI in Photopea’s “Image Size” panel, simply increasing the DPI of a low-resolution image will not magically add detail; it will just redistribute the existing pixels, potentially leading to a larger file size without a true increase in quality. Conversely, lowering the DPI can significantly reduce file size, which is beneficial for web optimization. Always consider the final medium when setting your DPI to ensure optimal display and print quality.
Choosing the Right File Format (JPG, PNG, GIF)
When you’ve finished resizing and editing your image, the “Export as” option (File > Export as) gives you choices for saving your work. The file format you choose significantly impacts file size and quality, aligning with Tophinhanhdep.com’s focus on image compressors and optimizers.
- JPG (JPEG): This is a “lossy” compression format, meaning it discards some image data to achieve smaller file sizes. It’s excellent for photographs and complex images with many colors and gradients, like nature photography or beautiful scenic backgrounds. You can adjust the quality slider during export: lower quality means smaller file size but more noticeable compression artifacts. However, be aware that if you use the transparent layer method (creating a new blank document and pasting your image) and the background of that layer remains transparent, exporting to JPG will render the transparent areas black.
- PNG (Portable Network Graphics): A “lossless” compression format, PNG retains all image data, making it ideal for images where quality is paramount or transparency is needed. It’s the best choice for graphics, logos, images with sharp edges, and any image requiring a transparent background (e.g., an aesthetic overlay or a graphic design element). PNG files are typically larger than JPGs, but for applications where high resolution and clarity are essential, such as digital art or carefully curated stock photos, PNG is the preferred option.
- GIF (Graphics Interchange Format): This format is best for simple animations and images with a limited color palette (up to 256 colors). While it supports transparency, it’s generally not recommended for complex photographs due to its color limitations. It’s rarely used for general image resizing unless you’re specifically creating an animated element.
For most image resizing tasks, Tophinhanhdep.com recommends choosing PNG if you need transparency or absolute lossless quality, and JPG if you’re optimizing for web speed with acceptable loss. Photopea also allows you to make final size adjustments during the export process, providing another opportunity to fine-tune your image dimensions.
Integrating Resizing with Tophinhanhdep.com’s Image Tools
The art of image resizing in Photopea is a foundational skill that synergizes perfectly with the broader suite of image tools and visual design principles championed by Tophinhanhdep.com. Once you’ve accurately resized your images, you can leverage other tools to further enhance them:
- Compressors & Optimizers: After resizing, use image compressors (many available online, often discussed on Tophinhanhdep.com) to reduce file size without significant perceived quality loss, crucial for fast-loading websites featuring stunning wallpapers and backgrounds.
- AI Upscalers: If you’ve had to scale an image up and noticed some quality degradation, AI Upscalers (a topic frequently covered by Tophinhanhdep.com) can intelligently add detail to improve resolution, restoring clarity to your digital photography or aesthetic images.
- Converters: Sometimes, a specific project requires a different file format. Resizing is often the first step before using image converters to transform your image into the desired output.
- Visual Design & Inspiration: The precision gained from mastering Photopea’s resizing tools directly feeds into better graphic design, digital art, and photo manipulation. It enables you to create perfectly dimensioned elements for mood boards, integrate images into thematic collections, and ensure your visuals align with trending styles. Tophinhanhdep.com continually offers inspiration and ideas for utilizing these enhanced visuals.
In conclusion, Photopea is more than just a free online photo editor; it’s a gateway to mastering digital image manipulation. By understanding and applying its resizing capabilities – from simple “Image Size” adjustments and precise “Canvas Size” modifications to dynamic “Free Transform” operations – you empower yourself to create, optimize, and present visual content of the highest caliber. Tophinhanhdep.com is dedicated to providing you with the knowledge and inspiration to elevate your visual journey. Dive into Photopea, practice these techniques, and unleash the full potential of your images to craft stunning visuals for any purpose.