How to Master Image Resizing in Photoshop: A Comprehensive Guide

In the dynamic world of digital imagery, the ability to effectively resize images is not just a technical skill; it’s a foundational art that underpins nearly every aspect of visual creation and consumption. From crafting breathtaking Wallpapers and Backgrounds that perfectly fit any screen, to ensuring your Beautiful Photography is displayed with crisp clarity across various platforms, mastering image resizing in Adobe Photoshop is indispensable. This guide from Tophinhanhdep.com will delve into the nuances of resizing, offering both fundamental techniques and advanced strategies to optimize your workflow and achieve impeccable results, whether you’re working on High Resolution masterpieces or preparing images for web use with Image Tools like compressors and optimizers.
Understanding how to manipulate image dimensions without compromising quality is crucial for photographers, graphic designers, digital artists, and anyone engaged in Visual Design. Incorrect resizing can lead to pixelation, distortion, and loss of detail, transforming an otherwise stunning image into an unprofessional output. Tophinhanhdep.com is dedicated to providing you with the insights and tools needed to elevate your digital art, from offering diverse Image Collections and Photo Ideas to detailed guides on Digital Photography and Editing Styles. This article will focus on the practical steps and underlying principles of image resizing in Photoshop, a powerful tool at the heart of much of today’s Photo Manipulation and Creative Ideas.
Understanding the Fundamentals: Image vs. Layer Resizing in Photoshop
Before diving into the “how-to,” it’s vital to distinguish between resizing an entire image document and resizing individual layers within that document. Each approach serves a different purpose and is governed by distinct Photoshop functions. Resizing the entire document changes the overall canvas size and resolution, affecting all pixels within it, suitable for final output adjustments for print or web. Resizing a layer, on the other hand, manipulates a specific element independently, crucial for compositing, Graphic Design, and intricate Digital Art projects.
Resizing the Entire Document: “Image Size” Explained
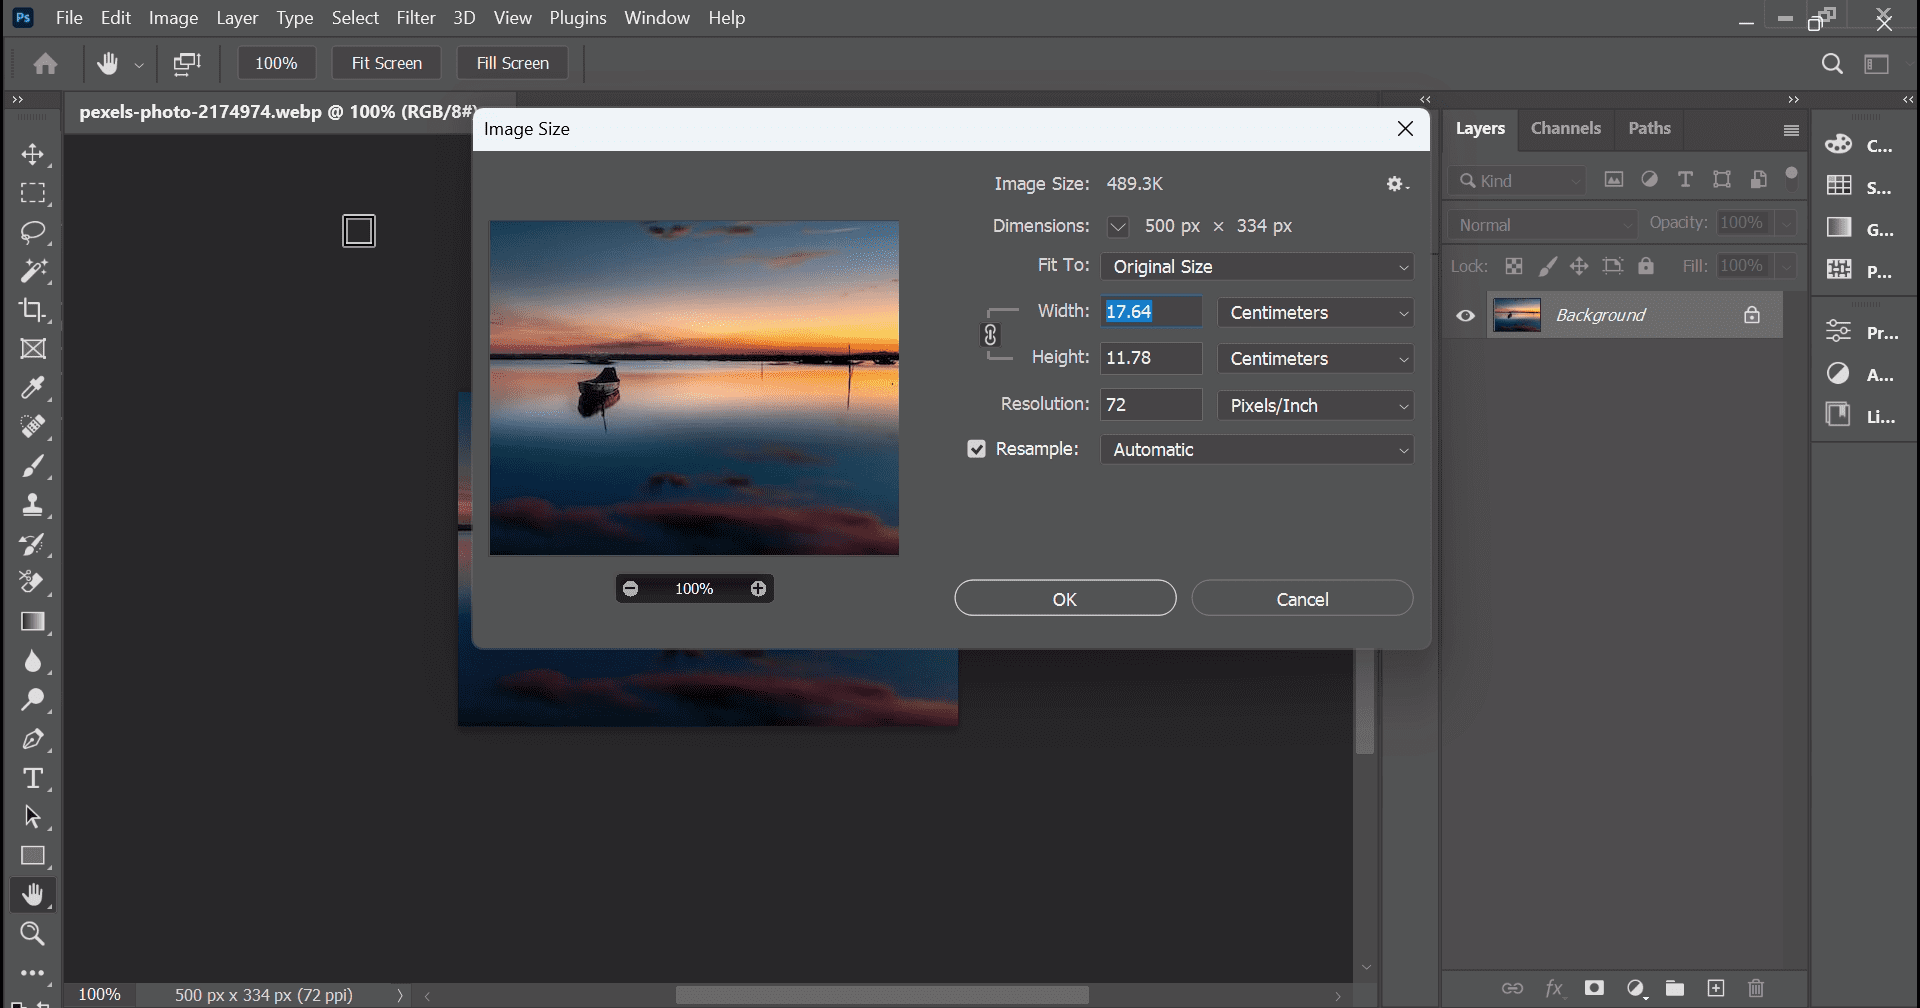
When your goal is to change the overall dimensions or resolution of your entire image, the “Image Size” dialog box is your primary tool. This is often the first step when preparing a High Resolution photograph for a specific print size, or scaling down a large Nature scene to be used as a desktop Wallpaper without excessive file size.
Here’s how to navigate this essential function:
- Open Your Image: Begin by opening your desired image in Photoshop. This could be one of your Stock Photos, a breathtaking piece of Beautiful Photography, or any image from your Image Inspiration & Collections.
- Access the Image Size Dialog: Go to
Imagein the top menu bar, and then selectImage Size. Alternatively, you can use the shortcutAlt + Ctrl + I(Windows) orOption + Cmd + I(Mac). - Understand the Dialog Box: A new window will appear, presenting several key options:
- Pixel Dimensions: This section displays the current width and height of your image in pixels, along with its current file size. As you adjust the dimensions, Photoshop will dynamically update the projected file size, a critical consideration for web optimization, linking directly to Tophinhanhdep.com’s Compressors and Optimizers.
- Document Size: This shows the physical dimensions of your image (e.g., in inches, centimeters, or millimeters) at a given resolution. This is particularly important for print applications.
- Resolution: Measured in pixels per inch (PPI) or dots per inch (DPI), resolution determines the pixel density. For screens, 72 PPI is often sufficient, but for high-quality printing, Tophinhanhdep.com recommends aiming for
200 pixels/inchas a minimum, with300 pixels/inchbeing ideal for professional results. This directly impacts the crispness of your Digital Photography when printed. - Constrain Proportions (Chain Link Icon): This is arguably the most critical setting. Ensure the chain link icon between Width and Height is active. When active, changing one dimension (e.g., width) will automatically adjust the other (height) to maintain the image’s original aspect ratio. This prevents distortion, ensuring your Aesthetic compositions or carefully curated Mood Boards retain their intended look. If this is unchecked, you can input arbitrary values for width and height, leading to stretched or squashed images – a common pitfall in amateur Visual Design.
- Resample: This checkbox is vital. When checked, Photoshop adds or removes pixels to achieve the new dimensions. If unchecked, Photoshop merely changes the print size and resolution without altering the total number of pixels, which can affect print quality without changing the on-screen appearance. Tophinhanhdep.com emphasizes that resampling is key for optimizing images for specific uses, and the quality of this process relies on the chosen resampling method.
- Resampling Methods: Photoshop offers several options:
- Automatic: Photoshop intelligently selects the best method based on your transformation.
- Preserve Details (enlargement): Best for enlarging images, attempting to maintain sharp edges and details.
- Bicubic Smoother (enlargement): Good for enlarging images, often producing smoother transitions.
- Bicubic Sharper (reduction): Ideal for shrinking images, enhancing sharpness after reduction.
- Bicubic (smooth gradients): A general-purpose method, good for smooth tonal gradations.
- Nearest Neighbor (hard edges): Fast but can produce jagged edges, best for illustrations with hard edges rather than Photography.
- Bilinear: A mid-range option, better than Nearest Neighbor but less precise than Bicubic.
- Resampling Methods: Photoshop offers several options:
- Input New Dimensions/Resolution: Based on your needs (e.g.,
10 incheswide for print at300 PPI, or1920 pixelswide for a desktop Background at72 PPI), input your desired values. - Click “OK”: Once satisfied, click
OKto apply the changes. - Save Your File: Always use
File > Save Asto save your resized image with a new name. This preserves your original file, which is a best practice for Digital Photography and Image Collections, allowing for future edits or alternative uses.
This method is perfect for situations where the entire image’s physical or pixel dimensions need to change, such as preparing Abstract art for a gallery print or optimizing a Sad/Emotional image for a blog post.
Resizing Individual Layers: The Power of Free Transform
Often, you won’t want to resize the entire canvas, but rather individual elements within your composite image. This is where the Free Transform tool shines, offering unparalleled flexibility for Photo Manipulation, Graphic Design, and Digital Art. Imagine adjusting a subject in a Nature photo, scaling a logo in a Creative Ideas mock-up, or fitting an Aesthetic element into a complex collage.
Here’s a step-by-step guide to resizing layers using Free Transform:
- Select the Layer: In the Layers panel, click on the specific layer you wish to resize. Make sure it’s not a locked background layer. If it is, convert it to a regular layer or Smart Object (more on this crucial step later) by double-clicking it.
- Activate Free Transform: Go to
Editin the top menu bar and selectFree Transform. Alternatively, and more commonly, use the shortcutCtrl + T(Windows) orCmd + T(Mac). - Identify the Transform Box: A bounding box with handles at the corners and sides will appear around your selected layer. A central pivot point will also be visible.
- Resizing the Layer:
- Proportional Resizing (CC 2019 and newer): Starting with Photoshop CC 2019, proportional scaling is the default behavior. Simply click and drag any of the corner handles. The layer will resize, maintaining its aspect ratio automatically. This streamlines the process for many users.
- Non-Proportional Resizing (CC 2019 and newer): To intentionally distort or stretch a layer (e.g., for certain Creative Ideas or Photo Manipulation effects), hold down the
Shiftkey while dragging a corner handle. This is an inversion of older Photoshop versions, so it might take some getting used to if you’re accustomed to the previous behavior. - Proportional Resizing (Pre-CC 2019): In older versions, you had to hold down the
Shiftkey while dragging a corner handle to maintain proportions. If you didn’t, the layer would resize non-proportionally by default. - Resizing from the Center: To resize the layer uniformly from its center point (rather than from the corner you’re dragging), hold down
Alt(Windows) orOption(Mac) while dragging a corner handle. This is an excellent trick to avoid having to reposition the layer after resizing, useful for centrally placed elements in Visual Design.
- Rotating the Layer: Move your mouse pointer just outside one of the corner handles. The cursor will change to a curved double-headed arrow. Click and drag to rotate the layer. Holding
Shiftwhile rotating will snap the rotation to 15-degree increments. - Moving the Layer: Click and drag anywhere inside the transform box (but not on a handle) to reposition the layer on the canvas.
- Confirm or Cancel:
- Confirm: Once you’re satisfied with the transformation, press
Enter(orReturnon Mac) to apply the changes. You can also click the checkmark icon in the Options bar at the top. - Cancel: If you’re unhappy with the changes and want to revert, press the
Escapekey, or click the cancel icon (circle with a slash) in the Options bar.
- Confirm: Once you’re satisfied with the transformation, press
Other Layer Transformations (Distort, Skew, Wrap)
The Free Transform tool is versatile, but Photoshop offers even more specialized transformation options under Edit > Transform. These tools allow for complex Photo Manipulation and Digital Art effects, perfect for adding unique flair to your Aesthetic projects or creating dynamic Image Inspiration elements:
- Scale: Similar to Free Transform for resizing, but without rotation or movement options.
- Rotate: Specifically for rotating layers.
- Skew: Distorts a layer by slanting it horizontally or vertically.
- Distort: Allows you to drag each corner handle independently, stretching and skewing the layer in more complex ways. Great for perspective changes, such as making an image appear to recede into the distance.
- Perspective: Applies a one-point perspective to the layer, allowing you to manipulate two opposing handles simultaneously to create a sense of depth.
- Warp: This incredibly powerful tool lets you reshape a layer using a grid or custom mesh. You can push, pull, and bend the image as if it were a flexible fabric. This is a favorite among Graphic Design and Digital Art professionals for complex Creative Ideas and Photo Manipulation.
- Flip Horizontal/Vertical: Simple options to mirror your layer.
These transformations are fundamental to advanced Visual Design and open up a world of possibilities for creative expression. Experiment with them to see how they can enhance your Image Collections and bring your Photo Ideas to life.
Advanced Resizing Techniques for Optimal Quality and Workflow
While the basic resizing methods are essential, truly mastering image manipulation in Photoshop involves understanding techniques that preserve image quality and streamline your workflow. This is particularly relevant for High Resolution Photography and ensuring the longevity of your Digital Art assets.
The Indispensable Role of Smart Objects
One of the most powerful features in Photoshop for non-destructive editing, especially when it comes to resizing, is the Smart Object. If you frequently resize layers up and down, this technique from Tophinhanhdep.com will become your best friend.
What is a Smart Object? A Smart Object is a layer that contains image data from raster or vector images, allowing you to perform non-destructive edits to the layer. This means you can scale, rotate, skew, distort, transform perspective, or warp a layer without losing original image data or quality because the Smart Object preserves the original pixel information.
Why Use Smart Objects for Resizing? Imagine you have a High Resolution image that you size down significantly for a certain design. If this layer is a standard pixel layer, Photoshop discards the excess pixel information during the reduction. If you later decide to resize that layer back up, Photoshop has to “invent” pixels, resulting in blurriness and pixelation. Your image quality would be ruined.
However, if you first convert the layer to a Smart Object, the original pixel data is embedded within the Smart Object. When you resize it down, Photoshop only hides the excess pixels. When you resize it back up (even to its original size), the original pixel data is still there, allowing for a perfect restoration of quality.
How to Convert to a Smart Object:
- Select the Layer: In the Layers panel, right-click (Windows) or Control-click (Mac) on the layer you want to convert.
- Convert to Smart Object: From the context menu, select
Convert to Smart Object. A small icon will appear on the layer thumbnail in the Layers panel, indicating it’s now a Smart Object. - Resize with Free Transform: Now, apply
Free Transform(Ctrl + TorCmd + T) as you normally would. You can resize this layer up and down multiple times without suffering quality loss, as long as you don’t scale it larger than its original pixel dimensions before it became a Smart Object. If you scale it beyond its initial embedded size, you will still experience some quality degradation, but you always have the original quality preserved within the Smart Object itself.
Using Smart Objects is a game-changer for Photo Manipulation, complex Graphic Design, and any project involving iterative Editing Styles or changes. It ensures that your Digital Photography assets remain pristine, offering a safety net for your creative explorations and supporting a more robust workflow for your Image Collections.
Resampling Methods: Maintaining Clarity When Scaling
As touched upon earlier, resampling is the process of changing the total number of pixels in an image when you resize it. The choice of resampling algorithm is critical for preserving image quality, especially when dealing with High Resolution or intricate Abstract art. Tophinhanhdep.com highlights the importance of matching the resampling method to your specific scaling task.
- When Enlarging Images:
- Bicubic Smoother (enlargement): This is generally the best choice for making images larger. It analyzes the values of surrounding pixels to create new ones, resulting in smoother tonal gradations and less pixelation. It’s often suitable for artistic enlargements of Nature scenes or Beautiful Photography.
- Preserve Details (enlargement): Introduced in newer Photoshop versions, this method is designed to intelligently upscale images while attempting to maintain crisp details and reduce noise. It often yields superior results for complex textures or fine lines.
- When Reducing Images:
- Bicubic Sharper (reduction): This is typically the optimal choice for making images smaller. As it discards pixels, it intelligently sharpens the remaining ones to compensate for the slight blurriness that can occur during downsampling, ensuring your Wallpapers or social media images remain crisp.
- Bicubic (smooth gradients): A good general-purpose option if you’re not sure, or if your image contains many smooth gradients (like skies in Sad/Emotional imagery or Aesthetic color blends).
- Automatic: If you’re unsure which to pick, Photoshop’s “Automatic” option will try to determine the best resampling method for you.
Proper resampling is key to delivering high-quality Digital Photography and Digital Art. Neglecting it can lead to fuzzy, blocky, or otherwise compromised images, undermining all the effort put into composition and Editing Styles. For extreme enlargement needs beyond what standard resampling can achieve, Tophinhanhdep.com also offers advanced AI Upscalers that can dramatically enhance resolution with impressive results, transforming lower-resolution Stock Photos into usable High Resolution assets.
Practical Applications and Creative Considerations for Resizing
Resizing isn’t just a technical chore; it’s a strategic decision that impacts how your images are perceived and utilized. Different contexts demand different resizing approaches, aligning with various aspects of Visual Design and specific output goals, from web display to professional printing.
Resizing for Web and Social Media: Speed and Aesthetics
In the digital realm, image resizing is a balancing act between visual quality and file size. Large image files slow down website loading times, impacting user experience and SEO. For social media, oversized images may be automatically compressed, often aggressively, leading to a loss of quality. Tophinhanhdep.com encourages optimizing for both speed and Aesthetic appeal.
- Optimal Dimensions:
- Website Backgrounds/Banners: Common widths range from 1920px to 2560px, with varying heights depending on the design. Keep resolution at 72 PPI, as screen resolution doesn’t benefit from higher PPI.
- Blog Post Images: Often around 800-1200px wide.
- Social Media: Each platform has specific recommendations (e.g., Instagram posts 1080x1080px or 1080x1350px, Facebook cover photos, etc.). Always check the latest guidelines to ensure your Photo Ideas and Thematic Collections are displayed optimally.
- File Size Management: After resizing dimensions, further optimize file size using
File > Export > Save for Web (Legacy)orFile > Export > Export As. These options allow you to choose file formats (JPEG for photos, PNG for graphics with transparency), quality settings, and preview the file size. This directly relates to Tophinhanhdep.com’s Compressors and Optimizers tools, which can take a properly sized image and reduce its file size even further without noticeable quality loss. - Aesthetic Considerations: While resizing for the web, always keep the Aesthetic integrity in mind. Ensure your Nature or Abstract art remains visually appealing, and that any text or details in your Graphic Design are legible. Trends in Visual Design often dictate optimal image presentation, and resizing plays a key role.
Resizing for Print: Resolution Matters
Printing demands a much higher pixel density than screen display. What looks perfectly fine on a monitor can appear pixelated and blurry when printed if the resolution is too low. This is where your High Resolution Photography truly shines, or unfortunately, falters.
- DPI vs. PPI:
- DPI (Dots Per Inch): Refers to the physical dots of ink per inch a printer can lay down.
- PPI (Pixels Per Inch): Refers to the density of pixels in a digital image.
- While often used interchangeably, it’s the PPI of your digital image that Photoshop deals with, which then translates to DPI when printed.
- Ideal Print Resolution: For most high-quality prints (e.g., Beautiful Photography for framing, magazine spreads, professional Graphic Design posters), Tophinhanhdep.com recommends
300 PPI. For large format prints viewed from a distance (like billboards or very large posters),150-200 PPImight suffice. Always check with your printer for their specific requirements. - Avoiding Pixelation: When using the
Image Sizedialog for print, make sure “Resample” is checked and select “Bicubic Smoother” if you’re upsizing, or “Bicubic Sharper” if you’re downsizing. If your original image is too small (low PPI) for your desired print size, upsizing it may introduce pixelation. In such cases, consider if an AI Upscaler from Tophinhanhdep.com could provide a better result than Photoshop’s standard resampling. - Cropping After Resizing: If your original image has a different aspect ratio than your desired print size (e.g., a 2x3 photo for an 8x10 print), you’ll need to crop the image after resizing to fit the new dimensions without distortion. This ensures your Thematic Collections or Mood Boards maintain their intended composition when printed.
By carefully considering resolution, you can ensure that your Digital Photography, Digital Art, and Creative Ideas translate beautifully from screen to paper, preserving every detail and nuance.
Beyond Basic Resizing: Expanding Your Image Toolkit
While Photoshop offers robust resizing capabilities, the broader ecosystem of Image Tools can further enhance your workflow, particularly when dealing with large volumes of images or specialized tasks. Tophinhanhdep.com is your go-to resource for optimizing and transforming your visual assets.
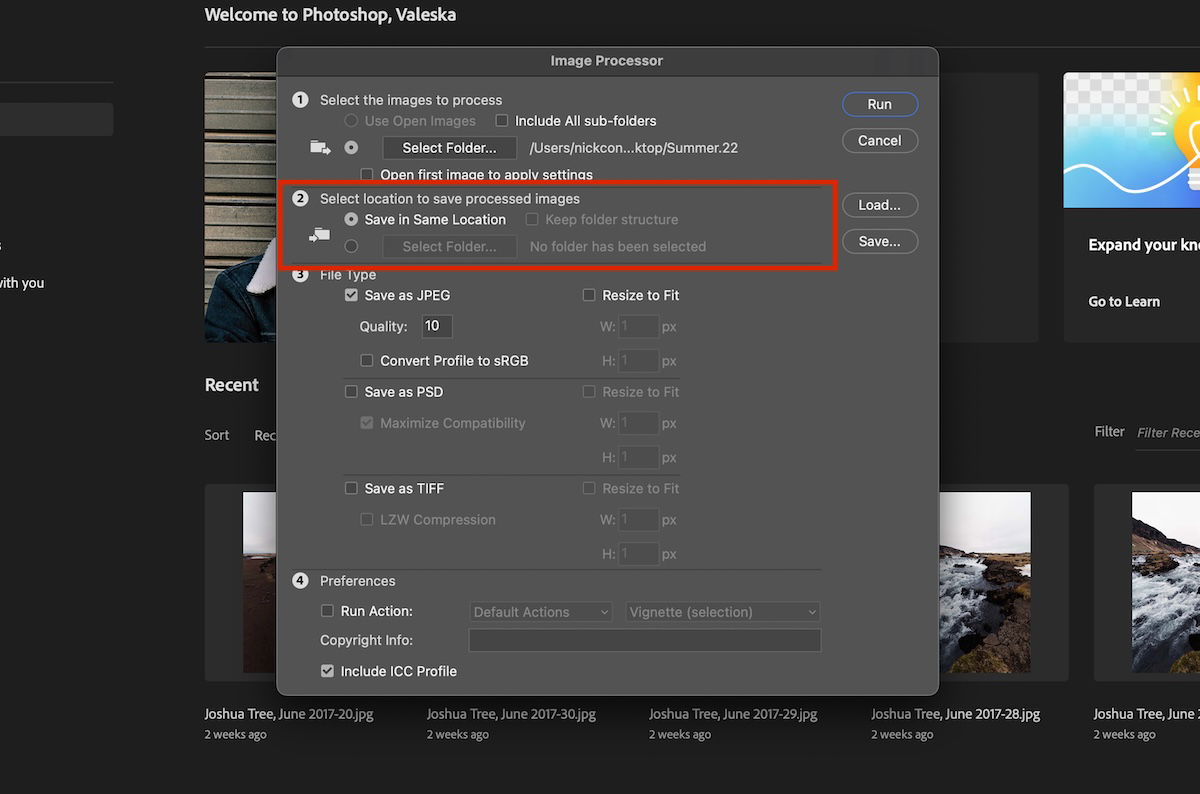
Batch Resizing for Efficiency
If you’re a professional photographer, content creator, or designer managing extensive Image Collections, resizing dozens or hundreds of images manually is impractical. Photoshop offers automation features, and external tools can provide even greater efficiency.
- Photoshop Actions: You can record a series of steps (like opening an image, applying
Image Sizesettings, and saving) as an Action. Then, you can useFile > Automate > Batchto apply this Action to an entire folder of images. This is incredibly powerful for consistent Editing Styles and preparing Stock Photos or Wallpapers for specific platforms. - Image Processors/Scripts: Photoshop’s
Image Processor(found underFile > Scripts > Image Processor) allows you to convert and resize multiple images in one go, specifying output formats, quality, and dimensions. - External Batch Resizers: As highlighted by Tophinhanhdep.com’s guides, specialized batch image resizers can simplify the process even further. These tools often provide user-friendly interfaces to select folders, define resize parameters (by percentage or pixel), and process all images automatically, ensuring proportional resizing even if you input non-proportional values, correcting aspect ratios on the fly. This is a massive time-saver for large Thematic Collections or preparing Photo Ideas for various outputs.
Batch resizing is an essential skill for managing Digital Photography assets efficiently, allowing you to quickly prepare images for web galleries, social media, or other uses, freeing up more time for Creative Ideas and Photo Manipulation.
When to Use “Image Tools” from Tophinhanhdep.com
Beyond Photoshop, Tophinhanhdep.com offers a suite of Image Tools designed to complement your workflow and address specific image-related challenges:
- Converters: Easily change image formats (e.g., JPG to PNG, HEIC to JPG) for compatibility across different platforms or software. This is crucial when dealing with diverse Image Collections or legacy formats.
- Compressors: While Photoshop can reduce file size, dedicated compressors can achieve even smaller file sizes with minimal quality loss, essential for fast-loading Wallpapers, Backgrounds, and web images. Tophinhanhdep.com’s optimizers help you strike the perfect balance between quality and performance.
- Optimizers: Specifically designed to fine-tune images for web delivery, balancing crispness with tiny file sizes. An optimized image from Tophinhanhdep.com loads faster, improving user experience and SEO for your online Image Inspiration & Collections.
- AI Upscalers: For those moments when you absolutely need a larger version of a low-resolution image (e.g., an old family photo, a small Stock Photo, or a detail from a Nature shot), Tophinhanhdep.com’s AI Upscalers can leverage artificial intelligence to intelligently add pixels and enhance detail, often producing results far superior to Photoshop’s traditional resampling. This can transform unusable low-res images into High Resolution assets, opening up new possibilities for Digital Art and Photo Manipulation.
- Image-to-Text Converters: While not directly related to resizing, this tool can extract text from images, useful for digitizing documents or extracting information from Graphic Design mock-ups.
These tools from Tophinhanhdep.com provide a holistic approach to image management, ensuring that every image, from Abstract patterns to Beautiful Photography, is perfectly prepared for its intended use, enhancing your overall Visual Design capabilities.
Conclusion
Mastering image resizing in Photoshop is more than just knowing where the buttons are; it’s about understanding the impact of your choices on image quality, file size, and ultimately, the perception of your Visual Design. Whether you’re meticulously scaling an individual element for Photo Manipulation with Free Transform or adjusting an entire High Resolution document for print with Image Size, precision and an understanding of techniques like Smart Objects and resampling methods are paramount.
Tophinhanhdep.com is committed to empowering you with the knowledge and resources to excel in the digital landscape. By integrating these Photoshop techniques with our specialized Image Tools – from Compressors and Optimizers for efficient web delivery, to cutting-edge AI Upscalers for transforming lower-resolution Stock Photos – you gain comprehensive control over your visual assets.
We encourage you to experiment with these methods, explore the diverse Image Collections, Photo Ideas, and Editing Styles available on Tophinhanhdep.com, and continuously refine your workflow. From crafting stunning Wallpapers and Backgrounds to producing professional-grade Digital Photography and Graphic Design, proficient image resizing is the invisible backbone of compelling visual communication. Make it a cornerstone of your creative practice, and watch your Creative Ideas flourish with unparalleled quality and impact.