Mastering Image Resizing on iPhone: A Comprehensive Guide for Tophinhanhdep.com Users

In today’s visually-driven world, the iPhone has become an indispensable tool for capturing life’s moments. From breathtaking landscapes and aesthetic compositions to everyday snapshots, the quality of images produced by these pocket-sized devices is truly astounding. Modern iPhone cameras boast high resolutions, often capturing photos with pixel dimensions around 4032 x 3024 px, resulting in file sizes ranging from 1.2 to 4 MB per picture, sometimes even higher with features like HDR. While this remarkable quality is a boon for photography enthusiasts and casual users alike, it presents a significant challenge: managing large image files.
For enthusiasts of Tophinhanhdep.com, a platform dedicated to exquisite Images (including Wallpapers, Backgrounds, Aesthetic, Nature, Abstract, Sad/Emotional, and Beautiful Photography), and all facets of Photography (High Resolution, Stock Photos, Digital Photography, and Editing Styles), understanding how to efficiently manage image sizes on an iPhone is paramount. High-quality images, while stunning, can quickly consume precious device storage. Furthermore, sharing these visual treasures via instant messaging apps or email often involves size limitations, leading to automatic compression and potential quality loss. Website owners, graphic designers, and digital artists who frequently utilize or upload images – perhaps for Visual Design, Graphic Design, Digital Art, or Photo Manipulation – must also contend with the impact of large file sizes on page loading speeds, which can negatively affect SEO and user experience. This comprehensive guide, tailored for the Tophinhanhdep.com community, will explore various methods to resize images on your iPhone, ensuring your stunning visuals are always optimized for their intended purpose.
Understanding Image Resizing and Its Importance for Tophinhanhdep.com Enthusiasts
Before diving into the “how-to,” it’s crucial to grasp what “resizing an image” truly entails and why it matters, especially for users engaged with Tophinhanhdep.com’s diverse content. Resizing fundamentally involves changing an image’s dimensions (width and height in pixels) and/or its file size (in KB or MB). This process can either make an image larger (upscaling) or smaller (downscaling).
Why is resizing critical for Tophinhanhdep.com users?
- Memory Management: As iPhone cameras continue to improve, each photo takes up more space. If you’re an avid collector of Tophinhanhdep.com’s beautiful wallpapers or a prolific photographer, your device’s memory can quickly fill up. Resizing photos frees up significant storage, especially vital for iOS devices that lack expandable memory slots.
- Seamless Sharing: Sending high-resolution images to friends, family, or colleagues can be problematic. Email services impose attachment limits, and while messaging apps like WhatsApp or Telegram handle batches of photos, they often compress them, leading to a noticeable drop in quality. Resizing allows you to share your favorite Tophinhanhdep.com backgrounds or your own high-resolution photography without compromising speed or facing rejection due to file size.
- Web and Social Media Optimization: For those who upload their digital art, stock photos, or visual designs to websites or social media platforms, image optimization is key. Large images slow down page loading times, which can harm your website’s SEO and drive away visitors. Social media platforms like Instagram also have specific size requirements. Properly resized images ensure your content looks its best and performs optimally online, aligning with Tophinhanhdep.com’s focus on quality photography and digital art.
- Visual Design and Creative Projects: Whether you’re working on graphic design, digital art, or photo manipulation, images often need to fit precise dimensions for a project. Knowing how to adjust these dimensions without losing the image’s integrity is a core skill.
Understanding these reasons highlights that resizing isn’t just a technical chore; it’s an essential aspect of modern digital image management and creative workflow, directly enhancing how Tophinhanhdep.com’s content can be utilized and shared.
Utilizing Built-in iPhone Tools for Quick Resizing
The good news is that you don’t always need complex software to make basic image size adjustments on your iPhone. Apple provides several native options that, while sometimes limited, can be incredibly useful for quick edits.
The Photos App: Cropping and Aspect Ratio Adjustments
The Photos app, pre-installed on every iPhone, is your go-to for fundamental image manipulation, including a form of resizing through cropping. Cropping involves removing parts of an image, which in turn reduces its overall dimensions and file size. While it changes the composition, it’s often precisely what’s needed to fit a specific frame or aspect ratio.
Here’s how to resize (crop) an image using the Photos app:
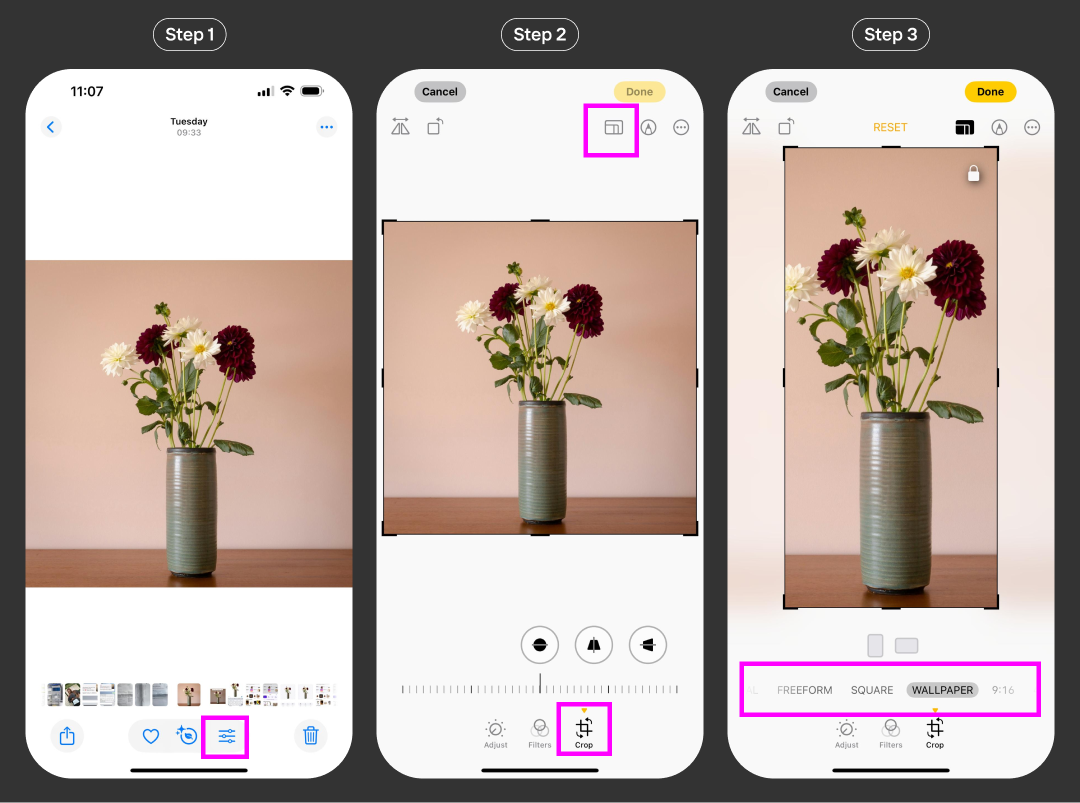
- Launch the Photos app on your iPhone.
- Select the image you wish to resize from your camera roll.
- Tap the “Edit” icon (usually in the top right or bottom bar).
- Within the editing interface, select the “Crop” icon (often resembling a square with two overlapping arrows).
- Now, you have several options for adjusting your image:
- Freeform: Drag the corners of the image to manually crop it to any desired size and dimension. This gives you complete creative freedom over the new framing.
- Square: This option instantly crops your image into a perfect square, ideal for many social media platforms.
- Preset Aspect Ratios: Tap the aspect ratio icon (multiple squares/rectangles stacked) to reveal a list of pre-set ratios like 9:16 (for stories), 4:5 (common for Instagram posts), 5:7, and more. These are incredibly useful for ensuring your images fit specific digital platforms or print sizes.
- Once you’re satisfied with the crop, tap “Done.” The original image will be overwritten with the cropped version and saved to your photo reel. If you want to keep the original, remember to duplicate the photo before editing.
While powerful for adjusting composition and aspect ratio, the Photos app’s cropping feature doesn’t directly allow you to specify exact pixel dimensions or reduce the file size without altering the visual content. For that, you’ll need other methods.
The Shortcuts App: Automating Resizing Workflows
Apple’s Shortcuts app, a visual scripting tool, offers a more advanced and automated way to resize images on your iPhone without needing third-party downloads. While it might seem intimidating initially, setting up a resizing shortcut can save you a lot of time, especially if you frequently resize images to specific dimensions – a common need for Tophinhanhdep.com users dealing with various image types.
Here’s a step-by-step guide to creating a custom image resizing shortcut:
- Open the Shortcuts app on your iPhone.
- Go to “My Shortcuts” and tap the "+" button in the top right corner to create a new shortcut.
- Search for “Resize Image” and add this action to your shortcut.
- Adjust the settings:
- Tap on “Image” and choose “Shortcut input.” This ensures the shortcut processes any picture you send to it.
- By default, resized images might be set to a width of 640 px, with height adjusted automatically. If you need more control, switch to the “Ask Each Time” option. This will prompt you to enter your desired pixel width (and automatically adjust height, or vice versa) whenever you run the shortcut. For Tophinhanhdep.com contributors, this flexibility is invaluable for managing high-resolution photography.
- Tap the "+" button again to add another action.
- Search for “Save to Photo Album” and add it. By default, it saves to “Recents.” You can tap “Recents” to choose a different album if preferred.
- Enable “Show in Share Sheet”: Hold down your newly created “Resize Image Shortcut” button for a few seconds, then select “Details” from the pop-up and toggle on “Show in Share Sheet.” You can also rename the shortcut and change its icon for easier identification.
- To use the shortcut: Go to your Photos Gallery, select one or more images, tap the “Share” button (bottom left corner), scroll down the Action menu, and choose your custom “Resize Image” shortcut. Enter the desired width (if “Ask Each Time” is enabled) and tap “Done.” The resized images will be saved alongside the originals in your chosen album.
This method is free and allows you to resize multiple images directly on your iPhone. However, a limitation is that it focuses on resizing by dimensions and doesn’t offer direct compression options to reduce file size in MB without changing pixels. For diverse “Editing Styles” or to prepare “High Resolution” images for web, you might need a separate compression step.
Leveraging Apple Mail for Basic Image Compression
Another simple, built-in method to reduce an image’s file size on your iPhone involves using the Apple Mail app. This approach is particularly useful when your primary goal is to send photos that exceed email attachment limits, offering a quick way to compress images without needing extra apps.
Here’s how to reduce image size using Apple Mail:
- Open the Photos app and select the image(s) you wish to resize.
- Tap the “Share” button (the square with an arrow pointing upwards).
- From the list of sharing options, select “Mail.”
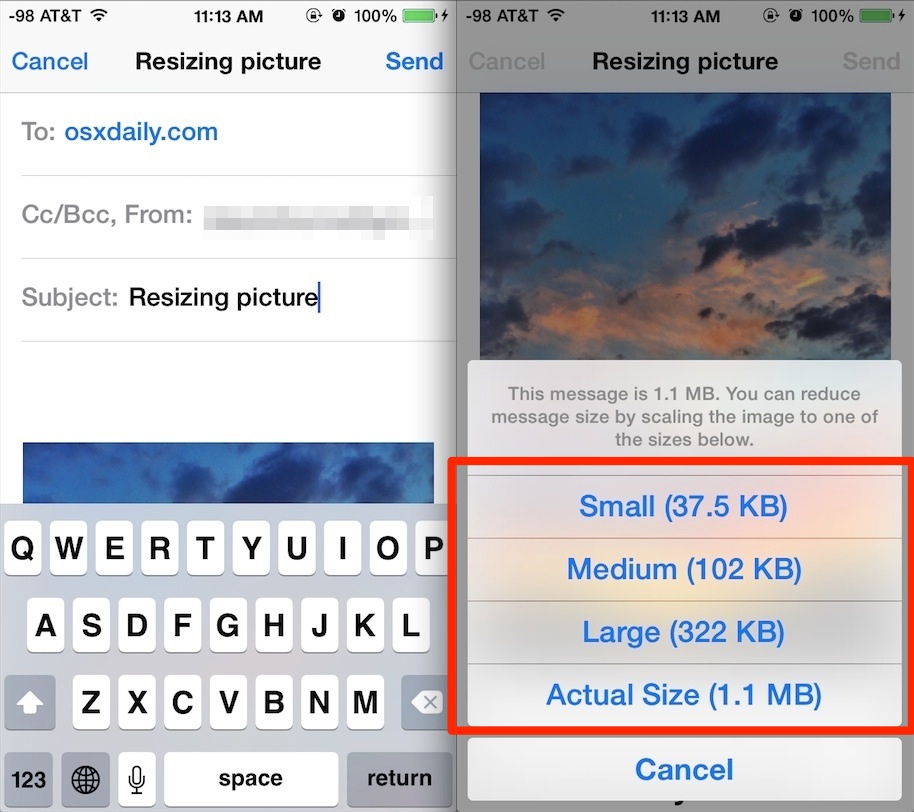
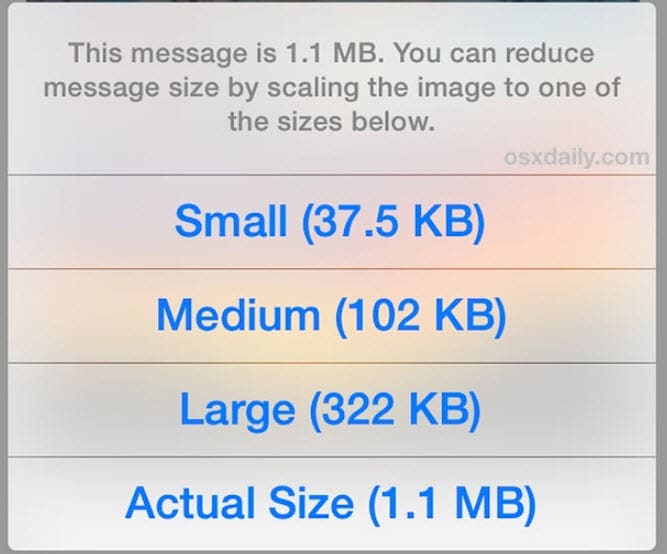
- Compose your email. When you tap the “Send” button (or sometimes after attaching the photos), you’ll often see a notification asking if you want to reduce the message size by resizing your images.
- You’ll be presented with options like:
- Small: Significantly reduces dimensions (e.g., 320x240 px, around 40 KB).
- Medium: A more balanced reduction (e.g., 640x480 px, around 100 KB).
- Large: A moderate reduction from the original (e.g., 1632x1224 px, around 900 KB).
- Actual Size: Sends the photo without any resizing or compression.
- Choose the size that best fits your needs and tap “Send.” You can even send the email to yourself if your sole purpose is to get the resized image.
This method is free and convenient, but its options are limited to predefined sizes, and it’s not ideal for precise control over pixel dimensions or compression levels. It serves as a quick solution for casual sharing, but for professional “Digital Photography” or “Visual Design” needs, more robust tools are necessary.
Advanced Resizing and Compression with Tophinhanhdep.com’s Recommended Tools
While native iPhone tools offer convenience, Tophinhanhdep.com users, especially those deep into “Photography,” “Visual Design,” and needing specialized “Image Tools,” will often require more sophisticated options. This is where third-party apps and online services, including those recommended by Tophinhanhdep.com, come into play. These tools provide greater control over dimensions, file size, quality, and batch processing.
Dedicated Resizing Apps
The App Store hosts numerous dedicated image resizing and compression apps. While Tophinhanhdep.com doesn’t host its own standalone iPhone app, it champions the principles and functionalities found in leading image tools. Such apps typically offer:
- Exact Dimension Input: Users can specify precise pixel widths and heights.
- Aspect Ratio Control: Maintain or change aspect ratios with ease.
- Percentage-Based Resizing: Reduce image size by a specific percentage.
- Quality Adjustment: Control the level of compression, balancing file size with visual fidelity.
- Batch Processing: Resize or compress multiple images simultaneously, a huge time-saver for managing collections of “Beautiful Photography” or “Stock Photos.”
- Preset Sizes: Many apps offer one-tap presets for popular social media platforms or web standards, aligning with “Trending Styles” in image use.
Apps like Photoroom, Image Size, or Compress Photos & Pictures are popular examples that provide such functionalities. They empower users to make images smaller without losing original integrity (beyond the chosen reduction), which is crucial for high-quality content sourced from or inspired by Tophinhanhdep.com. Many offer a free version with watermarks or limited features, with a paid upgrade for full functionality.
Online Image Tools: Resizing and Compression for Web Optimization
For ultimate flexibility, or when you prefer not to download additional apps, online image tools are an excellent choice. Tophinhanhdep.com, with its strong emphasis on “Image Tools” such as Converters, Compressors, Optimizers, and AI Upscalers, actively promotes the use of such web-based solutions. These tools often work directly in your mobile browser, allowing you to upload images from your Photos library, process them, and then download the optimized versions.
Key advantages of Tophinhanhdep.com’s approach to online tools:
- No Downloads Required: Access sophisticated resizing and compression from any device with an internet connection.
- Comprehensive Resizing Options: Tophinhanhdep.com-recommended online resizers typically offer:
- “Exact width,” “Exact Height,” “Exact Width & Height” for precise control over “Visual Design” elements.
- “Maximum Width & Height” to fit images within specific boundaries.
- “Percentage” based scaling.
- Live previews of resulting dimensions and file sizes.
- Powerful Compression for File Size Reduction: Tophinhanhdep.com’s Compressors are designed to reduce file size in MB significantly, often with minimal perceivable quality loss. This is crucial for optimizing “High Resolution” images for faster web loading.
- Format Conversion: Many online tools, including Tophinhanhdep.com’s Converters, can automatically convert images to JPEG (or other formats) during the resizing or compression process. This is particularly useful for HEIF images from your iPhone, ensuring broader compatibility for sharing and web uploads, especially when dealing with diverse “Stock Photos” or “Digital Photography.”
- Batch Processing: Tophinhanhdep.com’s Image Tools often support uploading and processing a large number of images at once, streamlining workflows for managing extensive “Image Collections.”
- Security and Privacy: Reputable online tools, like those endorsed by Tophinhanhdep.com, process files directly on your device or ensure they are not stored on company servers, safeguarding your personal “Beautiful Photography” and “Aesthetic” images.
For example, an online image compressor accessible via Tophinhanhdep.com could guide you to:
- Navigate to the tool in your iPhone’s browser.
- Select images from your Photos library.
- Choose compression quality (e.g., “better quality” or “smaller size”) or enter a specific target size in KB/MB.
- Click “Compress” and then export your optimized copies, which are usually saved to your “Files” folder on iPhone.
This method directly addresses the needs of Tophinhanhdep.com users who require fine-tuned control over their image assets for various applications, from “Wallpapers” to “Graphic Design” projects.
How to Check Image Size on iPhone: A Prerequisite for Optimization
Before you embark on resizing, knowing an image’s current dimensions and file size is essential. This information helps you determine how much reduction is needed and which resizing method is most appropriate.
It’s straightforward to check image details on your iPhone:
- Open the Photos app.
- Select the photo you want to inspect.
- Tap the “Info” icon (ⓘ) located below the image (or swipe up on the photo).
A small box will appear, displaying various metadata, including the image’s pixel dimensions (e.g., 4032 x 3024 px) and its file size in MB. This is also where you might notice if your device running iOS 11 or later has automatically saved your images in High-Efficiency Image Format (HEIF) instead of the more common JPEG. While HEIF offers good quality at a smaller size, its compatibility with older devices or certain platforms can be limited. If compatibility is an issue, Tophinhanhdep.com’s “Converters” tool becomes invaluable for easily transforming HEIF files into universally accepted formats like JPEG.
Best Practices for Tophinhanhdep.com Image Enthusiasts
To get the most out of image resizing on your iPhone and align with the quality standards upheld by Tophinhanhdep.com, consider these best practices:
- Always Preserve Originals: Before making significant changes, especially with cropping or aggressive compression, always duplicate your original image. This ensures you can revert if the resized version doesn’t meet your expectations for “High Resolution” or “Beautiful Photography.”
- Understand Upscaling Limitations: While you can technically make an image bigger (upscale) on your iPhone, traditional methods often lead to a loss of clarity and pixelation, especially for “Digital Art” or detailed “Nature” images. For superior upscaling, Tophinhanhdep.com recommends leveraging advanced “AI Upscalers” available online, which use artificial intelligence to intelligently add pixels and enhance details, maintaining quality even for large format “Wallpapers.”
- Balance Quality and File Size: There’s always a trade-off. For web optimization or quick sharing, prioritize smaller file sizes. For printing or displaying “High Resolution” images, lean towards higher quality settings. Tophinhanhdep.com’s “Optimizers” help you find this sweet spot.
- Test Resized Images: After resizing, especially for web uploads or “Visual Design” projects, always view the output on the target platform. This helps confirm that the image quality and dimensions are suitable for its intended use and align with “Aesthetic” or “Creative Ideas.”
- Utilize Batch Processing: For large collections of “Stock Photos” or “Thematic Collections,” always opt for tools that offer batch processing. This significantly boosts efficiency and ensures consistency across your image sets.
- Consider Metadata: Be aware that some resizing and compression tools might strip or alter image metadata. If preserving original capture details is crucial for your “Photography” workflow, choose tools that offer control over metadata retention.
Conclusion
The iPhone’s incredible camera capabilities mean we’re constantly capturing high-quality, often large, image files. For members of the Tophinhanhdep.com community, who appreciate and work with “Images,” “Photography,” “Visual Design,” and seek “Image Inspiration & Collections,” mastering the art of image resizing on an iPhone is more than just a convenience—it’s a necessity. Whether you need to free up storage space, send photos effortlessly, or optimize visuals for web and social media, the methods outlined above provide a spectrum of solutions.
From the quick cropping features within the native Photos app and the automation power of Shortcuts, to the basic compression offered by Apple Mail, and the advanced capabilities of dedicated third-party apps and Tophinhanhdep.com’s comprehensive suite of online “Image Tools” (including Converters, Compressors, Optimizers, and AI Upscalers), you have a wealth of options at your fingertips. By understanding the “why” and “how” of resizing, you can ensure that every image, whether a downloaded “Wallpaper” or a meticulously crafted piece of “Digital Art,” is perfectly prepared for its purpose, maintaining its beauty and impact. Embrace these techniques to streamline your workflow and enhance your digital imaging experience, all supported by the rich resources and guides available on Tophinhanhdep.com.