How to Resize Images on Mac: A Comprehensive Guide for Visual Content Creators

In the dynamic world of digital content, images reign supreme. Whether you’re a professional photographer curating a portfolio of stunning high-resolution captures, a graphic designer crafting intricate digital art, or simply an enthusiast building an aesthetic collection of wallpapers and backgrounds, managing image dimensions and file sizes is a fundamental skill. Mac users are fortunate to have a suite of powerful, built-in tools that make image resizing not just possible, but remarkably straightforward.
From preparing captivating nature photography for a website to optimizing abstract art for a mood board, understanding how to effectively resize your images on a Mac is crucial for maintaining visual quality, ensuring fast load times, and achieving creative control. This comprehensive guide will walk you through the various methods available on your macOS device, empowering you to handle any image resizing task with confidence and precision.
Leveraging Apple’s Built-In Tools for Image Resizing

Your Mac comes pre-equipped with several applications that offer robust image resizing capabilities, eliminating the need for expensive third-party software for most common tasks. These tools are integrated seamlessly into the macOS ecosystem, providing intuitive workflows for both single image adjustments and batch processing.
Resizing with Preview: The Core Mac Utility
Preview is often underestimated, perceived merely as a basic image viewer. However, this versatile application is a powerhouse for quick and efficient image manipulation, including resizing, cropping, and even basic color adjustments. It’s the go-to tool for many Mac users looking to adjust images for emails, documents, or social media without delving into complex editing suites.
How to Resize a Photo on Mac Using Preview
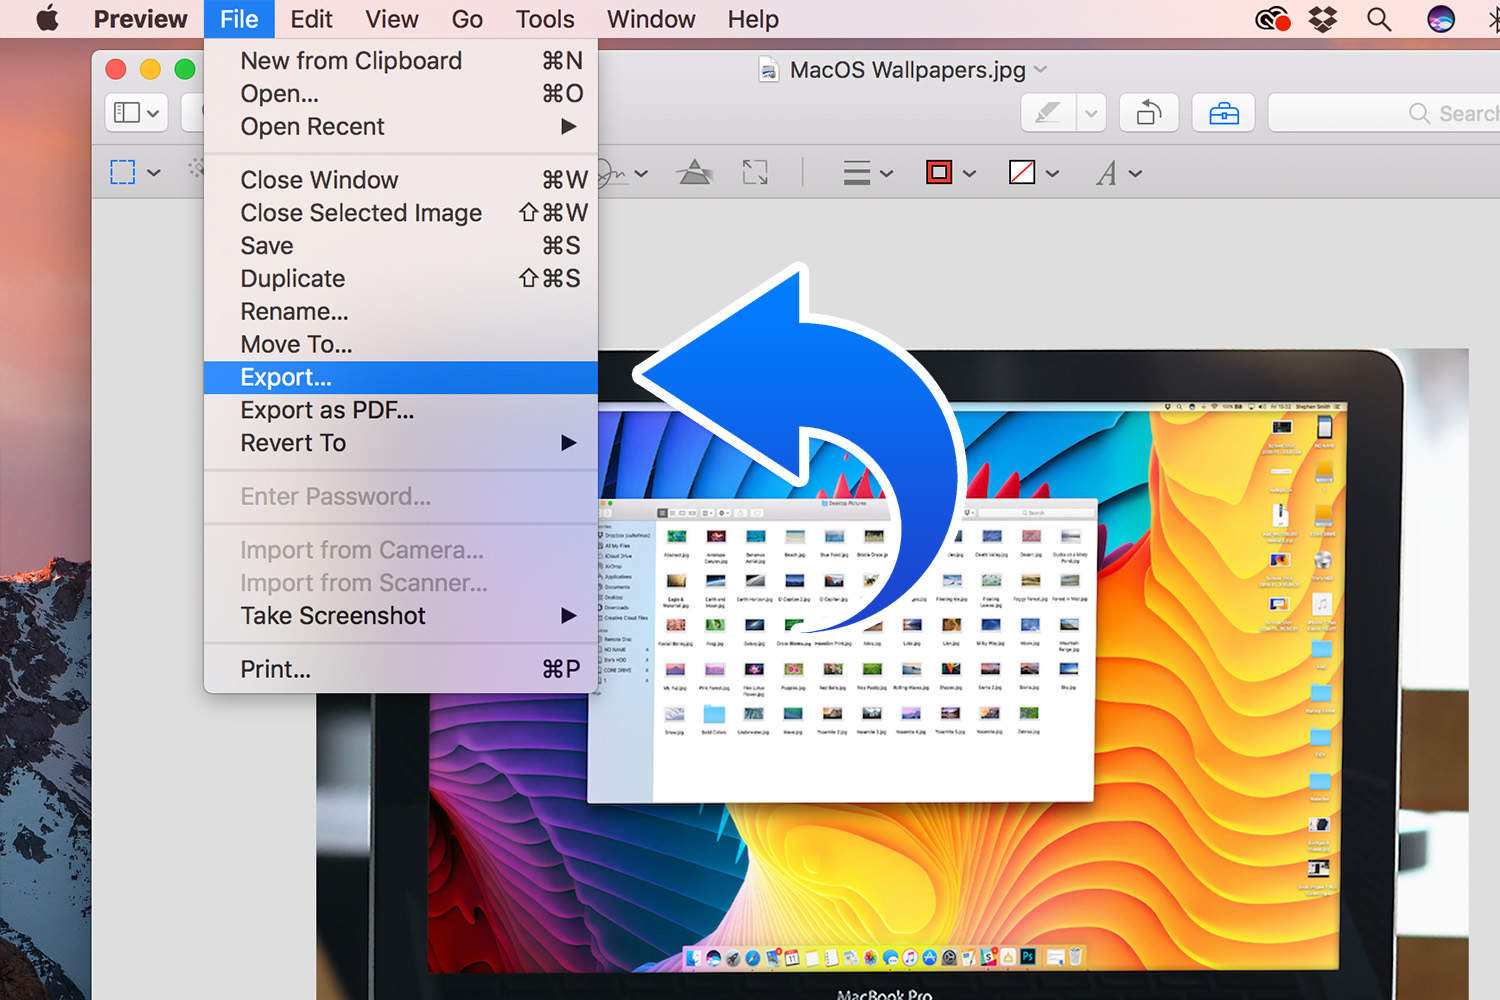
Resizing a single image in Preview is an incredibly simple process, perfect for when you need to quickly adjust the dimensions of a photo for a document, a web page, or even a custom sad/emotional graphic.
- Locate Your Image: Begin by finding the image file you wish to resize in your Mac’s Finder. This could be a high-resolution stock photo, a piece of digital art, or a beautiful photograph you’ve taken.
- Open in Preview: Double-click the image file. By default, it should open in Preview. If not, right-click (or Control-click) the file, select “Open With,” and then choose “Preview.”
- Access Adjust Size: Once the image is open in Preview, navigate to the menu bar at the top of your screen. Click on “Tools,” then select “Adjust Size…” A new “Image Dimensions” window will appear.
- Define New Dimensions:
- Unit Selection: You’ll see the image’s current width and height, typically in pixels. You can change the unit of measurement using the dropdown menu next to the “Width” and “Height” fields. Options include pixels, inches, centimeters, millimeters, and percentages. For web content and digital displays, pixels are usually preferred.
- Scale Proportionally: Crucially, ensure the “Scale proportionally” checkbox is ticked. This maintains the aspect ratio of your image, preventing distortion and preserving the integrity of your photography or visual design. When this is checked, changing either the width or height will automatically adjust the other dimension to maintain balance.
- Custom Dimensions: Enter your desired new width or height. For example, if you’re preparing a background image for a specific screen resolution, you’d input those pixel values.
- “Fit into” Presets: Alternatively, Preview offers a “Fit into” dropdown menu with common predefined sizes (e.g., 640x480, 800x600, 1024x768). These are particularly useful for standardizing images for web galleries or email attachments.
- Apply and Review: Click “OK.” The image in Preview will instantly resize to your chosen dimensions. Take a moment to review the result. If you’re not satisfied, you can undo the change (Edit > Undo) and try again.
- Save Your Work:
- Overwrite Original: If you want to replace the original file with the resized version, go to “File” > “Save.”
- Save as New File: To keep your original image and save the resized version as a new file, go to “File” > “Export…” (or “File” > “Save As…” in older macOS versions). Here, you can specify a new file name, choose a different destination, and select a file format (JPEG, PNG, TIFF, PDF, etc.). For JPEG files, you can also adjust the quality using a slider, which impacts the final file size – a key consideration for web optimization.

How to Resize Multiple Images at Once on Mac with Preview?
For photographers and visual artists dealing with large collections of images – perhaps a series of nature shots or an abstract art collection destined for a thematic gallery – batch resizing is a significant time-saver. Preview handles this effortlessly.
- Select Multiple Images: In Finder, navigate to the folder containing the images you wish to resize. Select all the image files you want to process by holding down the Shift key and clicking on them, or by dragging a selection box around them.
- Open in Preview: Right-click (or Control-click) on any of the selected files, then choose “Open With” > “Preview.” All selected images will open within a single Preview window, displayed as thumbnails in the left sidebar.
- Select All Thumbnails: In the Preview window, go to “Edit” > “Select All” from the menu bar. This ensures that the resizing action will apply to all images in the sidebar.
- Adjust Size: Go to “Tools” > “Adjust Size…” The “Image Dimensions” window will appear, similar to the single image resizing process.
- Enter New Dimensions: Choose your desired dimensions (pixels, percentages, etc.) and ensure “Scale proportionally” is checked. This is particularly important for maintaining the aesthetic of a consistent photography collection. Click “OK.”
- Save All: After the resizing is complete, go to “File” > “Save All” to overwrite the original files, or “File” > “Export Selected Images…” to save them as new files, specifying format and quality as needed.
What Does the Resample Image Option Do in Preview?
The “Resample image” checkbox within the “Adjust Size” dialog is critical for understanding image quality and file size.
- Resampling Explained: Resampling refers to changing the total number of pixels in an image.
- When you downsize an image with resampling enabled, Preview discards pixels, effectively reducing the file’s dimensions and its overall pixel count. This typically results in a smaller file size, which is excellent for web optimization.
- When you upsize an image with resampling enabled, Preview adds new pixels by interpolating data from existing ones. While it makes the image larger, it often leads to a “pixelated” or blurry appearance, especially for significant enlargements, as the software is essentially guessing what those new pixels should look like.
- Without Resampling: If you uncheck “Resample image,” Preview maintains the original number of pixels but changes the image’s physical print dimensions (e.g., inches, centimeters) and its resolution (pixels per inch or PPI).
- Downsizing without resampling increases the PPI, making the image sharper for print at a smaller size, but the file size remains largely the same because the pixel count hasn’t changed.
- Upsizing without resampling decreases the PPI, making the image appear larger physically but potentially less sharp if printed, again without changing the underlying pixel count or file size.
For web usage and most digital displays, resampling is generally recommended when reducing image size to achieve smaller file sizes and faster loading. When aiming to preserve maximum quality for beautiful photography or high-resolution stock photos, it’s best to avoid upsizing with resampling, or consider advanced AI upscaling tools (which we’ll touch on later) to mitigate quality loss.
Batch Processing with Automator: Efficiency for Image Collections
Automator is another pre-installed macOS utility designed to automate repetitive tasks, turning multi-step processes into single-click “Quick Actions.” This is invaluable for content creators who frequently need to perform the same resizing operations, perhaps for standardizing images for blog posts, social media, or specific visual design projects.
How to Batch Resize Images on a Mac With Automator
Automator allows you to create a custom workflow for batch resizing, accessible directly from the Finder’s contextual menu.
- Open Automator: Find and open the Automator application on your Mac (you can use Spotlight Search by pressing Command + Space and typing “Automator”).
- Create a New Document: Select “File” > “New” from the menu bar, then choose “Quick Action” (or “Service” in older macOS versions) and click “Choose.”
- Configure Workflow Input: At the top of the workflow pane:
- Set “Workflow receives current” to “image files.”
- Set “in” to “Finder.app.”
- Add “Scale Images” Action: In the left sidebar, search for “Scale Images.” Drag this action from the library to the workflow pane on the right.
- Choose to Copy or Overwrite: Automator will prompt you to add a “Copy Finder Items” action. This step is highly recommended if you wish to keep your original images intact. Click “Add.” If you don’t add this, the Quick Action will overwrite your original files.
- Define Scale Parameters: In the “Scale Images” action box:
- Choose whether to scale by “To Size (pixels)” or “By Percentage.”
- If “To Size (pixels)” is selected, enter a specific pixel value. This value will be applied to the longest side of the image, maintaining proportions.
- If “By Percentage” is selected, enter the percentage by which you want to scale the images (e.g., 50% to half the size).
- Save Your Quick Action: Go to “File” > “Save” and give your Quick Action a descriptive name (e.g., “Resize to 1200px Long Edge,” “Half Size for Web”).
- Use Your Quick Action: Close Automator. Now, whenever you need to resize images, simply select one or more image files in Finder, right-click (or Control-click) them, go to “Quick Actions” (or “Services” in older versions), and select your newly created resizing action. The images will be processed automatically, appearing either in a new folder (if you chose to copy them) or replacing the originals.
Managing Visuals in Apple Apps: Photos, Pages, and Mail
Beyond Preview and Automator, other Apple applications offer convenient, context-specific resizing options, especially useful for integrated workflows or unique visual design tasks.
Resizing Images in the Photos App for Seamless Management
For those who organize their beautiful photography and image collections within Apple’s Photos app, resizing is integrated into the export process.
- Select and Export: Open the Photos app, select the image(s) you want to resize. Go to “File” > “Export” > “Export [Number] Photos.”
- Size Options: In the export dialog, look for the “Size” dropdown menu. You can choose from presets like “Small,” “Medium,” “Large,” or “Full Size.”
- Custom Dimensions: Select “Custom” to enter specific dimensions (e.g., a certain width or height in pixels). You can also specify the type of export (JPEG, TIFF, PNG) and adjust the JPEG quality (Low, Medium, High, Maximum), which is crucial for balancing visual quality with file size for digital photography or stock photos.
- Color Profile: The Photos app also allows you to assign a color profile (sRGB, Adobe RGB, etc.), an important detail for photographers concerned with color accuracy across different displays and prints.
Resizing Images on a Mac With Pages
When incorporating images into documents, Pages provides straightforward resizing controls that integrate directly into your visual design workflow.
- Select Image in Pages: Open your Pages document and click on the image you wish to resize.
- Access Arrange Tab: In the Format sidebar on the right, click the “Arrange” tab.
- Adjust Size: In the “Size” section, you’ll find “Width” and “Height” fields. Enter your desired dimensions.
- Constrain Proportions: Make sure “Constrain proportions” is checked to avoid distorting the image, preserving the aesthetic integrity of your digital art or photography.
- Manual Resizing: For less precise adjustments, you can also click on an image and drag its corner handles to visually resize it within the document.
How to Change the Size of an Image Using the Mail App
Sending large, high-resolution images via email can be cumbersome. Apple’s Mail app offers a simple way to downsize images automatically before sending, preventing issues with attachment limits.
- Compose New Message: Open the Mail app and start a new message.
- Attach Images: Drag and drop your images into the email body, or use the “Attach” button/menu.
- Select Image Size: After attaching, look for the “Image Size” dropdown menu, usually located on the right side of the message header.
- Choose Size: Select “Small,” “Medium,” “Large,” or “Actual Size.” Choosing a smaller size will reduce the image dimensions and file size, making it easier to send and faster for the recipient to download. This is practical for sharing quick previews of beautiful photography or aesthetic images.
Optimizing Images for Diverse Visual Applications and Quality
Effective image resizing goes beyond merely changing dimensions; it’s about strategic optimization for specific uses, whether for a website’s background, professional photography portfolios, or digital art displays.
Ensuring High Resolution and Quality for Photography and Digital Art
For photographers and digital artists, maintaining image quality during resizing is paramount. High-resolution images, whether stunning nature photography or intricate abstract designs, deserve to retain their crispness and detail.
- Understanding Lossy vs. Lossless: When saving resized images, especially in Preview, consider your file format. JPEG is a “lossy” format, meaning it compresses data by discarding some information, which can reduce quality but significantly shrink file size. PNG is generally “lossless” for most images, preserving quality but resulting in larger files. For web images where file size is critical, a carefully chosen JPEG quality setting is often the best balance. For digital art or professional prints, higher quality settings or lossless formats are preferred.
- Avoid Upsizing: As a rule, avoid increasing an image’s resolution through resizing if the original is of lower quality. This almost invariably leads to pixelation and a blurry appearance, detrimental to aesthetic images and beautiful photography. If a larger, high-quality version is needed, sourcing the original high-resolution file or using specialized AI upscalers (as discussed later) are better options.
- DPI for Print: If your resized images are destined for print (e.g., a photo manipulation piece for a magazine, or a high-resolution stock photo for a brochure), pay attention to Dots Per Inch (DPI) or Pixels Per Inch (PPI). Most professional printers require images at 300 DPI for optimal sharpness. Preview’s “Adjust Size” dialog allows you to manually set the resolution, providing granular control for print-ready assets.
Tailoring Images for Web: Aesthetic Wallpapers and Backgrounds
Web optimization is a primary reason for resizing images. Large image files slow down website loading times, impacting user experience and search engine rankings. This applies to everything from website backgrounds and thematic collections to individual aesthetic images.
- Screen Dimensions: For wallpapers and website backgrounds, align your image dimensions with common screen resolutions. While a “fill screen” or “fit to screen” option (found in System Preferences > Desktop & Screen Saver for wallpapers) can automatically adjust, pre-sizing your images ensures better quality and less distortion.
- File Size Reduction: Smaller dimensions almost always mean smaller file sizes when resampling. For web images, target the smallest possible file size without a noticeable drop in visual quality. This is particularly important for mobile users and improving page speed scores.
- Consistent Aspect Ratios: For image galleries or trending style collections, maintaining a consistent aspect ratio through proportional scaling creates a more professional and visually appealing layout. This contributes to a cohesive visual design across your platform.
Advanced Resizing Insights and Enhancing Your Visual Workflow
Moving beyond basic operations, a deeper understanding of image properties and the available tools can significantly enhance your visual design and photography workflows on a Mac.
Understanding Image Dimensions: Pixels, PPI, and DPI
A solid grasp of image resolution terminology is essential for achieving precise and high-quality results in both digital and print media.
- Pixels: The fundamental building blocks of digital images. When you resize a digital image in Preview, you’re primarily adjusting its pixel dimensions (width x height). For web content, this is the most important measurement.
- PPI (Pixels Per Inch): This refers to the density of pixels in a digital image file. A higher PPI means more pixels are packed into each inch, resulting in a sharper image when displayed at a specific physical size. For screens, PPI is less critical than pixel dimensions, as screen density (retina displays, etc.) varies.
- DPI (Dots Per Inch): This term is often used interchangeably with PPI but technically refers to the density of ink dots per inch a printer lays down on paper. For print, DPI is highly significant. As mentioned, 300 DPI is a common standard for high-quality prints. Preview allows you to adjust the resolution (PPI/DPI) when resampling is unchecked, giving you control over print output.
Understanding the interplay between pixel dimensions, PPI, and DPI allows you to make informed decisions about how to resize an image, whether it’s for a high-resolution digital photography display or a meticulously prepared graphic design for print.
Expanding Your Toolkit: Beyond Built-in Apps with Tophinhanhdep.com
While macOS’s built-in tools are incredibly capable for most resizing tasks, certain advanced requirements or specialized workflows might benefit from dedicated image tools. This is where platforms like Tophinhanhdep.com come into play, offering a broader array of features that complement your Mac’s native capabilities.
For instance, if you’re dealing with:
- Advanced Image Compression: While Preview offers basic JPEG quality adjustments, dedicated image compressors can provide more granular control over compression algorithms, achieving even smaller file sizes without significant perceptual quality loss – ideal for heavily optimized web content or large thematic collections.
- Specialized Converters: Need to convert a batch of images from a less common format (like HEIC from your iPhone) to a universally compatible one while resizing? Dedicated converters often support a wider range of input/output formats and offer more conversion options than Preview’s export function.
- AI Upscalers: When you absolutely must increase the dimensions of a smaller image for a larger display (e.g., turning a regular photo into a large background image, or enhancing a vintage digital art piece) without introducing blurriness, AI upscalers use artificial intelligence to intelligently add pixels, producing remarkably better results than traditional resampling. Tophinhanhdep.com, with its focus on “AI Upscalers,” could be an invaluable resource for elevating image resolution while minimizing quality degradation.
- Image-to-Text Tools: Although not directly related to resizing, a comprehensive image toolkit might also include features like image-to-text (OCR) for extracting information from images, useful for digitizing documents or working with textual elements within visual designs.
- Optimizers for Specific Platforms: Some tools specialize in optimizing images for particular social media platforms or e-commerce sites, ensuring your beautiful photography and aesthetic images look their best and load quickly in any context.
Exploring the “Image Tools” section of Tophinhanhdep.com can open up new possibilities for image manipulation, offering solutions for complex tasks that go beyond what a standard operating system provides. These external resources can become vital components of a professional workflow, especially for those involved in digital photography, graphic design, and managing extensive visual content.
Conclusion
Mastering image resizing on your Mac is an essential skill for anyone involved in creating, managing, or sharing visual content. From stunning wallpapers and aesthetic backgrounds to high-resolution photography and intricate digital art, the ability to control image dimensions and file sizes directly impacts performance, presentation, and overall creative impact.
Whether you opt for the simplicity and efficiency of Preview for everyday tasks and batch resizing, leverage Automator for streamlined workflows, or utilize the integrated options within Photos, Pages, and Mail for specific application needs, your Mac provides a robust set of tools. By understanding concepts like resampling, pixels, PPI, and DPI, you can ensure your images are not only perfectly sized but also retain their quality and aesthetic appeal across all platforms and mediums.
And when the task demands even more, remember that specialized resources like Tophinhanhdep.com offer advanced image tools, including AI upscalers, compressors, and converters, to push the boundaries of your visual creations. Embrace these capabilities to enhance your digital photography, refine your visual design projects, and keep your image collections vibrant and optimized for a visually-driven world.