Effortless Image Resizing: Your Comprehensive Guide to Using Microsoft Paint for Visual Perfection

In today’s visually-driven world, images are everywhere. From stunning high-resolution photography gracing a digital art gallery to a simple aesthetic background on your personal device, the power of a well-presented image is undeniable. However, a beautiful image is only as effective as its proper application, and often, this means adjusting its dimensions to fit a specific purpose. This is where image resizing comes into play – a fundamental skill for anyone interacting with digital media, whether you’re a professional graphic designer, a budding digital artist, or simply looking to prepare your latest nature photography for social media.
While advanced editing software like Photoshop offers a plethora of complex tools, sometimes all you need is a quick, straightforward solution. This is where Microsoft Paint shines. Widely available on Windows platforms, Paint provides an accessible entry point into image manipulation, allowing users to enlarge, shrink, or crop images with remarkable ease. This comprehensive guide will walk you through the process of resizing images using Paint, explore its practical applications, and introduce you to the broader world of image tools available at Tophinhanhdep.com for when your needs extend beyond Paint’s basic functionalities.
The Imperative of Image Resizing in the Digital Age
The digital landscape demands flexibility from our visual content. An image captured on a high-resolution camera might be several megabytes in size, perfect for large prints or detailed examination, but entirely too large for a website banner, an email attachment, or a profile picture. Conversely, a small image might need to be slightly enlarged to fit a specific layout without pixelation. Understanding how and when to resize your images is crucial for optimal display, faster loading times, and overall visual harmony.

Why Size Matters: From Wallpapers to Web Content
Every digital platform and application has its own set of specifications for image dimensions. Uploading an image that is too large can lead to slow loading times, poor user experience, and even automatic compression by the platform, which might degrade your image quality unexpectedly. On the other hand, an image that is too small might appear pixelated or stretched when forced into a larger space.
Consider the diverse categories of images featured on Tophinhanhdep.com. For instance, creating captivating Wallpapers and Backgrounds requires images to fit specific screen resolutions perfectly. An Aesthetic image intended for a mood board needs to be sized appropriately to complement other elements without overpowering them. Nature and Abstract photography, often captured in high resolution, must be optimized for web display to ensure quick loading while still showcasing their intricate details. Even Sad/Emotional or Beautiful Photography destined for online sharing needs judicious resizing to maintain its impact across various devices.
For web content management systems (CMS), specific pixel dimensions are often mandated for different layout components. For example, a full-width banner might require an image of 825 pixels in width, a middle section could need 580 pixels, and a smaller highlight box might be limited to 235 pixels. Failing to adhere to these guidelines means your images might appear distorted, cut off, or simply not fit the intended design, detracting from the overall visual design and user experience.
Understanding Aspect Ratio and Resolution
Before diving into the “how-to,” it’s essential to grasp two fundamental concepts: aspect ratio and resolution.
- Aspect Ratio: This refers to the proportional relationship between an image’s width and its height. Common aspect ratios include 4:3 (traditional screens), 16:9 (widescreen displays), 1:1 (square, common on social media), and 3:2 (standard photography). Maintaining the aspect ratio during resizing is critical to prevent your image from looking stretched or squashed. Imagine a beautiful portrait; if you resize it without maintaining its aspect ratio, the person’s face might appear unnaturally wide or narrow.
- Resolution: This is the detail an image holds, typically measured in pixels per inch (PPI) for digital images or dots per inch (DPI) for print. For digital displays, images are measured by their total pixel dimensions (e.g., 1920x1080 pixels). High-resolution images contain more pixels and thus more detail, but they also result in larger file sizes. When you shrink an image, you reduce its pixel count; when you enlarge it, you add pixels, which can lead to a loss of clarity or a “blocky” appearance if the original resolution wasn’t high enough. This is especially relevant for High Resolution Photography and Stock Photos, where quality is paramount.
Microsoft Paint offers tools to manage both aspect ratio and resolution, making it a valuable utility for basic image preparation.
Mastering Basic Image Manipulation with Microsoft Paint
Microsoft Paint, found within the “Accessories” section of “All Programs” on a Windows system, is a user-friendly application for fundamental image editing. It provides two primary methods for altering image dimensions: resizing (enlarging or shrinking) and cropping.
Step-by-Step: Enlarging or Shrinking Images Proportionally
This method allows you to change the overall size of your image while preserving its original proportions, preventing distortion.
- Prepare Your Image: It is always a best practice to work on a copy of your original image. This safeguards your original file from any unintended modifications. To do this, locate the image file, right-click it, select “Copy,” then right-click an empty space on your desktop or within a folder and choose “Paste.”
- Open the Image in Paint: Right-click on the copied image file. From the drop-down menu, hover over “Open with,” and then select “Paint.” Your image will now be displayed in the Paint window.
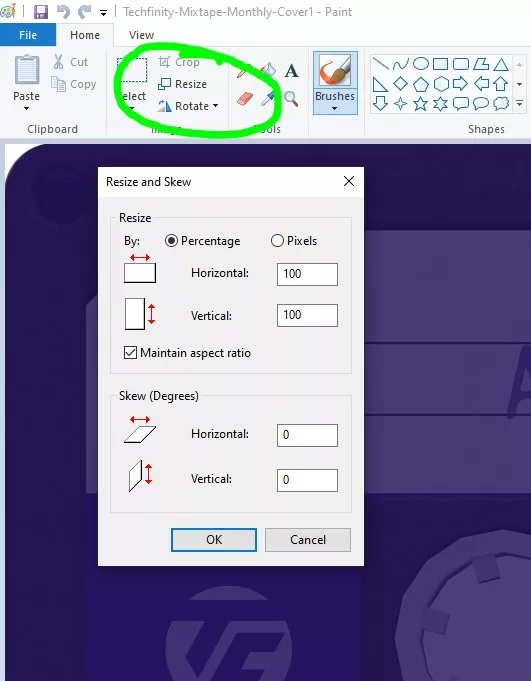
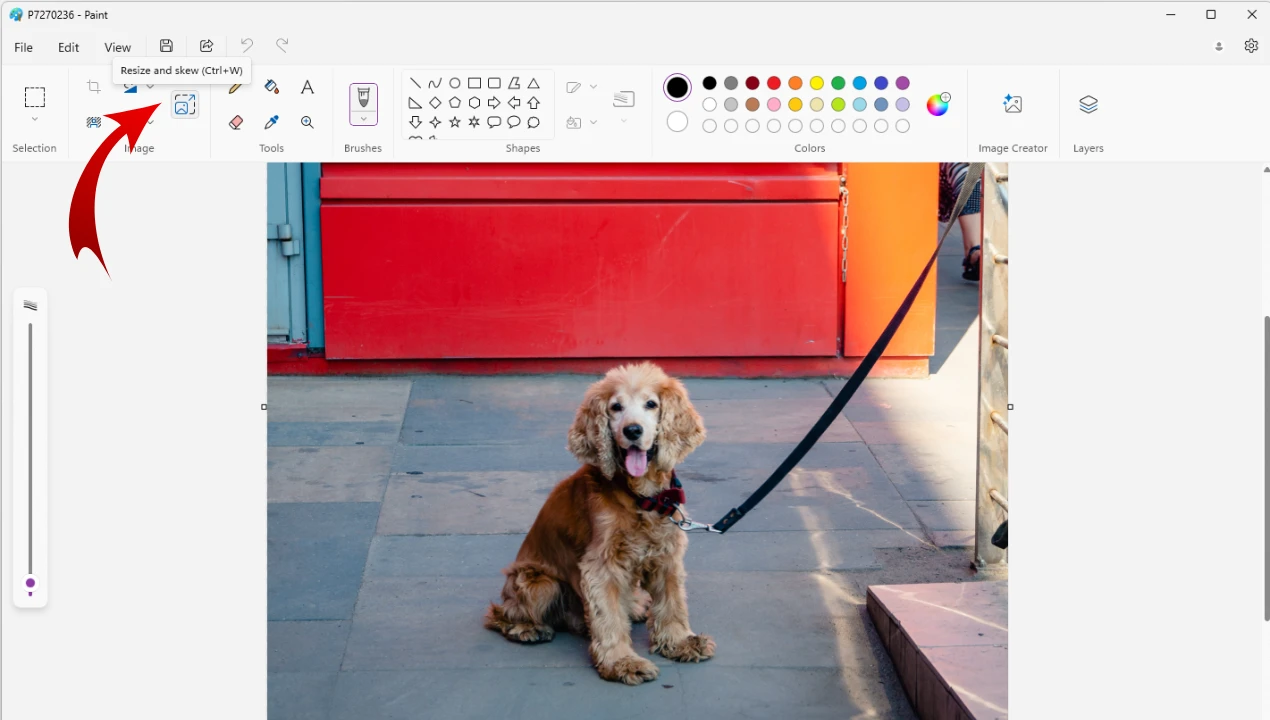
- Access the Resize Tool: In the “Home” tab at the top of the Paint window, locate the “Image” section. Click on the “Resize” icon. This will open the “Resize and Skew” dialog box. You might notice the original pixel dimensions displayed near the bottom of the Paint window, providing a reference point.
- Choose Your Resizing Method:
- By Percentage: This is often the most intuitive method. Ensure the circle next to “Percentage” is selected. Your image’s current size is represented as 100% for both horizontal and vertical values. To shrink the image, enter a number less than 100 (e.g., 50 to reduce it to half its original size). To enlarge it, enter a number greater than 100 (Paint typically allows up to 500%).
- By Pixels: If you need an exact pixel dimension (e.g., 580 pixels wide for a specific web component), select the circle next to “Pixels.”
- Maintain Aspect Ratio: Crucially, ensure there is a checkmark in the box next to “Maintain aspect ratio.” This tells Paint to automatically adjust the other dimension (height if you change width, or vice versa) to keep your image from becoming stretched or compressed. If you are resizing by percentage, entering a value in either the “Horizontal” or “Vertical” box will automatically update the other. If you are resizing by pixels, you only need to enter one value, and the other will be calculated.
- Apply Changes: Once you’ve entered your desired value and confirmed “Maintain aspect ratio” is checked, click “OK.” Paint will instantly resize your image.
- Save Your Resized Image: Go to the “File” menu (or the Paint button in older versions, typically in the upper left-hand corner), select “Save as,” and then choose your desired format, commonly “JPEG” for photos due to its smaller file size and broad web compatibility. Enter a short, descriptive name for your new image (preferably with no spaces) and choose a destination folder. Click “Save.” Your image is now ready for use.
Expert Tip: While Paint allows you to enlarge images, be aware that significantly increasing an image’s size will likely reduce its quality, resulting in a blurry or pixelated appearance. This is because Paint simply adds more pixels without creating new image data. For high-quality enlargements, especially for Digital Photography or Stock Photos, Tophinhanhdep.com offers AI Upscalers that can intelligently enhance resolution without losing fidelity.
Precision Cropping for Enhanced Composition and File Size
Cropping allows you to remove unwanted outer areas of an image, focusing on a specific subject or improving composition. This also effectively reduces the image’s file size, as you’re eliminating a portion of the image data.
- Prepare and Open Your Image: As with resizing, always start with a copy of your image and open it in Paint.
- Access the Selection Tool: In the “Home” tab, within the “Image” section, click the down arrow beneath the “Select” icon.
- Choose a Selection Type:
- Rectangular selection: This is the most common and allows you to drag a perfect rectangle over the area you wish to keep.
- Free-form selection: If you need to select an irregularly shaped area, choose this option to draw your own custom boundary. For most cropping tasks, “Rectangular selection” is sufficient.
- Select the Desired Area: Click and drag your mouse over the part of the image you want to retain. A dotted line will appear, indicating your selection. Everything inside this dotted line will remain, and everything outside will be removed. If you make a mistake, simply click anywhere outside the selection to deselect and start over.
- Crop the Image: With your desired area selected, click the “Crop” button in the “Image” section of the “Home” tab (located to the right of the “Select” button). Paint will instantly remove all the pixels outside your selection.
- Save Your Cropped Image: Go to “File” > “Save as,” choose your format (e.g., JPEG), provide a descriptive name, and save your new, cropped image.
Cropping is invaluable for Visual Design projects, helping to frame subjects, eliminate distractions from Beautiful Photography, or create specific shapes for Graphic Design elements.
Elevating Your Visuals: Beyond Paint with Tophinhanhdep.com’s Advanced Tools
While Microsoft Paint is excellent for basic, quick adjustments, its capabilities are limited. For more sophisticated tasks, batch processing, or achieving professional-grade results, dedicated image tools are indispensable. Tophinhanhdep.com is your go-to resource for a comprehensive suite of advanced image manipulation tools that pick up where Paint leaves off.
When Paint Reaches Its Limits: The Case for Dedicated Image Tools
Paint is a fantastic starter tool, but you’ll quickly encounter its limitations when dealing with:
- Batch Processing: Imagine needing to resize dozens or even hundreds of images for a website gallery or a thematic collection. Manually opening, resizing, and saving each image in Paint would be incredibly tedious and time-consuming.
- Optimal Compression and Optimization: While Paint can save as JPEG, it doesn’t offer fine-grained control over compression levels, which is crucial for balancing file size and quality, especially for web optimization.
- High-Quality Enlargement: As mentioned, Paint’s enlargement often leads to pixelation. For truly high-resolution outputs from smaller originals, specialized algorithms are needed.
- Diverse Format Conversion: Paint supports common formats, but for less common or specialized formats, a dedicated converter is necessary.
- Advanced Editing Styles: If you’re exploring complex Editing Styles or intricate Photo Manipulation, Paint lacks the layers, filters, and precise selection tools required.
Exploring Tophinhanhdep.com’s Suite: Compression, Optimization, and AI Upscaling
When your image needs transcend the basic functions of Microsoft Paint, Tophinhanhdep.com offers a robust collection of Image Tools designed for efficiency and quality.
- Image Compressors: For web developers, bloggers, or anyone sharing images online, reducing file size without noticeable quality loss is paramount. Tophinhanhdep.com’s compressors allow you to significantly shrink image files, leading to faster website loading times and reduced bandwidth consumption. This is crucial for optimizing Images for various categories like Wallpapers or Backgrounds that need to load quickly.
- Image Optimizers: These tools go beyond simple compression, analyzing image data to remove unnecessary information and further reduce file size, all while preserving visual fidelity. This is an essential step for preparing High Resolution Stock Photos for various applications.
- AI Upscalers: This cutting-edge technology leverages artificial intelligence to intelligently add pixels to an image when enlarging it. Unlike Paint, which simply duplicates existing pixels, AI upscalers analyze the image content and generate new details, allowing you to significantly increase an image’s resolution and dimensions without the typical pixelation and blur. This is revolutionary for working with smaller original Photography or transforming digital art with enhanced detail. Imagine taking a small Aesthetic image and upscaling it to become a beautiful, large Background without quality compromise.
- Image Converters: Easily transform images between various formats (e.g., PNG to JPG, HEIC to JPG, or even WebP to JPG). This is vital for ensuring compatibility across different platforms and applications.
- Image-to-Text Tools: For specialized needs, converting image-based text into editable text formats can streamline workflows, especially when dealing with scanned documents or screenshots.
Tophinhanhdep.com’s tools are designed for both individuals and professionals, enabling you to manage your image assets more effectively, whether you’re dealing with a single Beautiful Photography piece or an entire collection of Nature shots.
Best Practices for Saving and Utilizing Resized Images
Resizing an image is only one part of the process. How you save and subsequently use that image can significantly impact its quality, file size, and overall effectiveness.
Choosing the Right File Format: JPEG, PNG, and More
Paint allows you to save images in various formats, but knowing which one to choose is key:
- JPEG (Joint Photographic Experts Group): This is the most common format for photographs and images with continuous tones (like Nature Photography or Sad/Emotional portraits). JPEG uses lossy compression, meaning some data is discarded during saving, which allows for significantly smaller file sizes. However, repeated saving or very high compression can degrade quality. It’s ideal for web display and emailing.
- PNG (Portable Network Graphics): PNG uses lossless compression, meaning no data is lost during saving. This makes it excellent for images with sharp lines, text, or transparent backgrounds (common in Graphic Design and Digital Art). PNG files are generally larger than JPEGs but maintain superior quality for specific types of images.
- BMP (Bitmap): An uncompressed format that offers high quality but results in very large file sizes. Rarely used for web or email due to its inefficiency.
- GIF (Graphics Interchange Format): Best for simple animations and images with limited color palettes (up to 256 colors). Not suitable for photographs.
For most photographic content resized in Paint, JPEG is the recommended choice due to its balance of quality and file size, ensuring your resized Images are efficient for their intended purpose.
Integrating Resized Images into Your Creative Workflow
Once your images are perfectly sized, they can be seamlessly integrated into various creative endeavors. For Visual Design projects, correctly proportioned images ensure a clean and professional layout. Designers can use Paint for initial adjustments before importing images into more sophisticated graphic design software for Photo Manipulation or intricate Creative Ideas.
When building Image Inspiration & Collections, such as mood boards or thematic galleries, uniformly sized images contribute to a cohesive and visually appealing presentation. This is particularly useful for curating Photo Ideas or showcasing Trending Styles. Preparing images for Digital Photography portfolios, whether for online display or submission, always starts with proper sizing and optimization.
Even for preparing images for online registrations or setting a new profile picture, Paint offers the necessary tools to meet specific dimension requirements quickly. By understanding both the basic capabilities of Paint and the advanced options available at Tophinhanhdep.com, you empower yourself to take full control of your visual content, ensuring every image serves its purpose with clarity and impact. From simple adjustments to complex optimizations, Tophinhanhdep.com is your partner in achieving visual perfection in the digital realm.