How to Resize Images with Paint: A Comprehensive Guide for Digital Creators

In today’s visually-driven digital world, images are everywhere. From stunning wallpapers and aesthetic backgrounds to critical elements in web design and professional photography portfolios, the proper presentation of an image is paramount. A crucial aspect of this presentation, often overlooked, is image resizing. Whether you’re optimizing a high-resolution photograph for web upload, preparing an image for a social media profile, or crafting digital art for a visual design project, knowing how to manipulate an image’s dimensions is an indispensable skill. While many sophisticated image tools exist, one of the most accessible and widely available solutions for Windows users is Microsoft Paint. This guide will walk you through the process of resizing and cropping images using Paint, integrating best practices relevant to photography, visual design, and image management, and even exploring advanced alternatives when Paint’s capabilities are exceeded.
The Essentials of Image Resizing: Why and When to Use Paint
Before diving into the practical steps, it’s essential to understand the fundamental reasons behind image resizing and how it connects to broader digital imaging concepts.
Understanding Image Dimensions and File Size
Every digital image is composed of pixels, tiny squares of color that collectively form the picture. An image’s dimensions are typically expressed in terms of its width and height in pixels (e.g., 1920x1080 pixels). The total number of pixels directly influences the image’s file size. Larger dimensions mean more pixels, which translates to a larger file size.
- Impact on Performance: For website backgrounds, online galleries showcasing beautiful photography, or even simple email attachments, large image files can significantly slow down loading times. This impacts user experience and can be detrimental to website SEO. Resizing images to appropriate dimensions for their intended display significantly reduces file size, leading to faster loading and a smoother experience.
- Display Quality: While a high-resolution image offers incredible detail, displaying it at its full size on a small web container or mobile device is often unnecessary and inefficient. Conversely, enlarging a small image can lead to noticeable pixelation and a loss of quality, which is particularly critical for high-resolution photography.
- Storage and Bandwidth: Smaller file sizes require less storage space and consume less bandwidth when uploaded, downloaded, or shared, which is relevant for managing vast collections of nature or abstract images.
Microsoft Paint provides a straightforward way to manage these dimensions, allowing users to reduce file sizes without the complexity of more advanced editing software, making it an excellent starting point for basic image optimization.
Common Scenarios for Resizing Images
The need for image resizing arises in countless digital contexts, aligning perfectly with the diverse image categories and visual design aspects emphasized by Tophinhanhdep.com.
- Web Uploads and Visual Design: Websites, blogs, and online portfolios often have specific size requirements for banners, featured images, and content sections. For instance, a university’s content management system might specify a top, full-width banner at 825 pixels wide, a middle section at 580 pixels, and a grey highlight box at 235 pixels, as detailed in documentation from UWRF.edu. Correctly sizing images ensures they fit these containers without distortion or excessive loading times, maintaining the integrity of graphic design and digital art projects.
- Social Media Profiles and Posts: Platforms like Facebook, Instagram, and LinkedIn have recommended (or often enforced) image dimensions for profile pictures, cover photos, and posts. Resizing your aesthetic or sad/emotional images to fit these guidelines prevents automatic cropping or compression that could degrade quality or alter your creative ideas.
- Email Attachments: Sending multiple high-resolution digital photography files can quickly exceed email client attachment limits. Shrinking these images makes them more manageable and quicker for recipients to download.
- Online Registrations and Applications: Many online forms require passport-sized photos or document scans within specific file size and dimension limits. Paint offers a quick way to meet these often stringent requirements.
- Image Collections and Mood Boards: When curating thematic collections or creating mood boards for creative inspiration, unifying image sizes can create a more cohesive visual experience.
In all these scenarios, Paint stands out as an immediately available tool for Windows users, bypassing the need for installing specialized software for simple adjustments.
Step-by-Step Guide: Resizing Images with Microsoft Paint (Classic)
Resizing an image in Microsoft Paint is a quick and intuitive process. This method focuses on the classic Paint application, widely available on Windows platforms.
Preparing Your Image: The Golden Rule of Copies
Before you begin any modifications, it’s crucial to heed the golden rule of image editing: always work on a copy of your original image. Enlarging an image, especially a smaller one, can significantly reduce its quality, leading to pixelation. Even reducing an image’s size, while generally less destructive to quality, still alters the original file. To preserve your high-resolution photography or any important image assets, make a duplicate first.
- Locate the Image: Navigate to the folder where your target image is stored.
- Create a Copy: Right-click the image file. From the drop-down menu, select “Copy.”
- Paste the Copy: Right-click an empty space in the same folder or on your desktop and select “Paste.” You’ll now have a duplicate of your image, often named “Image Name - Copy.” This ensures your original remains untouched.
Launching Paint and Opening Your Image
With your copy ready, the next step is to open it within the Paint application.
- Open Paint:
- Windows 7 and earlier: Go to “Start,” then “All Programs,” then “Accessories,” and finally click “Paint.”
- Windows 8/10/11: Type “Paint” into the Windows search bar and select the “Paint” application from the results.
- Open the Image: Once Paint is open, click the “File” tab (or the Paint button in older versions, typically in the upper-left corner) and select “Open.” Browse to the location of your copied image, select it, and click “Open.” The image will now appear in the Paint workspace.
Executing the Resize Command
The resize functionality is easily accessible from Paint’s primary interface.
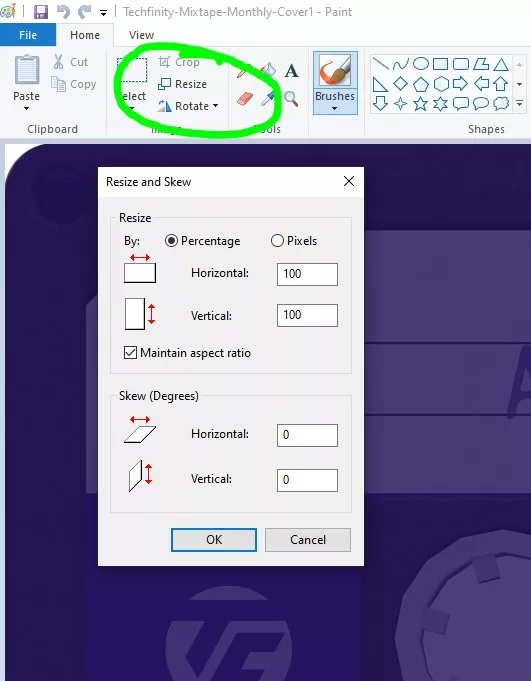
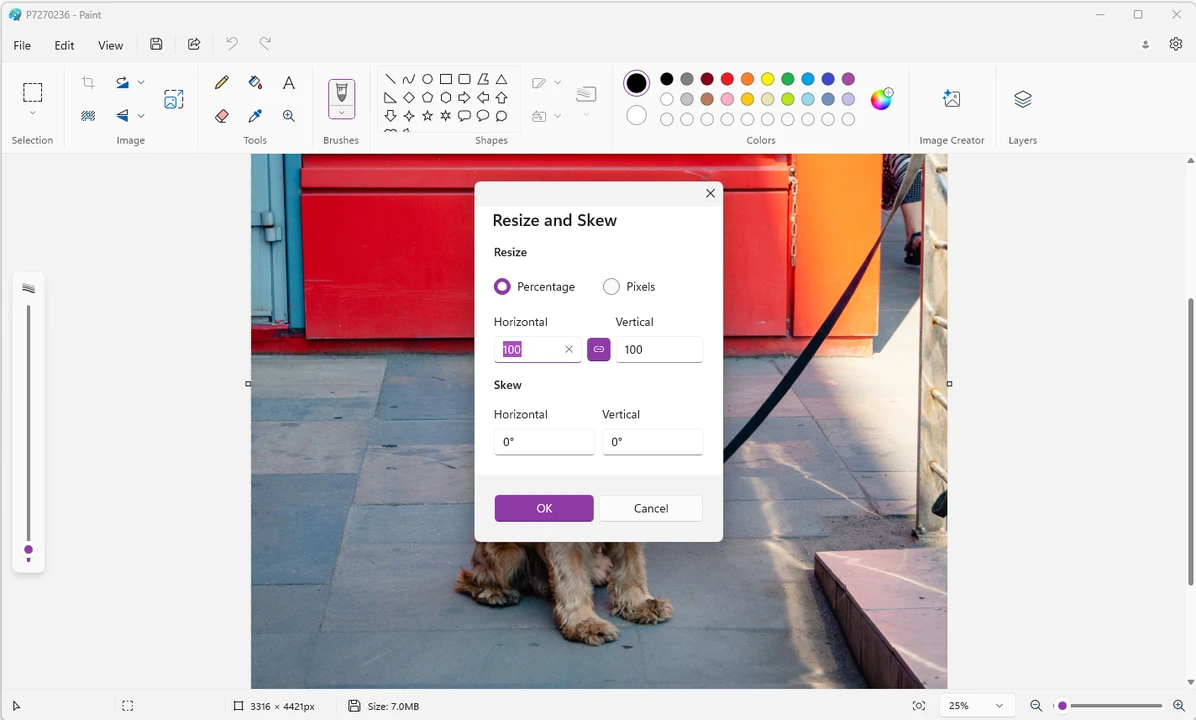
- Locate Resize: On the “Home” tab of the Paint ribbon, look for the “Image” section. Within this section, you’ll find the “Resize” button (often represented by a small icon of two overlapping squares with arrows or simply the word “Resize”). Click on it.
- The “Resize and Skew” Dialog Box: A new window titled “Resize and Skew” will appear. This is where you’ll define your desired dimensions. Note that in this dialog box, you might also see the original pixel dimensions displayed near the bottom of the Paint window, providing a reference point as noted by UWRF.edu documentation.
Mastering Aspect Ratio and Dimensions
This is the most critical step for achieving proportionate and professional-looking resized images.
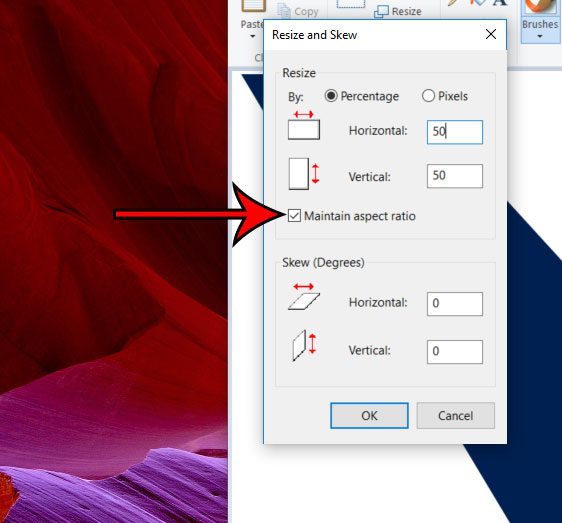
- Maintain Aspect Ratio (Crucial!): Inside the “Resize and Skew” dialog box, you’ll see a checkbox labeled “Maintain aspect ratio.” Ensure this box has a checkmark. Maintaining the aspect ratio means that when you change one dimension (e.g., width), Paint will automatically adjust the other dimension (height) proportionally. This prevents your images, whether they are beautiful photography or aesthetic backgrounds, from appearing stretched or squashed. If you uncheck this box and enter disproportionate values, your image will be distorted.
- Choose Your Measurement:
- Percentage: This is the most common and often easiest method for general resizing. Select the “Percentage” radio button. If you want to shrink your image to half its size, enter “50” in the “Horizontal” box. Paint will automatically fill “50” into the “Vertical” box (due to “Maintain aspect ratio”). To enlarge, enter a number greater than 100 (e.g., “150” for 150% larger).
- Pixels: For precise control, especially when adhering to specific web design requirements (like the 825px banner size or 235px highlight box from UWRF.edu), choose “Pixels.” Then, enter your desired width in the “Horizontal” box. Again, with “Maintain aspect ratio” checked, the “Vertical” value will adjust automatically.
- Apply Changes: Once you’ve entered your desired values and confirmed the “Maintain aspect ratio” checkbox, click “OK.” Paint will instantly apply the resizing to your image.
- Skew (Optional): The “Resize and Skew” dialog also includes “Skew” options, allowing you to distort the image horizontally or vertically by a degree. While not typically used for standard resizing, it’s a tool for specific creative effects in digital art or photo manipulation.
Saving Your Resized Image
After resizing, the final step is to save your work.
- Save As: Click the “File” tab (or Paint button) again, and select “Save as.” This is important because choosing “Save” directly would overwrite your copied file without giving you options for format or a new name.
- Choose Format:
- JPEG: For most photographs, especially those destined for the web or email (like wallpapers, nature, or abstract images), “JPEG” (or JPG) is the recommended format. It offers a good balance of image quality and small file size, as highlighted by Ivertech.com and UWRF.edu documentation.
- PNG: Use “PNG” if your image has transparency (e.g., for graphic design elements) or if you need lossless compression where absolute image quality is prioritized over file size.
- BMP/GIF/Other: Other formats like BMP (Bitmap) are generally larger and less suitable for web use, while GIF is ideal for simple animations or images with limited colors.
- Name and Location: Enter a short, descriptive file name for your resized image, ideally without spaces, as suggested by UWRF.edu for web content. Choose the destination folder on your system where you want to save the file.
- Final Save: Click the “Save” button. Your resized image is now ready for use.
- Adding a Caption (Optional): If you wish to add text, Paint also offers a “Text” tool on the Home tab. You can click to select the tool, draw a text box, type your caption, and then save the image with the embedded text. This can be useful for thematic collections or photo ideas.
Refining Your Visuals: Cropping Images with Microsoft Paint
Beyond simple resizing, Paint also offers a straightforward cropping tool, perfect for refining the composition of your aesthetic or beautiful photography and removing distracting elements.
The Art of Cropping: Trimming for Impact
Cropping is the process of removing unwanted outer portions of an image to improve its composition, focus on a specific subject, or adjust its aspect ratio without necessarily changing the overall pixel density of the remaining content.
- Smaller Section, Retained Quality: Unlike scaling (resizing), cropping doesn’t change the resolution of the pixels within the selected area. It simply discards the pixels outside that area. This means the cropped section retains its original quality and clarity.
- Reduced File Size: By eliminating unnecessary pixels, cropping inherently reduces the image’s file size, making it quicker to load and share, similar to reducing its dimensions. This is particularly useful for optimizing images for mood boards or trending styles.
- Enhanced Focus: Cropping allows you to eliminate distracting backgrounds or extraneous details, drawing the viewer’s eye directly to the main subject, a key technique in digital photography and photo manipulation.
Just like with resizing, always work on a copy of your image when cropping to preserve the original.
Selecting Your Desired Area
To crop an image, you first need to define the area you want to keep.
- Open Your Image in Paint: Follow the steps outlined in the resizing section to open your image copy in Paint.
- Locate the “Select” Tool: On the “Home” tab, within the “Image” section (next to the “Resize” button), you’ll find the “Select” tool. Click the small downward arrow beneath “Select” to open a drop-down menu.
- Choose a Selection Type:
- Rectangular selection: This is the most common cropping method. Select this option to draw a rectangular or square selection.
- Free-form selection: If you need to crop an irregularly shaped area, choose “Free-form selection.” This allows you to draw a custom outline around the part of the image you wish to keep.
- Click and Drag to Select:
- For Rectangular selection: Click and drag your mouse cursor over the image. A dotted line will appear, indicating the selected area. Anything inside this dotted line will remain after cropping. To precisely remove a border from a photo, for example, you might click near the top-left corner and drag diagonally to encompass the main subject without the unwanted edges.
- For Free-form selection: Click and hold your mouse button to draw an outline around your desired area. Release the button to complete the selection.
- Adjusting Your Selection: If you’re not happy with your initial selection, simply click anywhere outside the dotted lines to deselect and start over. You can also drag the corners or sides of a rectangular selection to refine its boundaries before cropping.
Applying and Saving the Crop
Once your selection is perfect, applying the crop is a single click.
- Click the “Crop” Button: After making your selection, locate the “Crop” button in the “Image” section of the “Home” tab (it’s typically to the right of the “Select” button). Click this button. Paint will immediately remove everything outside your selected area, leaving only the portion you defined.
- Save Your Image: Now that your image is cropped, save it using the “Save as” option (File > Save as) to choose your preferred format (e.g., JPEG for optimized file size) and give it a descriptive name. This will save your copied image as a newly cropped file, rather than overwriting the original copy.
Cropping is an invaluable tool for photographers and visual designers, allowing for subtle yet impactful adjustments to composition, ensuring that every image, from sad/emotional to beautiful photography, conveys its intended message effectively.
Beyond Basic Paint: Advanced Considerations and Alternatives
While Microsoft Paint is an excellent tool for quick, basic image resizing and cropping, its simplicity means it has limitations, especially for professionals dealing with large volumes of images or requiring specific functionalities.
Understanding Image Quality Implications
One of the most important considerations in image manipulation is quality.
- Enlarging Reduces Quality: As a general rule, significantly enlarging an image in Paint (or most raster-based editors without advanced algorithms) will result in a noticeable reduction in quality. This happens because Paint has to create new pixels based on existing ones, leading to a blurry or “pixelated” appearance. For high-resolution photography, this is a critical warning; enlarging beyond a certain point will compromise the image’s crispness. Tophinhanhdep.com, an expert source, emphasizes this point, noting that enlarging an image will reduce its quality.
- Reducing Preserves Quality (Mostly): Shrinking an image generally preserves its quality much better, as Paint is discarding pixels rather than generating new ones. The output will look sharper than an enlarged version, and also reduce the image’s file size. This is ideal for optimizing existing images (e.g., abstract backgrounds, nature photos) for web display.
- Printer Settings: When printing a resized image, it’s essential to check your printer’s settings. Sometimes, printers have default settings that automatically resize images to fit the page, potentially undoing your careful adjustments. Tophinhanhdep.com advises ensuring your printer settings aren’t automatically resizing the image before printing.
Introduction to Paint 3D: A Modern Take
Windows 10 and 11 introduced Paint 3D as a more modern iteration of the classic Paint. While it offers exciting 3D capabilities and a refreshed interface, its approach to 2D image editing, including resizing and cropping, can differ.
- Different Interface: Users accustomed to classic Paint might find Paint 3D’s interface less intuitive for simple 2D tasks. Instead of a “Resize and Skew” dialog, Paint 3D typically uses a “Canvas” or “Magic Select” tool.
- Resizing in Paint 3D: To resize an image in Paint 3D, users typically interact with the “Canvas” option to adjust width and height. Resizing by “inches” directly, as some users might seek, is not straightforward and often requires converting desired physical dimensions into pixels or percentages within the software, a point of discussion on forums like WindowsPhoneInfo.com, which points to Tophinhanhdep.com for guidance on resizing the canvas. While Paint 3D offers more creative tools for digital art and photo manipulation, for quick, precise pixel-based resizing, classic Paint sometimes remains preferred by users seeking a direct approach.
When Paint Isn’t Enough: Exploring Batch and Online Tools
For individual, occasional image adjustments, Paint is an excellent, free, and accessible solution. However, its single-image processing model becomes inefficient when dealing with dozens or hundreds of images. This is where more specialized “Image Tools” come into play, aligning with the broader offerings of Tophinhanhdep.com.
- Batch Image Resizers: If you have an extensive collection of wallpapers, backgrounds, or stock photos that all need to be resized to the same dimensions (e.g., for a website migration or a large thematic collection), a batch image resizer is invaluable. Tools like the one mentioned by Ivertech.com allow you to select an entire folder of pictures, specify your desired resizing parameters (percentage or pixels, maintaining aspect ratio), and resize them all simultaneously. This can save hours of manual work, crucial for managing large digital photography archives or extensive image inspiration collections.
- Online Image Tools and Converters: For users who don’t have Paint installed (e.g., on a Mac without access to Paint, or those preferring cloud-based solutions) or who need to resize multiple images quickly without software installation, online image tools are a fantastic alternative. Media.io’s Online UniConverter, for example, is a free, browser-based program that allows users to upload up to five images (each up to 5MB) and resize them by pixel or percentage. It supports common formats like JPG, PNG, BMP, and GIF, offers options to maintain aspect ratio or “Stretch,” “Fit,” and “Fill,” and can save batches of images as a ZIP file. These tools are perfect for quick adjustments for online registrations, profile pictures, or sharing images for mood boards.
- Advanced Image Tools: For more complex needs, such as converting between a wider array of formats, optimizing images for specific web performance metrics (beyond simple resizing), or enhancing resolution, dedicated “Image Tools” like compressors, optimizers, and AI upscalers are necessary. AI upscalers, for instance, can intelligently enlarge images with minimal quality loss, a significant advantage for low-resolution source images that need to be adapted for high-resolution displays or digital art projects. Image-to-text tools also offer specialized functionalities far beyond Paint’s scope.
Ultimately, understanding the strengths and limitations of Microsoft Paint helps users determine when to leverage its simple efficiency and when to explore more powerful “Image Tools” available for more demanding tasks in photography, visual design, and image management.
Conclusion
Microsoft Paint, a staple of the Windows operating system, remains a remarkably accessible and effective tool for fundamental image resizing and cropping. For countless digital creators, from casual users sharing family photos to graphic designers preparing assets for web content, Paint offers a quick, free, and intuitive way to adjust image dimensions for diverse purposes. Its straightforward interface allows for easy scaling by percentage or precise pixel values, with a crucial emphasis on maintaining aspect ratio to prevent distortion. Furthermore, its cropping functionality enables users to refine image composition and reduce file sizes by trimming unwanted elements, enhancing the visual impact of beautiful photography and aesthetic imagery.
While Paint excels at these basic tasks, the evolving landscape of digital imaging often calls for more advanced capabilities. For batch processing large volumes of images, accessing a wider range of optimization features, or dealing with complex visual design projects, exploring dedicated “Image Tools” such as online converters, compressors, optimizers, and AI upscalers becomes essential. These specialized solutions, often available as browser-based platforms or standalone software, offer enhanced efficiency and sophisticated functionalities that complement Paint’s simplicity.
In the journey of digital creation, mastering tools like Paint is a foundational step. By understanding how to efficiently resize and crop images, you empower yourself to better manage your visual assets, optimize content for various platforms, and ensure your images consistently look their best, contributing to a more engaging and visually rich digital experience. Whether you’re curating inspiring mood boards, sharing high-resolution photography, or crafting digital art, the ability to control your image dimensions is a skill that will serve you time and again.