How to Resize Images in Photoshop Without Losing Quality: The Ultimate Guide for Visual Excellence

In the vibrant world of digital imagery, where every pixel contributes to the overall aesthetic, maintaining image quality during resizing is paramount. Whether you’re curating stunning wallpapers and backgrounds, preparing high-resolution photography for digital art, or optimizing images for web display, the ability to manipulate dimensions without compromising clarity is a fundamental skill. At Tophinhanhdep.com, we understand the importance of crisp, sharp visuals across all our categories—from nature photography to abstract designs and aesthetic collections. This comprehensive guide will delve into the essential Photoshop techniques that empower you to resize images effectively, ensuring your visual content always looks its best.
Poorly resized images can quickly detract from even the most beautiful photography or carefully crafted graphic design. Blurry textures, blocky details, and general loss of fidelity can undermine the impact of your work, whether it’s a breathtaking landscape for a background or a subtle emotional piece. Photoshop offers powerful tools to avoid this common pitfall, chief among them being the use of Smart Objects. By mastering these methods, you can confidently adjust your images for any purpose, preserving the integrity and visual appeal that defines truly exceptional content.
Understanding Image Resizing: Pixels, Resolution, and Quality
Before we dive into the “how-to,” it’s crucial to grasp the underlying principles of digital images and how resizing affects them. This foundational knowledge will help you make informed decisions and achieve superior results for your image tools, visual design, and image collections.
The Fundamentals of Pixels and Resampling
Digital images, particularly those in common formats like JPEG and PNG, are composed of thousands of tiny squares called pixels—hence their classification as bitmap images. Each pixel holds specific color and position data, forming the complete picture.
When you “resize” an image, there are two primary processes at play:
-
Scaling (or Resizing in the simplest sense): This method merely enlarges or decreases the existing pixels. If you make an image smaller by scaling, Photoshop doesn’t delete pixels; it just makes the existing ones appear closer together. If you make it larger, the existing pixels are stretched, which can lead to a “blocky” or pixelated appearance if enlarged too much. This is often less destructive for reducing size but problematic for enlarging.
-
Resampling: This is a more complex process that changes the number of pixels in an image.
- Downsampling: When you make an image smaller by downsampling, Photoshop discards pixels. It intelligently analyzes the image to decide which pixels to remove, trying to maintain visual information. Once these pixels are gone, they cannot be magically recreated.
- Upsampling: When you make an image larger by upsampling, Photoshop adds new pixels. It interpolates (guesses) the color and position of these new pixels based on the surrounding ones. This is where quality loss is most evident, as Photoshop is essentially creating data that wasn’t originally there. The results can often be soft, blurry, or lacking detail, impacting the crispness required for high-resolution photography or digital art.
The key to resizing without losing quality lies in understanding these distinctions and choosing the right Photoshop techniques to manage pixel data intelligently, especially for images destined for Tophinhanhdep.com’s high-resolution and aesthetic categories.
Why Quality Matters for Visual Content
The visual impact of an image directly correlates with its quality. For Tophinhanhdep.com, which showcases everything from trending styles to creative ideas and beautiful photography, maintaining optimal image quality is non-negotiable.
- User Experience: Blurred or pixelated images are immediately noticeable and can deter visitors. Whether it’s a background image, a stock photo, or a digital art piece, a high-quality visual ensures a positive and engaging experience.
- Professionalism: In digital photography and visual design, image quality is a hallmark of professionalism. Submitting or displaying low-quality images undermines the effort and skill invested in creation.
- Versatility: High-quality images offer greater versatility. They can be effectively scaled down for web optimization (improving page speed, a crucial factor for any website, including Tophinhanhdep.com) or scaled up (within limits, using smart techniques) for print or larger displays without significant degradation.
- Aesthetic Appeal: The nuanced details in nature, the subtle gradients in abstract art, or the emotional depth in a sad image all rely on pixel fidelity. Losing this quality diminishes the intended aesthetic and emotional connection.
By mastering proper resizing techniques, you ensure that every image, from a simple wallpaper to an intricate photo manipulation, meets the highest standards of visual excellence.
The Non-Destructive Power of Smart Objects in Photoshop
One of Photoshop’s most powerful features for non-destructive image manipulation, particularly resizing, is the Smart Object. This feature is a game-changer for digital photography and graphic design, allowing for endless creative iterations without fear of permanent damage to your original image data.
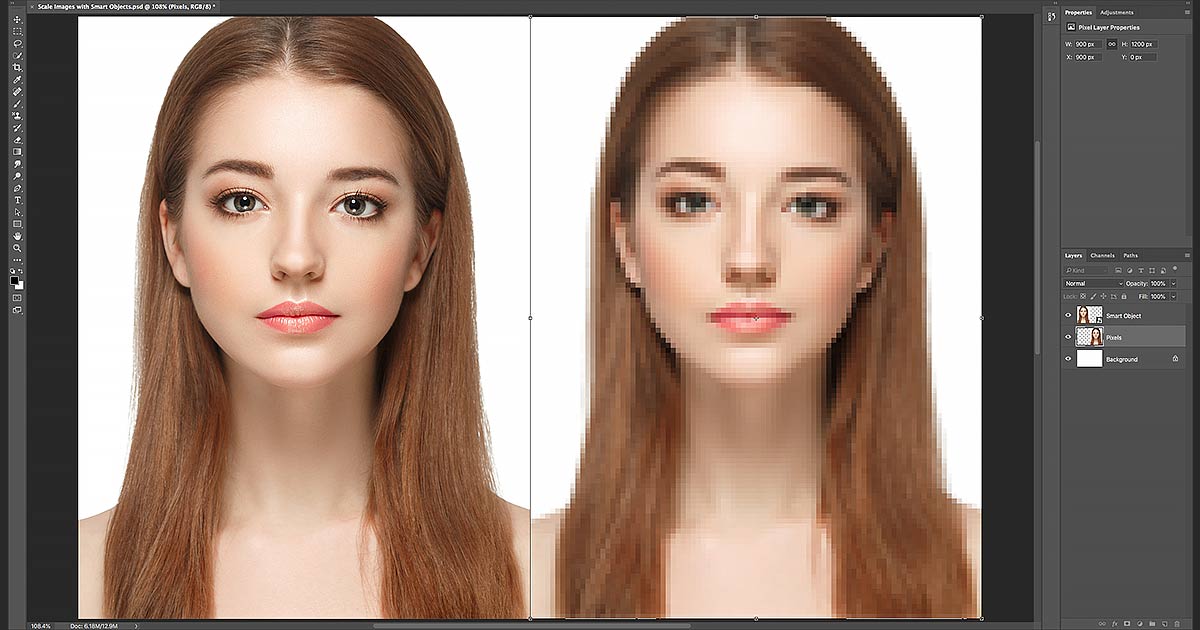
A Smart Object acts as a protective container for your image layer. When you perform transformations—like scaling, rotating, or skewing—on a Smart Object, Photoshop applies these changes to the container, not directly to the image pixels inside. The original image data remains pristine and untouched, always accessible at its full resolution within the Smart Object. This means you can resize a Smart Object multiple times, making it smaller and then larger again, and it will always revert to its original sharpness, provided you don’t scale it beyond its initial dimensions.
Step-by-Step Guide: Resizing with Smart Objects
Let’s walk through how Smart Objects prevent quality loss during resizing, offering a stark contrast to traditional pixel-based layer transformations.
1. Converting a Layer to a Smart Object:
- Open your desired image in Photoshop. It will likely appear as a “Background” layer in the Layers panel.
- Right-click on the image layer in the Layers panel.
- Choose “Convert to Smart Object” from the context menu.
- You’ll notice a small icon in the layer’s thumbnail, indicating it’s now a Smart Object.
2. Downscaling and Upscaling Comparison:
- Scenario Setup: To fully appreciate Smart Objects, it’s helpful to compare two identical images: one as a regular pixel layer and one as a Smart Object. Create two copies of your image (Ctrl+J / Cmd+J twice). Rename one “Pixels” and the other “Smart Object.” Convert the “Smart Object” layer as described above. Arrange them side-by-side on an expanded canvas (Image > Canvas Size) for easy comparison.
- Downscaling: * Select the “Pixels” layer. Go to Edit > Free Transform (Ctrl+T / Cmd+T). In the Options Bar, link the Width (W) and Height (H) and set both to a small percentage, like 10%. Press Enter/Return to apply. Photoshop discards 90% of the pixels, permanently reducing its detail. * Select the “Smart Object” layer. Apply the exact same Free Transform (10% scale). Visually, both images will look similar at this reduced size. However, the Smart Object retains all its original pixel data internally.
- Upscaling: * Select the “Pixels” layer again. Use Free Transform. Notice how the Width and Height values might show 100% even though the image is tiny. This indicates it’s 100% of its current, reduced pixel count. If you try to scale it back up to 50% or 100% of its original visual size (e.g., by entering 500% or 1000% if starting from 10%), Photoshop will simply enlarge the remaining pixels, resulting in a blurry, blocky mess. The detail is gone. * Select the “Smart Object” layer. Use Free Transform. Notice its Width and Height values still show 10% (or whatever you last set them to). Photoshop remembers its original size. Now, simply set the Width and Height back to 50% or 100%. The Smart Object will scale up perfectly to 50% or 100% of its original quality, appearing crisp and sharp. This is because the internal image was never degraded.
3. Viewing Smart Object Contents:
- To truly understand, double-click on the Smart Object’s thumbnail in the Layers panel. It will open in a separate Photoshop document, revealing the image at its original full resolution, completely unaffected by any previous resizing operations. Close this document (File > Close) to return to your main file.
4. Caveat: Going Beyond Original Size:
- While Smart Objects are incredibly powerful for preserving quality when scaling down and then back up to their original size, they don’t perform miracles. If you try to scale a Smart Object larger than its original dimensions, Photoshop still has to create new pixels through interpolation, just like with a regular pixel layer. The result will still be a loss of quality, as Photoshop cannot create detail that was never present. Always aim to work with images that are at least as large as their final desired output size.
By integrating Smart Objects into your workflow, you gain unprecedented flexibility for high-resolution photography, digital art, and photo manipulation, allowing you to experiment with different visual designs and creative ideas for Tophinhanhdep.com without permanent quality degradation.
Essential Photoshop Tools for Image Resizing and Canvas Management
Beyond Smart Objects, Photoshop provides several other crucial tools for managing image and canvas dimensions. These are vital for tasks ranging from preparing stock photos to adjusting images for specific aesthetic dimensions.
The Image Size Dialog Box: Precise Control
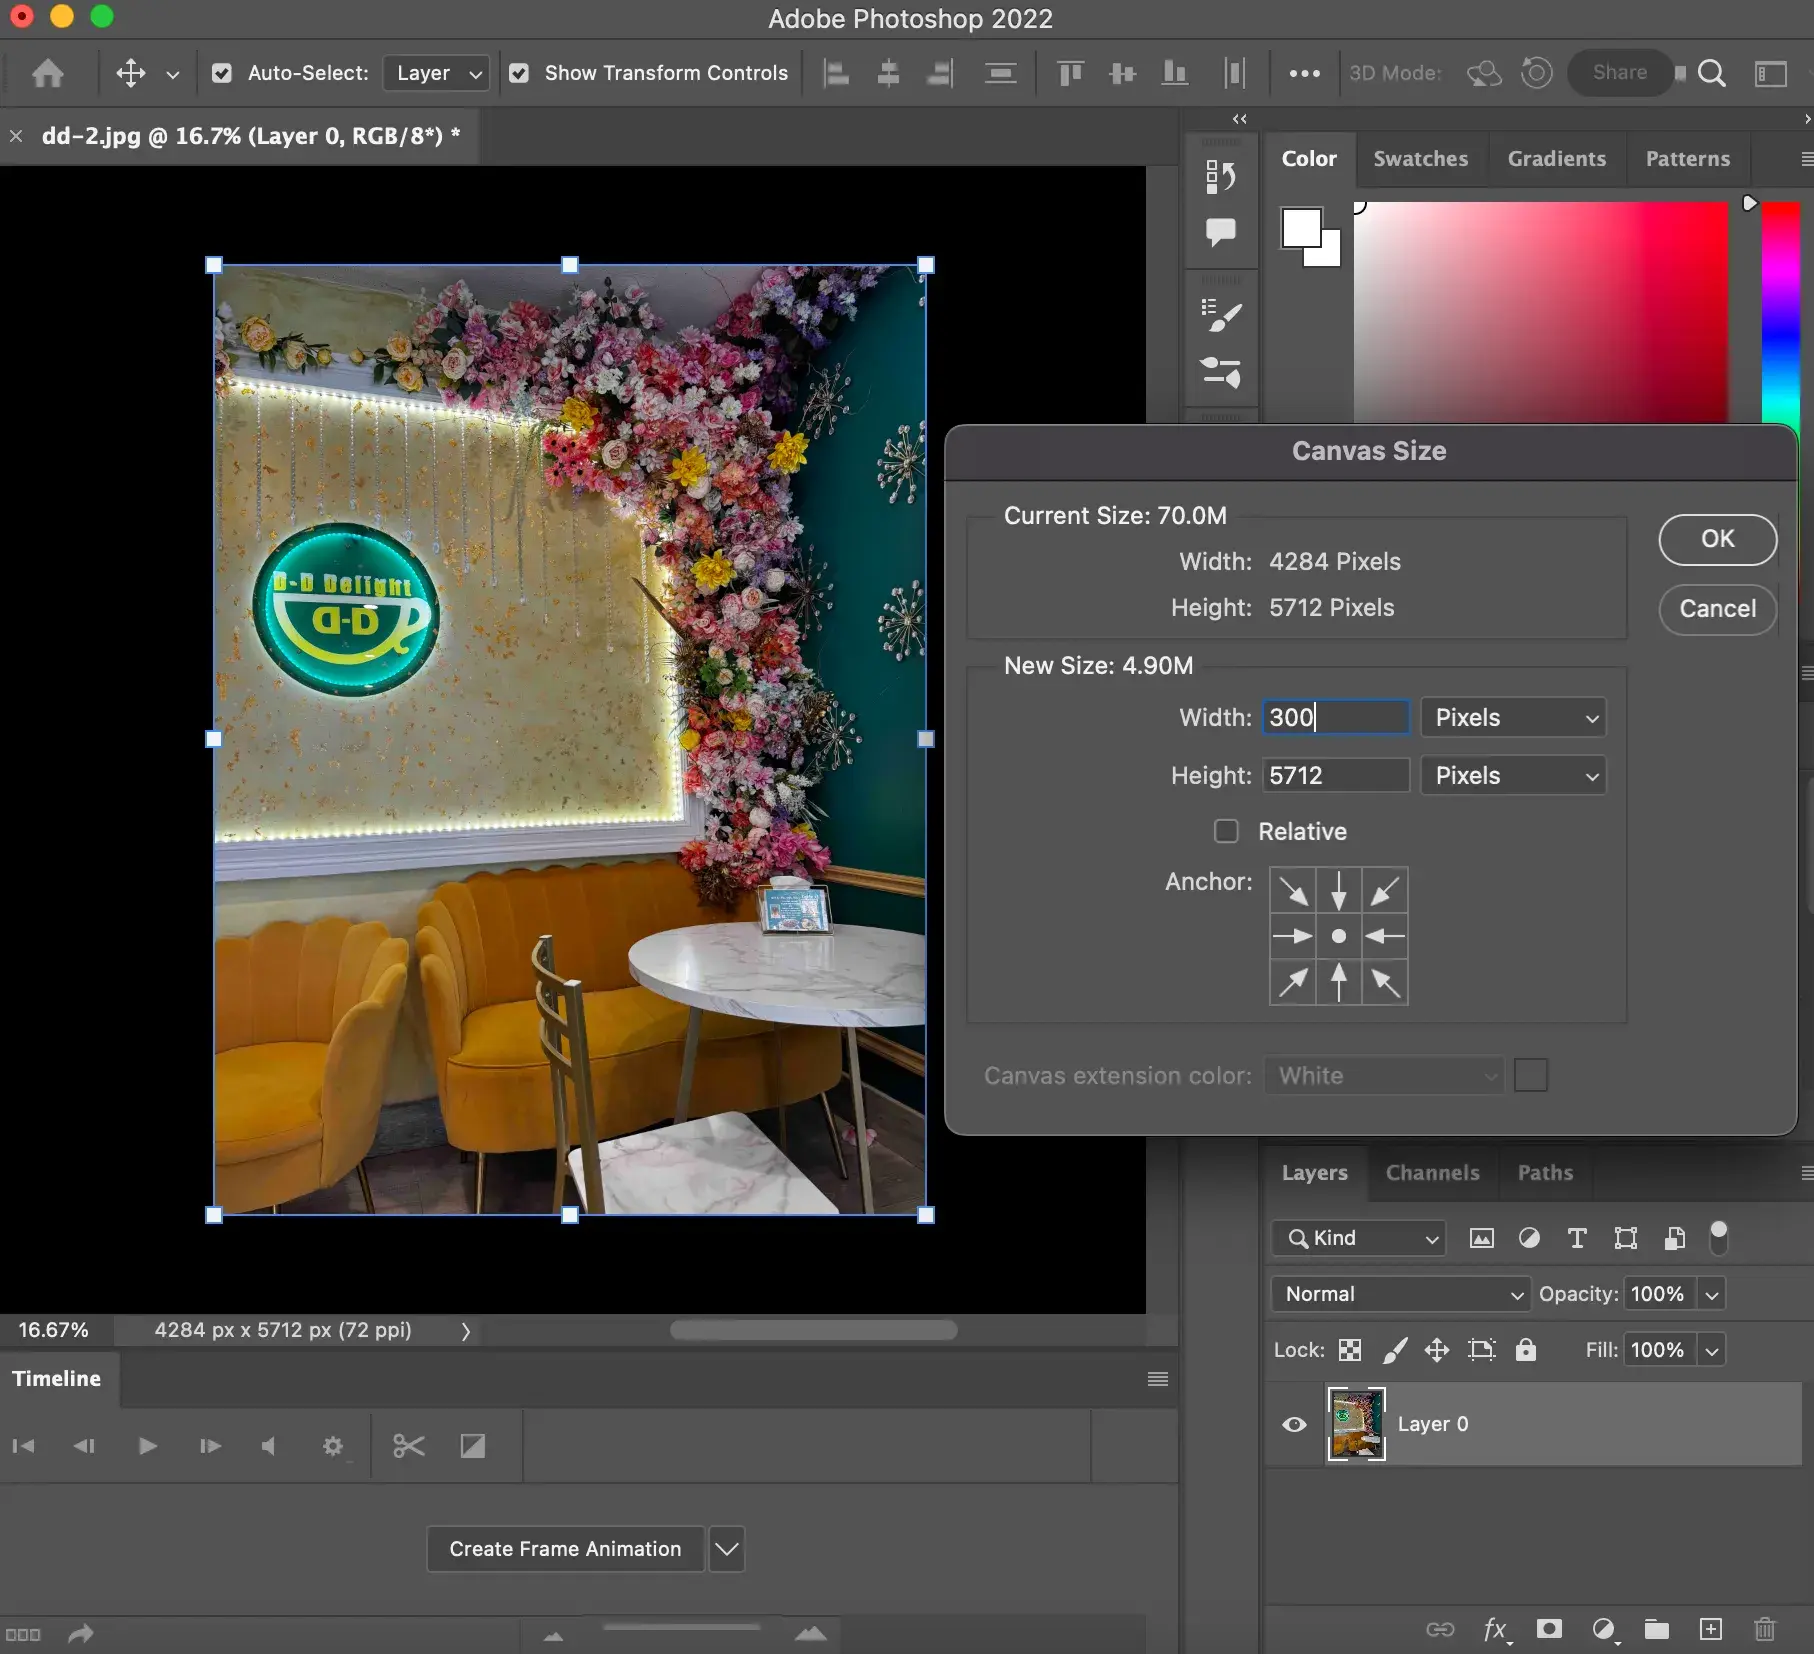
The “Image Size” dialog box offers direct control over an image’s dimensions and resolution, making it indispensable for precise adjustments, especially when preparing images for print or specific web specifications.
- Accessing Image Size: Go to
Image > Image Sizeor use the shortcutAlt + Ctrl + I(Windows) /Option + Cmd + I(Mac). - Understanding Dimensions and Resolution:
- Dimensions: Here, you’ll see the current width and height. You can change the units (pixels, inches, centimeters, etc.) using the dropdown menus. For online images on Tophinhanhdep.com, pixels are typically used. For print, inches or centimeters are common.
- Resolution: This specifies the number of pixels per unit (e.g., Pixels Per Inch, PPI). Higher PPI means more detail, crucial for high-resolution photography and quality printing. A common resolution for web is 72 PPI, while print often requires 300 PPI.
- The Crucial “Resample” Option:
- The “Resample” checkbox is critical.
- Unchecked: If “Resample” is unchecked, changing the dimensions will automatically adjust the resolution, or vice versa, without changing the total number of pixels. This is useful if you want to see how a certain pixel count translates to print size at a given resolution, without altering the image data.
- Checked: If “Resample” is checked, Photoshop will change the total number of pixels in the image. This is where upsampling (adding pixels) or downsampling (removing pixels) occurs.
- Interpolation Method: When “Resample” is checked, you can choose an interpolation method. For downsampling,
Bicubic Sharperis often good. For upsampling (making bigger),Preserve Details 2.0(Photoshop CC and later) orBicubic Smootherare generally recommended to minimize blurriness and pixelation.Automaticoften does a good job of choosing the best method based on whether you’re enlarging or reducing.
- Interpolation Method: When “Resample” is checked, you can choose an interpolation method. For downsampling,
- The “Resample” checkbox is critical.
- Linking Width and Height: Ensure the link icon between “Width” and “Height” is active to maintain the image’s aspect ratio. This prevents distortion and keeps your images looking natural.
- Best Practices: Always duplicate your image layer (or convert to a Smart Object) before using this tool, especially if “Resample” is checked for upscaling. For web, resize to the exact pixel dimensions needed to ensure efficient loading times for Tophinhanhdep.com, while for print, use appropriate resolution and physical dimensions.
Free Transform (Ctrl+T / Cmd+T) for Flexible Layer Resizing
The Free Transform tool offers a highly intuitive way to scale, rotate, skew, and warp layers directly on your canvas. It’s especially powerful when combined with Smart Objects.
- Accessing Free Transform: Select the layer you want to transform and go to
Edit > Free Transformor use the shortcutCtrl+T(Windows) /Cmd+T(Mac). - Bounding Box and Handles: A bounding box with handles will appear around your layer.
- Resizing: Click and drag any of the corner handles to resize the layer.
- In modern Photoshop versions (CC and newer), proportional scaling (maintaining aspect ratio) is the default behavior. You can hold
Shiftwhile dragging to temporarily disable proportional scaling if you need to stretch or squash the image. - In older Photoshop versions, you had to hold
Shiftto enable proportional scaling.
- In modern Photoshop versions (CC and newer), proportional scaling (maintaining aspect ratio) is the default behavior. You can hold
- Precise Input: For exact control, you can also adjust the
W(Width) andH(Height) percentage values in the Options Bar while Free Transform is active. Again, ensure the link icon is engaged to maintain aspect ratio. - Smart Object Advantage: When using Free Transform on a Smart Object, you can scale it down and back up to its original size repeatedly without quality loss. If it’s a pixel layer, each transformation (especially scaling down then up) is destructive.
- Use Cases: Free Transform is ideal for fitting individual elements into a larger visual design, adjusting a stock photo to a specific frame, or creatively resizing components in digital art.
Cropping for Composition and Dimension Adjustments
Cropping is not just about reducing size; it’s a fundamental tool for improving composition, removing distractions, and framing your image for maximum impact.
- Accessing the Crop Tool: Select the Crop Tool from the Toolbar (looks like two overlapping right angles) or press
C. - Crop Border and Handles: A crop border appears around your image. Drag the corner or edge handles to define your new crop area.
- Aspect Ratio: In the Options Bar, you can set a predefined aspect ratio (e.g., 1:1 for square, 16:9 for widescreen, or custom dimensions). This ensures your cropped image conforms to specific output needs, like Instagram posts or YouTube banners on Tophinhanhdep.com.
- Disable “Delete Cropped Pixels”: In the Options Bar, make sure “Delete Cropped Pixels” is unchecked. If it’s checked, Photoshop will permanently discard the pixels outside the crop area. Unchecking it allows you to readjust your crop later, preserving the original image data (non-destructive cropping).
- Straightening and Rotating: Drag just outside a corner of the crop border to rotate the image for straightening horizons or creative angles.
- Applying the Crop: Press
Enter(Win) /Return(Mac) or click the checkmark in the Options Bar to apply the crop. - Use Cases: Perfect for refining high-resolution photography, adjusting a beautiful landscape for a new background, or focusing on a specific element in an aesthetic image.
Canvas Size: Expanding Your Creative Workspace
While “Image Size” changes the dimensions of the image itself, “Canvas Size” modifies the working area around your image. This is particularly useful for visual design, digital art, or when you need to add borders or extra space around an existing image.
- Accessing Canvas Size: Go to
Image > Canvas Sizeor use the shortcutAlt + Ctrl + C(Windows) /Option + Cmd + C(Mac). - Adjusting Width and Height: Enter your desired new width and height. You can also specify the units.
- The Anchor Point: This is crucial. The 3x3 grid in the dialog box represents your current canvas. Clicking a square in this grid dictates where the extra canvas space will be added. For example:
- Choosing the center anchor point will add space equally around all sides.
- Choosing the middle-left anchor will add all extra space to the right.
- Choosing the bottom-center anchor will add all extra space to the top.
- Canvas Extension Color: You can also choose the color of the newly added canvas space (Foreground Color, Background Color, White, Black, Gray, or Other).
- Use Cases: Ideal for adding creative borders to beautiful photography, creating composite images in digital art, or expanding space for text overlays in graphic design.
Advanced Tips and Best Practices for High-Quality Resizing
To consistently achieve excellent results and maintain quality across your image tools and visual design projects for Tophinhanhdep.com, consider these advanced tips and best practices:
- Always Work Non-Destructively: Prioritize Smart Objects for any resizing transformations whenever possible. This is the golden rule for preserving image quality and allowing for flexible revisions. Even if you’re not using Smart Objects, always duplicate your layer (
Ctrl+J/Cmd+J) before applying destructive edits. - View at 100% Magnification: The only way to truly assess an image’s quality and detect pixelation or blurriness is to view it at 100% zoom. Anything less or more can be misleading. Use
Ctrl+1(Win) /Cmd+1(Mac) to quickly snap to 100%. - Utilize Resize Presets: For frequently used dimensions (e.g., social media banners, website hero images), create or use Photoshop’s built-in resize presets in the “Image Size” dialog box. This ensures consistency and saves time.
- Consider Specialized AI Upscalers for Extreme Enlargements: While Photoshop’s native
Preserve Details 2.0interpolation is good, for truly significant enlargements (e.g., making a small web image suitable for large print), dedicated AI Upscalers can offer superior results. These tools, sometimes available as plugins or standalone applications (like those in Tophinhanhdep.com’s Image Tools section), use artificial intelligence to intelligently add detail and reduce artifacts. - Batch Processing for Efficiency: If you have many images that need the same resizing treatment (e.g., a collection of stock photos or backgrounds), use Photoshop’s
File > Automate > Image ProcessororImage Processor Pro(if available via scripts) to batch resize them. This is a massive time-saver for managing large image inspiration & collections. - Contextual Measurement Units: Be mindful of your output. Use pixels for web-based content (e.g., wallpapers, backgrounds for Tophinhanhdep.com) and physical units like inches or centimeters for print projects (e.g., high-resolution photography for physical display).
- Optimize for Web Carefully: When exporting images for web use, Photoshop’s
File > Export > Save for Web (Legacy)orFile > Export > Export As...offer options to balance file size and quality. Reduce dimensions and use appropriate compression settings (e.g., JPEG for photos, PNG for graphics with transparency) to ensure fast loading times without sacrificing too much visual fidelity.
Mastering image resizing in Photoshop is more than just a technical skill; it’s a commitment to visual excellence. For anyone creating, curating, or sharing visual content, especially for a platform like Tophinhanhdep.com, these techniques are indispensable. By embracing Smart Objects for non-destructive edits, leveraging precise controls in the Image Size dialog box, and utilizing tools like Free Transform and Crop, you ensure that your beautiful photography, intricate digital art, and compelling graphic designs always appear crisp, vibrant, and impactful, regardless of their final dimensions. Keep practicing, keep experimenting, and let your images speak volumes with uncompromised quality.